

springboot原理实战(14)--springbootweb
source link: https://blog.51cto.com/u_12486320/5448745
Go to the source link to view the article. You can view the picture content, updated content and better typesetting reading experience. If the link is broken, please click the button below to view the snapshot at that time.
springboot原理实战(14)--springbootweb
原创- 六、更换web容器
- 第二部分
- 一、请求静态资源:
- 第三部分
- 1.拦截器:
- 2.异常处理:
- 2).自处理异常
本文章的大纲如下:
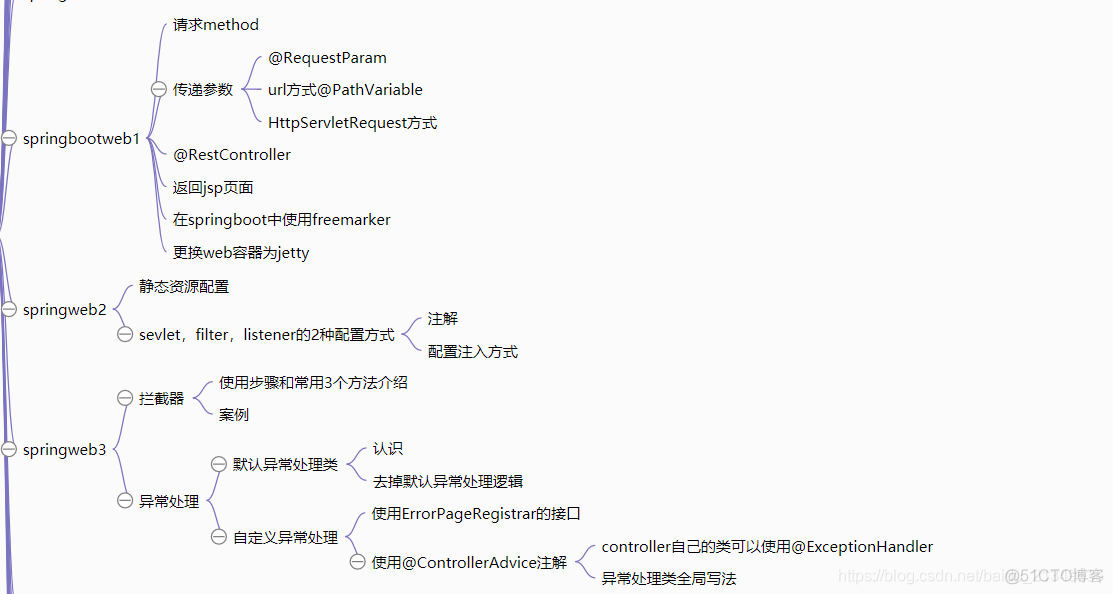
第一部分:
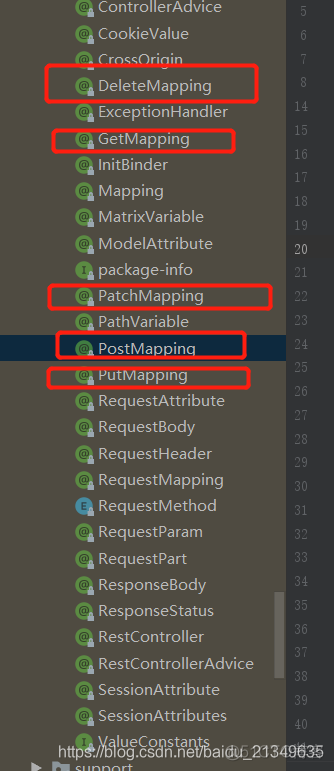
一、请求method
springboot的请求注解是@RequestMapping(value = "/user/home",method= RequestMethod.GET) spring4.3以后可以使用: @GetMapping("/user/home2"),@PostMapping("/user/create")等语义化表示get,post等请求方法。
二、传递参数的3种方式
1.RequestParam
@RequestParam 默认必填,可以设置非必填,和默认值:
* @RequestParam 注解默认是参数必须提供值
* @param username
* @param password
* @return
*/
@PostMapping("/user/create")
@ResponseBody
public String create(@RequestParam(value = "username",defaultValue = "admin") String username, @RequestParam(value="password",required = false) String password){
return "user create, username=" + username + ",password="+password;
}
2.url方式 @PathVariable
* 获取url的方式/user/1 ,/user/2
* @param id
* @return
*/
@GetMapping("/user/{id}")
@ResponseBody
public String display(@PathVariable("id") String id){
return "user display is=" + id;
}
3.HttpServletRequest方式
@GetMapping("/user/ip")
public String edit(HttpServletRequest req){
return "user edit " + req.getRemoteHost();
}
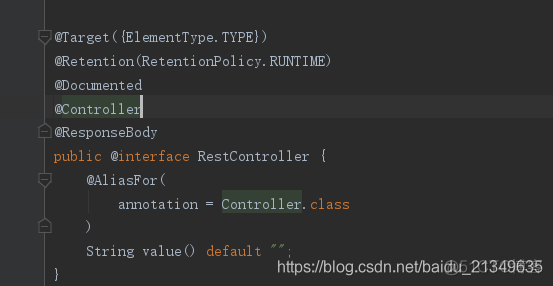
三、@RestController
这个注解相当于@Controller+@RequestBody,用在视图访问层,表示当前controller的方法的返回值并可以直接用于body测试.返回json格式数据:
四、springboot的数据渲染到jsp页面
需要的步骤:
1.配置文件:
application.properties加入2个配置项,执行页面路径和后缀
spring.mvc.view.suffix=.jsp
2.加入 tomcat-embed-jasper的依赖
pom.xml中:
<groupId>org.apache.tomcat.embed</groupId>
<artifactId>tomcat-embed-jasper</artifactId>
<!-- <version>9.0.27</version>-->
</dependency>
<!--servlet依赖jar-->
<dependency>
<groupId>javax.servlet</groupId>
<artifactId>javax.servlet-api</artifactId>
</dependency>
<!--Jstl标签依赖的jar包start-->
<dependency>
<groupId>javax.servlet</groupId>
<artifactId>jstl</artifactId>
</dependency>
build下加入resoures
<!-- <resource>-->
<!-- <directory>src/main/java</directory>-->
<!-- <includes>-->
<!-- <include>**/*.xml</include>-->
<!-- </includes>-->
<!-- </resource>-->
<!-- <resource>-->
<!-- <directory>src/main/resources</directory>-->
<!-- <includes>-->
<!-- <include>**/*.*</include>-->
<!-- </includes>-->
<!-- </resource>-->
<resource>
<directory>src/main/webapp</directory>
<targetPath>META-INF/resources</targetPath>
<includes>
<include>**/*.*</include>
</includes>
</resource>
</resources>
</build>
3.测试:
public class LoginController {
@PostMapping("/login")
public String login(@RequestParam(value = "username") String username, @RequestParam(value = "password") String password) {
if (username.equals(password)) {
return "ok";
}
return "fail";
}
/**
* 给jsp传参数,类似req.setAttribute
* @param model
* @return
*/
@GetMapping("/login")
public String loginIndex(Model model){
model.addAttribute("username", "root");
return "login";
}
}
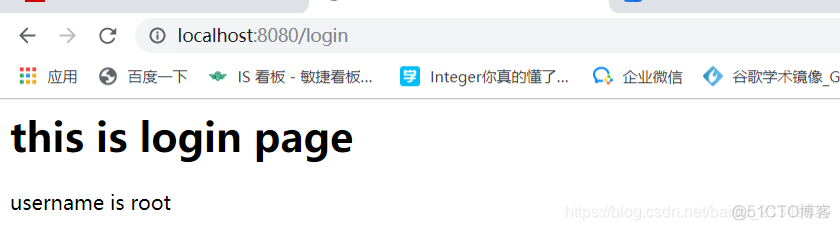
login.jsp页面:
<html>
<head>
<title>Title</title>
</head>
<body>
<h1>this is login page</h1>
<p>username is ${username}</p>
</body>
</html>
运行入口函数
public class Demo11Application {
public static void main(String[] args) {
ConfigurableApplicationContext context = SpringApplication.run(Demo11Application.class, args);
}
}
运行结果,显示已经数据已经渲染到jsp页面:
五、springboot渲染数据到freemarker页面:
在springboot中使用freemarker的步骤
1. 在pom.xml里面加入依赖
<groupId>org.springframework.boot</groupId>
<artifactId>spring-boot-starter-freemarker</artifactId>
</dependency>
2.配置文件修改freemarker的位置和后缀
看配置信息可以看源码: FreeMarkerProperties:
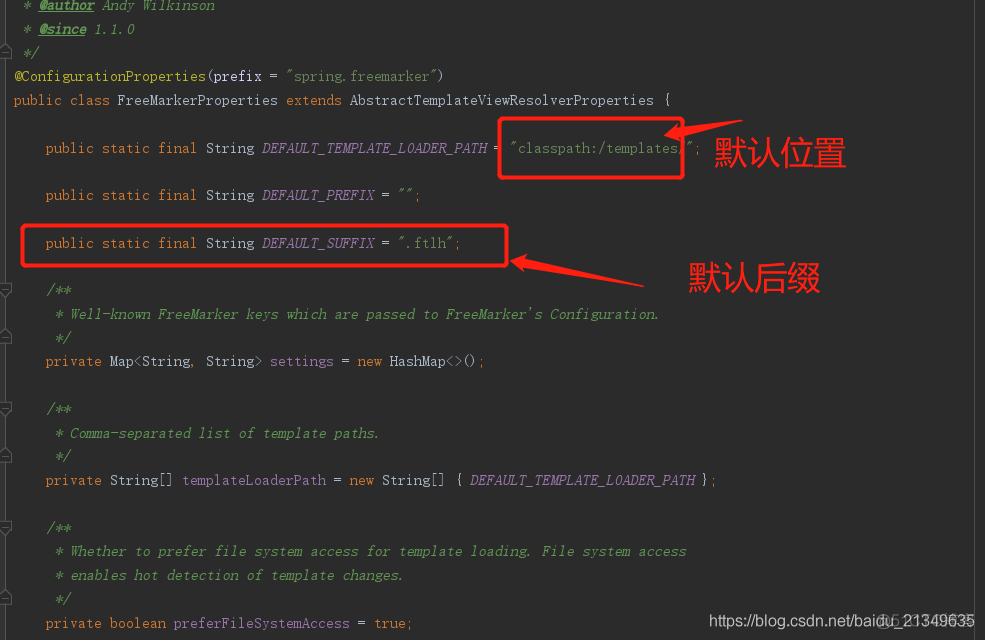
我们在application.properties中修改配置信息:
spring.freemarker.suffix=.ftl
3.测试:
public class AccountController {
@RequestMapping("/reg")
public String req(Model model){
model.addAttribute("username", "root");
return "reg";
}
}
页面代码:

运行入口函数:
public class Demo11Application {
public static void main(String[] args) {
ConfigurableApplicationContext context = SpringApplication.run(Demo11Application.class, args);
}
}
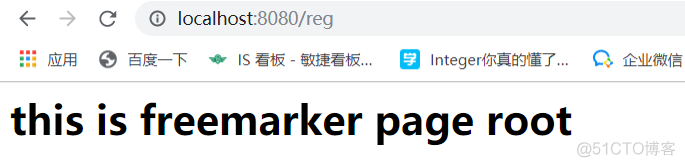
查看页面,显示已经渲染到HTML页面:
六、更换web容器
pringboot 容器默认使用的是tomcat作为外部容器, 可以更换为jetty。
具体操作如下:
1.排除tomcat,加入jetty的依赖
<groupId>org.springframework.boot</groupId>
<artifactId>spring-boot-starter-web</artifactId>
<!-- 排除tomcat-->
<exclusions>
<exclusion>
<groupId>org.springframework.boot</groupId>
<artifactId>spring-boot-starter-tomcat</artifactId>
</exclusion>
</exclusions>
</dependency>
<dependency>
<groupId>org.springframework.boot</groupId>
<artifactId>spring-boot-starter-jetty</artifactId>
</dependency>
2.测试:
运行入口函数:
public class Demo11Application {
public static void main(String[] args) {
ConfigurableApplicationContext context = SpringApplication.run(Demo11Application.class, args);
}
}
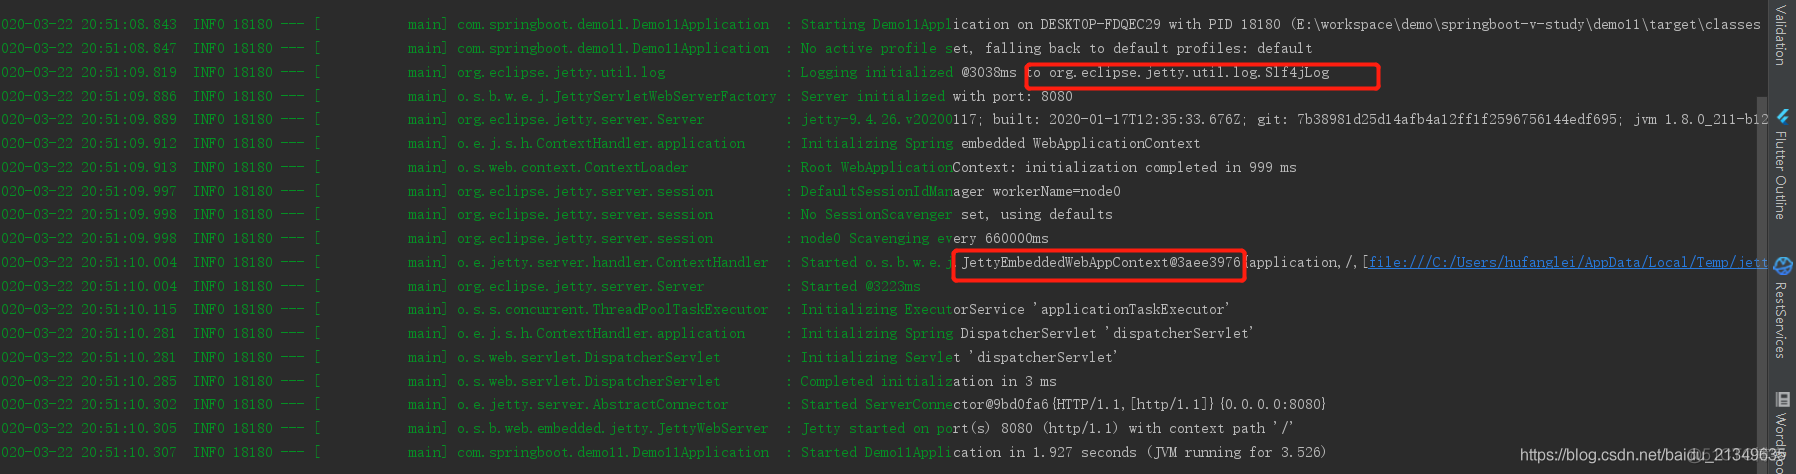
运行结果,看打印结果,已显示为jetty:
源码地址:
https://github.com/hufanglei/springboot-v-study/tree/springboot-web1
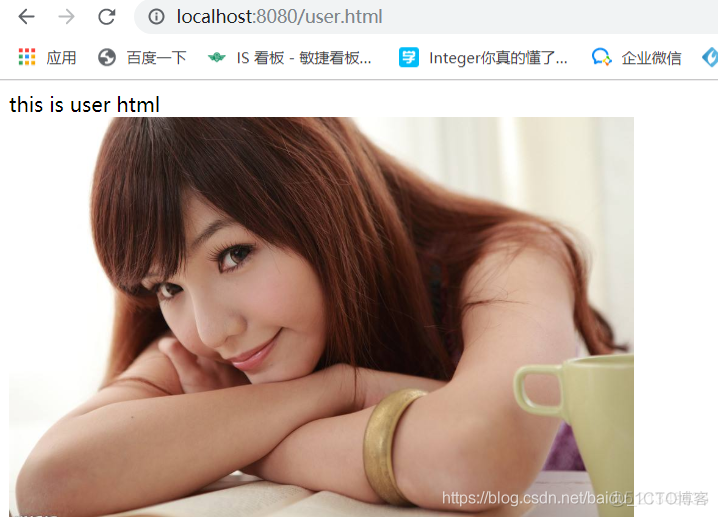
一、请求静态资源:
1. 放在webapp下 加resources.xml 可以访问到
做个案例,测试下:
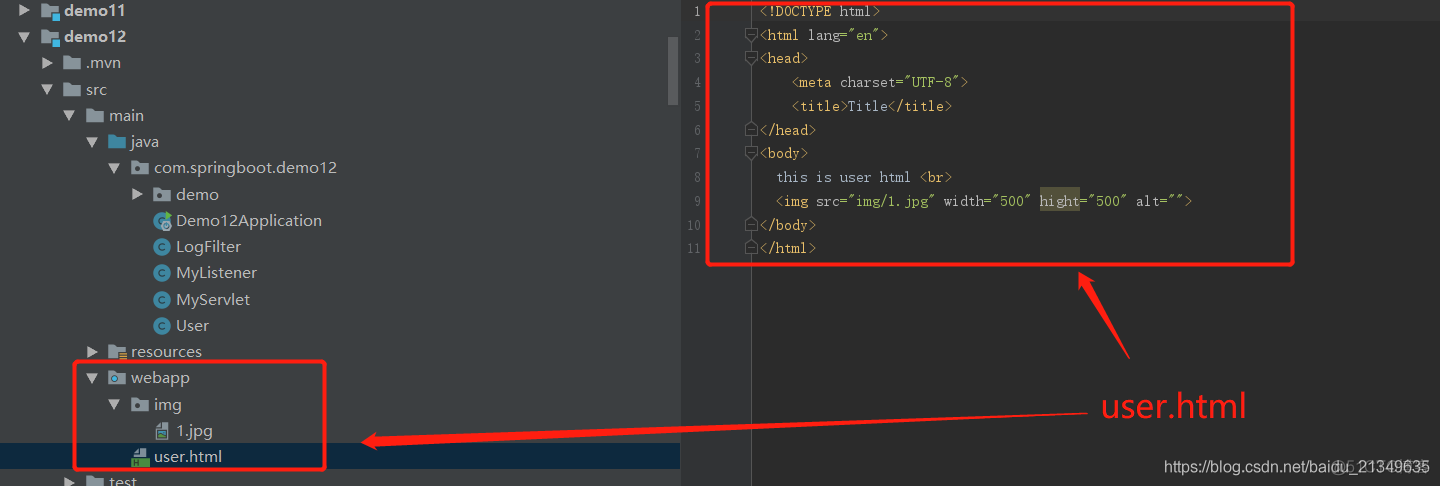
- 在webapp下准备一个图片和一个user.html
<plugins>
<plugin>
<groupId>org.springframework.boot</groupId>
<artifactId>spring-boot-maven-plugin</artifactId>
</plugin>
</plugins>
<resources>
<resource>
<directory>src/main/webapp</directory>
<!--注意此次必须要放在此目录下才能被访问到 -->
<targetPath>META-INF/resources</targetPath>
<includes>
<include>**/**</include>
</includes>
</resource>
<resource>
<directory>src/main/resources</directory>
<filtering>true</filtering>
<includes>
<include>**/*</include>
</includes>
</resource>
</resources>
</build>
- 入口函数启动:
public class Demo12Application {
public static void main(String[] args) {
SpringApplication.run(Demo12Application.class, args);
}
}
- 查看效果,显示图片和页面都可以访问到:
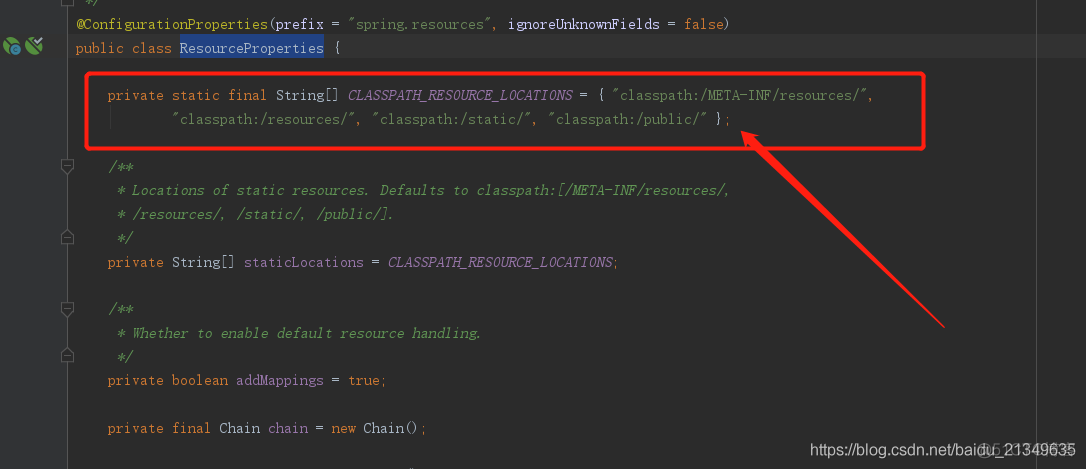
2. springboot默认的静态资源的路径是:
- “classpath:/META-INF/resources/”,
- “classpath:/resources/”,
- “classpath:/static/”,
- “classpath:/public/” };
我们可以在ResourceProperties源码中找到这个原因:
在public下准备个文件看下能否访问到:
运行入口函数:看下页面,显示已经访问到public下的html页面和css。
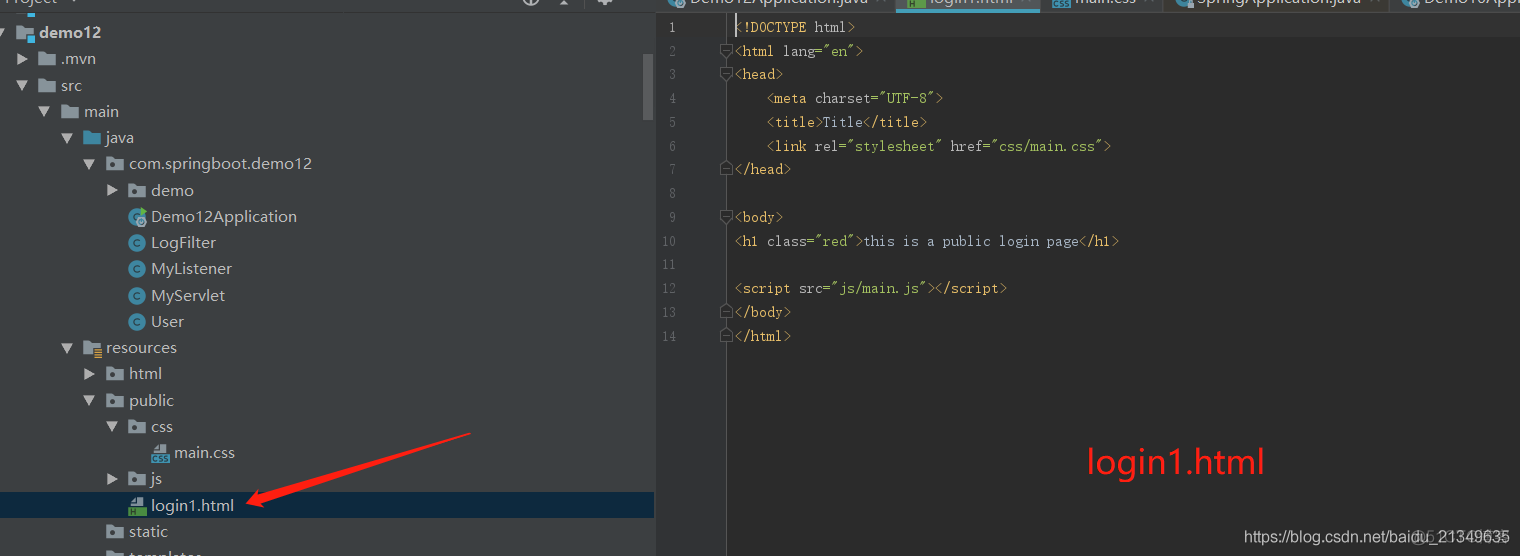
3.可以通过spring.resources.static-locations 配置项修改默认静态资源路径
我们指定html文件下为我们的默认静态资源路径,并准备个login.html,看下能否访问:


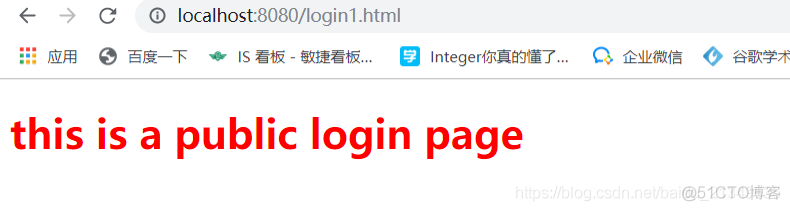
运行,看下页面效果:
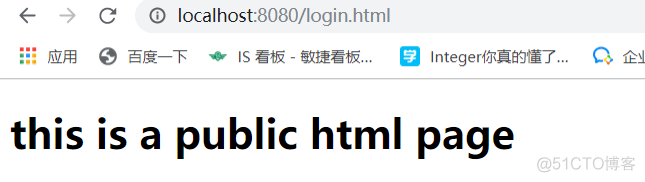
结果显示已经访问到html下的页面。修改默认的静态资源路径成功。
二、sevlet,filter,listener的2种配置方式:
1.springboot如何使用servlet
有2种方式,一种是用sevlet3加入口函数注解扫码方式,一种是配置类注入servlet方式:
现在动手试试:
① 方法一:(servlet3可以使用这种方法)
- 1)编写servlet,然后加上响应的注解@WebServlet
- 2)需要启用@ServletComonentScan注解
public class BookServlet extends HttpServlet {
private static final long serialVersionUID = 1L;
public BookServlet() {
System.out.println("===servet BookServlet========");
}
@Override
protected void doGet(HttpServletRequest req, HttpServletResponse resp) throws ServletException, IOException {
resp.getWriter().println("book servlet");
}
}
@SpringBootApplication
public class Demo12Application {
public static void main(String[] args) {
SpringApplication.run(Demo12Application.class, args);
}
}
运行入口,访问BookServlet 映射的user.do路径:
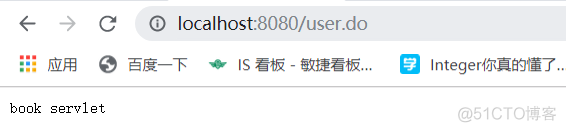
说明servlet已经访问成功。
② 方法2:(servlet2.5及以下版本可以使用这种方法)
- 1) 书写servlet无需对位映射,不用加@WebServlet注解
- 2)书写个配置类,使用@Bean注入,注入的话,需要调用ServletRegistrationBean的构造方法。
代码如下:
servlet:
private static final long serialVersionUID = 1L;
public BookServlet() {
System.out.println("===servet BookServlet========");
}
@Override
protected void doGet(HttpServletRequest req, HttpServletResponse resp) throws ServletException, IOException {
resp.getWriter().println("book servlet");
}
}
public class ServletConfigration {
@Bean
public ServletRegistrationBean createBookServlet(){
ServletRegistrationBean servletRegistrationBean = new ServletRegistrationBean(new BookServlet(), "/book.do");
return servletRegistrationBean;
}
}
public class Demo12Application {
public static void main(String[] args) {
SpringApplication.run(Demo12Application.class, args);
}
}
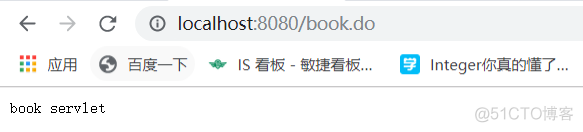
启动并测试:结果显示ok:
2.springboot如何使用过滤器
使用的方式和servet差不多,一种是@WebFilter("/*")注解方式,另一种是也是通过配置类:
不过生成filter的类是 fileter -》 FilterRegistrationBean。
方式1通过@WebFilter("/*")+入口@ServletComponentScan注解实现过滤器
public class LogFilter implements Filter {
@Override
public void init(FilterConfig filterConfig) throws ServletException {
System.out.println("==LogFilter =init===");
}
@Override
public void doFilter(ServletRequest request, ServletResponse response, FilterChain chain) throws IOException, ServletException {
System.out.println("==LogFilter =filter ==="+ request.getRemoteHost());
chain.doFilter(request,response);
}
@Override
public void destroy() {
System.out.println("=====destroy======");
}
}
@SpringBootApplication
public class Demo12Application {
public static void main(String[] args) {
SpringApplication.run(Demo12Application.class, args);
}
}
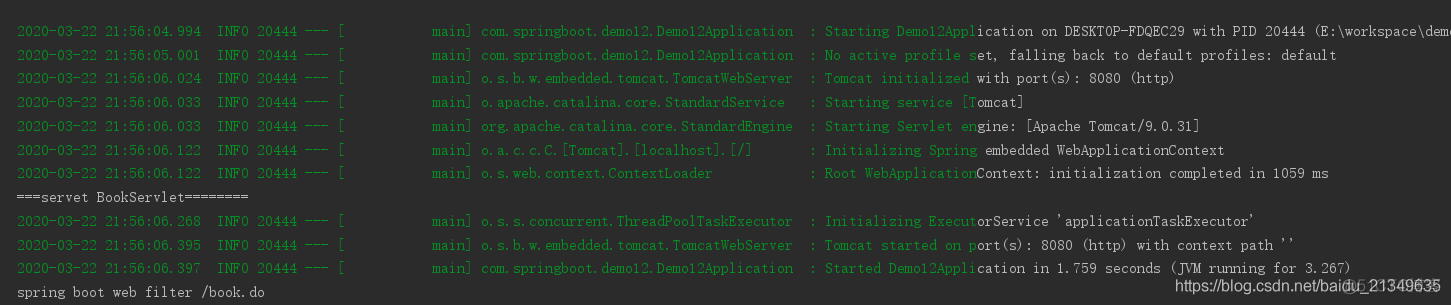
启动入口函数,访问刚才的servlet,看下控制台打印情况:

显示过滤器已经被注入了。
方式2:配置类+注入bean,
@Override
public void init(FilterConfig filterConfig) throws ServletException {
}
@Override
public void doFilter(ServletRequest request, ServletResponse response, FilterChain chain) throws IOException, ServletException {
HttpServletRequest req = (HttpServletRequest) request;
System.out.println("spring boot web filter "+ req.getRequestURI());
chain.doFilter(request,response);
}
@Override
public void destroy() {
}
}
public class ServletConfigration {
@Bean
public FilterRegistrationBean createFilterRegistrationBean(){
FilterRegistrationBean filter = new FilterRegistrationBean();
filter.setFilter(new EchoFilter());
filter.setUrlPatterns(Arrays.asList("/book.do"));
return filter;
}
}
public class Demo12Application {
public static void main(String[] args) {
SpringApplication.run(Demo12Application.class, args);
}
}

运行结果:显示过滤器已经起作用了了。
3.springboot如何使用监听器
1)方式1:@WebListener+@ServletComponentScan
public class MyListener implements ServletContextListener {
@Override
public void contextInitialized(ServletContextEvent sce) {
System.out.println("StartUpListener app startup at " + LocalDateTime.now().toString());
}
@Override
public void contextDestroyed(ServletContextEvent sce) {
}
}
@SpringBootApplication
public class Demo12Application {
public static void main(String[] args) {
SpringApplication.run(Demo12Application.class, args);
}
}

2)方式2:配置类+@bean+ServletListenerRegistrationBean构造函数注入
@Override
public void contextInitialized(ServletContextEvent sce) {
System.out.println("StartUpListener app startup at " + LocalDateTime.now().toString());
}
@Override
public void contextDestroyed(ServletContextEvent sce) {
}
}
public class ServletConfigration {
@Bean
public ServletListenerRegistrationBean createServletListenerRegistrationBean(){
ServletListenerRegistrationBean listener = new ServletListenerRegistrationBean(new StartUpListener());
return listener;
}
}
public class Demo12Application {
public static void main(String[] args) {
SpringApplication.run(Demo12Application.class, args);
}
}

源码地址:
https://github.com/hufanglei/springboot-v-study/tree/demo12
1.拦截器:
拦截器的使用步骤
①写一个拦截器,实现HandlerInterceptor接口
import org.springframework.web.servlet.ModelAndView;
import javax.servlet.http.HttpServletRequest;
import javax.servlet.http.HttpServletResponse;
public class LogHandlerInterceptor implements HandlerInterceptor {
@Override
public boolean preHandle(HttpServletRequest request, HttpServletResponse response, Object handler) throws Exception {
System.out.println("=========preHandle===============" + handler);
return true;
}
@Override
public void postHandle(HttpServletRequest request, HttpServletResponse response, Object handler, ModelAndView modelAndView) throws Exception {
System.out.println("=========postHandle===============" + handler);
}
@Override
public void afterCompletion(HttpServletRequest request, HttpServletResponse response, Object handler, Exception ex) throws Exception {
System.out.println("=========afterCompletion===============" + handler);
}
}
- preHandle: controller执行之前调用
- postHandle: controller执行之后,且页面渲染之前调用
- afterCompletion: 页面渲染之后调用,一般用于资源清理操作
②写一个类,实现WebMvcConfigurer接口,重写addInterceptors方法(已经过时),并调用registry.addInterceptor把上一步的拦截器加进去
public class WebConfiguration implements WebMvcConfigurer {
// @Override
// public void addResourceHandlers(ResourceHandlerRegistry registry) {
// registry.addResourceHandler("/web/**").addResourceLocations("classpath:/web/");
// }
@Override
public void addInterceptors(InterceptorRegistry registry) {
registry.addInterceptor(new LogHandlerInterceptor());
}
}
写个controller
public class UserController {
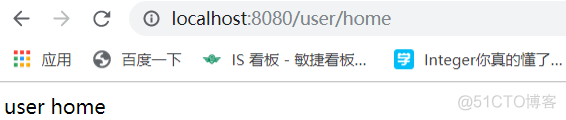
@GetMapping("/user/home")
public String home(){
return "user home";
}
@GetMapping("/user/help")
public String help() {
throw new IllegalArgumentException("args is empty");
}
}
public class Demo13Application {
public static void main(String[] args) {
SpringApplication.run(Demo13Application.class, args);
}
}
页面测试:
看下控制台:

显示已经拦截controller。
2.异常处理:
1)默认异常处理逻辑ErrorMvcAutoConfiguration
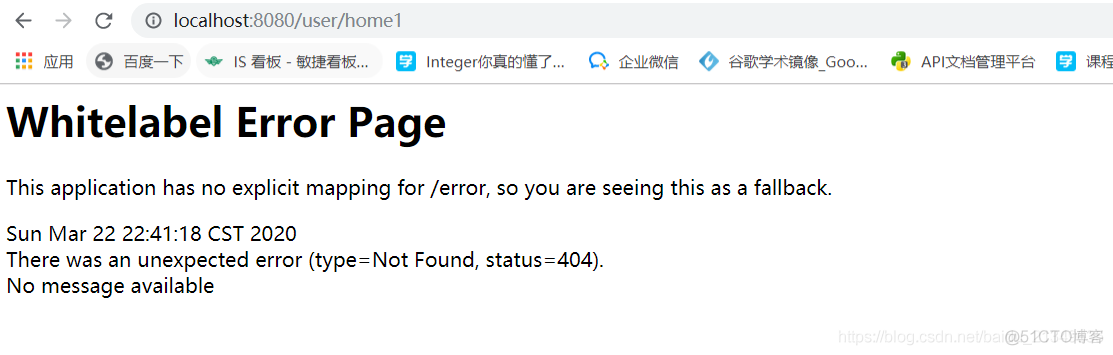
当我们访问一个不存在的url时候会出现如下页面:
看下ErrorMvcAutoConfiguration源码:
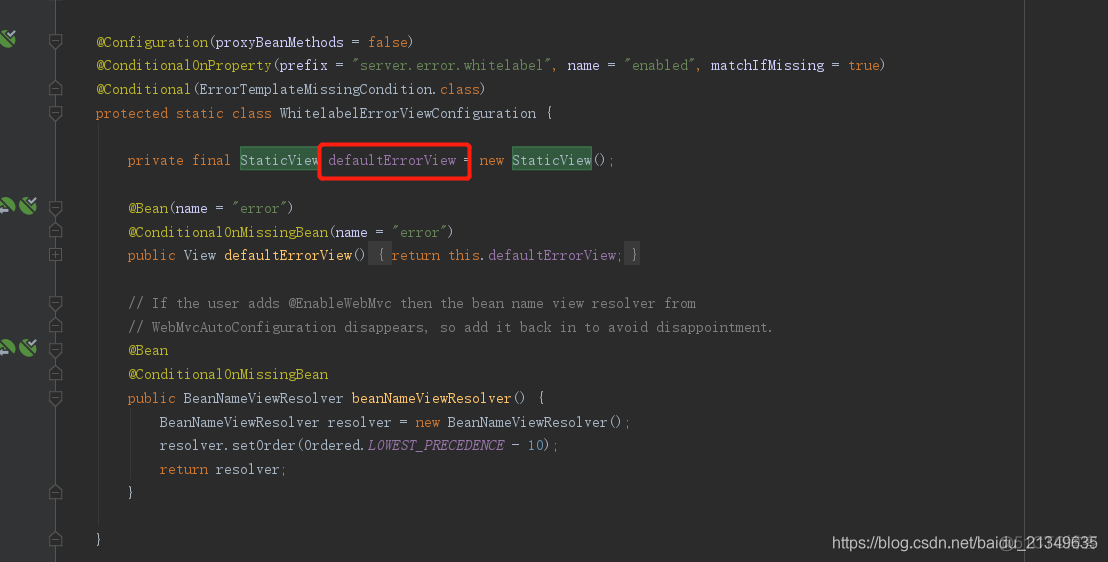

排除springboot默认显示的异常页方式1:
可以看到找到就是渲染的这段代码。
我们可以关闭这个默认异常页配置:

看了源码再去修改applicaiton.properties
重新运行:
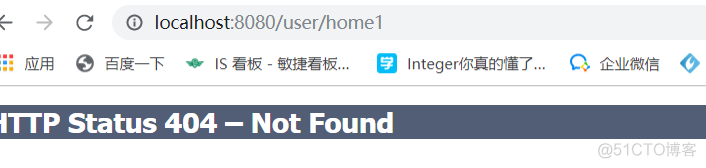
输入一个无效的url,就没有默认的异常处理页了。
排除springboot默认显示的异常页方式2:
也可以直接在入口函数上,用exclude去排除自动注册的这个默认异常注册类:
public class Demo13Application {
public static void main(String[] args) {
SpringApplication.run(Demo13Application.class, args);
}
}
2).自处理异常
定义一个controller。手动抛出异常:
①在当前controller类使用@ExceptionHandler处理异常
public class BookController {
// @ExceptionHandler(value = FileNotFoundException.class)
@ExceptionHandler(value = FileNotFoundException.class)
public String error(Exception e){
return "file not found exception==== " + e.getMessage();
}
@GetMapping("/book/error1")
public String list() throws FileNotFoundException {
throw new FileNotFoundException("file not found");
}
@GetMapping("/book/error2")
public String error2() throws ClassNotFoundException {
throw new ClassNotFoundException("file not found");
}
@GetMapping("/user/null")
public String empty() {
throw new NullPointerException("args is empty");
}
}
我们看到访问list,error2,empty的方法都会抛出异常,同时定义一个处理异常的方法error:
public String error(Exception e){
return "file not found exception==== " + e.getMessage();
}
如果匹配到 @ExceptionHandler中value对应的异常,就可以在error方法中处理异常,或者跳转到错误页面。
我们访问/user/null:
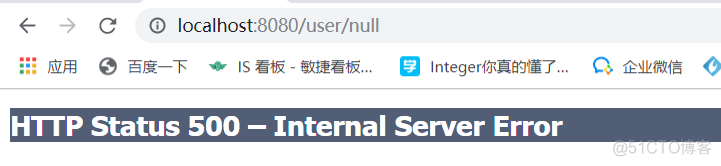
@GetMapping("/user/null") public String empty() { throw new NullPointerException("args is empty"); } } 对应的是空指针异常,而@ExceptionHandler(value = FileNotFoundException.class)是文件找不到的异常,所以controller没给我们处理。然后访问@GetMapping("/book/error1")

看到已经帮我们处理了。
如果想要@ExceptionHandler当前类全部的方法,就可以扩大异常范围,改成exception.class就可了。
public String error(Exception e){
return " exception==== " + e.getMessage();
}
②全局处理异常的2种方式:
- a.方式1:使用ErrorPageRegistrar的接口
写一个类,实现ErrorPageRegistrar接口,实现registerErrorPages,在该方法里面,添加具体的错误处理逻辑
public class CommonErrorRegistry implements ErrorPageRegistrar {
@Override
public void registerErrorPages(ErrorPageRegistry registry) {
ErrorPage e404 = new ErrorPage(HttpStatus.NOT_FOUND, "/404.html");
ErrorPage e500 = new ErrorPage(INTERNAL_SERVER_ERROR, "/500.html");
ErrorPage argsPage= new ErrorPage(IllegalArgumentException.class, "/args.html");
registry.addErrorPages(e404, e500,argsPage);
}
}
- b.方式2:@ControllerAdvice
具体做法:
-1.写一个类,需要加上@ControllerAdvice注解
-2.写一个异常处理方法,需要加上@Exception(value=Exception.class)这个注解,在该方法上处理异常,
public class GloabalExceptinHandler {
@ExceptionHandler(value = Exception.class)
@ResponseBody
public String errorHandler(Exception e){
return "gloabal error " + e.getClass().getName()+ " =="+ e.getMessage();
}
@ExceptionHandler(value = NullPointerException.class)
@ResponseBody
public String errorHandler2(Exception e){
return "gloabal error2 " + e.getClass().getName()+ " =="+ e.getMessage();
}
}
这2种方法都可以跳转到自定义的页面,或者抛出异常。
看下这个ErrorPage类的源码:
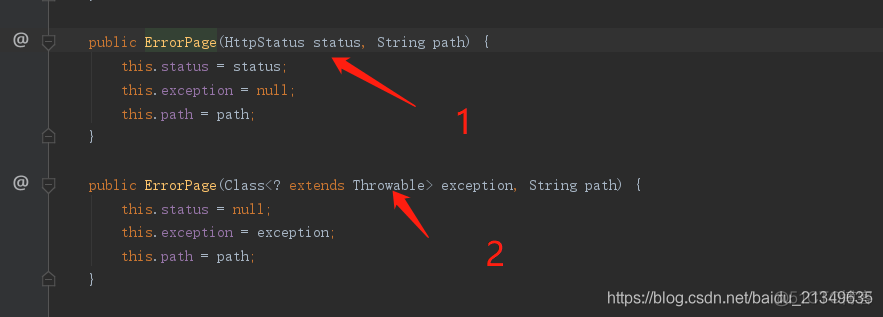
可以看到,errorpage可以通过请求响应状态码控制跳转页面,可以根据具体异常控制跳转页。
演示代码git地址:
https://github.com/hufanglei/springboot-v-study/tree/springbootweb3
以上就说了springbootweb的大体内容,基础springboot2的。关于请求方法参数,数据渲染到jsp页面和freemarker页面的配置方式,替换内置tomcat的方法,请求静态页面的设置,过滤器,监听器,servlet的2种注册方式,拦截器的自定义,异常处理的类上的处理,和全局处理的2种方式。
个人微信公号:
搜索: 怒放de每一天
不定时推送相关文章,期待和大家一起成长!!

- 赞
- 收藏
- 评论
- 分享
- 举报
Recommend
About Joyk
Aggregate valuable and interesting links.
Joyk means Joy of geeK