
2

HarmonyOs - ArkUI (JS) 自定义组件之计时组件
source link: https://os.51cto.com/article/713390.html
Go to the source link to view the article. You can view the picture content, updated content and better typesetting reading experience. If the link is broken, please click the button below to view the snapshot at that time.

学习 HarmonyOS ArkUI(JS) 也有一段时间了,为了检验自己的成果,基于现掌握的 FA 相关知识,编写一个可能会在日常开发中遇到的简单计时器组件。
此组件基于 JS 扩展的类Web开发范式开发的组件,通过传入时间参数可以实现简单计时功能,也可以传入其他参数以显示手动控制计时和手动选择时间功能。
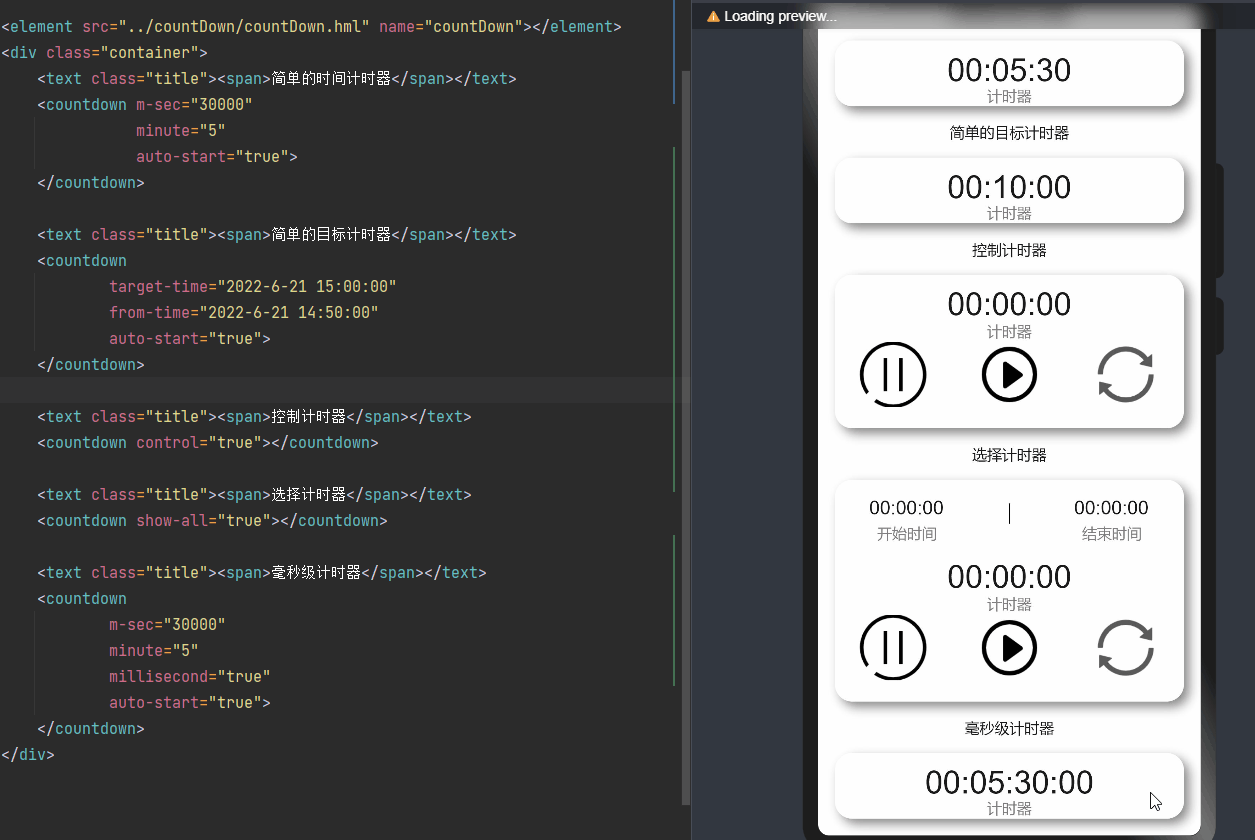
props
**注意:**仅需要计时时,可直接传入时间(mSec,sec,minute,hour,targetTime,fromTime),然后传入属性autoStart='true’自动计时即可,其中fromTime、targetTime与前面的四个单位属性不能共用。
倒计毫秒数,如3000毫秒 | Number | ||
倒计秒数,如100秒 | Number | ||
minute | 倒计分钟数,如80分钟 | Number | |
倒计小时数,如25小时 | Number | ||
targetTime | 目标时间,如"2022-6-21 10:00:00" | String | |
fromTime | 开始时间,如"2022-6-21 10:00:00" | String | |
autoStart | Boolean | false | |
control | 显示手动控制图标 | Boolean | false |
showAll | 显示时间选择区,点击数字开启 | Boolean | false |
millisecond | 开启毫秒级计时 | Boolean | false |
1、首先,将传入或者设置的时间转成毫秒数,并格式化字符串显示
timeToString(value) { // 毫秒时间转换
    let secondTime = parseInt(value / 1000), // 秒
        minuteTime = 0, // 分
        hourTime = 0, // ⼩时
        millisecond = Math.floor((value % 1000)/10)
    if (secondTime > 60) { //如果秒数⼤于60,将秒数转换成整数
        minuteTime = parseInt(secondTime / 60);//获取分钟,除以60取整数,得到整数分钟
        secondTime = parseInt(secondTime % 60);//获取秒数,秒数取佘,得到整数秒数
        if (minuteTime > 60) {//如果分钟⼤于60,将分钟转换成⼩时
            hourTime = parseInt(minuteTime / 60);//获取⼩时,获取分钟除以60,得到整数⼩时
            minuteTime = parseInt(minuteTime % 60);//获取⼩时后取佘的分,获取分钟除以60取佘的分
        }
    }
    let result = "";
    if(this.millisecond){  // 毫秒计时
        this.delay = 30;
        result = ":" + this.sizeFormat(millisecond) + "" + result;
    }
    result = "" + this.sizeFormat(secondTime) + "" + result;
    if (minuteTime >= 0) {
        result = "" + this.sizeFormat(minuteTime) + ":" + result;
    }
    if (hourTime >= 0) {
        result = "" + this.sizeFormat(hourTime) + ":" + result;
    }
    // 保存时间数据
    this.countDownTimeText = result;
    this.hourTime = hourTime;
    this.minuteTime = minuteTime;
    this.secondTime = secondTime;

    return result;
},
// 格式化,小于10则前加0
sizeFormat(value){
    let val = parseInt(value)
    return val>=10?''+val:'0'+val
},
2、启动定时器
startTiming(){
    if (this.countDownTime && this.order == false) {  // 倒计时
        this.timer = setInterval(()=>{
            this.timeToString(this.countDownTime);
            this.countDownTime = this.countDownTime - this.delay;

            if(this.countDownTime <= 0){
                this.countDownTimeText = '00:00:00';
                clearTimeout(this.timer);
            }
        },this.delay)
    }else {  // 顺计时
        this.order = true;
        this.timer = setInterval(()=>{
            this.timeToString(this.countDownTime);
            this.countDownTime = this.countDownTime + this.delay;
        },this.delay)
    }
}
3、hml 绑定数据
<div class="countDown">
    <slot name="before"></slot>
    <div class="content">
        <!-- 手动时间选择 -->
        <div class="select" if="{{ showAll }}">
            <div class="start">
                <picker type="time"
                        value="{{startTimeText?startTimeText:'00:00:00'}}"
                        containsecond="true"
                        hours="24"
                        class="pickertime"
                        onchange="startSelect"></picker>
                <text class="tips"><span>开始时间</span></text>
            </div>
            <div class="line"></div>
            <div class="stop" onclick="pickerShow">
                <picker type="time"
                        value="{{stopTimeText?stopTimeText:'00:00:00'}}"
                        containsecond="true" hours="24"
                        class="pickertime"
                      onchange="stopSelect"></picker>
                <text class="tips"><span>结束时间</span></text>
            </div>
        </div>
        <!--计时器显示区-->
        <div class="count">
            <text class="time"><span>{{countDownTimeText?countDownTimeText:'00:00:00'}}</span></text>
            <text class="tips"><span>计时器</span></text>
        </div>

        <!-- 手动控制开启、暂停、重置 -->
        <div class="img" if="{{ showAll||control }}">
            <image src="../countDown/common/pause.png" class="img_item" onclick="pause"></image>
            <image src="../countDown/common/start.png" class="img_item" onclick="start"></image>
            <image src="../countDown/common/reset.png" class="img_item" onclick="reset"></image>
        </div>
    </div>
    <slot name="after"></slot>
</div>
4、其他代码
(1)手动控制 js
start(){
    clearInterval(this.timer)
    this.startTiming()  // 开启定时器
},
pause(){
    clearInterval(this.timer)
},
reset(){
    this.countDownTime = this.initTime  // 回归初始时间
    this.order = false  // 倒计时模式
    this.timeToString(this.countDownTime)  // 格式化时间字符串
    clearInterval(this.timer)
},
(2)css
.countDown {
    flex-direction: column;
    background-color: white;
    width: 100%;
    font-size: 24px;
    border-radius: 16px;
    margin: 16px;
    box-shadow :5px 5px 8px 0px #888888
}
.line{
    height: 30%;
    width: 1px;
    background-color: black;

}
.content{
    flex-direction: column;
}
.select{
    justify-content: space-around;
    align-items: center;
    height: 70px;
}
.start,.stop{
    margin-top: 18%;
    flex-direction: column;
}
.img{
    height: 70px;
    align-items: center;
    justify-content: space-around;
    margin-bottom: 20px;
}
.img_item{
    width: 64px;
    height: 64px;
}
.pickertime{
    font-size: 18px;
}
.tips{
    text-align: center;
    font-size: 14px;
    color: gray;
    height: 20px;
}
.count{
    margin-top: 10px;
    width: 100%;
    text-align: center;
    flex-direction: column;
    height: 60px;
}
.time{
    text-align: center;
}
到这里此组件基本完成,容易出错的点主要在定时器是否需要被清除, 相当于学习了鸿蒙的开发,自己尝试封装,让自己更加了解鸿蒙开发。欢迎各位开发者一起讨论与研究,本次分享希望对大家有所帮助。
Recommend
About Joyk
Aggregate valuable and interesting links.
Joyk means Joy of geeK