

Three.js 之 14 Raycaster 光线投射
source link: https://gaohaoyang.github.io/2022/07/03/three-raycaster/
Go to the source link to view the article. You can view the picture content, updated content and better typesetting reading experience. If the link is broken, please click the button below to view the snapshot at that time.
本系列为 Three.js journey 教程学习笔记。
光线投射 Raycaster
光线投射可以发射一个特定方向的射线,来检测是否有物体与这个射线相交。有以下的使用场景:
- 检测玩家前方是否有墙
- 检测射击游戏是否击中了什么物体
- 检测是否有什么物体在鼠标下,并模拟鼠标事件
创建光线投射 Raycaster
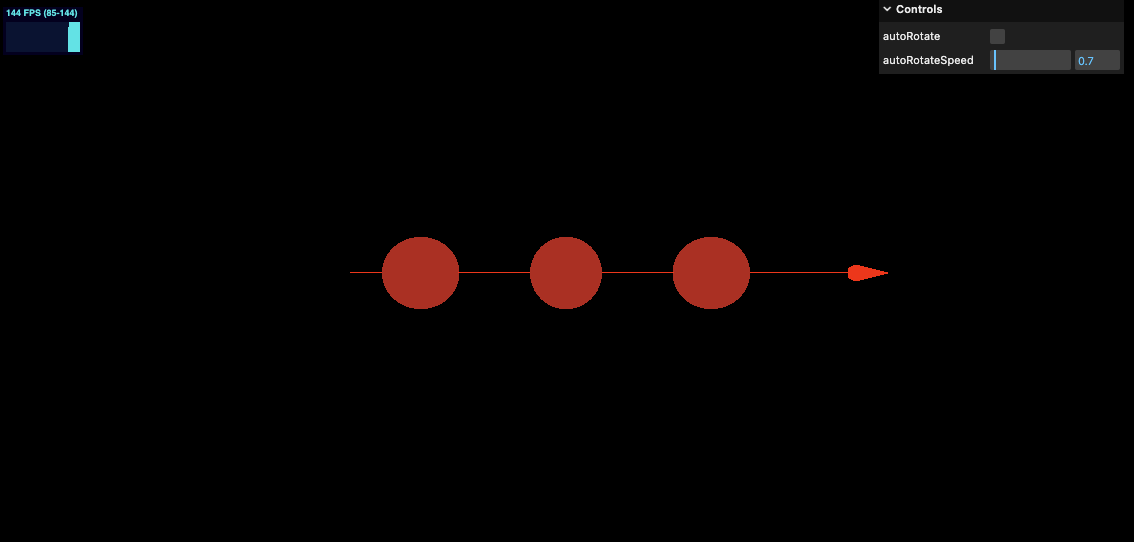
我们沿着 x 轴,创建 3 个球体,从最左边发射一个射线,沿着 x 轴指向右侧
/**
 * Objects
 */
const object1 = new THREE.Mesh(
  new THREE.SphereGeometry(1, 32, 32),
  new THREE.MeshBasicMaterial({ color: '#B71C1C' })
)
object1.position.setX(-4)
const object2 = new THREE.Mesh(
  new THREE.SphereGeometry(1, 32, 32),
  new THREE.MeshBasicMaterial({ color: '#B71C1C' })
)
const object3 = new THREE.Mesh(
  new THREE.SphereGeometry(1, 32, 32),
  new THREE.MeshBasicMaterial({ color: '#B71C1C' })
)
object3.position.setX(4)

scene.add(object1, object2, object3)

/**
 * Raycaster
 */
const raycaster = new THREE.Raycaster()
const rayOrigin = new THREE.Vector3(-6, 0, 0)
const rayDirections = new THREE.Vector3(10, 0, 0)
rayDirections.normalize()
raycaster.set(rayOrigin, rayDirections)
Raycaster( origin : Vector3, direction : Vector3, near : Float, far : Float )
- origin —— 光线投射的原点向量。
- direction —— 向射线提供方向的方向向量,应当被标准化。
- near —— 返回的所有结果比near远。near不能为负值,其默认值为0。
- far —— 返回的所有结果都比far近。far不能小于near,其默认值为Infinity(正无穷。)
set 方法##
.set ( origin : Vector3, direction : Vector3 ) : undefined
- origin —— 光线投射的原点向量。
- direction —— 为光线提供方向的标准化方向向量。
为了便于观察这个射线,我们使用 arrowHelper 可视化这个射线
const arrowHelper = new THREE.ArrowHelper(
  raycaster.ray.direction,
  raycaster.ray.origin,
  15,
  0xff0000,
  1,
  0.5,
)
scene.add(arrowHelper)
.intersectObject ( object : Object3D, recursive : Boolean, optionalTarget : Array ) : Array
- distance —— 射线投射原点和相交部分之间的距离。
- point —— 相交部分的点(世界坐标)
- face —— 相交的面
- faceIndex —— 相交的面的索引
- object —— 相交的物体
- uv —— 相交部分的点的UV坐标。
- uv2 —— Second set of U,V coordinates at point of intersection
- instanceId – The index number of the instance where the ray intersects the InstancedMesh
检测一组物体
.intersectObjects ( objects : Array, recursive : Boolean, optionalTarget : Array ) : Array
我们加入以下代码
const intersect = raycaster.intersectObject(object1)
const intersects = raycaster.intersectObjects([object1, object2, object3])

console.log(intersect)
console.log(intersects)
可以看到日志

我们让3个球运动起来,动态检测是否被射线穿过
首先给3个小球的 positionY 设置位移
// Animations
const clock = new THREE.Clock()
const tick = () => {
  stats.begin()

  const elapsedTime = clock.getElapsedTime()
  object1.position.setY(Math.sin(elapsedTime * 2) * 2)
  object2.position.setY(Math.sin(elapsedTime * 1.5) * 2)
  object3.position.setY(Math.sin(elapsedTime * 3) * 2)

  controls.update()

  // Render
  renderer.render(scene, camera)
  stats.end()
  requestAnimationFrame(tick)
}

tick()
增加 intersectObjects 相交检测,并设置相交后的颜色。这里我们遍历所有的物体为其上色
const tick = () => {

  ...

  const objectsToTest = [object1, object2, object3]
  const intersects = raycaster.intersectObjects(objectsToTest)

  objectsToTest.forEach((item) => {
    item.material.color.set('#B71C1C')
  })

  intersects.forEach((item) => {
    item.object.material.color.set('#F9A825')
  })
  requestAnimationFrame(tick)
}
tick()
在线 demo 链接
可扫码访问
使用鼠标光线投射
我们也可以使用 raycaster 来检测一个物体是否在鼠标后面。其核心原理就是我们需要发射一个从相机位置到鼠标方向的射线。
Hover & touch
首先我们需要获取鼠标的位置,通过监听 mousemove 事件
const mouse = new THREE.Vector2()

window.addEventListener('mousemove', (event) => {
  mouse.x = (event.clientX / sizes.width) * 2 - 1
  mouse.y = -(event.clientY / sizes.height) * 2 + 1
  console.log(mouse)
})
将鼠标的坐标转换为 -1 到 1 的值。这是因为接下来我们要使用的 api 需要 -1 到 1 的值。
为了移动端也能很好的看到效果,我们再增加 touchmove 事件
/**
 * Mouse
 */
const mouse: {
  x: number | null
  y: number | null
} = { x: null, y: null }

window.addEventListener('mousemove', (event) => {
  mouse.x = (event.clientX / sizes.width) * 2 - 1
  mouse.y = -(event.clientY / sizes.height) * 2 + 1
})

window.addEventListener('touchmove', (event) => {
  const { clientX, clientY } = event.touches[0]
  mouse.x = (clientX / sizes.width) * 2 - 1
  mouse.y = -(clientY / sizes.height) * 2 + 1
})
我们将之前的小球增加一些,做一个三维矩阵,这里使用3次for循环实现,代码如下
const ballNumInRow = 5

const cubeGroup = new THREE.Group()
for (let k = 0; k < ballNumInRow; k += 1) {
  const planeGroup = new THREE.Group()
  for (let j = 0; j < ballNumInRow; j += 1) {
    const rowGroup = new THREE.Group()
    for (let i = 0; i < ballNumInRow; i += 1) {
      const object = new THREE.Mesh(
        new THREE.SphereGeometry(1, 32, 32),
        new THREE.MeshStandardMaterial({ color: '#fff' }),
      )
      object.position.setX(i * 2)
      object.name = 'ball'
      rowGroup.add(object)
    }
    rowGroup.position.setZ(j * 2)
    planeGroup.add(rowGroup)
  }
  planeGroup.position.setY(k * 2)
  cubeGroup.add(planeGroup)
}

cubeGroup.position.set(-ballNumInRow / 2 - 1.5, -ballNumInRow / 2 - 1.5, -ballNumInRow / 2 - 1.5)

scene.add(cubeGroup)
效果如下:
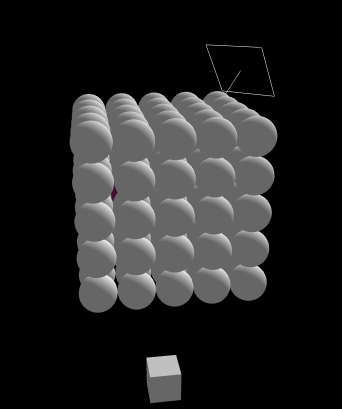
再将这个 cubeGroup 里的所有球体扁平化,变为 1 维数组,便于后续的 Intersection 检测。这里我们使用 Three.js 提供的遍历 api traverse, 代码如下
const objectsToTest: THREE.Mesh[] = []
cubeGroup.traverse((obj: THREE.Mesh) => {
  if (obj.type === 'Mesh') {
    objectsToTest.push(obj)
  }
})
想要从一个坐标从相机方向发射射线,需要使用以下 api
.setFromCamera ( coords : Vector2, camera : Camera ) : undefined
- coords —— 在标准化设备坐标中鼠标的二维坐标 —— X分量与Y分量应当在-1到1之间。
- camera —— 射线所来源的摄像机。
使用一个新的原点和方向来更新射线。
最后我们在 tick 中增加如下代码,增加鼠标至相机的光线投射,检查相交的物体,将第一个物体设置为随机色。
// Animations
const tick = () => {

  stats.begin()

  if (mouse.x && mouse.y) {
    raycaster.setFromCamera({ x: mouse.x, y: mouse.y }, camera)
  }

  const intersects: THREE.Intersection<
  THREE.Mesh<THREE.SphereGeometry, THREE.MeshStandardMaterial>
  >[] = raycaster.intersectObjects(objectsToTest)

  if (
    JSON.stringify(intersects[0]?.object.material.color)
    === JSON.stringify(new THREE.Color(0xffffff))
  ) {
    intersects[0]?.object.material.color.set(
      new THREE.Color(Math.random(), Math.random(), Math.random()),
    )
  }

  controls.update()

  // Render
  renderer.render(scene, camera)
  stats.end()
  requestAnimationFrame(tick)
}

tick()
最终效果如下
在线 demo 链接
可扫码访问
mouse enter and leave
鼠标事件比如 mouseenter 和 mouseleave, 目前默认还不能支持,canvas 或 WebGL 也没有直接支持,需要自己手动模拟实现这两个事件
我们可以使用变量控制射线是否与当前物体相交,代码如下
window.addEventListener('mousemove', (event) => {
  mouse.x = (event.clientX / sizes.width) * 2 - 1
  mouse.y = -(event.clientY / sizes.height) * 2 + 1
})

let currentIntersect: THREE.Intersection<
THREE.Mesh<THREE.SphereGeometry, THREE.MeshStandardMaterial>
> | null = null

// Animations
const tick = () => {
  stats.begin()

  if (mouse.x && mouse.y) {
    raycaster.setFromCamera({ x: mouse.x, y: mouse.y }, camera)
  }

  const objectsToTest = [object1, object2, object3]
  const intersects: THREE.Intersection<
  THREE.Mesh<THREE.SphereGeometry, THREE.MeshStandardMaterial>
  >[] = raycaster.intersectObjects(objectsToTest)

  if (intersects.length) {
    if (!currentIntersect) {
      console.log('mouse enter')
    }

    [currentIntersect] = intersects
  } else {
    if (currentIntersect) {
      console.log('mouse leave')
    }

    currentIntersect = null
  }

  objectsToTest.forEach((item) => {
    item.material.color.set('#B71C1C')
  })

  intersects.forEach((item) => {
    item.object.material.color.set('#F9A825')
  })

  controls.update()

  // Render
  renderer.render(scene, camera)
  stats.end()
  requestAnimationFrame(tick)
}

tick()
click event
点击事件也类似,不过不需要在 requestAnimationFrame 中持续监听了,因为点击事件就仅仅会触发一次(点击的瞬间)
/**
 * Mouse
 */
const mouse: {
  x: number | null
  y: number | null
} = { x: null, y: null }

window.addEventListener('mousemove', (event) => {
  mouse.x = (event.clientX / sizes.width) * 2 - 1
  mouse.y = -(event.clientY / sizes.height) * 2 + 1
})

let currentIntersect: THREE.Intersection<
THREE.Mesh<THREE.SphereGeometry, THREE.MeshStandardMaterial>
> | null = null

window.addEventListener('click', (event) => {
  mouse.x = (event.clientX / sizes.width) * 2 - 1
  mouse.y = -(event.clientY / sizes.height) * 2 + 1
  if (currentIntersect) {
    // console.log(currentIntersect)
    switch (currentIntersect.object) {
      case object1:
        console.log('clicked object1')
        break
      case object2:
        console.log('clicked object2')
        break
      case object3:
        console.log('clicked object3')
        break
      default:
        break
    }
  }
})
在线 demo 链接
掌握了这个技能之后,再开发鼠标类事件相关的操作就非常容易了
本节我们学习了光线投射相关的知识,学习了如何判断物体与射线相交,以及如何模拟鼠标事件,这在后续的开发中应该非常有帮助。下一节想学学如何将传统的 HTML 交互操作与 WebGL 相结合。
我正在参与掘金技术社区创作者签约计划招募活动,点击链接报名投稿。
Recommend
About Joyk
Aggregate valuable and interesting links.
Joyk means Joy of geeK