

让你的Nginx支持分布式追踪 - Cylon
source link: https://www.cnblogs.com/Cylon/p/16441422.html
Go to the source link to view the article. You can view the picture content, updated content and better typesetting reading experience. If the link is broken, please click the button below to view the snapshot at that time.
Background#
NGINX 是一个通用且流行的应用程序。也是最流行的 Web 服务器,它可用于提供静态文件内容,但也通常与其他服务一起用作分布式系统中的组件,在其中它用作反向代理、负载均衡 或 API 网关。
分布式追踪 distributed tracing 是一种可用于分析与监控应用程序的机制,将追踪在从源到目的的整个过程中的单个请求,这与仅通过单个应用程序域来追踪请求的形式不同。
换句话说,我们可以说分布式追踪是对跨多个系统的多个请求的拼接。拼接通常由一个或多个相关 ID 完成,并且跟踪通常是一组记录的、跨所有系统的结构化日志事件,存储在一个中心位置。
在这种背景的情况下, OpenTracing 应运而生。OpenTracing 是一个与应用供应商无关的 API,它可帮助开发人员轻松地跟踪单一请求的域。目前有多种开源产品都支持 OpenTracing(例如,Jaeger, skywalking 等),并将其作为一种检测分布式追踪的标准化方法。
本文将围绕,从0到1实现在nginx配置分布式追踪的架构的简单实例说明。本文实例使用的组件为
nginx-1.22jaeger-all-in-on v1.38nginx-opentracing v1.22jaeger-client-cpp v0.9
源码构建nginx-opentracing#
准备nginx-opentracing#
nginx-opentracing 仓库中可以看到,官方为每个nginx版本都提供了一个编译好的动态库(Nginx1.19.13+),我们可以直接拿来使用这个动态库,如果你想将这个利用Nginx 提供的编译参数 --add-module=/path/to/module 构建为nginx的内置功能的话,可能会出现一些问题,例如下面的一些错误:
ngx_http_opentracing_module.so/config was found
	/root/nginx-opentracing-0.25.0/opentracing//src/ngx_http_opentracing_module.cpp
In file included from /root/nginx-opentracing-0.25.0/opentracing//src/ngx_http_opentracing_module.cpp:1:0:
/root/nginx-opentracing-0.25.0/opentracing//src/load_tracer.h:3:38: fatal error: opentracing/dynamic_load.h: No such file or directory
根据 issue 中查询得知 nginx-opentracing 需要嵌入到nginx中,是需要一些 opentracing-cpp 因为对c++不熟,尝试调试很久还是上面的错误,故直接使用了官方提供的动态库。
准备jaeger-client-cpp#
根据 nginx-opentracing 中提到的,还需要一个 jaeger-client-cpp 的 tracer 才可以正常运行(这也是作为jaeger架构中的角色)
来到 jaeger-client-cpp 看到Release提供的编译好的动态库已经很久了,而最新版都没有提供相应编译的版本,需要我们自己编译
说明: 编译依赖CMake 3.3+,gcc 4.9.2+
我们的编译环境使用CentOS 7 默认gcc与CMake都符合要求需要自行编译两个的版本。
编译gcc#
gcc下载地址:https://ftp.gnu.org/gnu/gcc/
cd gcc-5.4.0
./contrib/download_prerequisites

mkdir gcc-build-5.4.0
cd gcc-build-5.4.0

/usr/local/src/gcc-5.4.0/configure \
	--enable-checking=release \
	--enable-languages=c,c++ \
	--disable-multilib

make && make install
引用处理 refer 1
cd /usr/bin/
mv gcc gcc_back
mv g++ g++_back
ln -s /usr/local/bin/gcc gcc
ln -s /usr/local/bin/g++ g++
编译时遇到几个问题
/lib64/libstdc++.so.6: version GLIBCXX_3.4.20' not found
gcc 编译,libgcc动态库有改动,恢复原状即可
configure: error: C++ compiler missing or inoperational

make[2]: \*** [configure-stage1-libcpp] Error 1
make[2]: Leaving directory `/home/clay/programming/C++/gcc-4.8.1'
make[1]: \*** [stage1-bubble] Error 2
make[1]: Leaving directory `/home/clay/programming/C++/gcc-4.8.1'
make: \*** [all] Error 2
编译cmake#
./configure --prefix=/path/to/app

make
make install
这里遇到一个小问题 编译过程中遇到 [libstdc++.so.6: version GLIBCXX_3.4.20 not found
因为这里使用了自己编译的gcc版本,需要指定下动态库的路径 refer 2
LD_LIBRARY_PATH=/usr/local/lib64 ./configure --prefix=/usr/local/cmake
编译jaeger-client-cpp#
这里根据官方提供的步骤操作即可
cd jaeger-client-cpp-0.9.0/
mkdir build
cd build
# 这里建议使用下强国特色上网,编译过程中会使用Hunter自动下载所需的依赖项
ALL_PROXY=http://x.0.0.x:10811 /usr/local/cmake/bin/cmake ..
make
注:依赖项挺大的,下载时间可能很长,会hang主,只需等待结束即可
编译完成后
libjaegertracing.so.0.9.0则是我们需要的
编译nginx#
./configure \
	--user=web_www \
	--group=web_www \
	--with-pcre \
	--with-compat \
	--with-http_ssl_module  \
	--with-http_gzip_static_module \
	--prefix=/root/nginx  \
	--with-http_stub_status_module
--with-compat 必须加上,表面允许使用动态库,否则编译完在启动时会报下面的错误
nginx: [emerg] module "/root/nginx/conf/ngx_http_opentracing_module.so" is not binary compatible in /root/nginx/conf/nginx.conf:1
遇到的问题,cc nou found,这里只需将 gcc 软连接一份为 cc 即可
配置nginx#
准备jaeger-client的配置#
jaeger.json
{
  "service_name": "nginx", // 服务名
  "sampler": {
    "type": "const",
    "param": 1
  },
  "reporter": {
    "localAgentHostPort": "jaeger:6831" // jaeger agent的地址
  },
  "headers": { // jaeger的默认的jaeger Baggage头设置
    "jaegerDebugHeader": "jaeger-debug-id",
    "jaegerBaggageHeader": "jaeger-baggage",
    "traceBaggageHeaderPrefix": "uberctx-"
  },
  "baggage_restrictions": {
    "denyBaggageOnInitializationFailure": false,
    "hostPort": ""
  }
}
在nginx中开启opentracing#
# 加载 OpenTracing 动态模块。
load_module conf/ngx_http_opentracing_module.so;
worker_processes  1;
user root root;

events {
    worker_connections  1024;
}
http {
    log_format opentracing '{"timestamp":"$time_iso8601",'
                       '"source":"$server_addr",'
                       '"hostname":"$hostname",'
                       '"ip":"$http_x_forwarded_for",'
                       '"traceID":"$opentracing_context_uber_trace_id",'
                       '"client":"$remote_addr",'
                       '"request_method":"$request_method",'
                       '"scheme":"$scheme",'
                       '"domain":"$server_name",'
                       '"referer":"$http_referer",'
                       '"request":"$request_uri",'
                       '"args":"$args",'
                       '"size":$body_bytes_sent,'
                       '"status": $status,'
                       '"responsetime":$request_time,'
                       '"upstreamtime":"$upstream_response_time",'
                       '"upstreamaddr":"$upstream_addr",'
                       '"http_user_agent":"$http_user_agent",'
                       '"https":"$https"'
                       '}';
	# 加载 tracer,这里使用的jaeger,需要传递配置文件
    opentracing_load_tracer conf/libjaegertracing.so conf/jaeger.json;
    # 启用 tracing
    opentracing on;
    # 设置tag,可选参数
    opentracing_tag http_user_agent $http_user_agent;
    include       mime.types;
    default_type  application/octet-stream;
    sendfile        on;
    keepalive_timeout  65;
    server {
        listen       80;
        server_name  localhost;
        location / {
            opentracing_operation_name $uri;
	    opentracing_propagate_context;
            root   html;
            index  index.html index.htm;
        }
	access_log logs/access.log opentracing;
        error_page   500 502 503 504  /50x.html;
        location = /50x.html {
            root   html;
        }
    }
}
注:这里使用的
opentracing-nginx的动态库为 ot16 ,linux-amd64-nginx-1.22.0-ot16-ngx_http_module.so.tgz,另外一个版本不兼容,-t检查语法时会提示
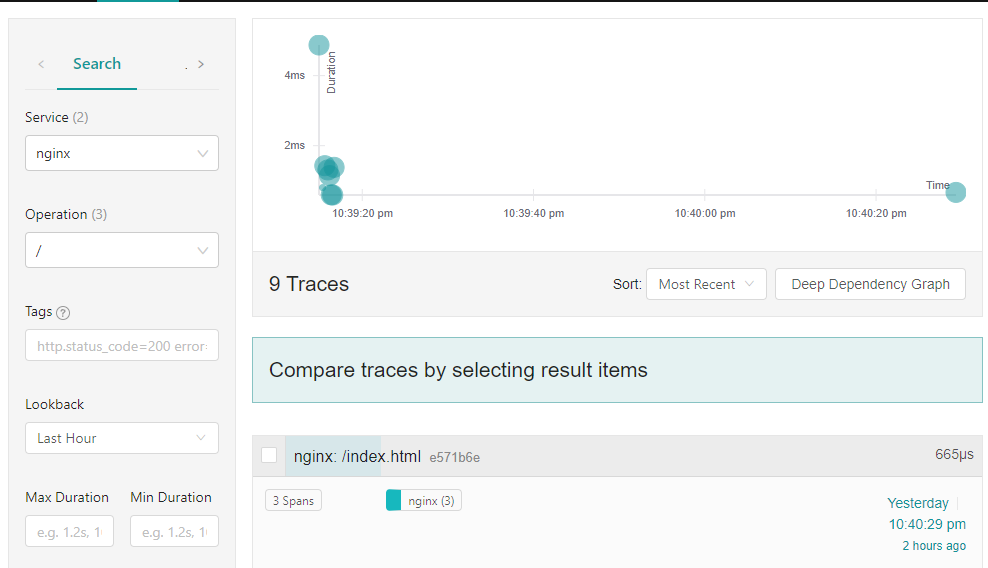
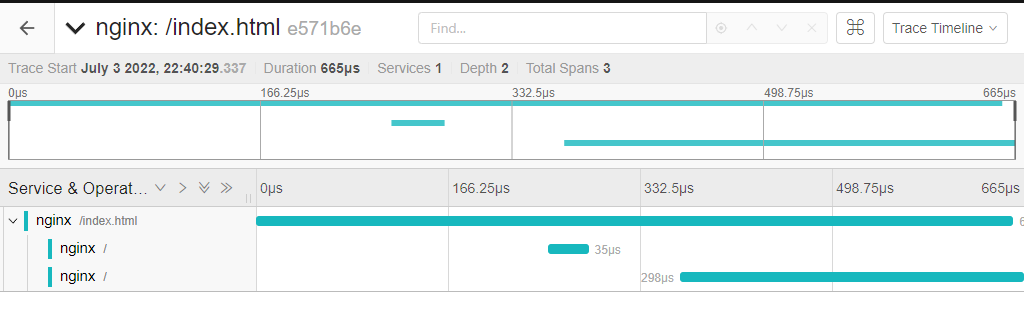
此时我们可以在jaeger上查看,可以看到 NGINX 的 span(因为这里只配置了NGINX,没有配置更多的后端)。
Reference
Recommend
About Joyk
Aggregate valuable and interesting links.
Joyk means Joy of geeK