

Surviving Configuration Changes in Android [FREE]
source link: https://www.raywenderlich.com/33044382-surviving-configuration-changes-in-android
Go to the source link to view the article. You can view the picture content, updated content and better typesetting reading experience. If the link is broken, please click the button below to view the snapshot at that time.
Surviving Configuration Changes in Android
Learn how to survive configuration changes by handling your activities or fragment recreation the right way using either ViewModels, persistent storage, or doing it manually!
5/5
Version

An Android device consistently changes configurations. This could be a screen orientation change, keyboard availability changes or a user switching to multi-window mode. During a configuration change, Android recreates existing activities to reload resources for the new configuration. To properly handle restarting an activity, it is important to restore the activity to its previous state.
In this tutorial, you’ll build BookHub App. This app allows users to search for books using the author’s name or the book title. Along the way, you’ll learn about:
- Saving and restoring activity state using instance state bundles.
- Using ViewModel to store UI state.
- Saving data in local persistent storage.
- Manually handling configuration changes.
Getting Started
Download the starter project by clicking the Download Materials button at the top or bottom of the tutorial.
Open Android Studio and import the starter project.
Build and run the project. You’ll see this screen:

The screen has an input field for entering an author’s name or a book title to search for books. It also has a search button with a magnifying glass icon and a label to show the number of books returned from a remote API, now showing no results.
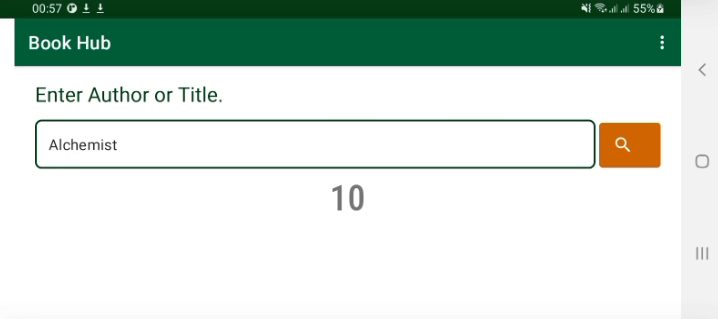
Enter an author’s name and tap the search button. The app updates the result label with the number of books returned from the API:

Rotate the app, though, and you’ll see a different number:

Whoops! The books count got lost. When you rotated the screen, the app lost the count data because it recreated the activity to adapt to the new orientation. Your mission in this tutorial is to liven up the app while persisting data across configuration changes.
Check out the project structure:

The project has the following packages:
- data: This contains logic for accessing data sources such as the app database or remote APIs.
-
ui: The ui package has
SearchFragmentthat holds an input field for entering the author’s name or book title andSearchHistoryFragmentfor showing the search terms the user enters. It also hasBookViewModelthat holds UI-related data.Fragmentclasses are responsible for displaying data to the user. - repository: Its classes receive user actions like tapping a button. Then, they forward user requests to the data layer. The repository classes also receive data from the data layer — for instance, the list of books received from the remote API. Then, they forward the data received to the UI layer.
You’ll work across various classes in these packages as you build BookHub App.
Grab your coffee! It’s gonna be amazing.
Saving UI State in Instance State Bundles
When the system recreates the UI, you can save the UI state in an instance state bundle using onSaveInstanceState() lifecycle callback.
Instance state is a collection of key-value pairs stored in a Bundle object. It’s the data the app uses to restore UI controllers like an activity or a fragment to their previous state.
You’ll implement onSaveInstanceState() callback to save the value of bookscount when a user rotates the screen.
Open SearchFragment.kt and replace // TODO 1 with the following:
override fun onSaveInstanceState(outState: Bundle) {
 super.onSaveInstanceState(outState)
 outState.putInt(bookCountKey, booksCount)
}
Here, you’re storing the value of booksCount in a Bundle object using bookCountKey key. The app calls onSaveInstanceState() immediately before calling onPause() to save the UI state.
To restore the saved state, you’ll fetch the stored value in the instance state bundle.
Replace // TODO 2 with this:
private fun restoreCount(savedInstanceState: Bundle?) {
 // 1
 booksCount = savedInstanceState?.getInt(bookCountKey) ?: 0
 // 2
 searchBinding.bookCountTextView.text = booksCount.toString()
}
Here’s what the code above does:
- Retrieves the value you stored in the instance state bundle using
bookCountKeykey and assigns it tobooksCount. - Restores the count pulled from saved state back to
bookCountTextView.
To call the method that retrieves the value stored in the state bundles, add this just above setTextChangedListener() in onCreateView():
restoreCount(savedInstanceState)
Build and run. Enter your favorite book title and tap the search button. You’ll see the following screen:

When you rotate the screen, the app retains the book count:
Congratulations! :]
onSaveInstanceState() serializes data to the disk. Serialization consumes a lot of memory when serializing large data sets or complex data structures such as bitmaps. This process happens in the main thread. Long-running serialization can cause UI jank during a configuration change. Therefore, you should store only primitives like Integer and small, simple objects like String in instance state bundles.
TransactionTooLargeException. This is another good reason to not process big data on a bundle.
BookHub App fetches a list of books from a remote API. How do you save the list of books to prevent the app from making another API call to fetch the books in case of a configuration change? In the following section, you’ll learn how to store data in a ViewModel to address this.
Using ViewModel to Store UI State
The Android team introduced ViewModel and LiveData classes to help save state during configuration changes.
A ViewModel stores and manages UI-related data in a lifecycle-conscious manner. Simply put, it allows data to survive configuration changes. A ViewModel remains in the memory until, the Lifecycle it is scoped to, goes away completely. For an activity, this means when it finishes; for a fragment when it’s when it’s detached.
The diagram below shows the lifetime of a ViewModel next to the lifecycle of the activity it’s associated with:

LiveData is an observable data-holder class. It’s lifecycle aware. It only notifies UI components that are in an active state when data changes.
Open BookViewModel.kt.
BookViewModel class extends ViewModel. It has three methods:
-
getBooks()to fetch books from a remote API. -
saveSearchTerm()that saves search terms entered by the user in the app database. -
getUserSearches()to retrieve search terms saved in the app database.
To add a LiveData object that saves the list of books fetched from the remote API, replace // TODO 3 with the following:
private val items = MutableLiveData<List<Item>?>()
val bookItems get() = items
Here, you’ve added a LiveData object that will store a list of books received from a remote API.
To store books returned from the API in items, your LiveData object, replace the getBooks() method with the following:
fun getBooks(searchTerm: String) {
 viewModelScope.launch(Dispatchers.IO) {
   // 1
   val booksInfo = bookRepository.getBookInfo(searchTerm)
   val books = booksInfo?.items
   // 2
   items.postValue(books)
 }
}
Here’s what’s happening in the code above:
- Calls
getBookInfo()to fetch books from a remote API. The method returns a list of books. - Stores the list of books received from the API in
items.
To show the list of books in the UI, you’ll add an observer for bookItems.
Observing LiveData Changes
Open SearchFragment.kt and replace onSearchBtnClicked() with the following:
private fun onSearchBtnClicked() {
 with(searchBinding) {
   searchBtn.setOnClickListener {
     hideKeyboard(searchBinding.root)
     progressIndicator.visibility = View.VISIBLE
     bookViewModel.getBooks(searchTerm)
     // TODO 4
   }
 }
}
In the code above, when the user taps the search button, the app calls getBooks() to fetch the list of books from a remote API.
To register an observer on bookItems, replace // TODO 5 with the following:
private fun observeBooks() {
 bookViewModel.bookItems.observe(viewLifecycleOwner) { books ->
   with(searchBinding) {
     progressIndicator.visibility = View.GONE
     if (books != null) {
       booksAdapter = BooksAdapter(books = books)
       booksRecyclerView.adapter = booksAdapter
     }
   }
 }
}
observe() takes a lifecycle owner object. LifeCycleOwner is a class that has an Android lifecycle, like an activity or a fragment. Here, you passed viewLifeCycleOwner that represents the Fragment‘s View lifecycle.
To call the method you’ve added, replace // TODO 9 with the following:
observeBooks()
onCreateView() is the right place to observe LiveData objects because:
- It ensures the app doesn’t make redundant calls from
onResume()callback of an activity or a fragment. - It ensures the activity displays data as soon as it enters an active state.
Build and run. Enter a book title and tap the search button. The app will show a list of books related to the search terms:
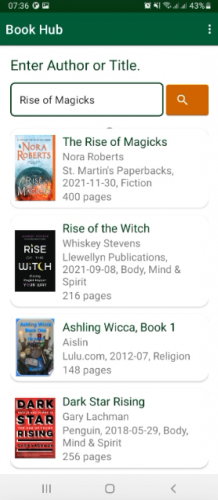
When you rotate the app, it preserves the list of books:

Well done! You’ve learned how to save state in instance state bundles and ViewModel class. Your app UI state can survive configuration changes.
However, the app will lose all its data when the user completely leaves the app. You should use instance state or ViewModel class to save transient data. To persist data long after the user completely leaves the app, the Android framework provides persistent storage mechanisms such as databases or shared preferences. In the following sections, you’ll learn how to save search terms entered by the user in the app database.
Understanding Room Library
In Android, you can store structured data in an SQLite database using the Room library. There are three major components when working with Room:
- Data Entities: Entity classes represent tables in the app database.
- Data Access Objects: DAOs provide methods to query, insert, delete or update data in the app database.
- Database class: This class holds the app database. It also defines database configurations.
Next, you’ll learn how you use them. Let’s start with entity classes.
Looking Into Data Entities
Open UserSearch.kt.
UserSearch is an entity class annotated with @Entity. Each attribute represents a column in the database table. The UserSearch entity has two columns: id and searchTerm. Optionally, you can provide the table name.
You’ve learned about the structure of an entity class. Next, you’ll learn about Data Access Objects (DAOs).
Understanding Data Access Objects
Open UserSearchDao.kt.
UserSearchDao is a DAO interface annotated with @Dao. You’ll add a method to save search terms to user_search table.
Replace // TODO 6 with the following:
@Insert(onConflict = OnConflictStrategy.REPLACE)
suspend fun saveSearchTerm(userSearch: UserSearch): Long
Add any missing imports by pressing Option-Enter on Mac or Alt-Enter on PC.
If you want the IDE to take care of missing imports the next time you copy/paste some code, you can enable auto-imports as follows:
- For Windows or Linux, go to File and select Settings. Then, go to Editor ▸ General ▸ Auto Import ▸ Kotlin. Change insert imports on paste to Always. Mark Add unambiguous imports on the fly option as checked .
- For Mac, do the same thing in Android Studio ▸ Preferences ▸ Editor ▸ General ▸ Auto Import ▸ Kotlin.
saveSearchTerm() will create a row in user_search table. The method takes one parameter of type UserSearch. Parameters passed into @Insert method must either be an instance of an entity class annotated with @Entity or a list of entity class instances.
Now, you understand the working of DAO interfaces. Next, you’ll look at the database class.
Exploring Database Class
Open BookHubDatabase.kt.
BookHubDatabase is an abstract class that extends RoomDatabase. It is a database class. The class must be annotated with a @Database that includes an array that lists data entities associated with the database.
For each DAO class, you must define an abstract method that returns an instance of the DAO. See the following method in BookHubDatabase class:
abstract fun userSearchDao(): UserSearchDao
Now that you understand the different components of the Room library, you’ll implement methods that will call saveSearchTerm() to save search terms in the app database.
Saving a Search Term
Open BookRepositoryImpl.kt. Replace // TODO 7 with the following:
val userSearch = UserSearch(searchTerm = searchTerm)
dao.saveSearchTerm(userSearch)
The code above creates an instance of UserSearch. Then, it calls the DAO method to save the UserSearch instance.
Navigate to BookViewModel.kt and replace // TODO 8 with the following:
bookRepository.saveSearchTerm(searchTerm)
Here, you’re calling the saveSearchTerm() you implemented in BookRepository.
Open SearchFragment.kt and replace // TODO 4 with the following:
bookViewModel.saveSearchTerm(searchTerm)
From the code above, when the user taps the search button, the app calls the saveSearchTerm() you implemented in BookViewModel to save the search terms in the app database.
Build and run. Enter an author’s name and tap search. The app displays the lists of books:

In Android Studio, start app inspector. Select the running process in the drop-down. Expand book_hub_database and select user_search table. You’ll see the app saved the search terms you entered:

You’ve learned how to save search terms entered by a user. Next, you’ll get the search terms from the database and show a user their search history.
Reading Data From the App Database
When you tap the Menu button — the three dots at the top of the screen — and select Search History, you’ll see a blank screen like this:

You’ll populate this screen with the search terms you saved in the previous step.
Open UserSearchDao.kt. Replace // TODO 10 with the following:
@Query("SELECT * FROM user_searches")
suspend fun getUserSearches(): List<UserSearch>
If you see an import error, add the following import statement in the imports at the top of the file:
import androidx.room.Query
The code above gets all entries saved in the user_searches table and returns a list of UserSearch entities.
Next, you’ll add a method in BookRepositoryImpl class that will call getUserSearches() DAO method. Open BookRepositoryImpl.kt and replace return emptyList() //TODO 11 in getUserSearches() with the following:
return dao.getUserSearches()
In BookViewModel.kt, replace // TODO 12 with the following:
val searches = bookRepository.getUserSearches()
userSearches.postValue(searches)
The code above calls getUserSearches() repository method that returns a list of UserSearch entities. It then stores the list in userSearches LiveData object.
In SearchHistoryFragment.kt, replace // TODO 13 with the following:
private fun getSearchHistory() {
 bookViewModel.getUserSearches()
}
In getSearchHistory() method, you’re calling getUserSearches() method to get search terms saved in the app database.
To call the method you have implemented, add getSearchHistory() above observeSearchHistory() in the onCreateView() method:
getSearchHistory()
Build and run. Tap the Menu button and select Search History. You’ll see saved search terms:

When you tap an item in the search history, the app sends a request to the remote API to fetch the books. Then it shows the list of books returned. To achieve this, replace // TODO 14 with the following:
private fun observeBooks() {
 // 1
 bookViewModel.bookItems.observe(viewLifecycleOwner) { books ->
  with(historyBinding) {
   progressIndicatorHistory.visibility = View.GONE
   // 2
   goToMainScreen()
  }
 }
}
The code above:
- Listens to changes in the
bookItemsLiveDataobject. - Navigates to main screen to display the list of books fetched from the remote API.
To call the method you’ve implemented, replace // TODO 15 with the following:
observeBooks()
Build and run. Navigate to the Search History screen. Tap an item in the search history list. The app will show a list of books fetched from the remote API:

You’ve learned how to save state across configuration changes and save data in persistent storage.
Sometimes, due to performance constraints, you may be unable to use any of the preferred mechanisms such as ViewModel or onSaveInstanceState(). If your app doesn’t require updating resources — taking advantage of automatic alternative resources handling — during a specific configuration change, you can prevent the app from restarting an activity when that change occurs.
Managing Configuration Changes Yourself
The <activity> element in AndroidManifest.xml has an optional attribute named android:configChanges. This attribute allows developers to lists configuration changes that the activity will handle itself in code.
The most commonly used values are:
-
orientation: To prevent an activity from restarting when the screen orientation changes. -
screenSize: It also prevents activity restarts when orientation changes, but only for Android 3.2 and above. -
screenLayout: This is necessary to detect changes that can be triggered by devices such as foldable phones and convertible Chromebooks. -
keyboardHidden: It prevents activity from restarting when the keyboard availability changes.
You’ll declare MainActivity to handle configuration when screen orientation changes.
Open AndroidManifest.xml. In the <activity> element, add the following attribute:
android:configChanges="orientation|screenSize"
The <activity> element will look like the code below:
<activity
 android:name=".ui.MainActivity"
 android:configChanges="orientation|screenSize"
 android:exported="true"
 android:theme="@style/SplashTheme">
 <intent-filter>
   <action android:name="android.intent.action.MAIN" />
   <category android:name="android.intent.category.LAUNCHER" />
 </intent-filter>
</activity>
When you declare the activity to handle configuration changes, the app does not restart the activity. Instead, it calls onConfigurationChanged() callback to determine resources required for the new configuration. For instance, the Search button’s color changes to pink when in landscape orientation and to orange when in portrait orientation. You’ll override onConfigurationChanged() to implement these changes.
In SearchFragment.kt, replace // TODO 16 with the following:
override fun onConfigurationChanged(newConfig: Configuration) {
  super.onConfigurationChanged(newConfig)
  context?.let {
    val colorPink = ContextCompat.getColor(it, R.color.pink)
    val colorOrange = ContextCompat.getColor(it, R.color.colorAccent)
    if (newConfig.orientation == Configuration.ORIENTATION_LANDSCAPE) {
      searchBinding.searchBtn.setBackgroundColor(colorPink)
    } else if (newConfig.orientation == Configuration.ORIENTATION_PORTRAIT) {
      searchBinding.searchBtn.setBackgroundColor(colorOrange)
    }
  }
}
You may see errors due to missing imports. Add the following import statement in the imports at the top of the file:
import android.content.res.Configuration
In onConfigurationChanged() method above, you’re checking the user’s phone orientation and applying the correct color to the search button.
Build and run. When in portrait orientation, the button color is orange:

Rotate the phone to a landscape orientation. The search button’s color changes to pink:

Congratulations! You’ve created the BookHub App. You’ve also learned different ways of managing configuration changes for your Android apps.
Where to Go From Here?
Download the completed project files by clicking the Download Materials button at the top or bottom of the tutorial.
To learn more about saving state, check out Jetpack Saved State for ViewModel tutorial. To learn more about saving data on Android, check out the book Saving Data on Android. The book covers saving data both locally — in your app — and remotely. From the book, you’ll learn about modern synchronization mechanisms to keep your app always up to date as well. To learn more about architecting your app check the guide to app architecture.
We hope you enjoyed this tutorial. If you have any questions or comments, please join the forum discussion below!
raywenderlich.com Weekly
The raywenderlich.com newsletter is the easiest way to stay up-to-date on everything you need to know as a mobile developer.
Recommend
About Joyk
Aggregate valuable and interesting links.
Joyk means Joy of geeK