

Git Commands ( to ease your development 🤗 )
source link: https://dev.to/shivam164/git-commands-to-ease-your-development--5a2h
Go to the source link to view the article. You can view the picture content, updated content and better typesetting reading experience. If the link is broken, please click the button below to view the snapshot at that time.

Git Commands ( to ease your development 🤗 )
Git is a prevalent version control system ( VCS ) used by most programmers. In this blog, I am going to share some tips with basic commands to make using git easier.
To start with git, we need to understand how things work locally on the system while using git.
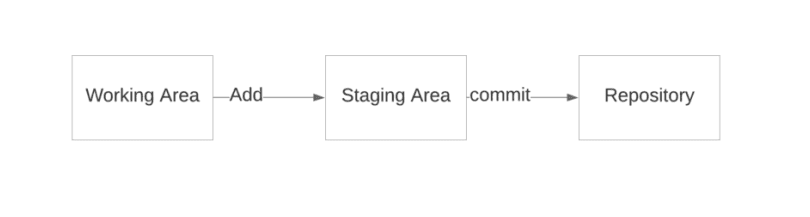
This diagram will help to understand, what actually happens while using git locally. Starting with the working area, the working area is where the files that are not handled by git, it is the place where all the untracked files are kept. Staging area has files that are going to be part of the next commit. The repository contains all the project commits. Using the repository we can have files as it was at some point in time.
Git Commands:
1. Initializing git in your directory
The very first step that you need to do is to initialize the repository.
git init
2. git config
This command helps you to set the username and user email address to be used with your commits respectively.
git config --global user.name "Shivam164"
git config --global user.email "[email protected]"
3. git status
This command is used to see the state of the working area and staging area.
git status
3. git add
This command is used to add files to the staging area.
To take all the files that are untracked in the working area to the staging area, we use:
git add .
Here ‘.’ specifies to stage all the untracked files.
To specify files that should be tracked, we can use their file name:
git add abc.txt
In order to stage abc.txt only.
4. git commit
The git commit command captures a snapshot of the project’s staged changes. Generally, we keep a short message with each commit in order to understand that commit in the future as well as for other people to understand.
⇒ It is good to keep commits in the present tense and short ( about 50 characters ).
git commit -m "first commit"
Here ‘-m’ is for the message.
To stage all your changes and commit them in single command we can use:
git commit -am "committing all changes"
There can be cases when you cannot explain your work in few words, even in such a scenario we should not just write a very big message in a single line, because that will be tough to read such messages on GitHub. For such a scenario after staging some file, we don't just directly commit like above. We write:
git commit
When we write git commit without -m. You will see a console text editor known as Vim.
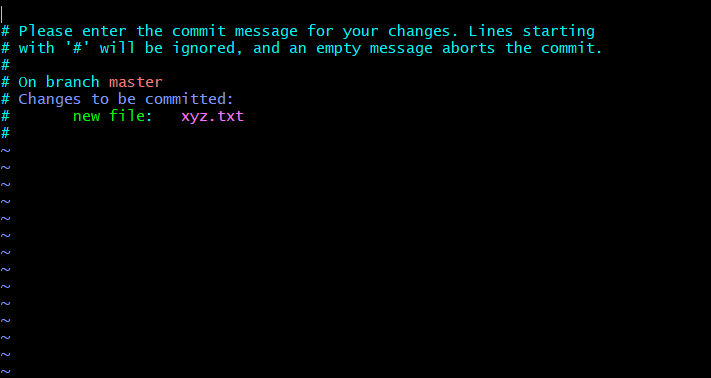
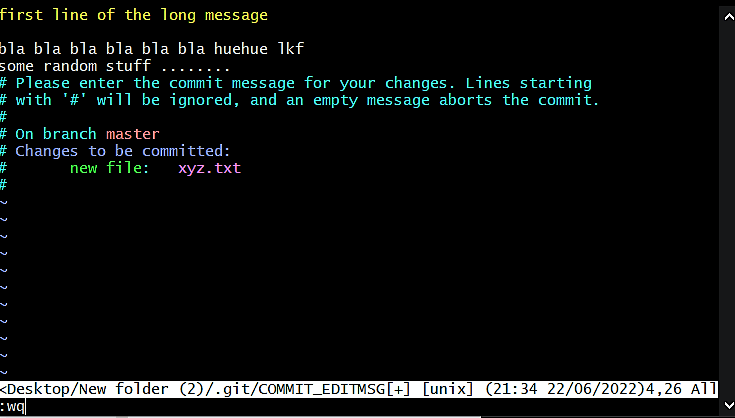
Now you can start writing your commit message here, you just need to press I (INSERT). And even within the long message, you should keep a short line at the start to before the long message, then after a line space, you can write your long message. When you are done writing your message, you can close this vim by first pressing ‘ESC’ and then ‘:wq’ to save and quit.
One of other useful git commit command:
git commit --amend -m "commit message'
This command will merge this commit with the last commit and it will have a new commit message.
5. git log
The git log command displays all of the commits in a repository’s history.
There are many ways to see commit history :
-
Most basic one: Shows all the commits from end to start, with all the info related to commits.
It shows commits based on the HEAD.
-
To see some number of the last commits:
To see the last 5 commits.
-
To see commit from some commit to some other commit: We use the hash value of those commits.
-
To see the stat of the commits:
-
One of the handiest git log commands:
⇒ all: to see all the commits
⇒ oneline: to keep all the data of commits within one line.
⇒ graph: to keep commits in graphical form, very useful when working with branches.
⇒ decorate: to make it visually better.
6. git show
The git show command will help to see details of a particular commit.
git show 1c16945

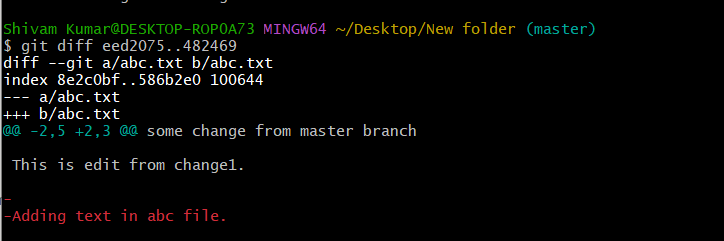
7. git diff
The git diff command is to see the difference between different commits.
git diff 1c16945..9dcff6
To see the difference between commit with hash value 1c16945 and 9dcff6.
We can also use it directly.
git diff
This will display the difference in files of the working area and directory.
We can use - - staged with git diff
git diff --staged
This will display the difference in files of the working area and staging area.
8. git stash
The git stash temporarily shelves (or stashes) changes you’ve made to your working copy so you can work on something else, and then come back and re-apply them later on.
Only the files that are in the staging area can be stashed.
git stash
After using git stash, if we use the command git status we will not see any file in the staging area.
We can also give a message while using git stash so that if we need it later we will be able to recall what we had done with the stashed files.
git stash save "changed title"

To view all the stashed changes:
git stash list
To view some particular stash, let’s say with index 1
git stash show -p stash@{1}
To retrieves stash changes:
- To retrieve last stashed change.
git stash pop
- To retrieve stash change with particular index
git stash pop stash@{1}
To delete stashed changes:
- To delete all
git stash clear
- To deleted some specific ones
git stash drop stash@{0}
9. git branch
The git branch command is used to work with branches in git.
Creating new branch:
-
From the branch where HEAD is currently pointing to:
-
From a branch where HEAD is not currently pointing to:
-
Creating a new branch and switching to it:
Switching to different branch:
git checkout toSwitchBranchName
Comparing different branches:
git diff master..new_feature
Renaming branches:
To change the name of the branch, HEAD is currently pointing to:
git branch -m newBranchName
To change the name of the branch irrespective of HEAD:
git branch -m oldName newName
Deleting branches
git branch -d branch_to_delete
-
If we are currently on the branch that we are trying to delete, we will get error.
So we have to make sure that we are not on branch we want to delete.
-
If the branch we want to delete is unmerged and has commits than this command won’t work. Git does this to stop accidental deletion of branches.
So we need to use ‘-D’ instead of ‘-d’
10. git merge
The git merge command lets you take the independent lines of development created by git branch and integrate them into a single branch.
git merge feature/Nav
The above written command will merge feature/Nav branch with current checked out branch.
Some of the good practices while merging branches, you can checkout here
Currently it has commands only related to handling files locally. I will be updating it soon. 👊
Recommend
About Joyk
Aggregate valuable and interesting links.
Joyk means Joy of geeK