

Angular v14 被低估的一个 DI 特性 inject
source link: https://www.fly63.com/article/detial/11790
Go to the source link to view the article. You can view the picture content, updated content and better typesetting reading experience. If the link is broken, please click the button below to view the snapshot at that time.
大家都知道 angular 在 2022年6月2日正式发布了 v14 版本,具体更新说明查看官方博客: https:// blog.angular.io/angular -v14-is-now-available-391a6db736af
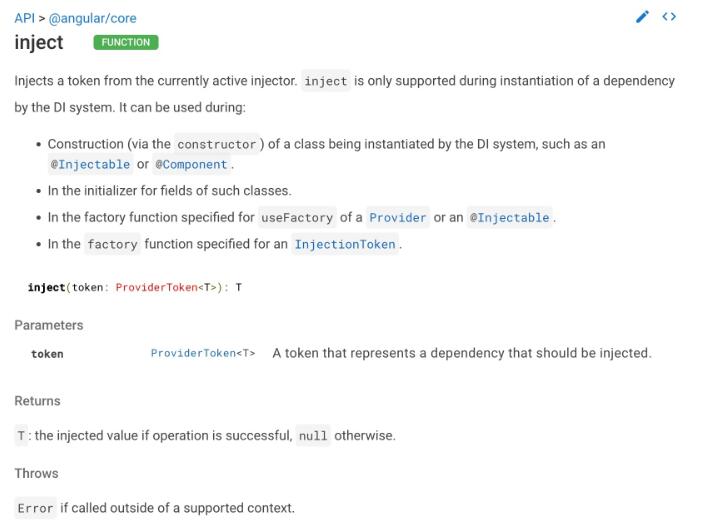
那么我认为 Angular 本次在 v14 版本中最被低估的一个特性就是: inject 函数可以在构造函数和属性初始化中使用,在过去的版本中只能在 factory 中使用,那么这个被低估的特性在官网v14发布博客中居然都没有被提及到,令人匪夷所思。
Angular DI api 介绍
首先回顾一下 Angular DI 的基础知识,在 Angular 应用中的组件/指令/管道中如果需要使用某个服务,必须通过构造函数参数注入才可使用(不管是自定义的服务还是官方提供的服务):
@Injectable({providedIn: 'root'})
export class Car {
  constructor() {
  }
}

@Component({ ... })
export class SomeComponent {
  constructor(private car: Car) {
  }
}
如果这个服务的 Token 不是类而是 InjectionToken ,需要通过 @Inject() 参数装饰器使用:
@Component({ ... })
export class SomeComponent {
  constructor(@Inject(SomeToken) private someService: SomeService) {
  }
}
有时候我们注入服务的时候不一定在构造函数中确定,可能还需要根据条件动态注入某些服务,那么 Angular 也提供了一个注入器 Injector ,可以先注入这个注入器,然后再通过注入器注入其他服务:
@Component({ ... })
export class SomeComponent {
  constructor(private injector: Injector) {
     const car = injector.get(Car);
     const engine = injector.get(Engine);
  }
}
以上基本是 Angular DI 过去提供的能力,大部分场景都可以满足,但是作为类库开发者,有时候需要封装一些更上层的工具类或者函数,就变得非常吃力,那么 inject 函数在 14 版本中可以在构造函数和属性初始化时使用简直就是把 DI 从水果刀变成了菜刀,官方 API : https://angular.io/api/core/inject
简单使用如下:
@Component({ ... })
export class SomeComponent {
  // OK: field initializer
  engine = inject(Engine);
  constructor() {
     // OK: constructor body
     const car = inject(Car);
  }
}

providers: [
  {provide: Car, useFactory: () => {
    // OK: a class factory
    const engine = inject(Engine);
    return new Car(engine);
  }}
]
需要注意的是必须在上述三种上下文中使用,如果在 ngOnInit() 或者其他场景使用 inject 会报错。
@Component({ ... })
export class SomeComponent {
  ngOnInit() {
    // ERROR: too late, the component instance was already created
    const engine = inject(Engine);
  }
}
这是因为 Angular 的注入器包含 ModuleInjector 和 ElementInjector ,对于 ElementInjector 来说是有层级的且和视图树的关系一一对应,有些服务只能在组件构造期注入有效,脱离构造时期可能就获取不到或者是错误的值,比如: ElementRef 、 ActivatedRoute 、 ViewContainerRef 、 TemplateRef 等,那么 Angular 为了避免应用出错直接就报错了。如果对于上述说明不太了解的推荐阅读我之前写的Angular DI 文档 。
下面我通过常用的几个示例来说明一下这个新特性的强大之处。
订阅销毁流 destroy$
Angular 内置了 RxJS,一切都是 Observable ,组件订阅了某个流,在组件销毁的时候需要取消订阅,虽然 Angular 提供了 async 管道自动订阅和取消,但是难免组件类中需要订阅,过去的做法是定一个 destroy$: Subject 变量, 在组件中通过 takeUntil(this.$destroy) 使用,最终再 ngDestroy 的时候调用 $destroy.next() 取消订阅,这种繁琐的冗余代码导致开发效率低下还容易出错,在过去的版本中为了解决这个问题有很多种做法,有的使用 Mixin 类继承实现,我们就是这样使用的:
export interface ThyUnsubscribe extends OnDestroy {
    ngUnsubscribe$: Subject<any>;
}

export function mixinUnsubscribe<T extends Constructor<{}>>(base: T): Constructor<ThyUnsubscribe> & T {
    return class Mixin extends base {
        ngUnsubscribe$ = new Subject();

        constructor(...args: any[]) {
            super(...args);
        }

        ngOnDestroy() {
            this.ngUnsubscribe$.next();
            this.ngUnsubscribe$.complete();
        }
    };
}

@Component({...})
export class SomeComponent extends mixinUnsubscribe(MixinBase) implements OnInit {
  ngOnInit() {
    this.some$
      .pipe(takeUntil(this.ngUnsubscribe$))
      .subscribe(() => {})
  }
}
这种方式的缺点就是多个类继承还需要组合使用 mixinInitialized(mixinUnsubscribe(MixinBase)) 虽然满足了我们的需求,但是不优雅,使用了继承实现了组合的功能。
有了 inject 的能力,我们就可以通过一个函数实现销毁,代码如下:
export function untilDestroyed() {
  const destroy$ = new Subject<void>();

  const viewRef = inject(ChangeDetectorRef) as ViewRef;

  viewRef.onDestroy(() => {
    destroy$.next();
    destroy$.complete()
  });

  return takeUntil(destroy$.asObservable())
}

@Component({...})
export class SomeComponent implements OnInit {
  destroy$ = untilDestroyed();

  ngOnInit() {
    this.some$
      .pipe(destroy$)
      .subscribe(() => {})
  }
}
上述代码通过 inject 注入了 ChangeDetectorRef ,实现 onDestroy 钩子时调用 destroy$.next
通过继承传递服务参数
有时候我们需要封装一个基类提供一些基础的功能,基类需要使用到一些 Angular 的服务,比如 HttpClient 等等,那么过去我们只能让子类也注入这些服务然后通过构造函数传递到父类,或者只注入一个 Injector 传参给父类:
export class ParentService {
  constructor(private http: HttpClient) {}
}

export class ChildService {
  constructor(private http: HttpClient) {
    super(http)
  }
}
这样做的缺点就是子类必须要把父类需要的所有服务都通过注入传参,麻烦不说,一旦父类的逻辑变更了子类也需要跟着修改,那么使用 inject 函数基本完美解决这个问题:
export class ParentService {
  private http = inject(HttpClient);
  constructor() {}
}

export class ChildService {
  constructor() {
  }
}
子类再也不用关心父类使用了哪些服务了。
除了纯业务逻辑的服务外,有时候我们需要封装一个操作 UI 的服务,比如我们组件库中就有一个 UpdateHostClassService ,这个服务有一个 updateClass(classes: string[]) ,传递一个新的 class 数组设置到 HostElement 节点上,同时会缓存上次的样式类,如果此次更新没有传递会自动移除,因为是更新 Host Element,所以需要传 Host html 节点,那么过去只能通过在组件构造函数中注入 ElementRef 传递到服务中,代码如下:
@Component({
  providers: [UpdateHostClassService]
})
export class SomeComponent implements OnInit {
  constructor(private updateHostClassService: UpdateHostClassService, elementRef: ElementRef) {
    updateHostClassService.initializeElement(elementRef.nativeElement)
  }

  ngOnInit() {
    this.updateHostClassService.updateClass([`thy-button-${this.type}`, `thy-button-${this.size}`])
  }
}
那么在 Angular v14 中我们就可以直接在 UpdateHostClassService 内部通过 inject 函数注入 ElementRef 实现更简化的 API
export class UpdateHostClassService {
  elementRef = inject(ElementRef);
}

@Component({
  providers: [UpdateHostClassService]
})
export class SomeComponent implements OnInit {
  constructor(private updateHostClassService: UpdateHostClassService) {
  }

  ngOnInit() {
    this.updateHostClassService.updateClass([`thy-button-${this.type}`, `thy-button-${this.size}`])
  }
}
除了 ElementRef 外,我们也可以在类似的 UI 服务中注入 ViewContainerRef 、 ChangeDetectorRef 、 父组件 等组件/指令中和视图相关的服务,做一些更高级的封装。
在过去 Angular 内置的一些服务必须通过构造函数注入才可以使用,意味着使用的地方也必须采用服务类的形式组织业务逻辑和 UI 服务,现在 inject 可以脱离了构造函数参数注入器使用,就可以发挥更多的想象力,对于 react 和 vue 的使用者来说,大家可能习惯使用函数封装,那么 inject 让这些都变得可能,注意在文章开头的第一个使用场景中的 untilDestroyed 就是一个普通函数。
还比如上述的 UpdateHostClass 服务,我们完全可以使用函数式的方式编写:
function useHostService() {
    const elementRef = inject(ElementRef);
    return {
        updateClass(classes: string[]) {
            classes.forEach((className) => {
                elementRef.nativeElement.classList.add(className);
            });
        }
    }
}

@Component({...})
export class SomeComponent implements OnInit {
  updateHost = useHostService();

  constructor() {
  }

  ngOnInit() {
    this.updateHost.updateClass([`thy-button-${this.type}`, `thy-button-${this.size}`])
  }
}
是不是更加的 React 和 Vue 呢?当然对于业务逻辑的封装我还是建议使用服务类的方式使用,因为这样更加的 DDD ,那么对于 UI 的封装和操作就无所谓了,这种方式更加的自由和灵活,简直强大的不能再强大。
自定义装饰器
Angular 内置提供了一些装饰器,比如 @HostBinding 可以方便根据某个属性的布尔值给 Host 元素绑定一个样式类。
@Component({...})
export class SomeComponent implements OnInit {
  @HostBinding(`class.thy-button`) isButton = true;

  constructor() {
  }
}
那么这个样式类是固定的,意味着如果要根据传入参数动态生成的就不起作用了,必须要通过代码的方式实现,过去即使可以自定义了一个装饰器,也无法获取到 Host HTML 元素,只能通过在构造函数中注入 ElementRef 传递使用,类似于上述的 UpdateHostClassService 。因为这个 inject 的能力让二次封装一些操作 UI 的装饰器变得可能。
@Component({
    selector: 'thy-button',
    templateUrl: './button.component.html',
    styleUrls: ['./button.component.scss']
})
export class ButtonComponent implements OnInit {
    @Input() @ClassBinding('thy-button-{{value}}') thyType!: 'primary' | 'success';

    constructor() {}

    ngOnInit(): void {}
}
这样当 thyType 传入 primary 设置 Host 的样式为 thy-button-primary ,传入 success 时设置 Host 的样式为 thy-button-success 。当然通过属性装饰器设置样式并不是官方推荐,谨慎使用,至于 ClassBinding 实现代码如下:
import { ElementRef, inject, Type } from '@angular/core';

type SafeAny = any;

const HOST_ELEMENT_NAME = '__HOST_ELEMENT';

function makeInjectElementRef(target: SafeAny) {
    if (target[HOST_ELEMENT_NAME]) {
        return;
    }
    const originalFactory = target.constructor.ɵfac;
    target.constructor.ɵfac = function (t?: Type<unknown>) {
        target[HOST_ELEMENT_NAME] = inject(ElementRef).nativeElement;
        const instance = originalFactory(t);
        return instance;
    };
}

export function ClassBinding(format: string): PropertyDecorator {
    return function (target: Object, propertyKey: string | symbol, originalDescriptor?: TypedPropertyDescriptor<any>) {
        const privatePropName = `$$__${propertyKey.toString()}`;
        let lastClassName = '';
        makeInjectElementRef(target);
        return {
            get(): string {
                return originalDescriptor && originalDescriptor.get ? originalDescriptor.get.bind(this)() : this[privatePropName];
            },
            set(value: SafeAny): void {
                const newClassName = format.replace(`{{value}}`, value);
                if (originalDescriptor && originalDescriptor.set) {
                    originalDescriptor.set.bind(this)(newClassName);
                }
                (target as SafeAny)[privatePropName] = newClassName;
                if (lastClassName !== newClassName) {
                    if (lastClassName) {
                        (target as SafeAny)[HOST_ELEMENT_NAME].classList.remove(lastClassName);
                    }
                    (target as SafeAny)[HOST_ELEMENT_NAME].classList.add(newClassName);
                }
            }
        };
    };
}
以上是我对 inject 这个特性的理解,有了这个底层 API 的支持,我相信类库开发者可以基于此做更多想不到的事情,这是 Angular 往灵活性方向的进一步试探。
https:// angular.io/api/core/inj ect
https:// netbasal.com/unleash-th e-power-of-di-functions-in-angular-2eb9f2697d66
原文 https://zhuanlan.zhihu.com/p/532236092
Recommend
About Joyk
Aggregate valuable and interesting links.
Joyk means Joy of geeK