

Express+FetchAPI 简单实践Cookie
source link: https://www.clzczh.top/2022/06/18/cookie-use/
Go to the source link to view the article. You can view the picture content, updated content and better typesetting reading experience. If the link is broken, please click the button below to view the snapshot at that time.
Express+FetchAPI 简单实践Cookie
本文并不是讲解Cookie在实际项目中的应用,而只是简单地实践一下,自动保存Cookie,然后后续请求自动携带Cookie,主要是通过使用刚学到的fetch API和差不多快忘记的express来实践。
Cookie 用于在客户端存储会话信息。它通过服务器响应请求时,响应头的Set-Cookie字段来设置 Cookie。Cookie 是服务端生成,保存在客户端

这个 HTTP 响应会设置一个名为name,值为value的 Cookie。名和值在发送时都会经过 URL 编码。
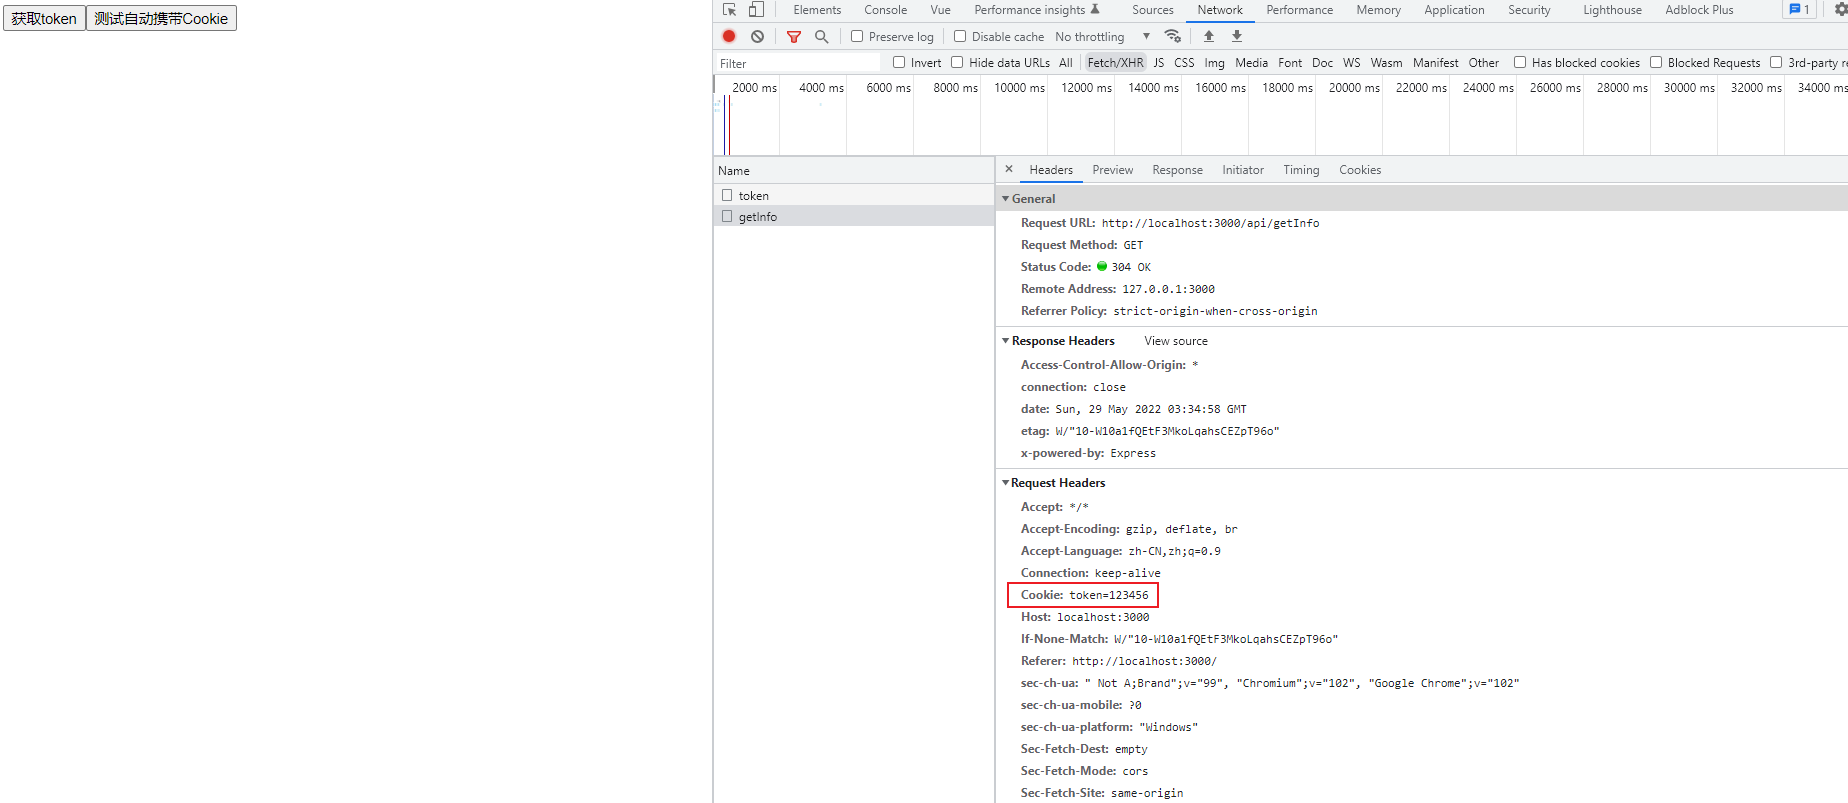
浏览器会存储这些会话信息,并且之后的每个请求都会通过请求头的Cookie字段再将它们发回服务器。
GET /index.jsl HTTP/1.1
Cookie: name=value
Other-header: other-header-value
发回给服务器的Cookie字段可用于唯一标识发送请求的客户端。
Cookie 有大小限制,一般 4K 左右。
Cookie 的构成
- 名称(
name=value):Cookie 的名称。不区分大小写,必须经过 URL 编码。 - 值(name=
value):Cookie 的值。必须经过 URL 编码 - 域(
Domain=clzczh.top):Cookie 有效的域。发送到该域名的所有请求都会包含对应的 Cookie。如果不明确设置,则默认为设置 Cookie 的域。 - 路径(
Path=/):请求 URL 中包含此路径才会携带 Cookie 发送请求。 - 过期时间(
Expires=Date):删除 Cookie 的时间戳,用于设置删除 Cookie 的时间,这个值是 GMT 格式(Wdy, DD-Mon-YYYY HH:MM:SS GMT)。当到达该时间后,就会删除 Cookie;没到达该时间时,即使关闭浏览器,Cookie 还会保留。把过期时间设置为过去的时间会立即删除 Cookie。默认只在浏览器关闭前有效 - 安全标志(
Secure):只在 HTTPS 安全连接时才可以发送 Cookie - 禁止 JS 读取 Cookie(
HttpOnly):通过 JS 脚本无法获取 Cookie,可以有效地防止XSS攻击。
Cookie 中实际发送给服务器的只有名/值对,其他部分只是告诉浏览器什么时候应该在请求中携带 Cookie 等。
Cookie 的简单实践
简单地说一下下面的代码:
- express 实现的后端服务
- 通过
app.post开启 post 接口 res.cookie设置 Cookie,第一个参数是 Cookie 名,第二个参数是 Cookie 值,第三个参数是 Cookie 的限制对象(如过期时间expires)
const express = require("express");
const cors = require("cors");
const app = express();
app.use(cors());
app.post("/token", function (req, res) {
// 设置Cookie
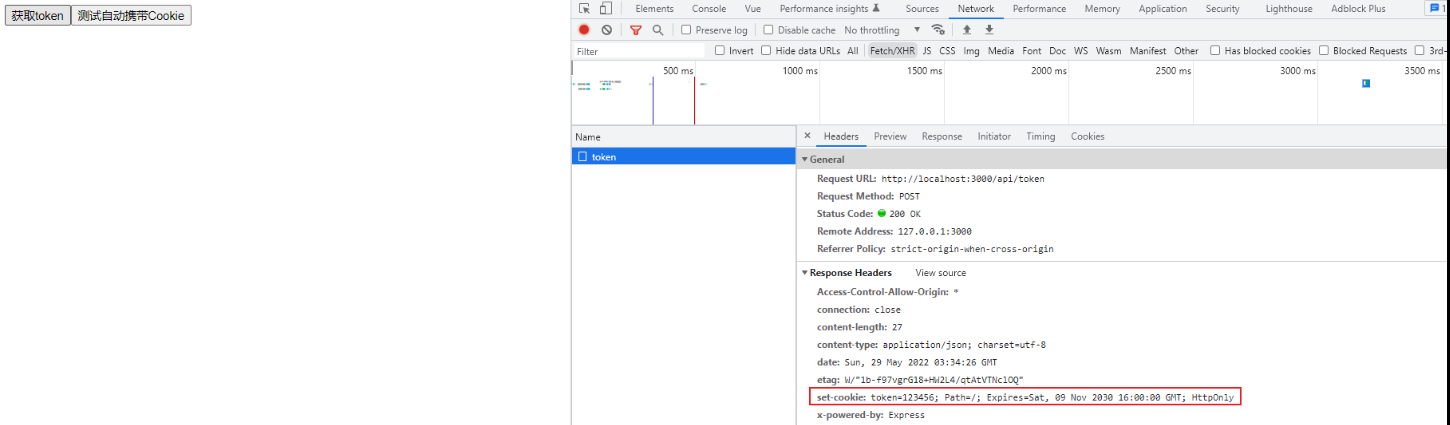
res.cookie("token", "123456", {
httpOnly: true,
expires: new Date(2030, 10, 10),
});
res.status(200).json({
msg: "获取token成功",
});
});
app.get("/getInfo", function (req, res) {
res.json({
msg: "成功",
});
});
app.listen(8088, () => {
console.log("http://localhost:8088");
});
前端试一下,能不能接收到Cookie。(使用 Fetch API,免装axios,实际使用和axios差不多,简单使用可查看之前的文章)
<body>
  <button id="btn">获取token</button>
  <button id="test-btn">测试自动携带Cookie</button>
  <script>
    const btn = document.getElementById("btn");
    btn.addEventListener("click", fetchData);

const testBtn = document.getElementById("test-btn");
    testBtn.addEventListener("click", getInfo);

function fetchData() {
      fetch("http://localhost:8088/token", {
        method: "post",
      }).then((res) => {
        // 获取响应的数据
        res.json().then((data) => {
          console.log(data);
        });
      });
    }

function getInfo() {
      fetch("http://localhost:8088/getInfo").then((res) => {
        console.log(res);
      });
    }
  </script>
</body>
看似万事大吉了,实际上,还是有问题的:
Cookie压根没存到客户端。
解决方案1
使用
fetch发送请求时,设置credentials为include(axios则是设置withCredentials为true),这样子跨域请求时夜会发送Cookie(也可以用来保存跨域请求响应的Cookie)fetch('http://localhost:8088/token', {
method: 'post',
credentials: 'include'
})image-20220529100902883当我们设置
credentials为include时,- 我们解决跨域时的
Access-Control-Allow-Origin不应该还是通配符,而应该是具体的地址,所以后端express应该调整一下不再使用cors中间件,而是自己设置响应头 Access-Control-Allow-Credentials也应该设置为true
// 使用cors中间件部分换成下面的形式
app.use(function (req, res, next) {
res.header('Access-Control-Allow-Origin', 'http://127.0.0.1:5501')
res.header('Access-Control-Allow-Credentials', 'true')
next()
})image-20220529103925082- 我们解决跨域时的
上面已经的警告已经说了:
Cookie有一个SameSite属性,它默认是Lax,要求响应是对顶层导航的响应(这个顶层导航并不是很懂,有懂得小伙伴欢迎评论)。先按她的提示,设置Cookie的SameSite属性为none(安全性会下降)。有SameSite属性的话,也必须要有Secure属性// 设置Cookie
res.cookie("token", "123456", {
httpOnly: true,
expires: new Date(2030, 10, 10),
secure: true,
sameSite: 'none'
});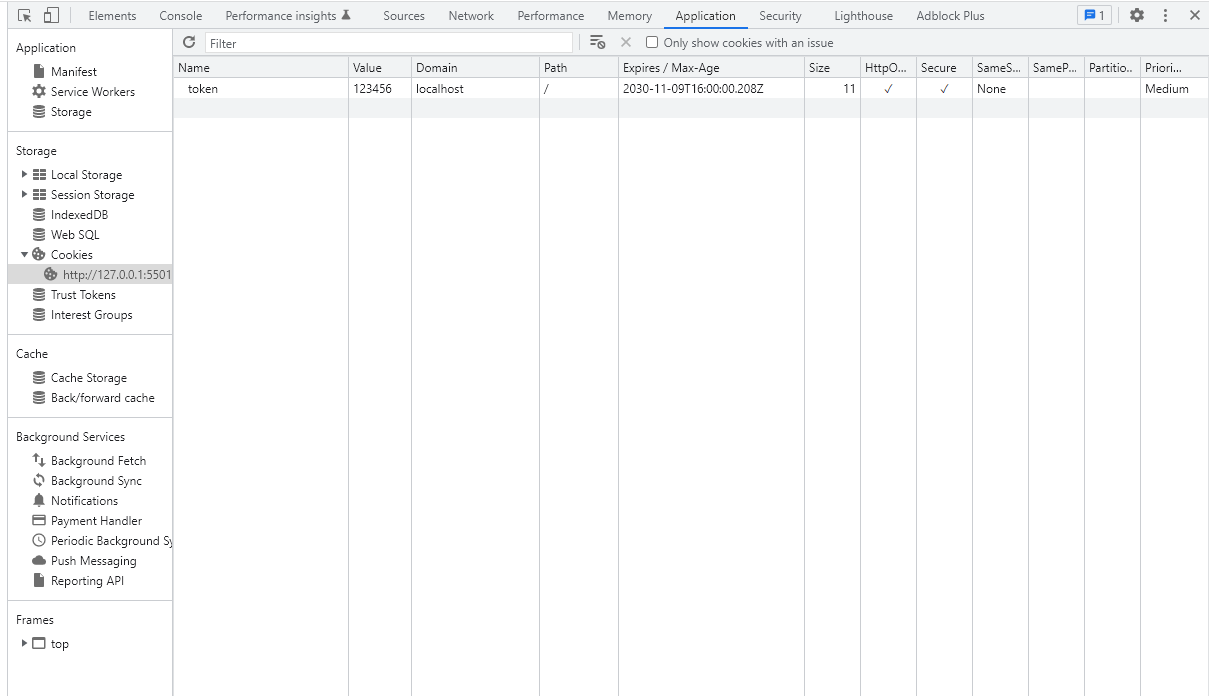 image-20220529105604140
 image-20220529105657457
最终代码:
express:
const express = require("express");
const cors = require("cors");
const app = express();
app.use(function (req, res, next) {
res.header('Access-Control-Allow-Origin', 'http://127.0.0.1:5501')
res.header('Access-Control-Allow-Credentials', 'true')
next()
})
app.post("/token", function (req, res) {
// 设置Cookie
res.cookie("token", "123456", {
httpOnly: true,
expires: new Date(2030, 10, 10),
secure: true,
sameSite: 'none'
});
res.status(200).json({
msg: "获取token成功",
});
});
app.get("/getInfo", function (req, res) {
res.json({
msg: "成功",
});
});
app.listen(8088, () => {
console.log("http://localhost:8088");
});<body>
<button id="btn">获取token</button>
<button id="test-btn">测试自动携带Cookie</button>
<script>
const btn = document.getElementById('btn')
btn.addEventListener('click', fetchData)
const testBtn = document.getElementById('test-btn')
testBtn.addEventListener('click', getInfo)
function fetchData() {
fetch('http://localhost:8088/token', {
    method: 'post',
    credentials: 'include'
})
}
function getInfo() {
fetch('http://localhost:8088/getInfo', {
credentials: 'include'
})
}
</script>
</body>
解决方案2
上面的解决方案1,非常的麻烦,还把Cookie的SameSite属性改成None了,安全性也会下降一点
实际上呢,我们有一个更简单的解决方案,只需要把他们变成不跨域就行了。
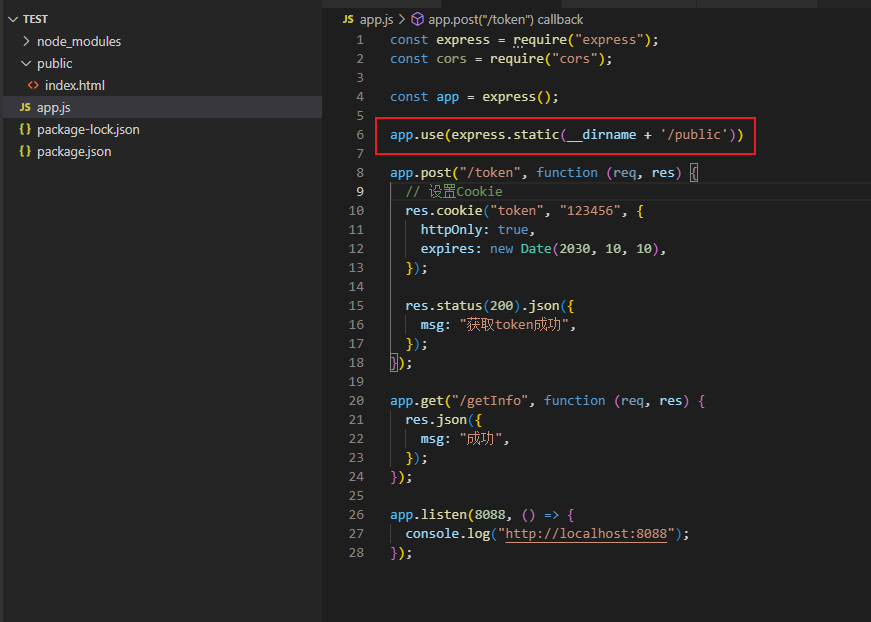
用express来测试的话,就是把之前的html代码放到express下的public文件夹里,
然后通过app.use(express.static(__dirname + '/public'))将静态文件目录设置为项目根目录+/public
然后,访问http://localhost:8088,就是我们写的html,不跨域,自然就没有解决方案1中出现的问题了.
当然,只看上面的例子的话,好像是用解决方案2的话,前后端就不能很好的分离了.其实并不是,我们可以通过nginx的代理来解决前后端的跨域问题.
可以使用Vue来简单实践代理能否解决这个保存携带Cookie问题.
首先呢?我们需要修改配置文件,实现代理.
import { defineConfig } from 'vite'
import vue from '@vitejs/plugin-vue'

// https://vitejs.dev/config/
export default defineConfig({
  plugins: [vue()],
  server: {
    // 实现其他设备能访问本机开启的服务
    host: '0.0.0.0',

proxy: {
      '/api': {
        target: 'http://localhost:8088',
        changeOrigin: true,
        rewrite: (path) => path.replace(/^\/api/, '')
      }
    }
  }
})
fetch API的请求地址就不再需要去到后端的那个接口地址了,而是变成/api即可,这样子代理就会把这个请求转发给真实服务器.
<template>
  <button @click="fetchData">获取token</button>
  <button @click="getInfo">测试自动携带Cookie</button>
</template>

<script setup>
function fetchData() {
  fetch("/api/token", {
    method: "post",
  }).then((res) => {
    // 获取响应的数据
    res.json().then((data) => {
      console.log(data);
    });
  });
}

function getInfo() {
  fetch("/api/getInfo").then((res) => {
    console.log(res);
  });
}
</script>
Recommend
About Joyk
Aggregate valuable and interesting links.
Joyk means Joy of geeK