

flutter系列之:深入理解布局的基础constraints
source link: http://www.flydean.com/13-flutter-ui-constraints/
Go to the source link to view the article. You can view the picture content, updated content and better typesetting reading experience. If the link is broken, please click the button below to view the snapshot at that time.
我们在flutter中使用layout的时候需要经常对组件进行一些大小的限制,这种限制就叫做constraints,用来控制layout中的组件大小。
掌握了constraints才算对layout有了真正的了解,但是flutter中的constraints和我们熟悉的HTML中的constraints区别比较大,所以我们还是需要深入了解flutter中contraints的特性。
Tight和loose constraints
对于constraints来说,只有四个属性,分别是最小width,最大width,最小height和最大height。这四个属性所能限制的就是宽度和高度的范围。
根据这两个属性的范围不同,constraints可以分为tight constraints和loose constraints。
那么tight和loose有什么区别呢?
对于tight来说,它的 maximum width = minimum width, 并且maximum height = minimum height, 也就是说为width和height提供了一个特定的值。
具体而言,可以看下BoxConstraints的tight实现:
BoxConstraints.tight(Size size)
   : minWidth = size.width,
     maxWidth = size.width,
     minHeight = size.height,
     maxHeight = size.height;
和tight相对应的就是loose,在loose中我们设置了最大的width和height,但是希望widget越小越好,这样对应width和height的最小值为0,同样以BoxConstraints为例看下它的定义:
BoxConstraints.loose(Size size)
   : minWidth = 0.0,
     maxWidth = size.width,
     minHeight = 0.0,
     maxHeight = size.height;
理解constraints的原则
前面我们讲到了constraints的分类,这里我们会讲一下constraints的基本原则。
通常来说,在flutter中,一个widget的constraints是从它的parent继承而来的。然后这个widget会将constraints告诉他的子widget.
子widget会有自己定义的大小,那么子widget会根据自己定义的大小来设置自己的大小,并将结果反馈跟父widget,父widget会最终根据所有子widget的大小来设置自己的大小。
所以总结而言就是,constraints是向下传递的,而size是向上传递的。
可能大家还不太明白是什么意思,没关系,接下来我们用具体的例子来说明。
首先,我们使用BoxConstraints.tightFor来创建一个尽可能大的width和height的Constraints,然后在这个constraint内部新建widget来观察他们的表现。
ConstrainedBox(
     constraints: const BoxConstraints.tightFor(
           width: double.infinity, height: double.infinity),
            child: exampleWidget)
通过替换上面的exampleWidget,我们来观察不同的表现形式。
首先是最基础的Container,对于Container本身来说,他可以设置width和height,但是这两个属性并不是constraint,所以还得从parent widget中继承。
那么对于下面的一个widget来说:
  Widget build(BuildContext context) {
    return Container(color: blue);
  }
它会使用从parent继承的constraints,也就是说尽可能的大,所以会展示下面的界面:

填满所有的区域。
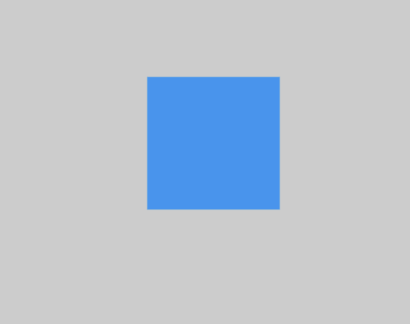
如果给Container指定了width和hight,同样的,Container需要从parent继承constraints,所以仍然是填满整个区域:
  Widget build(BuildContext context) {
    return Container(width: 100, height: 100, color: blue);
  }
但是,如果我们在Container的外面再加上一个constraints,比如Center:
  Widget build(BuildContext context) {
    return Center(
      child: Container(width: 100, height: 100, color: blue),
    );
  }
那么虽然Center会从parent继承constraints,去填满整个区域,但是Center本身的constraints是告诉子widget可以按照他自己的意愿来调整大小,所以这个时候最终Container的大小就是100×100:

除了Center之外,我们还可以使用Align,效果和Center是一致的:
  Widget build(BuildContext context) {
    return Align(
      alignment: Alignment.bottomLeft,
      child: Container(width: 100, height: 100, color: blue),
    );
  }

下面是一个使用Center的很有趣的例子:
  Widget build(BuildContext context) {
    return Center(
      child: Container(
        color: blue,
        child: Container(color: green, width: 30, height: 30),
      ),
    );
  }
这里Center中有一个Container,Container中有一个Container,但是这两个Container设置了不同的颜色。
因为外层的Container并没有设置大小,所以他的大小是由child Container来决定的,因为两个Container大小一样,所以外部的颜色会被内部的覆盖,我们可以得到下面的界面:

如果我们给外层的添加一个padding如下:
  Widget build(BuildContext context) {
    return Center(
      child: Container(
        padding: const EdgeInsets.all(20.0),
        color: blue,
        child: Container(color: green, width: 30, height: 30),
      ),
    );
  }
那么外层现在就比内层的widget要大了,颜色也可以展示出来了:

我们再来看下面的例子:
  Widget build(BuildContext context) {
    return ConstrainedBox(
      constraints: const BoxConstraints(
        minWidth: 70,
        minHeight: 70,
        maxWidth: 150,
        maxHeight: 150,
      ),
      child: Container(color: blue, width: 10, height: 10),
    );
  }
上面的例子在Container外面添加了一个ConstrainedBox,指定了四个constraints属性,但是这个ConstrainedBox并不会应用到child上,所以最终得到的界面还是全部的蓝色。
为什么呢?这是因为不同的widget对constraints有不同的定义,对于ConstrainedBox来说,他是一个对其子项施加额外约束的小部件。记住,这里是额外的约束。因为对于它的parent来说,约束已经制定好了,所以ConstrainedBox会被忽略。
我们再看下下面的代码:
  Widget build(BuildContext context) {
    return Center(
      child: ConstrainedBox(
        constraints: const BoxConstraints(
          minWidth: 70,
          minHeight: 70,
          maxWidth: 150,
          maxHeight: 150,
        ),
        child: Container(color: blue, width: 10, height: 10),
      ),
    );
  }
这里因为使用了Center,Center会让child来自行决定他们的大小,所以这里的ConstrainedBox是生效的,如下:
flutter中除了ConstrainedBox,还有一个UnconstrainedBox,它的作用和ConstrainedBox是相反的,大家可以自行尝试。
从上面的具体例子,我们可以看出,虽然我们有通用的Constraint规则,但是具体的表现还是要看不同的widget来定。
所以大家在使用widget的时候,一定要去读一下widget的代码,从而加深对widget的掌握。
本文的例子:https://github.com/ddean2009/learn-flutter.git
更多内容请参考 http://www.flydean.com/13-flutter-ui-constraints/
最通俗的解读,最深刻的干货,最简洁的教程,众多你不知道的小技巧等你来发现!
欢迎关注我的公众号:「程序那些事」,懂技术,更懂你!
Recommend
About Joyk
Aggregate valuable and interesting links.
Joyk means Joy of geeK