

Getting Started with IoT and Camunda Platform 8
source link: https://dzone.com/articles/getting-started-with-iot-and-camunda-platform-8
Go to the source link to view the article. You can view the picture content, updated content and better typesetting reading experience. If the link is broken, please click the button below to view the snapshot at that time.
Getting Started with IoT and Camunda Platform 8
Integrating IoT, AI, and cloud-based BPMN automation.
I've been writing about and doing, IoT for almost 20 years now and one of the things I am continually doing is seeing how I can use different technologies to further the state of the art in IoT. I've invested a lot of time and effort in seeing that IoT is successful, and finding innovative ways to look at IoT.
It turns out that close to 70% of IoT projects fail at the proof of concept phase. Why? because they are unable to deliver any lasting value to businesses and are thus abandoned. This is one reason why I believe that, even though IoT has been "about to explode" for over a decade, it has yet to deliver as well.
IoT Is Automation
At its heart, IoT is automation. It is instrumenting the environment (be that factories, homes, what have you) to gather vast amounts of data and then taking action on that data to automate tasks that used to be done manually.
Note: If your IoT project is collecting vast amounts of data and you don't have a plan on what to actually do with that data, your IoT project has already failed, you just don't know it yet.
How though do you use all that data and integrate actions from that data to actually improve business outcomes? To improve the things you care about like cost savings, efficiency, etc? That's part of what's still missing from IoT. And part of what is still holding IoT back from delivering on its promises.
Automating the Automation
Yes, I said automating automation with a straight face. I know it sounds awfully meta, but it really is what needs to happen.
You see, IoT is still quite technical, requiring programming skills, engineering skills, etc. in order to get a project off the ground. But having to continue to use those highly skilled disciplines to maintain and extract value from an IoT deployment is part of what makes them unsustainable.
If you want to make any changes to how the system operates, etc. you have to once again bring in the programmers, the embedded systems engineer, etc. to make even the slightest change. But it doesn't need to be this way. What if you could deploy an IoT system, and then let the business line folks -- the people who know what value they are trying to extract from the system -- actually design how those goals are achieved?
And when the business goals shift, what if those same business managers could be the ones to alter how the IoT systems operate? Without bringing in the parade of embedded programmers.
Enter Business Process Management and BPMN
Business Process Management Notation (BPMN) has been around for decades and has been used by all sorts of industries from banking to insurance and more to streamline and automate business processes.
BPMN is an executable modeling language that allows you to map out your business processes, and automate steps where possible while still allowing for human intervention when needed. It is extremely flexible and powerful for these purposes.
But using it for IoT? That seems ... a bit of a stretch. At first. But once you stop to actually think about it, it begins to make perfect sense. Most IoT projects are just a series of processes that need to be coordinated and orchestrated to make sure that they actually function.
You can, of course, continue to hard-code these processes into the IoT deployment, but this removes a lot of flexibility and opportunity for further automation and makes even simple changes very complex.
Prove It!
Ok. I will. And the best way to prove it is by example. And of course, the best example is one that you can get your hands on and do yourself. So that's what we're going to do.
A Hands-on Tutorial
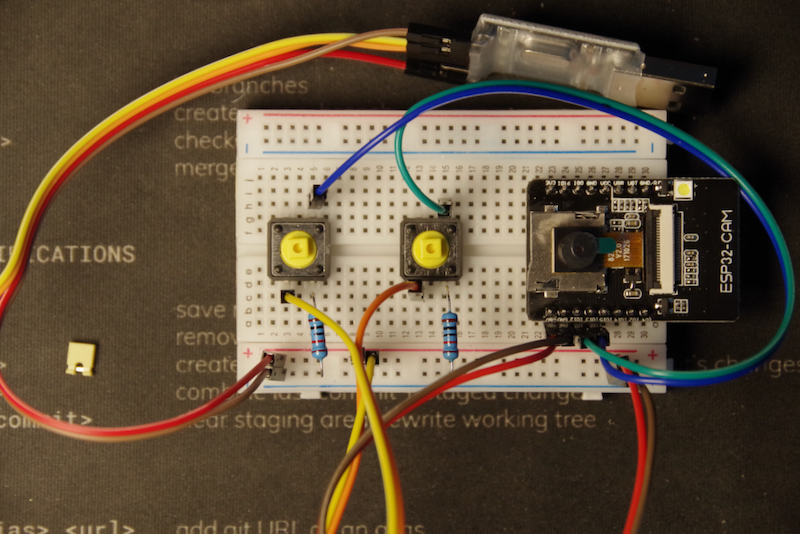
This tutorial is one that I have given in person and for which I hand out the actual hardware that you will need in order to complete it. You can either purchase this hardware yourself (it's only around $20US) but I have now made some modifications to it so that you can run it entirely without any actual hardware.
You would, of course, have to provide your own hardware but it's really not that much. You will need the following:
- ESP32-CAM board. These cost between $5 and $10 US, and you can get them easily on Amazon.
- 2 momentary switches. You can get the same ones I used on Amazon, but you'll be getting way more than 2.
- A USB-TTL converter so that you can talk to your ESP32-CAM. The exact one in the kit is here, but again, you get 5 at a time (still, only $2 each).
- 2 10KΩ resistors. You can't buy just 2 pretty much anywhere, but you can also buy them super cheap just about anywhere.
- A bunch of jumper wires. Again, you can't buy just the 6 or 8 you need here, but they are super cheap and available on Amazon, Sparkfun, and Adafruit among many other places.
If you've built it all according to this tutorial, you should end up with something that looks roughly like this:
And that's where I'm going to leave the hardware portion behind because, as I said, you can actually do this entire tutorial without this hardware.
The Tutorial
The rest of this tutorial is going to be without the hardware, but again, you can always follow the original tutorial to use the incorporated hardware bits. So let's get things going!
The Accounts You’ll Need
To start things off, there are 2 accounts that you will need to set up in order to have this all work. First, of course, you will need an account for Camunda Platform 8. While you can self-host this on your own hardware, this tutorial will be using the SaaS version, so you'll be using the free account available to you. It's a 30-day trial account, and there is no payment or credit card required, so nothing to worry about there.
The other account you will need for this is a Google Cloud account. I'm sure most of you already have Gmail accounts, and you can use this account to sign up for a Google cloud account. We will go through how to create and configure your Google Cloud account in the coming sections.
Camunda Platform 8 (C8) Account
The first step is to Sign up for an account.
This is a free trial account that will give you 30-days to try out Camunda Platform 8. You can use this account to create and deploy processes. It is the account you’ll be using throughout this lab.
Once you’ve clicked on the link above, you will out the form to create your account:
Once you’ve signed up, you will be sent a confirmation email with a link to activate your account. Clicking on the link in that email will take you to the login screen where you will enter the email address and password you created in the first step.
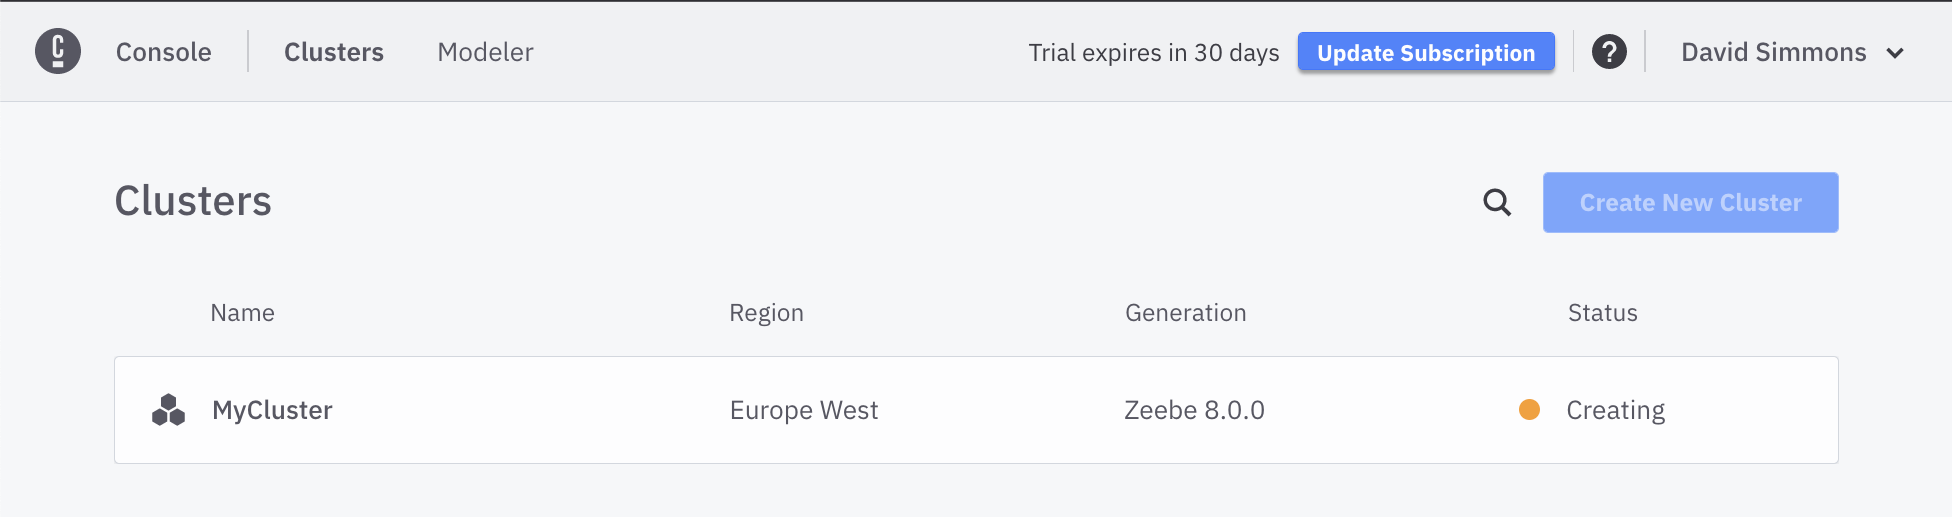
Once logged in, you will see your Console page. This is where you will see your account information and the processes you have deployed. So far, you won’t have any clusters or processes, so let’s go ahead and create one.
Under the Clusters area, you will see that you have 0 Clusters, and a link View All that will take you to the page where you can create a new cluster. Click on the Create New Cluster button. You can name your cluster whatever you want, but it should be unique.
Finally, click on the Create button. You should be directed back to the Clusters page where you will see your cluster is created.
This process can take several minutes as the cluster is provisioned in the cloud and the cluster is configured and started.
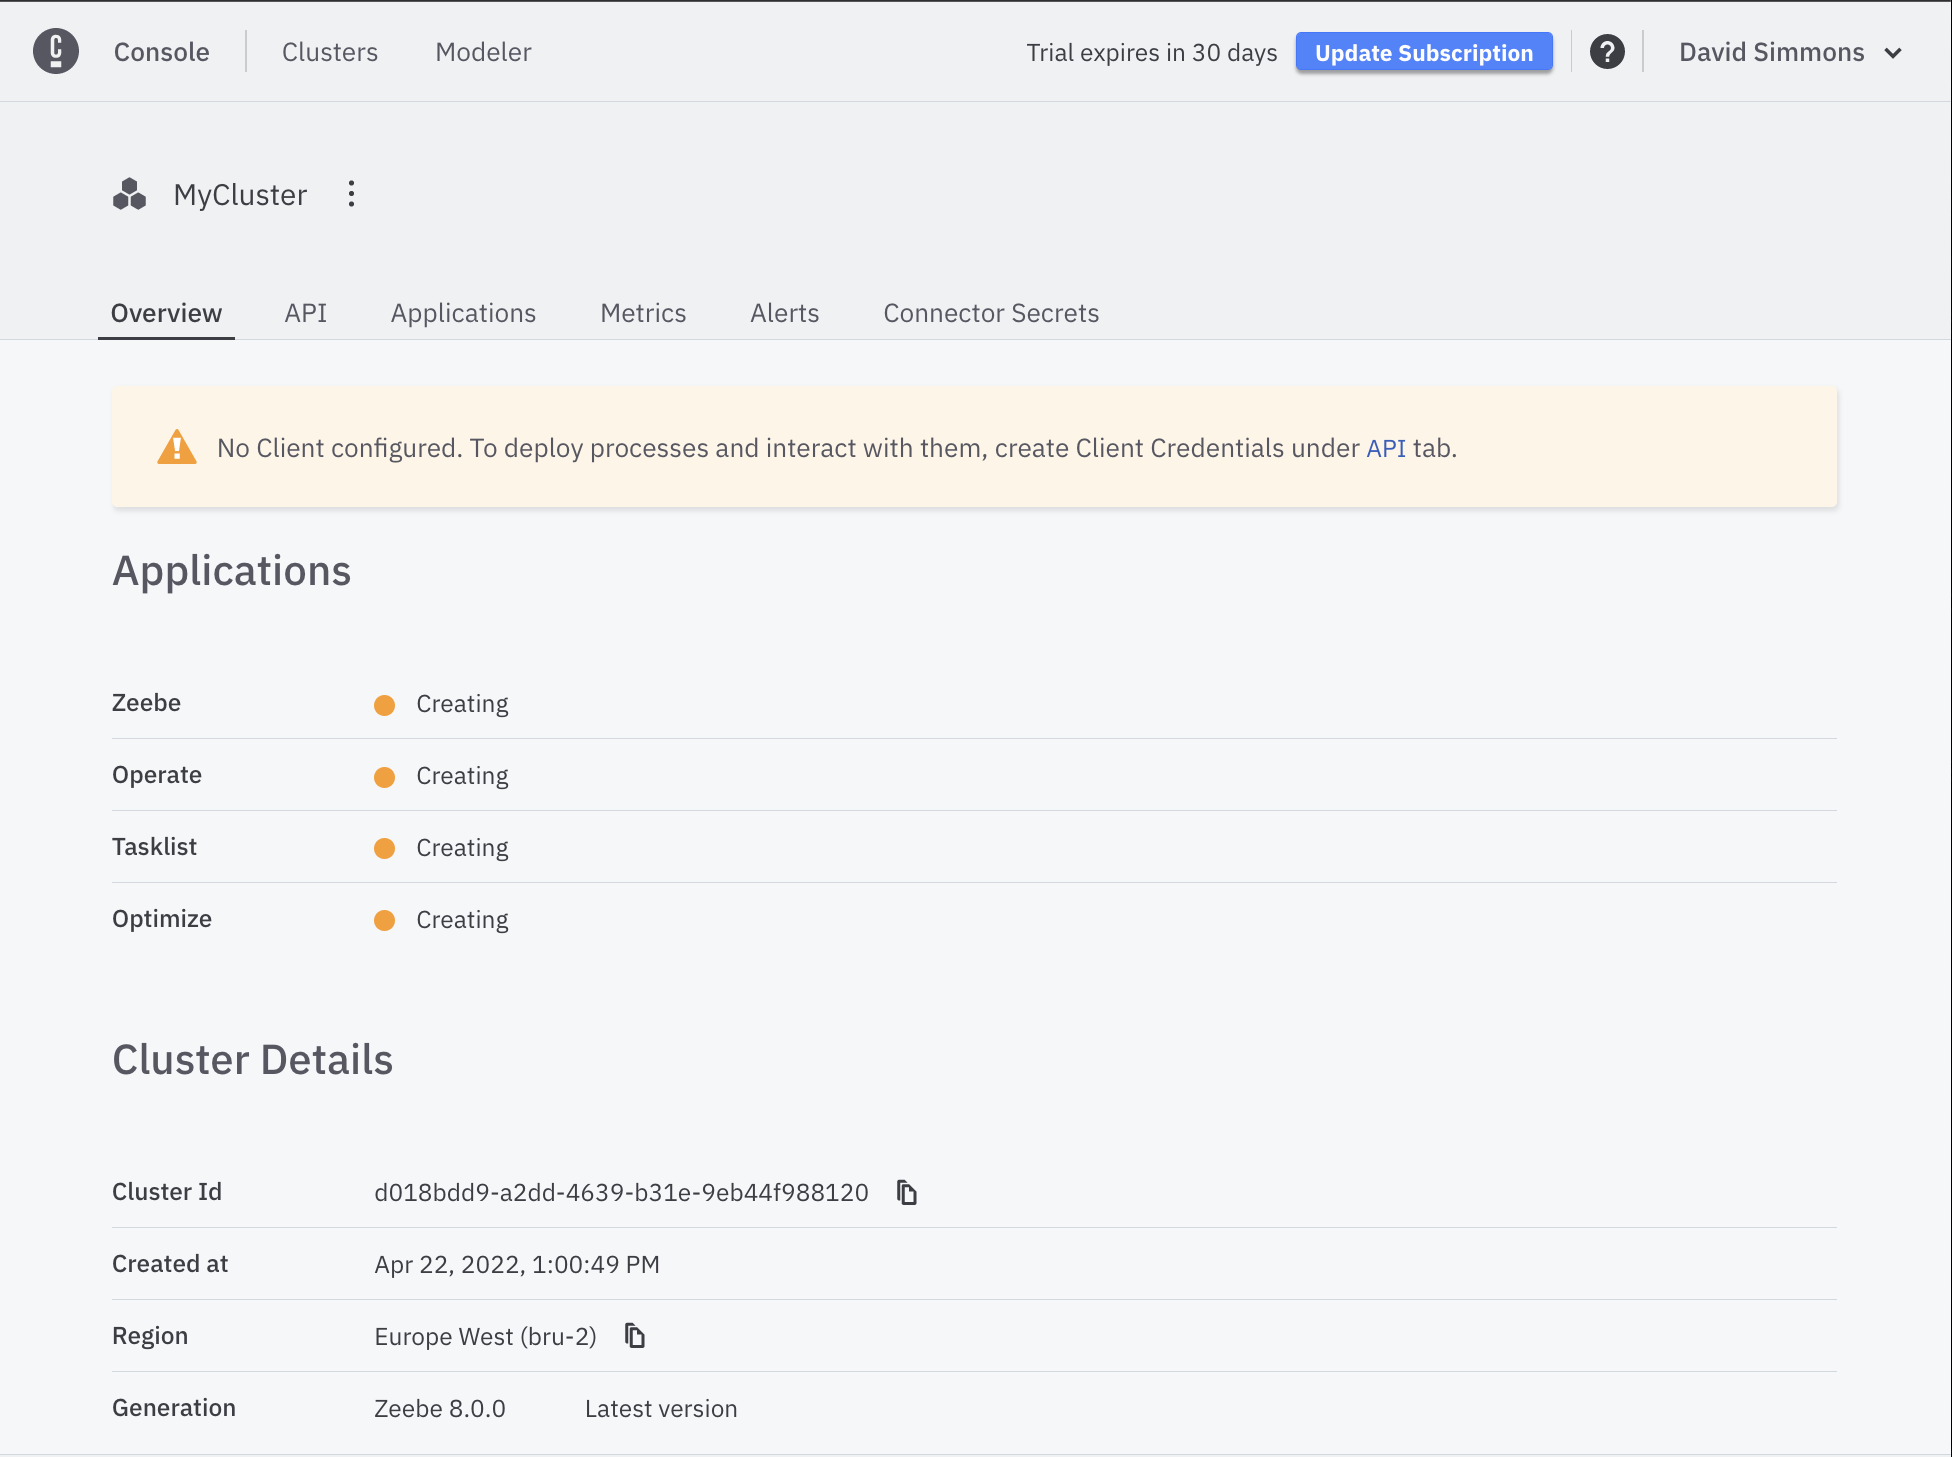
If you click on the cluster while it is being created, you will see more details about the cluster, and you will be able to create the Client Credentials that you will need to connect to the cluster.
You should click on the API tab, and then click the Create button in order to create your credentials. You can name your credentials whatever you want, but it should be unique.
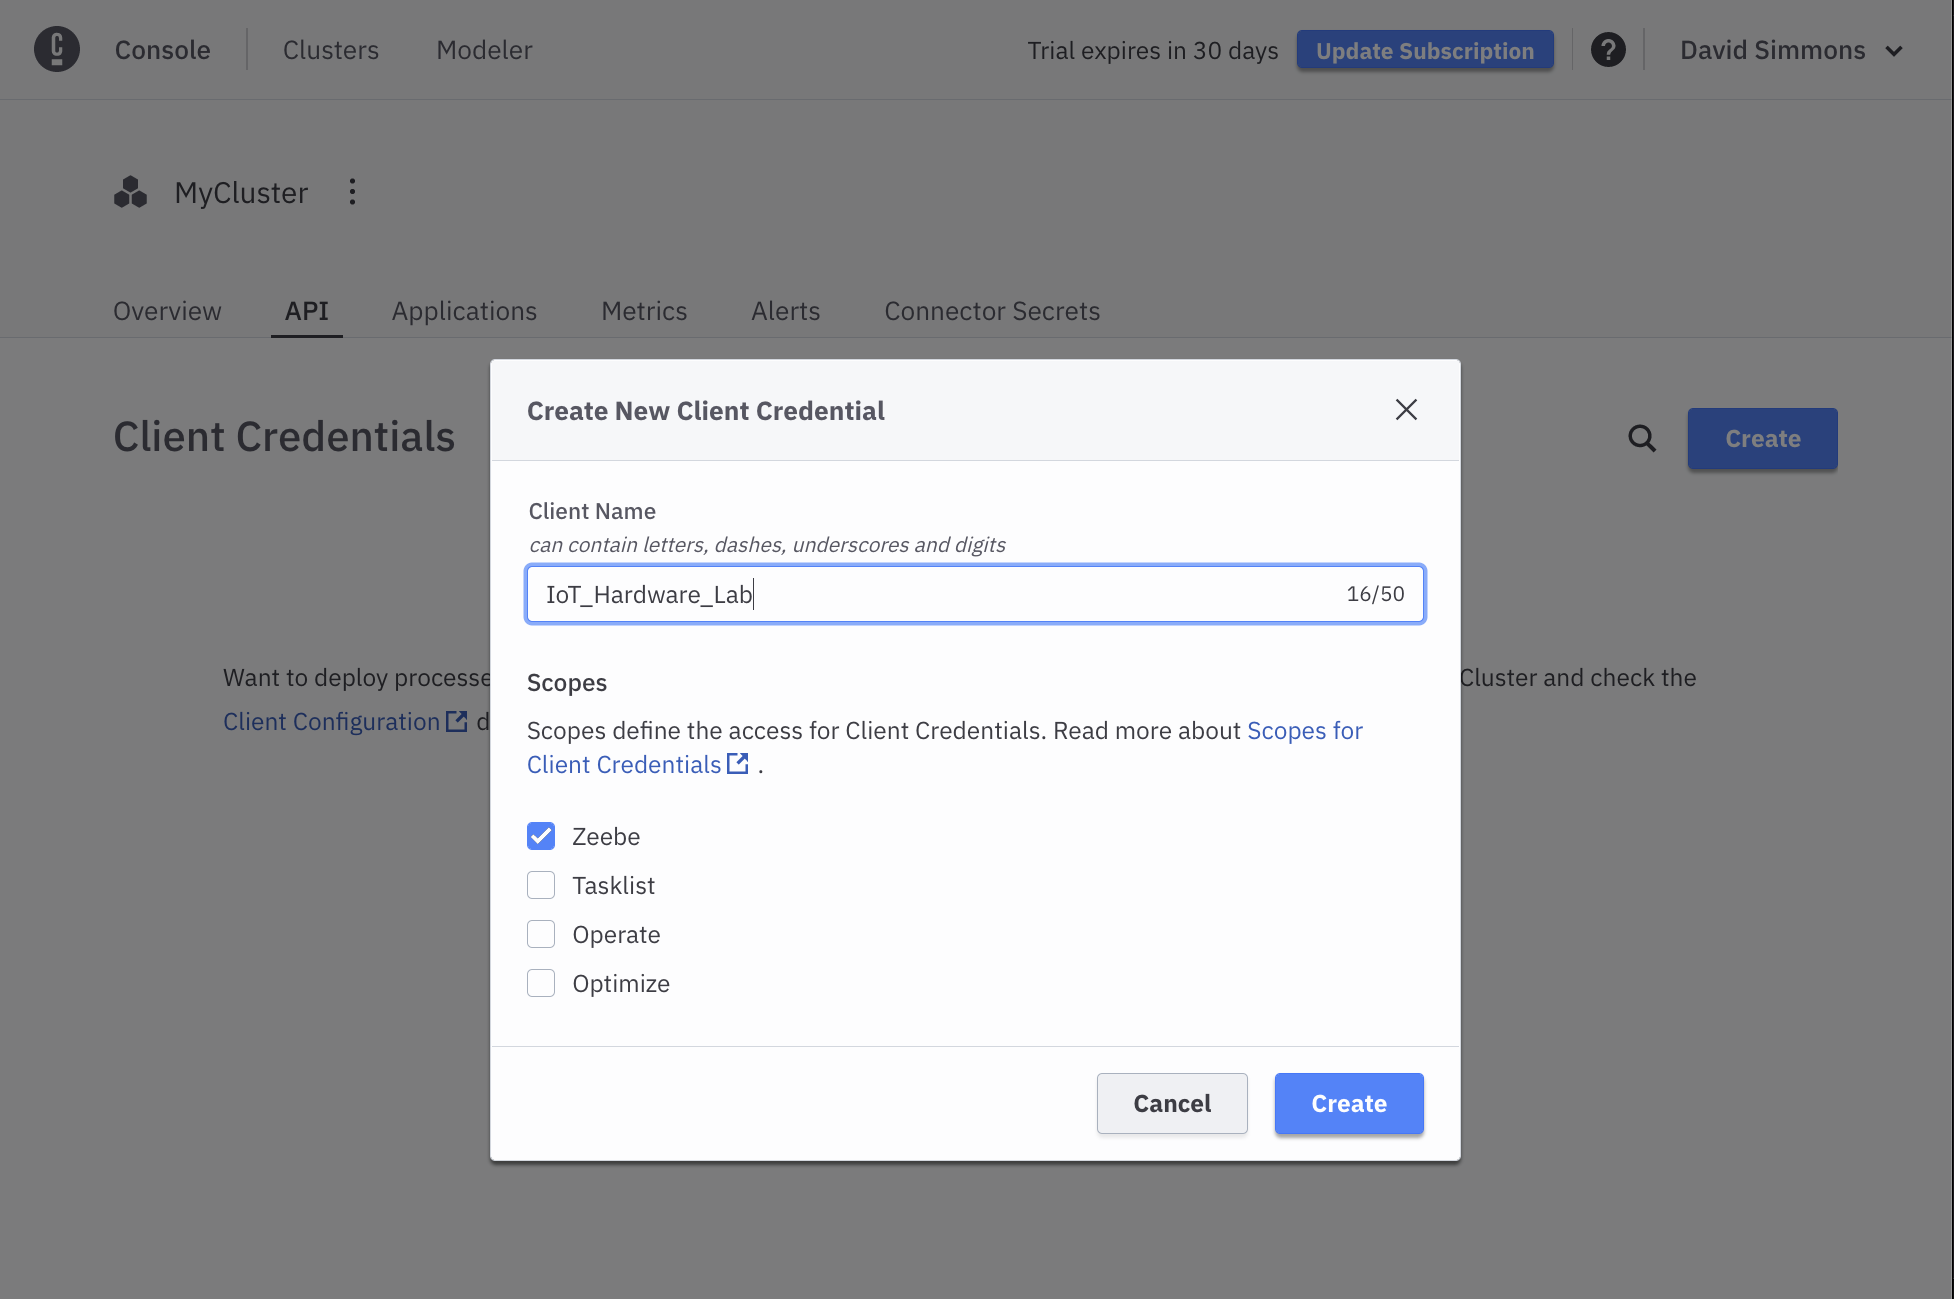
You will then be presented with a screen listing your credentials. Click the Download Credentials button to save the credentials to your computer.
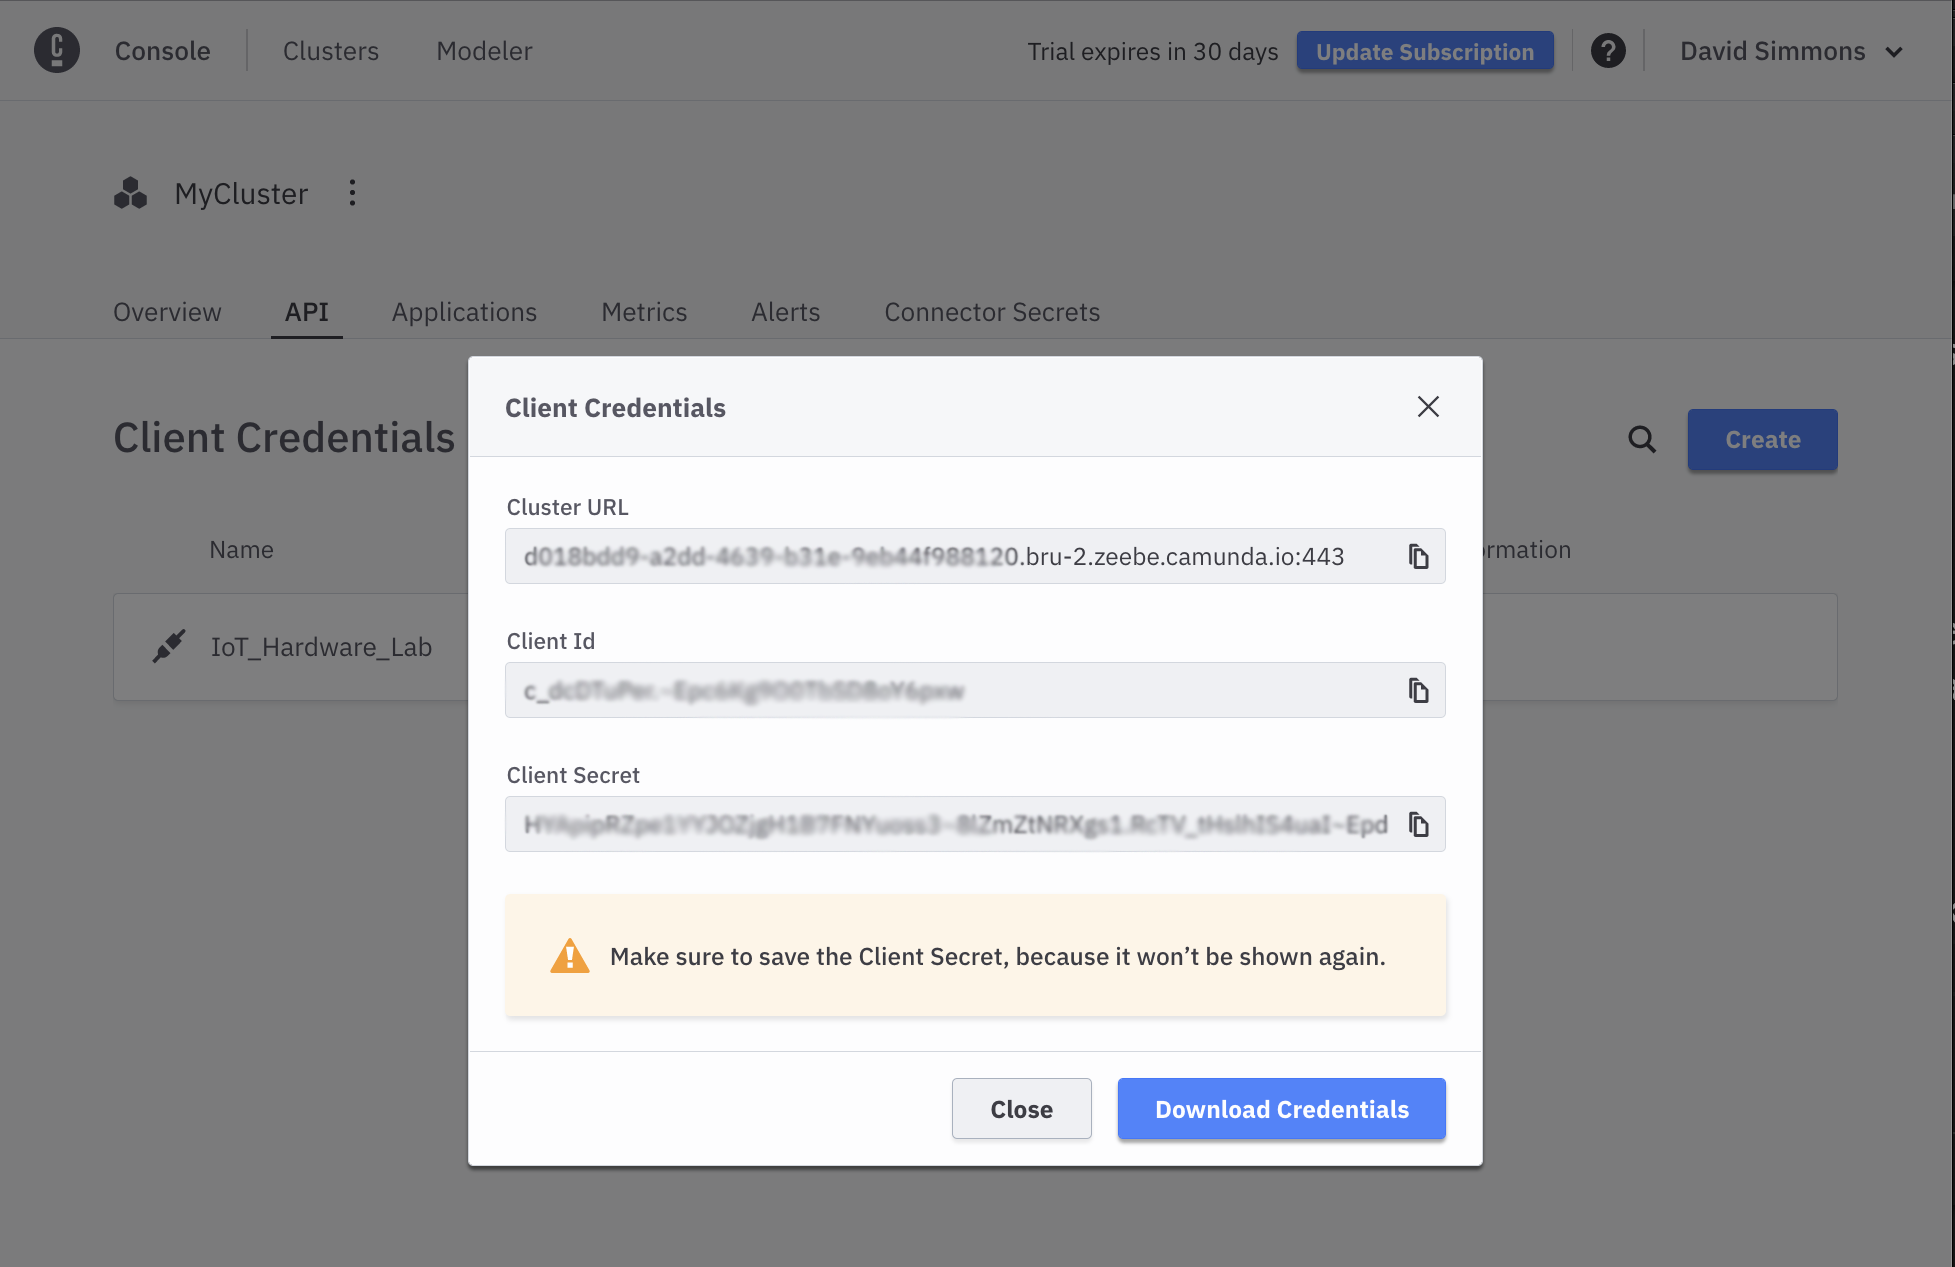
Important: You will need these credentials for the rest of the exercises, and you will not be able to see your Client Secret again after you download them.
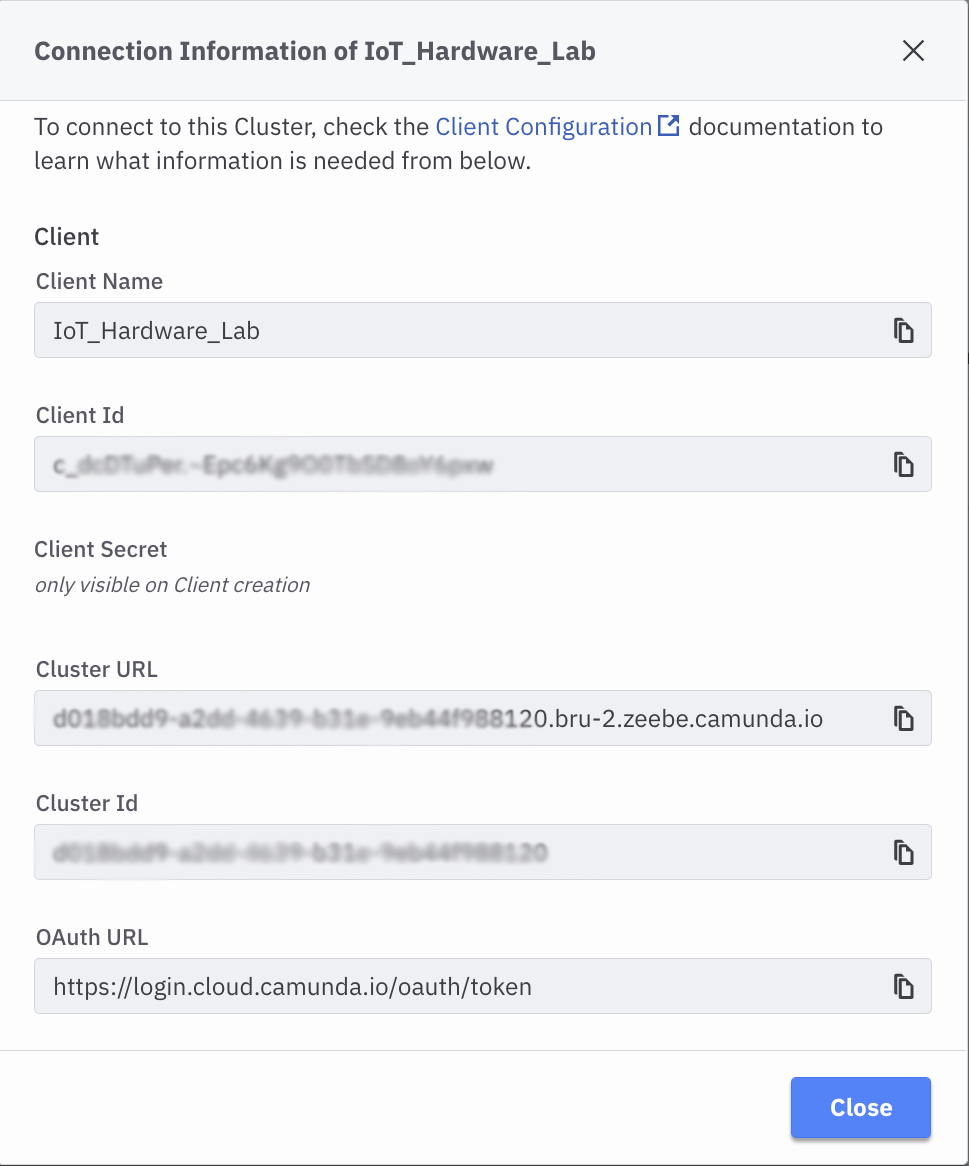
You can view the rest of your credentials in the View tab, but your CLient Secret will not be visible.
Once your credentials are created and your cluster has finished being provisioned, your Console page will show you the cluster you created, along with links to the Modeler, the Task List, Operate (where running tasks are shown), and Optimize where you can create reports, etc. for your cluster.
At this point, your cluster is ready to use!
Google Cloud Account
Later on, in this lab, we will be using the Google Image AI service to process images. In order to use the service, you will need to create a Google Cloud account. Use can use your existing google account as well.
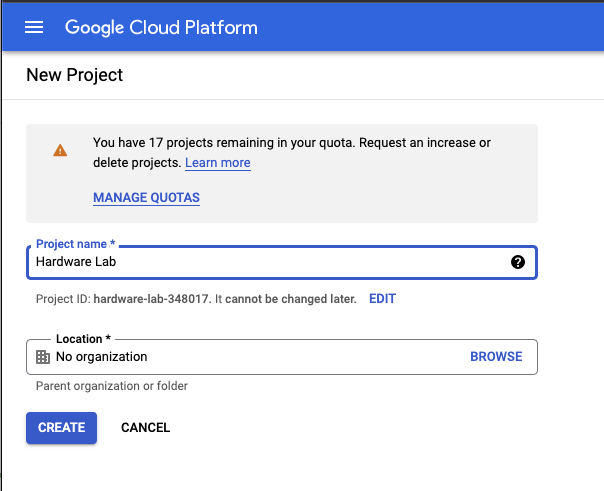
You can log in to your Google account, and then go to the Cloud Console where you can create a new project.
Once your project is created, go to the Getting Started box and click the explore and enable APIs link.
Under the APIs and Services menu you will see the Libraries link, which you should click on.
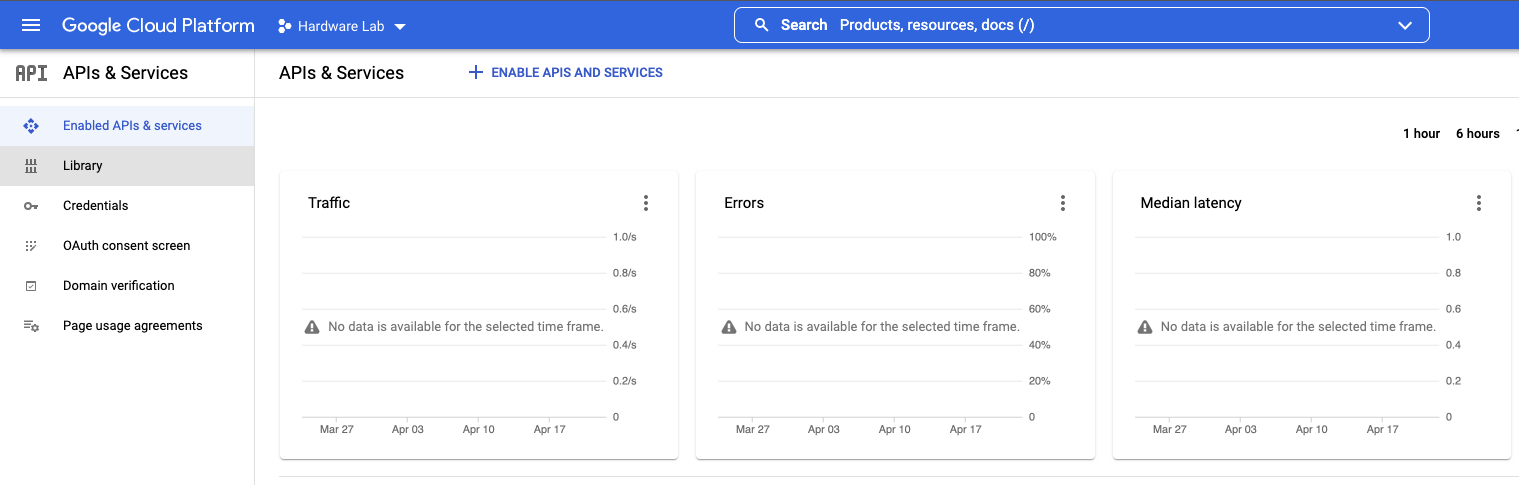
Click on Libraries and look for the Google Cloud Vision API link.
Once you’ve selected that, you can click the Enable button to enable this API.
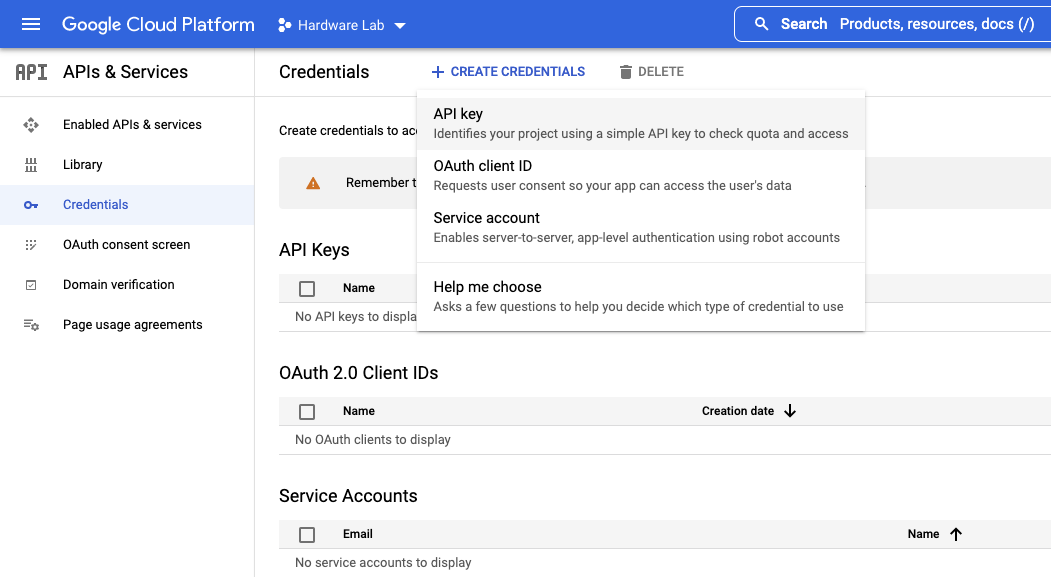
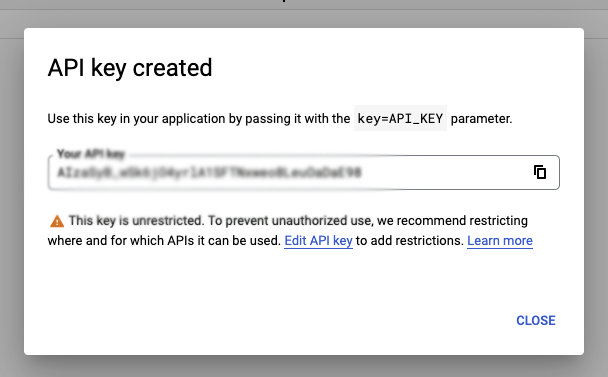
You can now click on the Credentials link on the left side, and then click the Create credentials button at the top of the page. Choose the API key option and your API Key will be shown. Save this API Key somewhere safe.
Important: You will need this API Key later on, and it’s easier to save it now than it is to try to retrieve it later!
That's it for the accounts you'll need, so let's kick the tires a bit and see how it all works!
Prerequisites
- Golang v1.17 or higher
- VSCode (not strictly a requirement, but it will be easier
At this point, it's going to be best if you go ahead and clone the workshop repository from GitHub. From a command line, you can enter:
git clone https://github.com/davidgs/c8-workshop
cd c8-workshop
code .
That will clone the repository and then open it in VSCode (as long as you've enabled the `code` shortcut). All of the required code and models for this exercise are in the `Exercise 2` directory.
Implementing a Simple Script Worker in Golang
In Camunda Platform 7 one could choose to implement scripts ‘in line’ in the process definition. While this was not a ‘best practice’ and was discouraged for maintainability, it was still a simple option for small problems.
With Camunda Platform 8 SaaS there are no longer any options for inline scripts. Frankly, that’s a good thing in my opinion. But it does mean that you have to find a new way to handle these relatively simple tasks. In this exercise, we will implement a simple script worker in Golang.
Setting up the Worker
The script-worker.go file is the solution here. It will start a task worker and listen for tasks from your process. When a task is received, it will execute the task and then complete the task.
The task listener looks for 2 variables in the incoming job: count and add. If the count variable is missing, it will default to initializing it at 0. If the add variable is missing, it will default to adding 1 to the count variable.
export ZEEBE_ADDRESS=ADDRESS_OF_YOUR_CLUSTER
export ZEEBE_CLIENT_ID=YOUR_CLIENT_ID
export ZEEBE_CLIENT_SECRET=YOUR_CLIENT_SECRET
In order to communicate with the Camunda Platform 8 (C8) service, we need to initialize all of the required variables like ClientID, ClientSecret, etc.
The easiest way to 'set it and forget it is to export these as environment variables in your shell, so you can open the integrated terminal and enter the following:
Remember when I told you you'd need those values? This is where you need them.
The script-worker process will read this file in and set all the variables as needed to communicate with the C8 processes.
The only edit to the Go file that is required is to change the PROC_NAME constant to the name of your process.
// Set this to the name of your task
const PROC_NAME = "AddOneTask"
Once this is set you can start the script-worker with the following commands:
$ go build
$ ./script-worker
When you start processes in Camunda Platform 8 that calls your PROC_NAME task worker, you should see output like this:
Starting Camunda Cloud Zeebe ScriptWorker
===================================
handleC8Job
{Add:0 Count:0}
{Add:1 Count:1}
Complete job 4503599627617096 of type AddOneTask
...
If you’d prefer to run all of these commands from a single terminal you can background the task with the following command:
$ ./script-worker &If you’d like to turn off all of the output to the terminal, change the line
const DEBUG = trueconst DEBUG = falsebefore building the script-worker. I like to leave `DEBUG` on and start a new integrated terminal for each new process we will run (remembering to export those environment variables for each new terminal) but you can manage these processes however you wish.
Testing Your Script Worker
To make sure that your script worker is functioning correctly, let’s run a few tests.
First, we will need to create and deploy a process that will call your script worker task.
in the script-worker.go file set the PROC_NAME constant to AddOneTask, build and start your script-worker.
There is a file test-script-worker.bpmn in this directory that you can use to create a test process. You can drag-drop this file into the Modeler tab of Camunda Cloud. Your process should look like this:
You can click the Deploy Diagram button to deploy the process. Once the process is deployed, click the Start Instance button to start a process instance.
If you’ve made no changes to the process diagram, your process should be complete very quickly. You can go to the Operate tab and see a list of processes that are running (or finished).
If you click on the process ID in the list, you can see that the process has completed and that the total count at the end is 10. (We started it with count=0 and added add=1 to it, then added 4, then added 5.)
Alternatively, we could start the process with an arbitrary number, and add any number to it in the first step. To do this, we add a starting set of variables to the process:
{
  "count": 10,
  "add": 5
}
And we will end up with a final count of 24 (10 + 5 + 4 + 5 = 24).
We will be using this simple script-worker for other parts of this lab as we move forward.
Your First Orchestrated IoT Process
Building the Models
You don’t actually have to build the models if you don’t want to as they are all provided for you here:
You can drag and drop these 4 files into your Camunda Web Modeler to see the models. I’ve created folders for each exercise, but you don’t have to.
If you open the exercise4.bpmn you will see that all the forms are already linked, and that the Task Workers are all filled out as well. We will be re-using the ScriptTaskWorker from the previous exercise to handle all the ‘candy’ in this model.
Starting a Process Instance
Now that we have deployed the model, we can start a process. Since we don't have a camera/IoT device to take and submit the picture, we will just set the picture variable when we start the process, just like we did when we altered the starting `count` and `add` variable in the previous exercise.
This picture will then be sent to a server process (that is running on my cloud server) and that server process will start your process instance with the picture you took.
Once you've deployed your process, you can click the `Start Instance` button, but then you will need to fill in some information before actually clicking that final `Start Instance` button:
{
  "imageLoc": "https://davidgs.com/camunda-workshop/images/headshot.png"
}
If you have another image file you're like to use, feel free to substitute that as well.
Once you click the `Start Instance` button on that, you should see a small pop-up at the bottom of your screen with a link to your live process.
Note: At the present time there is no mechanism for displaying the picture in-line in your form. This is a current shortcoming of the Camunda Platform 8 Forms implementation but I have submitted a feature request to the Camunda Platform team to have this added. For now, your form will have an uneditable field that contains the complete URL to your picture. You can copy/paste this URL into a new browser tab to see the picture.
If you go to the Operate Tab in C8, you should now see a running instance of your process
And you can see that the token is waiting at the first User Task.
Completing Tasks
Now that the process has been started by your picture, you can go to the Task List tab in Camunda Platform 8 where you should now see a new Task:
You will need to click the claim button in order to be able to make a selection on if this is a picture of a person in a costume or not.
Once you click the Complete Task button the task will disappear from your task list. If you go back to your Operate Tab you can see the token moving along the diagram. The path that it has taken so far will be highlighted in blue.
You will now need to go back and forth between the Operate Tab and the Task List Tab to see the process move along the diagram as you complete the tasks in the Task List.
In the end, you should hear Skittles come out of the dispenser at the front of the room. You won't hear anything, and in fact, the process will likely sit at the end there, waiting for something to claim it and actually dispense the skittles.
So let's make something to claim this process and dispense (virtual) candy. You can now build and start the go process dispense-candy.go contained in this directory by running the following command in your terminal:
go mod init dispense-candy
go mod tidy
go build
./dispense-candy
Which will simply build and run the go process. This Go process will print out the number of candy pieces to dispense rather than sending them to the actual Candy Dispenser.
Lessons Learned
As you have noticed, this is a very user-intensive task. You have to repeatedly claim a task and answer a question about the picture. This is a very time-consuming process. In the next exercise, we will see how we can streamline this process by using DMN decision tables.
Creating a Decision Table
As we saw in the previous exercise, doing everything manually in separate steps is tedious and time-consuming. What if there were a way to automate more of the process so that we only had to interact with it once? This is where Decision Tables come in.
Again, all of the files are built for you if you’d like to use them instead of building them yourself.
Decision Tables, or DMNN
Of course, the Decision Table for this exercise is already created for you, but let’s go through and look at it a little bit more in order to understand how it works.
This decision table takes 3 inputs isCostume, Age, and Costume Rating that are used as input to the Determine Skittles Decision Table. These are all the variables we need in order to make a determination of how many Skittles to dispense.
If we look at the details of how the decision is made, we can see how these inputs are used:
You can see that we first evaluate the rating of the costume and add Skittles (or not) based on that rating. We then evaluate the age of the person, and again add (or subtract) skittles from the total.
In the last step, we evaluate the isCostume variable and if it is false, we zero out the total, because if you’re not wearing a costume, you get no candy!
This decision table is a Collect (sum) table which means that it will go through all the rules and add up all the values from the rules that apply. It will output the final sum from this table. That’s why we save the isCostumefor last so that we can zero out the total as the last step.
Creating the Improved Form
Now that we have the decision table, it’s time to create the form that we will use. Since our goal here is to simplify the process and require less human interaction we’re going to combine everything into one form.
It really is just all the elements from the previous forms. We’re simply going to do all the evaluations in one form.
Creating the Model
The model is a much more simplified version of what we did in the previous exercise. We’re going to create a model that uses only one form and has one decision table.
Note: Finding the
decision idfor the decision table can be a bit tricky. You can find it by opening the Decision Table, and clickin on the table itself, then looking in the Properties Panel under theGeneraltab.
Deploying the Improved Model
Now that we have our decision table, our form, and our model, it’s time to get it all up and running. First, you’ll need to deploy the decision table. Open the decision table in the modeler, and click the Deploy Diagram button.
Once the Decision Table is deployed, you’ll do the same thing with the form. Open the form in the modeler, and click the Deploy Diagram button.
Finally, you’ll need to deploy the model. Open the model in the modeler, and click the Deploy Diagram button.
Now that all 3 parts of the process are deployed, you can start the process.
Starting the Process
The process ID (unless you changed it in the model) is exercise-5-process. Once again, since we don't have the IoT hardware handy, we can simply start the process with some pre-defined variables by clicking `Start Instance` and filling in the JSON as before:
Or use your own image location.
If you go back to your Camunda Platform 8 Console now, and look under the Operate tab, you should see your Exercise 5 process running. You can then go to the Task Manager tab to complete the form and watch as the decision table is executed and virtual skittles are dispensed but your `dispense candy` process (that you left running, right?).
Conclusion
We have now seen how using a DMN Decision table can greatly simplify and streamline the entire process. We have reduced the human interaction to a single form, and we have a single DMN table to make all the decisions before dispensing Skittles.
In the next exercise, we will see how we can remove all human interaction from the process and turn everything over to some Image AI technology to make all the decisions.
Humans Are Slow
As we’ve seen in the previous exercises, humans are slow. They take a long time to think about what they want to do, and they don’t always get it right. Also, filling out the same form repeatedly is tedious and time-consuming, and people get tired of doing the same thing over and over.
We saw that we can reduce some of this time by reducing the number of forms, but still, there is a form that requires human interaction.
In this final exercise, we will see how we can automate an entire process by removing all human interaction and still achieving a result.
What we will do
In order for this portion of the workshop to work, we are going to change the overall task a little bit. We could continue with the costume evaluation process, but in order to do so we would first have to train a Visual AI model to detect the things we’re looking for, and that is well outside of the scope of this workshop.
If training an AI model is something you’re interested in doing, please feel free to contribute that model to this GitHub repo so that others can use it.
Since we don’t have a trained AI model for costumes and ages, we’re going to use a pre-trained Google Vision AI model to evaluate the emotional state of a person and dispense candy depending on their state.
The New Process
Since we are no longer using any forms or user tasks, our process will be very short and relatively simple.
As you can see, we have one external task, followed by a decision table, followed by the task to dispense candy (if any candy is deserved, of course).
This is, clearly, a much simplified and more efficient process that requires no human interaction. We can deploy this process and have it run, unattended, for as long as we want.
You can download the new model here and upload it to your Cloud Modeler.
The Google AI Task
The first thing that happens when a picture is submitted is that we execute a “Submit to Google AI” external task. This task takes the provided picture, submits it to Google’s Vision AI API, and returns the evaluated results to the model.
To do this, we will submit the picture to Google’s Vision AI API. This is why we all enabled that API in our Google Console back in Exercise 1!
If you’re not interested in how this whole process works, you can simply build and start the exercise-6.go task worker as is with the following command in your terminal:
$ go mod init exercise-6
$ go mod tidy
$ go build
$ ./exercise-6
Much of the Golang code in this Task Worker will look vary familiar to previous exercises. We start a Task Worker using our Camunda Platform 8 credentials, which listens for tasks with the ID DoPictureAI. When it finds one, it gets the process variable imageLoc, downloads the picture at that location, and submits it to the Google Vision AI for processing.
jobKey := job.GetKey()
    _, err := job.GetCustomHeadersAsMap()
    if err != nil {
        // failed to handle job as we require the custom job headers
        failJob(client, job)
        return
    }
    jobVars := JobVars{}
    err = job.GetVariablesAs(&jobVars)
    if err != nil {
        failJob(client, job)
        return
    }
    dPrintf("%+v\n", jobVars)
    if jobVars.ImageLoc == "" {
        failJob(client, job)
        return
    }
    // Get the image from the storage
    resp, err := http.Get(jobVars.ImageLoc)
    if err != nil {
        failJob(client, job)
        return
    }
    defer resp.Body.Close()
  emote := doAIOnPic(&resp.Body)
That last bit is where the actual work takes place, so let’s look a little more closely at that.
client, err := vision.NewImageAnnotatorClient(ctx, options)
    if err != nil {
        log.Fatalf("Failed to create client: %v", err)
    }
    defer client.Close()
    im, err := vision.NewImageFromReader(io.Reader(*image))
    if err != nil {
        log.Fatalf("Failed to create image: %v", err)
    }
    emotions := Emotions{}
  annotations, err := client.DetectFaces(ctx, im, nil, 10)
    if err != nil {
        fmt.Println("No faces found.")
        emotions.IsPicture = false
        log.Fatalf("Failed to detect faces: %v", err)
    }
We first create a Google Vision API client which we will use to submit the image, once we have that, we will create the new image from the URL we got as part of the process variables. This actually saves us some memory because we don’t download the image, and then submit it but rather send a reference to the Reader object directly to the Google Vision API NewImageFromReader method. We also create a emotions variable to store the results of the Google Vision API.
When we submit the image to Google, we will get back an annotations object from Google. We are not interested in everything in this object, so I created an interestingAnnotations JSON object that has the parameters we will use to dispense candy:
type interestingAnnotations struct {
    DetectionConfidence    float64 `json:"detection_confidence"`
    LandmarkingConfidence  float64 `json:"landmarking_confidence"`
    JoyLikelihood          int     `json:"joy_likelihood"`
    SorrowLikelihood       int     `json:"sorrow_likelihood"`
    AngerLikelihood        int     `json:"anger_likelihood"`
    SurpriseLikelihood     int     `json:"surprise_likelihood"`
    UnderExposedLikelihood int     `json:"under_exposed_likelihood"`
    BlurredLikelihood      int     `json:"blurred_likelihood"`
    HeadwearLikelihood     int     `json:"headwear_likelihood"`
}
We can then go through the larger annotations object and gather the things we want:
 for i, annotation := range annotations {
        goodStuff := interestingAnnotations{}
        data, err := json.Marshal(annotation)
        if err != nil {
            log.Fatal(err)
        }
        err = json.Unmarshal(data, &goodStuff)
        if err != nil {
            log.Fatal(err)
        }
        dPrintln("  Face", i)
        emotions.Anger = annotation.AngerLikelihood.String()
        emotions.AngerNumber = goodStuff.AngerLikelihood
        dPrintln("    Anger:", annotation.AngerLikelihood)
        emotions.Joy = annotation.JoyLikelihood.String()
        emotions.JoyNumber = goodStuff.JoyLikelihood
        dPrintln("    Joy:", annotation.JoyLikelihood)
        emotions.Surprise = annotation.SurpriseLikelihood.String()
        emotions.SurpriseNumber = goodStuff.SurpriseLikelihood
        dPrintln("    Surprise:", annotation.SurpriseLikelihood)
        emotions.Sorrow = annotation.SorrowLikelihood.String()
        emotions.SorrowNumber = goodStuff.SorrowLikelihood
        dPrintln("    Sorrow:", annotation.SorrowLikelihood)
    }
We will then return this emotions object, from which we will submit the task variables:
 variables := make(map[string]interface{})
    variables["isPicture"] = emote.IsPicture
    variables["Joy"] = emote.Joy
    variables["JoyNumber"] = emote.JoyNumber
    variables["Anger"] = emote.Anger
    variables["AngerNumber"] = emote.AngerNumber
    variables["Surprise"] = emote.Surprise
    variables["SurpriseNumber"] = emote.SurpriseNumber
    variables["Sorrow"] = emote.Sorrow
    variables["SorrowNumber"] = emote.SorrowNumber
    dPrintf("%+v\n", variables)
    request, err := client.NewCompleteJobCommand().JobKey(jobKey).VariablesFromMap(variables)
    if err != nil {
        failJob(client, job)
        return
    }
    dPrintln("Complete job", jobKey, "of type", job.Type)
    ctx := context.Background()
    _, err = request.Send(ctx)
    if err != nil {
        panic(err)
    }
I’m returning the String values, but when we look at the DMN table you will see that they are unused. We could use them in the process if we wanted to, but for this exercise we will just use the Number values.
Making Decisions
Now that we are using different criteria for our decision, we need to create an entirely new decision table in order to decide how much candy to distribute.
Woah! That’s a complicated table! In fact, it’s not just one table but a whole series of them, all feeding into one final table that will decide how much candy to distribute.
Note: the smaller tables contain my proprietary algorithm for giving out candy based on the detected
moodof the person in the picture but you are welcome to create your own by modifying those tables however you wish.
You can see from the table for Joy how I calculate the number of pieces of candy for someone:
These calculations are entirely made up by me.
Once the number of pieces of candy are calculated for each emotion, the final table adds them all up and provides a final result:
You can download the DMN Table pictured above and deploy it to your Cloud Modeler.
Conclusions
What Have We Learned?
I hope that this tutorial has been both interesting as well as useful. But I started off this piece by making some pretty bold statements about how automating the IoT could lead to more successful IoT deployments. The question here is, have I proven that in any way?
What We’ve Done
We’ve seen how we can iterate on a process that started out as very complicated and cumbersome, streamlined it a bit to make it easier, and then finally employed some image AI technology to make it all automated, cutting out human interaction entirely.
Some key concepts I hope you’ve learned:
- How to use BPMN to automate a process
- How to create external task workers to handle tasks
- How to use Forms to allow humans to interact with a process
- How to automate decisions with DMN Decision tables
- How to completely automate a process with AI and DMN Decision tables
But if we look more closely at what we've done, we can see how I really have proven that point. You see, what we've ended up with is an automated process, with a bunch of external Go programs that handle the real work. And if we look at what drives that really work it's not the IoT processes themselves. It's the business decisions made based on the input from that data.
Looked at another way, you could have your IoT engineers build this system (let's go with the last version) so that anyone that walks up to your kiosk gets their picture taken, and is rewarded with some candy. Now, as this kiosk is running in the real world, the business folks in charge of the kiosk realize that it is handing out far too much candy. Now, without the intervention of anyone outside the business line managers, they can go in, and make some adjustments to the DMN tables (my highly proprietary and scientifically derived formulas) to reduce the amount of candy handed out.
No re-engineering of any other components -- the camera, or the actual candy dispenser -- would be required. The automated process has been abstracted with business rules that can easily be altered in the business model (the BPMN and DMN) to alter how the system works.
If you have questions or comments, please feel free to reach out to me.
Feel free to follow me on Twitter at @davidgsIoT.
Recommend
About Joyk
Aggregate valuable and interesting links.
Joyk means Joy of geeK