

Get started with Red Hat OpenShift Connectors
source link: https://developers.redhat.com/articles/2022/06/09/get-started-red-hat-openshift-connectors
Go to the source link to view the article. You can view the picture content, updated content and better typesetting reading experience. If the link is broken, please click the button below to view the snapshot at that time.
Red Hat OpenShift Connectors is a new cloud service offering from Red Hat. They are pre-built connectors for quick and reliable connectivity across data, services, and systems. Connectors are delivered as a fully managed service, tightly integrated with Red Hat OpenShift Streams for Apache Kafka, Red Hat's managed cloud service for Apache Kafka.
Red Hat OpenShift Connectors is in the Service Preview phase at the moment. As part of the Service Preview program, you can deploy up to four connectors free of charge. The connectors are deleted after 48 hours.
We make a distinction between source and sink connectors. A source connector allows you to send data from an external system to OpenShift Streams for Apache Kafka. A sink connector allows you to send data from OpenShift Streams for Apache Kafka to an external system.
At the moment we offer more than 50 source and sink connectors. These include source and sink connectors to a variety of cloud services based on the awesome Camel K technology, as well as source connectors for databases based on the popular Debezium project that performs change data capture. The complete list of available connectors to date can be found at the Red Hat OpenShift Connectors site.
This article shows you how to get started with OpenShift Connectors. You will learn how to create a source connector and a sink connector and send data to and from topics in OpenShift Streams for Apache Kafka.
Prerequisites
Prerequisites
This article assumes that you have created an OpenShift Streams for Apache Kafka instance and that the instance is in the Ready state. Please refer to Getting started with OpenShift Streams for Apache Kafka for step-by-step instructions to create your Kafka instance.
Configure OpenShift Streams for Apache Kafka
Configure OpenShift Streams for Apache Kafka
Your OpenShift Streams for Apache Kafka instance requires some setup for use with Red Hat OpenShift Connectors. This includes creating Kafka topics to store messages sent by producers (data sources) and make them available to consumers (data sinks), creating a service account to allow you to connect and authenticate your connectors with the Kafka instance, and setting up access rules for the service account to define how your connectors can access and use the associated Kafka instance topics.
Create a Kafka Topic
We start with an example Kafka topic, because it's the resource at the center of Kafka operations. Create a topic as follows:
- Log in to the hybrid cloud console at console.redhat.com with your Red Hat account credentials.
- Navigate to Application and Data Services→Streams for Apache Kafka→Kafka instances, and select the Kafka instance you created as part of the prerequisites.
- Select the Topics tab, and click Create topic.
- Enter a unique name for your topic, for example test-topic. Accept the defaults for partitions, message retention, and replicas.
Create a service account
Next, you need an account in order to get access to Kafka. Create the account as follows:
- In the cloud console, select Service Accounts and click Create Service Account.
- Enter a unique name for the service account, and click Create.
- Copy the generated Client ID and Client Secret to a secure location. You'll use these credentials when configuring your connectors.
- Select the I have copied the client ID and secret option, and then click Close.
Set the access level for the service account
Having an account, you can now obtain the necessary permissions. For this example, you need to be a consumer for one service and a producer for another, so you'll enable both sets of permissions. Set the access levels as follows:
- In the cloud console, select Streams for Apache Kafka→Kafka instances. Select the Kafka instance you created as part of the prerequisites.
- Click the Access tab to view the current Access Control List (ACL) for the Kafka instance and then click Manage access.
- From the Account drop-down menu, select the service account that you created in the previous step, and then click Next.
- Under Assign Permissions, click Add permission.
- From the drop-down menu, select Consume from a topic. Set all resource identifiers to
isand all identifier values to*(an asterisk). - From the drop-down menu, select Produce to a topic. Set all resource identifiers to
isand all identifier values to*.
Figure 1 shows what the access control list should look like.

Figure 1: The access control list for your OpenShift Streams for Apache Kafka instance shows that your service account has access to all topics.
Your OpenShift Streams for Apache instance is now configured for use by your connectors.
Create a source connector
Create a source connector
A source connector consumes events from an external data source and produces Kafka messages. For this getting started guide, you will use the Data Generator source connector. This connector does not actually consume data from an external system, but produces Kafka messages to a topic at a configurable interval. Install the connector as follows:
- In the cloud console, select Connectors and click Create a Connectors instance.
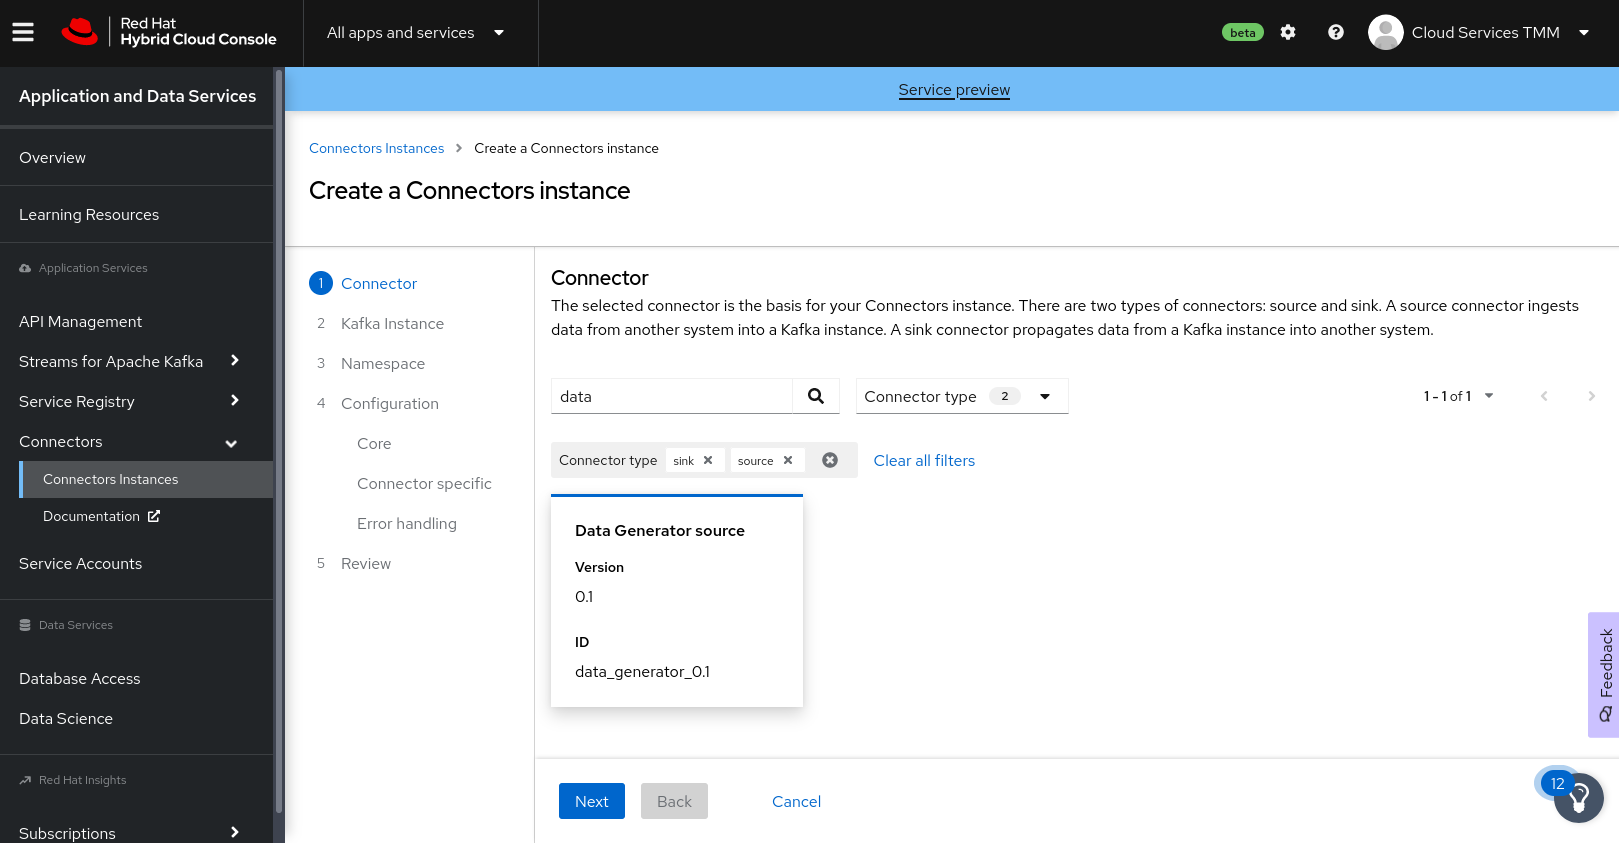
- Select the connector that you want to use as a data source. You can browse through the catalog of available connectors, or search for a particular connector by name and filter the search to look for sink or source connectors. For example, to find the Data Generator source connector, type data in the search box. The list filters to show only the Data Generatorconnector card, as shown in Figure 2. Click the Data Generator card to select the connector, then click Next.
- For the Kafka instance, click the card for the OpenShift Streams for Apache Kafka instance that you configured for your connectors, and click Next.
- On the Namespace page, click Create preview namespace to provision a namespace for hosting the connector instances that you create. This evaluation namespace will remain available for 48 hours. You can create up to four connector instances per namespace. Once the namespace is available, select it and click Next.
- Configure the core configuration for your connector as follows:
-
Provide a name for the connector.
-
Enter the Client ID and Client Secret of the service account that you created for your connectors, then click Next.
-
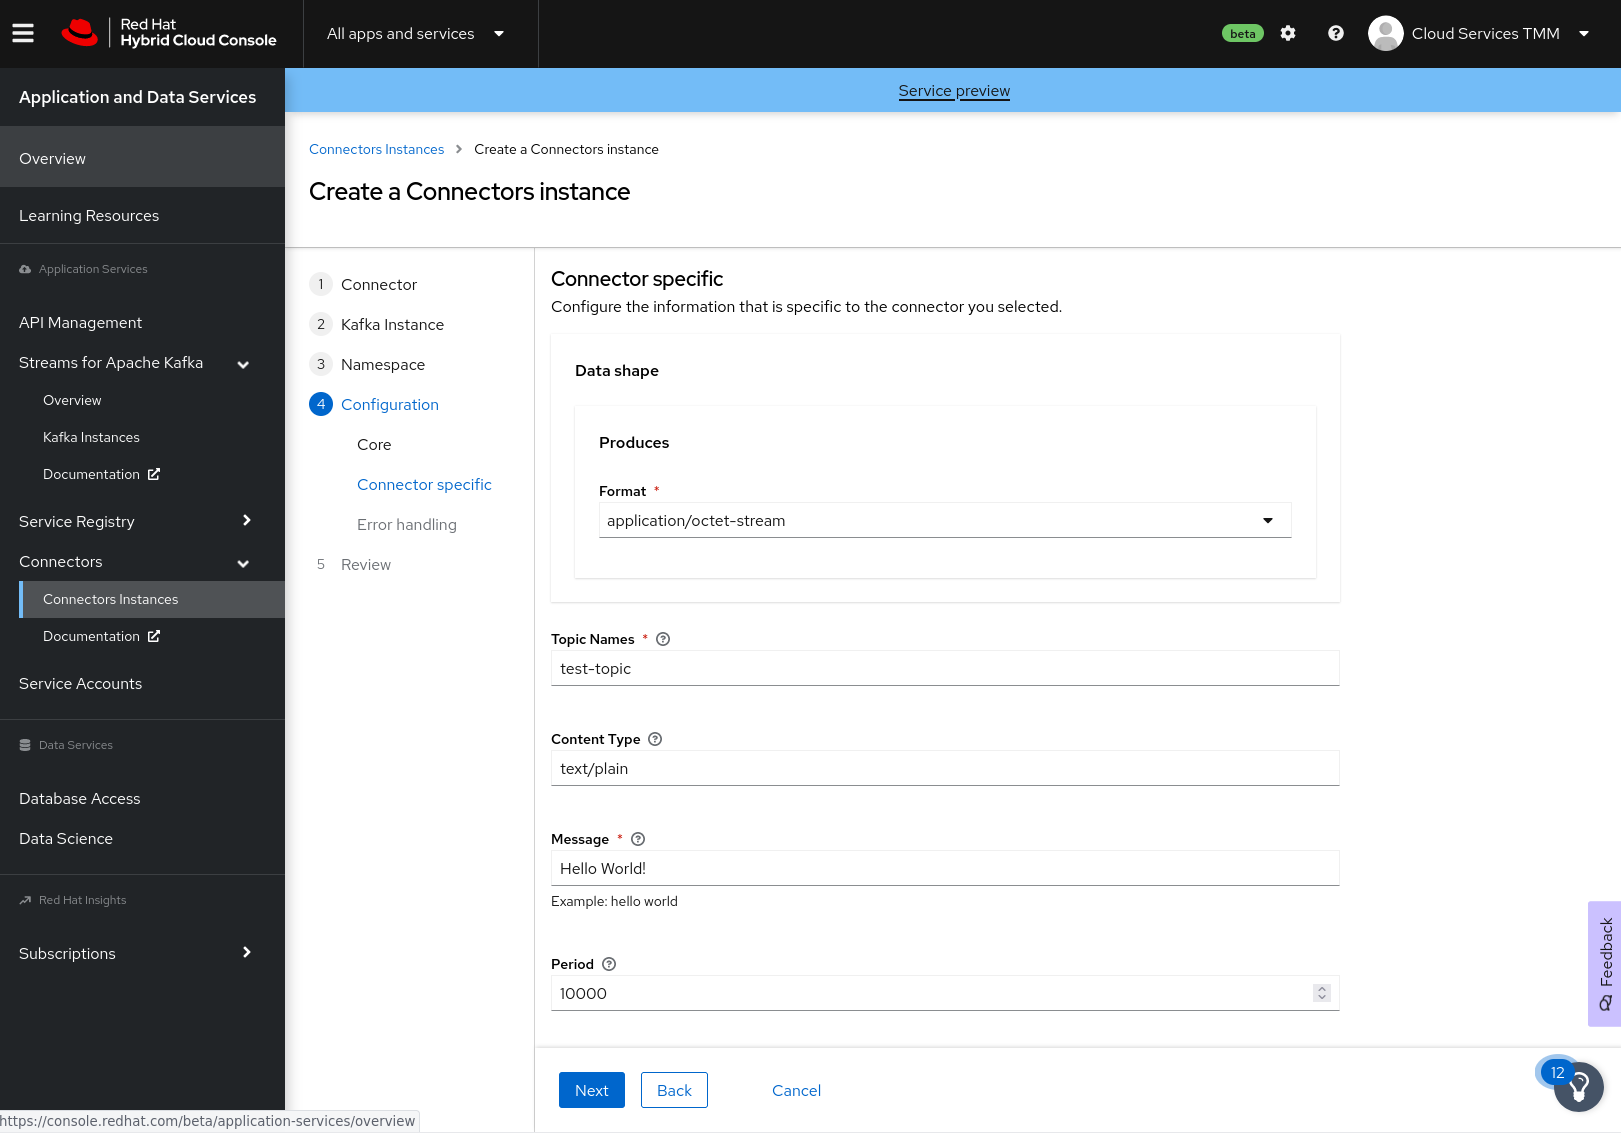
Provide connector-specific configuration values. For the Data Generator connector, provide the following information:
-
Data shape Format: Accept the default,
application/octet-stream. -
Topic Names: Enter the name of the topic that you created previously for your connectors (for example, test-topic).
-
Content Type: Accept the default,
text/plain. -
Message: Enter the content of the message that you want the connector instance to send to the Kafka topic. For example, type
Hello World!. -
Period: Specify the interval (in milliseconds) at which you want the connector instance to send messages to the Kafka topic. For example, specify
10000to send a message every 10 seconds.Figure 3 shows an overview of the connector configuration.
-
- Configure the error handling policy for your connector instance. The default is stop, which causes the connector to shut down when it encounters an error.
-
- Review the summary of the configuration properties and click Create Connector.
Your connector instance should now be listed in the table of connectors. After a couple of seconds, the status of your connector instance will change to the Ready state, and it will start producing messages and sending them to its associated Kafka topic.
From the connectors table, you can stop, start, and delete your connector, as well as edit its configuration, by clicking the options icon (three vertical dots).
Create a sink connector
Create a sink connector
A sink connector consumes messages from a Kafka topic and sends them to an external system. For this example, use the HTTP Sink connector, which consumes Kafka messages from one or more topics and sends the messages to an HTTP endpoint.
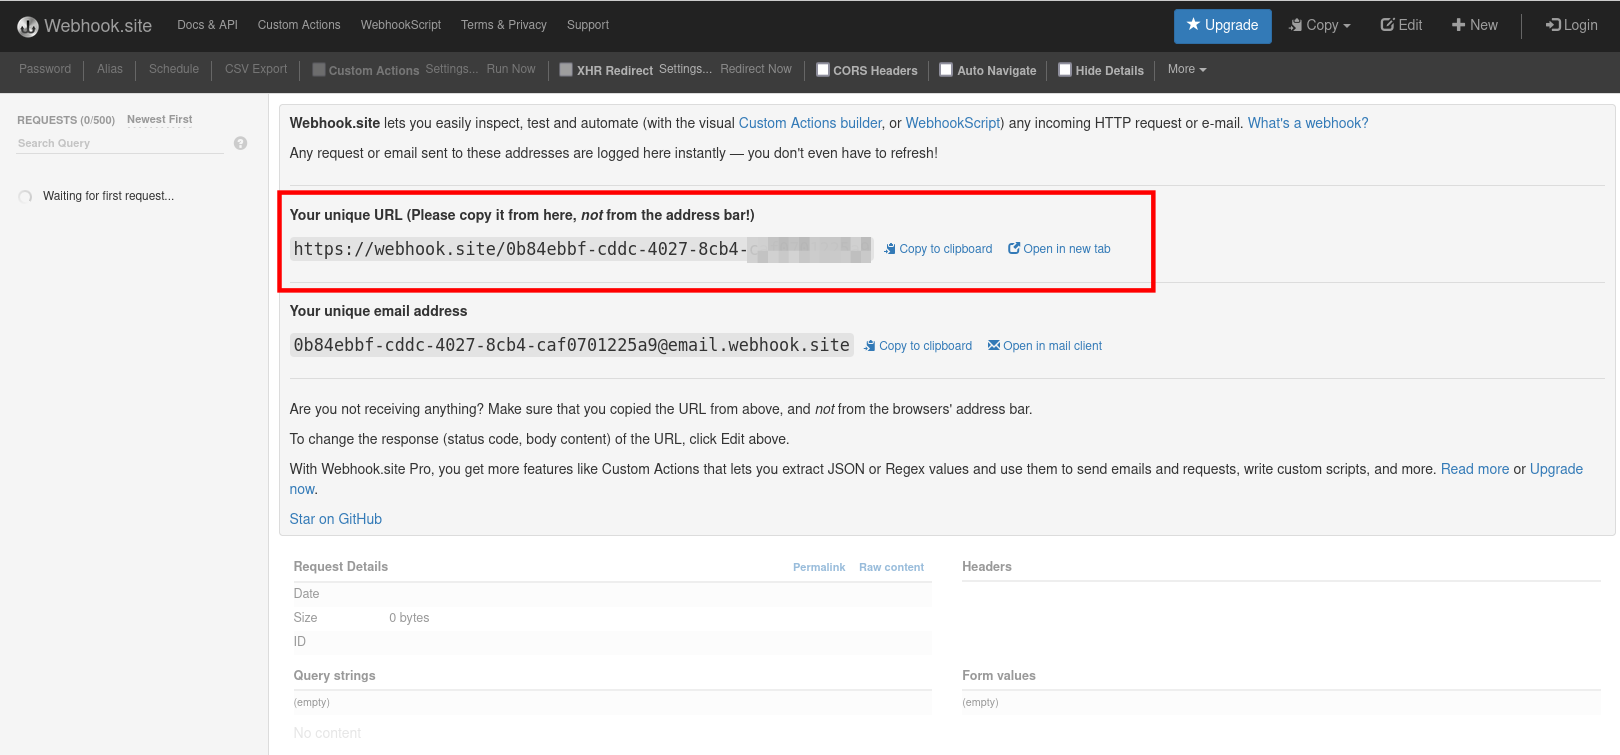
The Webhook.site service offers a convenient way to obtain a general-purpose HTTP endpoint. Open a new tab in your browser and navigate to https://webhook.site. The page displays a unique URL that you can use as a data sink, as shown in Figure 4.
Once you have that URL, configure the endpoint as follows:
- In the cloud console, select Connectors and click Create Connectors instance.
- To find the HTTP Sink connector, enter http in the search field. Click the HTTP Sink connector card and then click Next.
- Select the OpenShift Streams for Apache Kafka instance for the connector to work with.
- On the Namespace page, click the eval namespace that you created when you created the source connector. Then click Next.
- Configure the core configuration for your connector:
- Provide a unique name for the connector.
- Type the Client ID and Client Secret of the service account that you created for your connectors, and click Next.
- Provide the connector-specific configuration for your connector. For the HTTP sink connector, provide the following information:
- Data shape Format: Accept the default,
application/octet-stream. - Method: Accept the default,
POST. - URL: Type your unique URL from Webhook.site.
- Topic Names: Type the name of the topic that you used for the source connector.
- Data shape Format: Accept the default,
- Set the error handling policy to stop.
- Review the summary of the configuration properties and click Create Connector.
Your connector instance will be added to the table of connectors. After a couple of seconds, the status of your connector instance will change to the Ready state. The connector consumes messages from the associated Kafka topic and sends them to the HTTP endpoint.
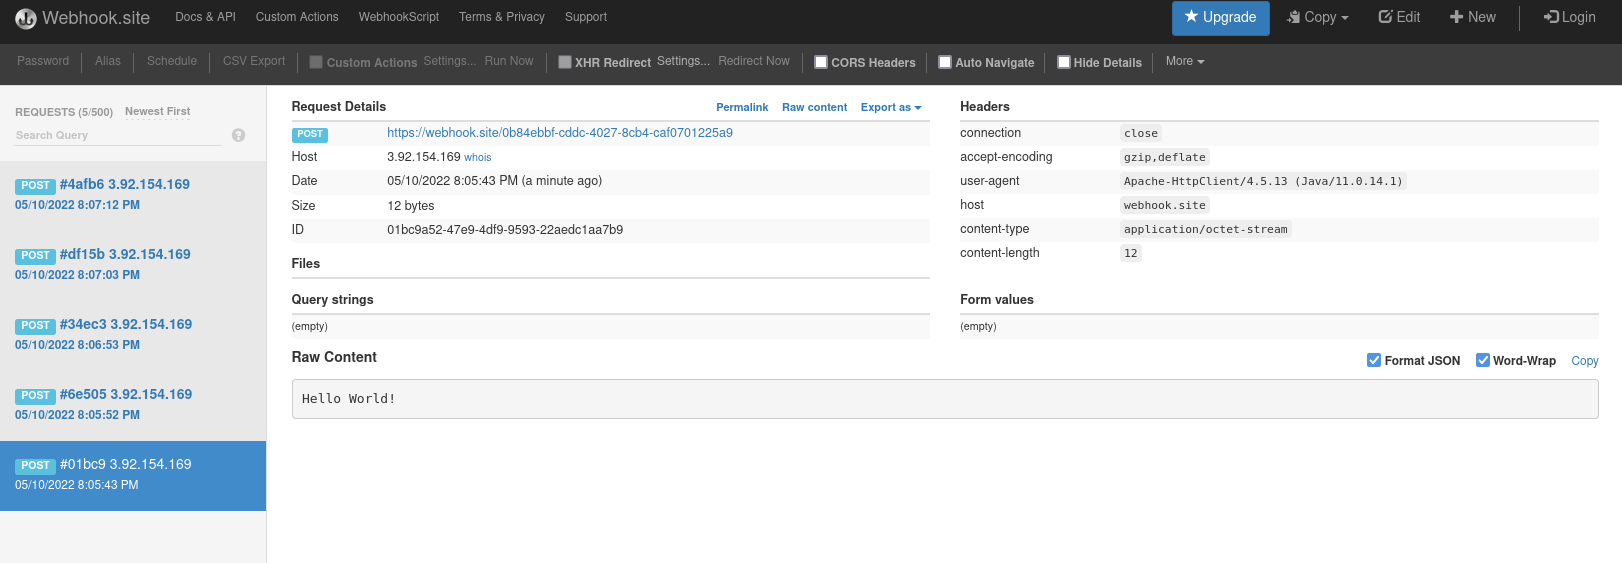
Visit the unique URL you got from Webhook.site in your browser to see the HTTP POST calls with the "Hello World!" messages that you defined in the source connector, as shown in Figure 5.
Next steps
Next steps
Congratulations—you have created your first Red Hat OpenShift Connector instances. From here, you can create other source and sink connectors to a variety of external systems and cloud services.
Stay tuned for the next article in this series, in which we will show you how to use Red Hat OpenShift Connectors to connect to a cloud-based database and capture data change events from that database.
Recommend
About Joyk
Aggregate valuable and interesting links.
Joyk means Joy of geeK