

windows下修改、编译、构建spring-framework4.1.8.RELEASE源码
source link: https://blog.51cto.com/zq2599/5358895
Go to the source link to view the article. You can view the picture content, updated content and better typesetting reading experience. If the link is broken, please click the button below to view the snapshot at that time.
windows下修改、编译、构建spring-framework4.1.8.RELEASE源码
原创欢迎访问我的GitHub
这里分类和汇总了欣宸的全部原创(含配套源码): https://github.com/zq2599/blog_demos
- 在《下载Spring4.1.x源码并用IntelliJ IDEA打开》一文中,我们将spring-framework源码在本地用ideal打开,今天来实战修改spring-framework源码,然后编译构建,最后用写一个demo工程来验证构建成功;
- 实战涉及的版本如下:
- 操作系统:win10 64;
- JDK:1.8.0_144;
- Maven:3.5.0;
- IntelliJ IDEA:2018.1.5(Ultimate Edition);
- 本次实战所有步骤如下:
- 下载spring-framwork源码,用IDEA打开此工程;
- 修改spring-framework中的类,添加代码;
- 编译构建spring-framework,添加到本地maven仓库;
- 基于maven创建一个新的demo,使用本地仓库的spring-framework;
- 执行demo工程验证修改的代码已经生效;
- 接下来开始实战吧;
下载spring-framework源码,用IDEA打开此工程
-
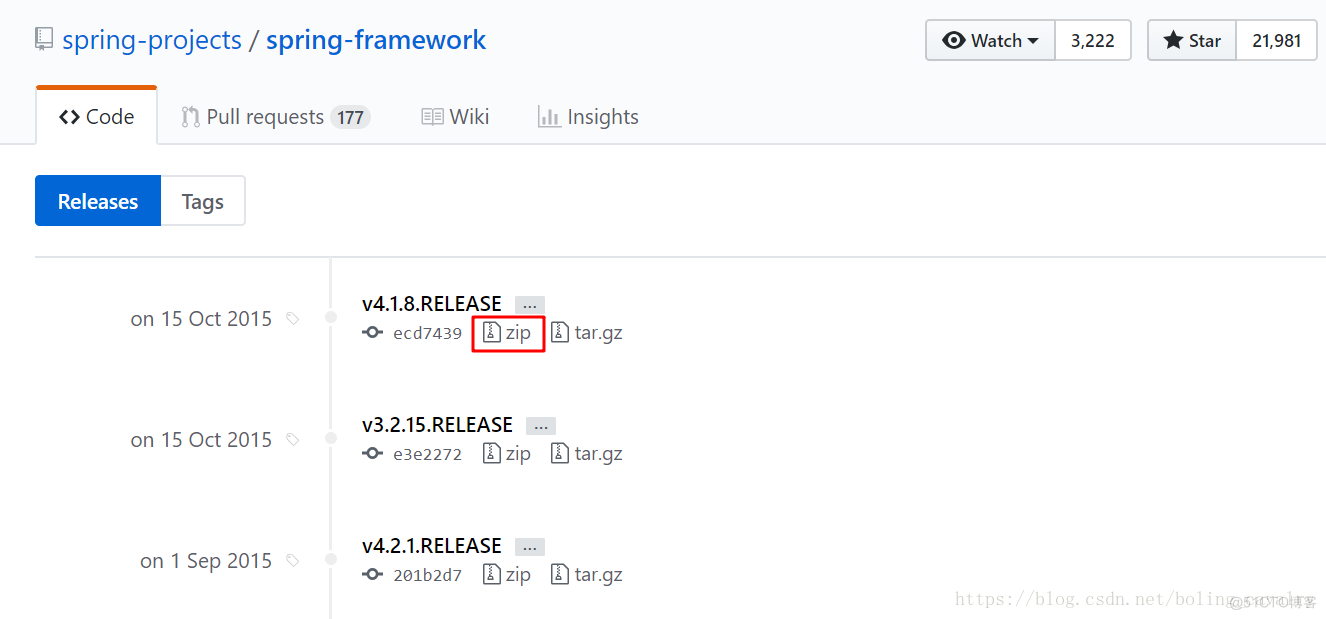
打开spring-framework在GitHub上的release列表,地址是: https://github.com/spring-projects/spring-framework/releases ,下载4.1.8.RELEASE版本,如下图红框所示:
-
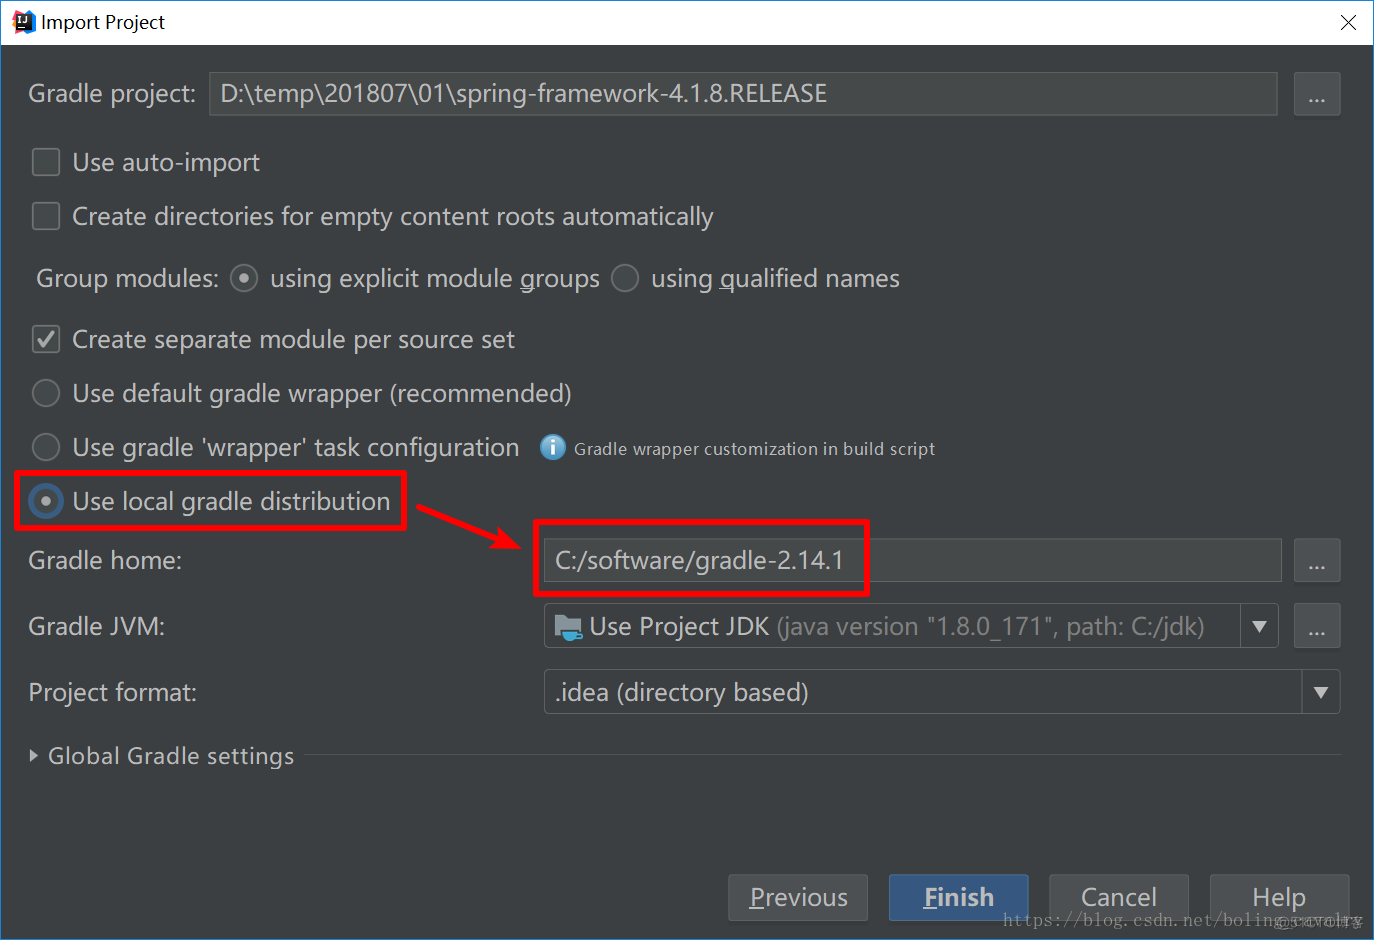
解压后,用Intellij IDEA以Gradle工程的形式导入,Gradle版本记得使用2.14.1,如下图:
修改spring-framework中的类
- 本次修改的类是PropertyPlaceholderHelper.java,这个类用来替换字符串中的占位符,本次修改源码的目的如下:
- 将替换前后的字符串打印出来用于对比;
- 将调用堆栈打印出来,这样我们在学习spring源码时,可以知道处理占位符的时机和位置;
- 对PropertyPlaceholderHelper.java的具体修改如下所示:
- 新增一个private方法,用于打印当前堆栈位置:
private void printTrack(String prefix){
    StackTraceElement[] st = Thread.currentThread().getStackTrace();
    if(st==null){
        logger.info("invalid stack");
        return;
    }

    StringBuffer sbf =new StringBuffer();

    for(StackTraceElement e:st){
        if(sbf.length()>0){
            sbf.append(" <- ");
            sbf.append(System.getProperty("line.separator"));
        }

        sbf.append(java.text.MessageFormat.format("{0}.{1}() {2}"
                    ,e.getClassName()
                    ,e.getMethodName()
                    ,e.getLineNumber()));
    }
    logger.info(prefix + "\n" + sbf.toString());
}
- 找到方法parseStringValue,注意是protected类型的那个,在该方法的起始位置添加如下两行代码:
protected String parseStringValue(
            String strVal, PlaceholderResolver placeholderResolver, Set<String> visitedPlaceholders) {
    printTrack("start parseStringValue");
    logger.info("before parse : [" + strVal + "]");
- 上述代码先是将parseStringValue被调用的堆栈打印出来,接着将入参strVal打印出来;
- 在上一步中的parseStringValue方法的结束位置,在return之前增加一行代码,将处理后的字符串打印出来,如下:
    logger.info("after parse : [" + result + "]");
    return result.toString();
}
- 为了避免当前电脑的其他项目用到我们构建的spring版本,我们把版本号改掉,打开gradle.properties文件,修改版本号为"4.1.88.RELEASE",如下:
version=4.1.88.RELEASE
编译构建spring-framework
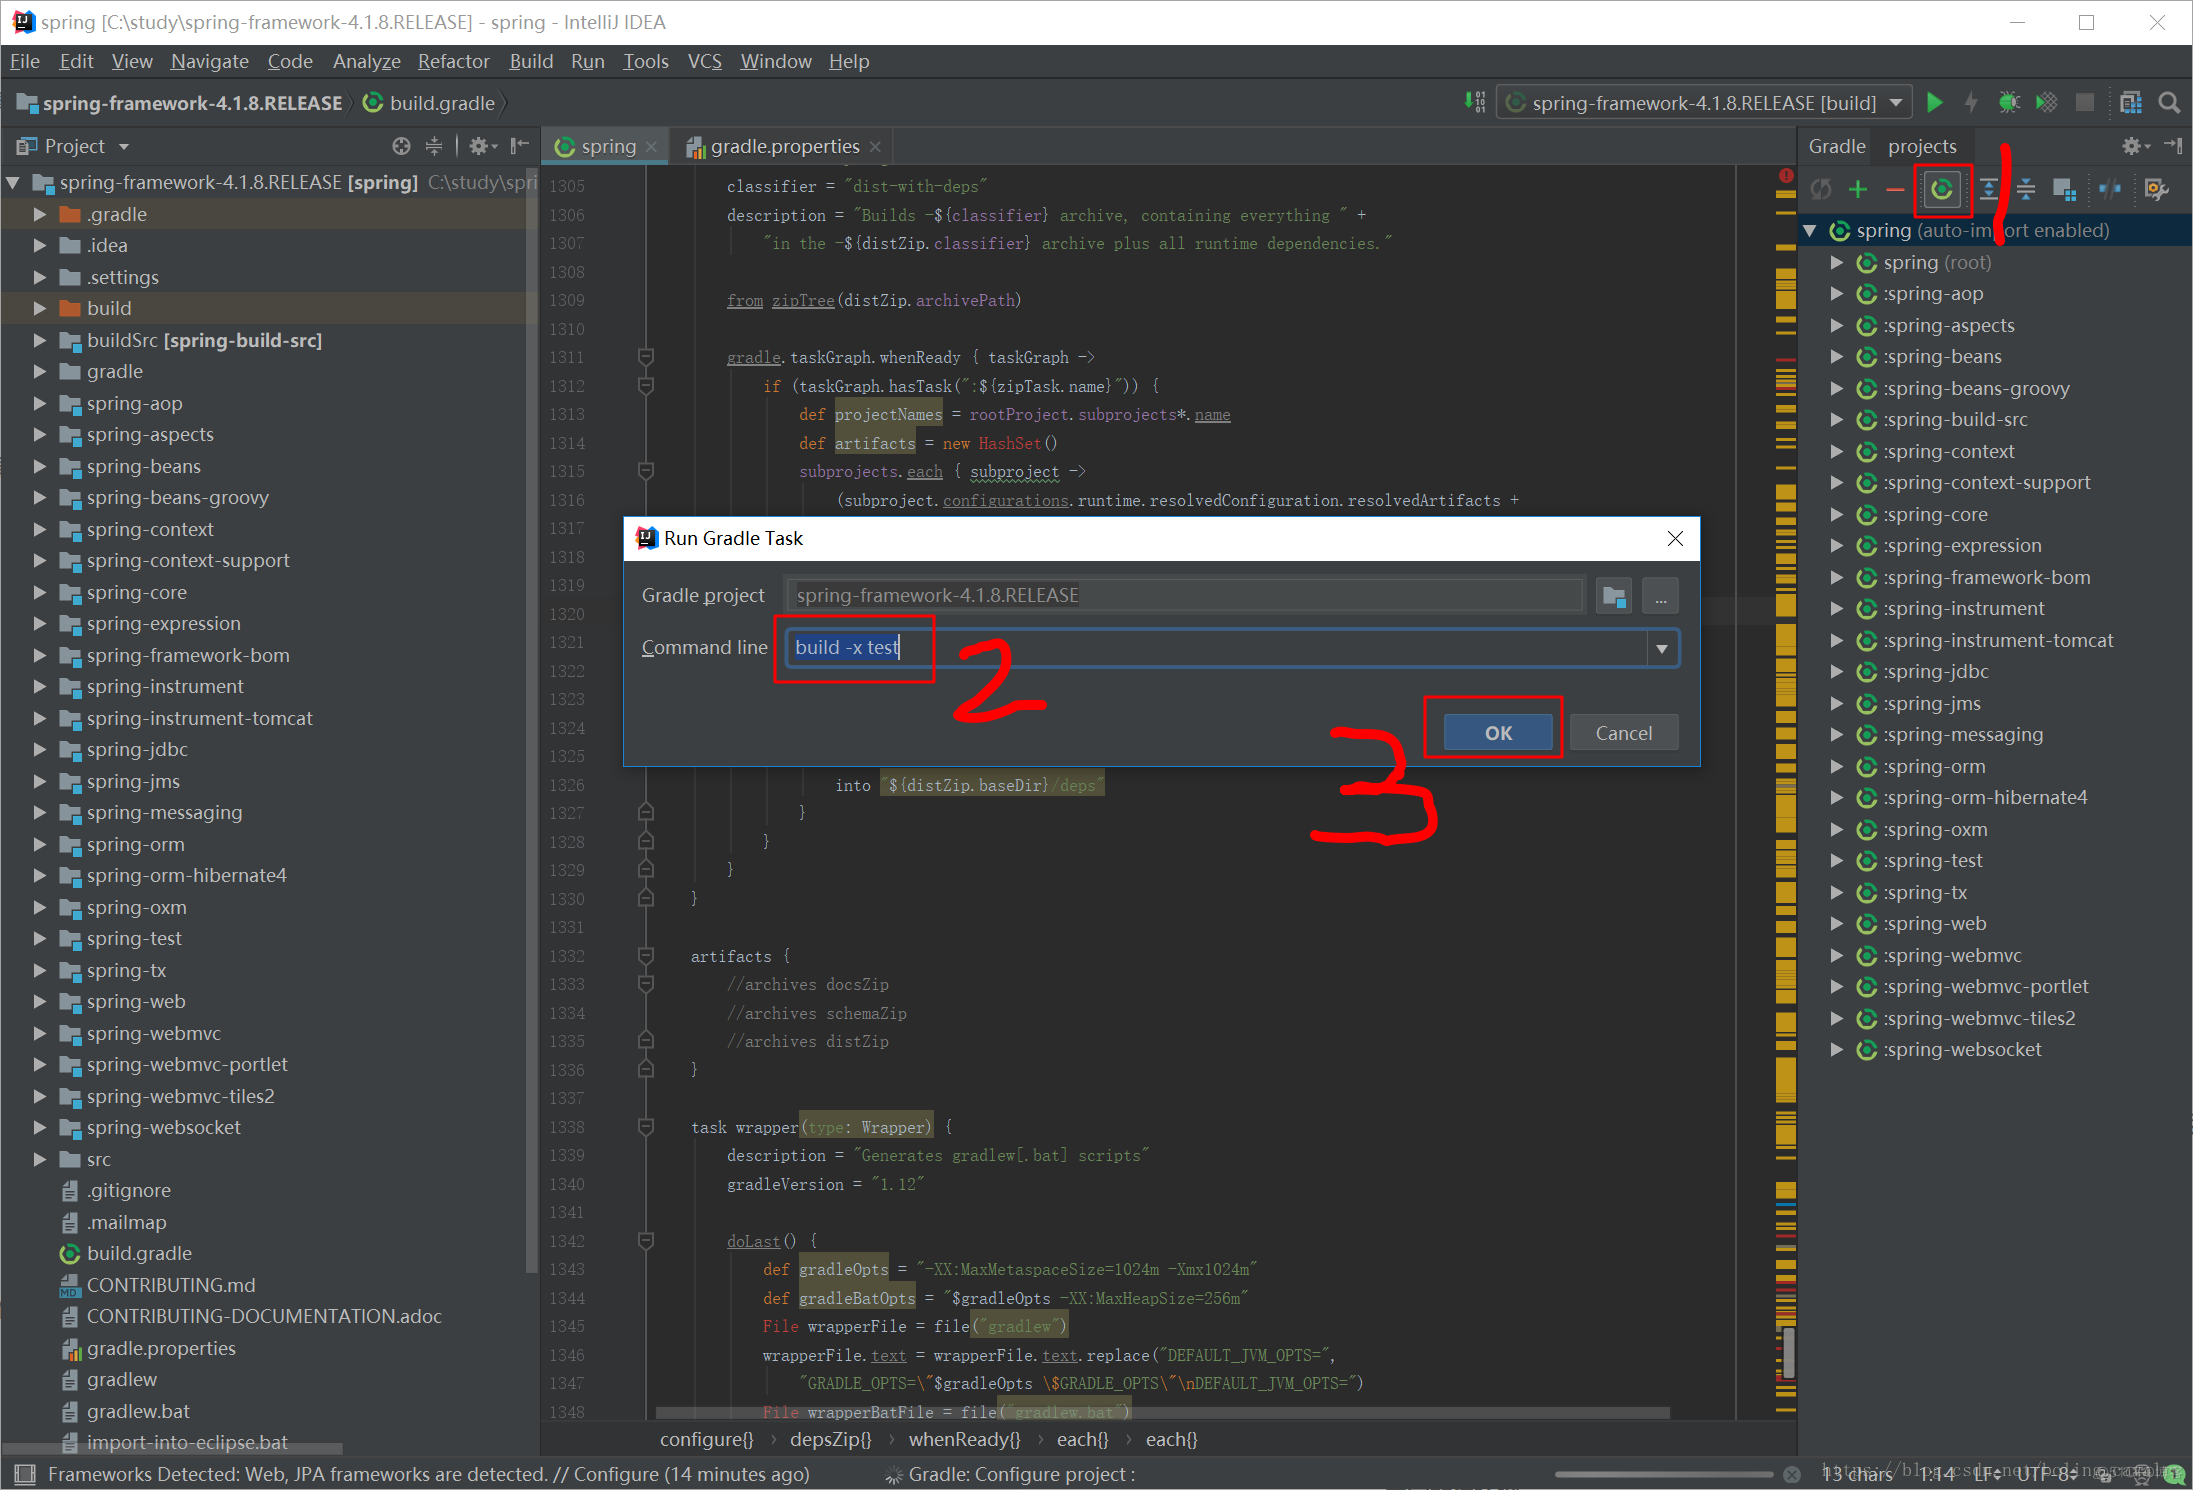
- 用命令build -x test编译和构建工程,操作如下图所示:
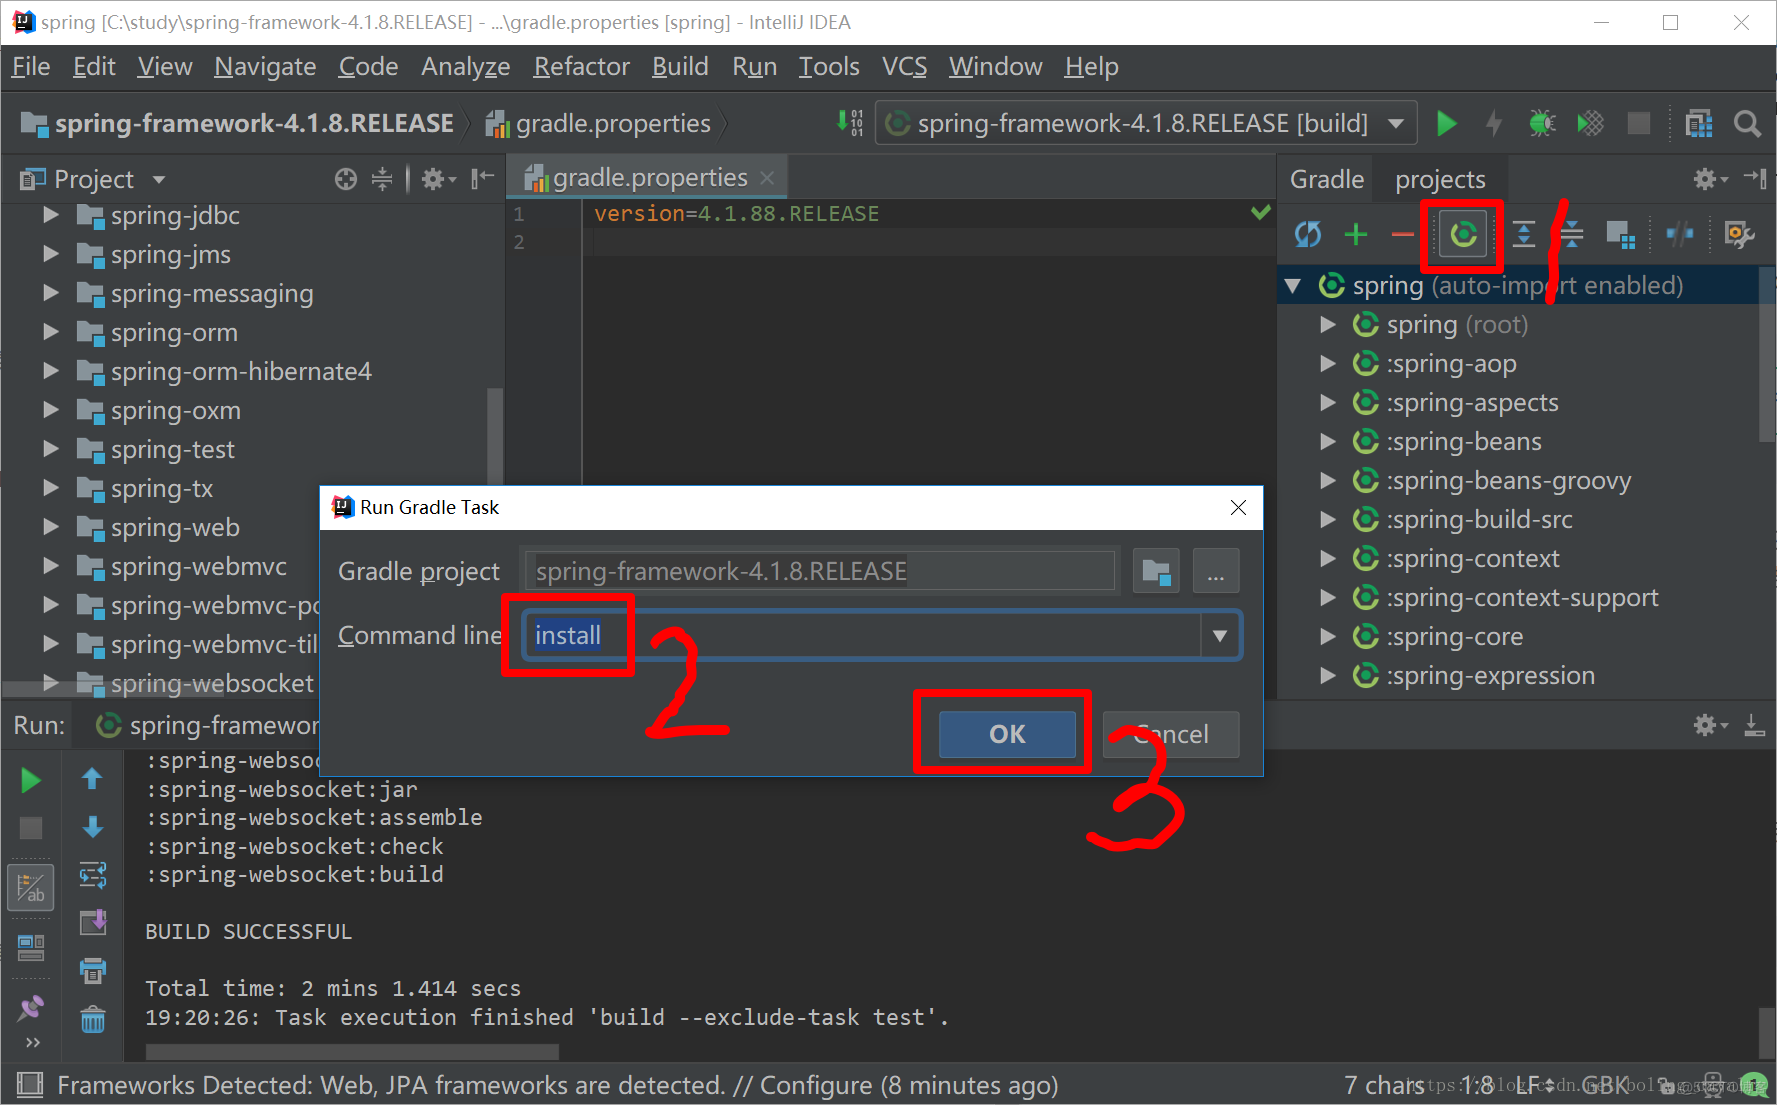
- 等待构建完成之后,用命令install将构建的jar部署到本地maven仓库中,如下图:
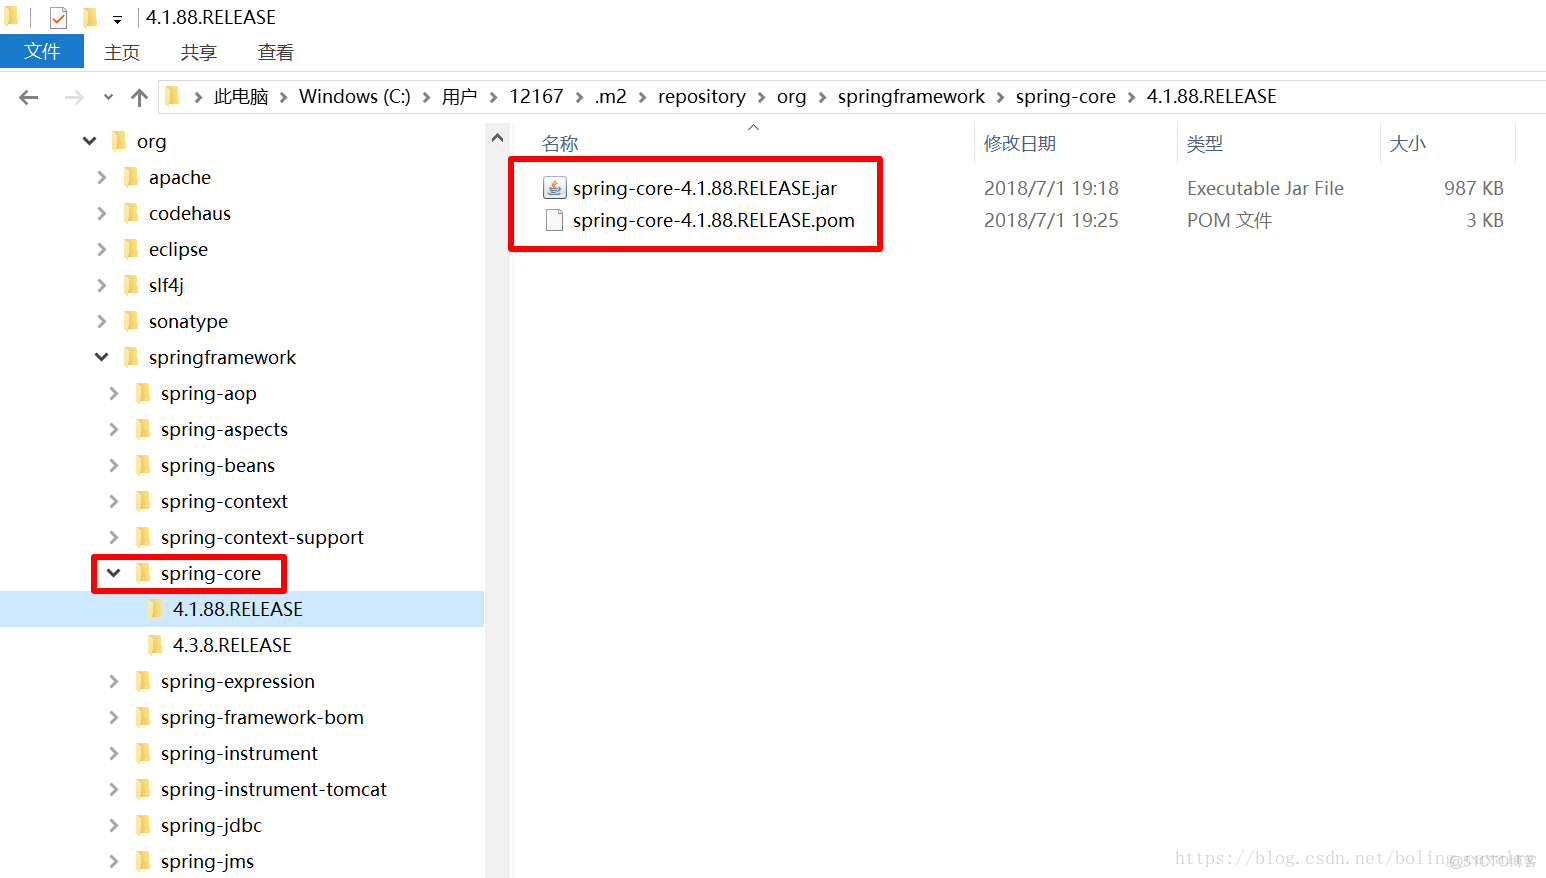
- 去本地maven仓库看看,果然已经有文件了,如下图:
创建demo,使用本地仓库的spring-framework
- 基于maven创建一个java应用,以下是步骤:
- pom.xml内容如下:
<?xml version="1.0" encoding="UTF-8"?>
<project xmlns="http://maven.apache.org/POM/4.0.0"
         xmlns:xsi="http://www.w3.org/2001/XMLSchema-instance"
         xsi:schemaLocation="http://maven.apache.org/POM/4.0.0 http://maven.apache.org/xsd/maven-4.0.0.xsd">
    <modelVersion>4.0.0</modelVersion>

    <groupId>com.bolingcavalry</groupId>
    <artifactId>springcoredemo</artifactId>
    <version>1.0-SNAPSHOT</version>

    <dependencies>
        <!-- Spring framework -->
        <dependency>
            <groupId>org.springframework</groupId>
            <artifactId>spring-core</artifactId>
            <version>4.1.88.RELEASE</version>
        </dependency>
        <dependency>
            <groupId>org.springframework</groupId>
            <artifactId>spring-context</artifactId>
            <version>4.1.88.RELEASE</version>
        </dependency>
    </dependencies>

</project>
- 新增文件:src/main/resources/applicationContext.xml,用于配置bean,内容如下:
<?xml version="1.0" encoding="UTF-8"?>
<beans xmlns="http://www.springframework.org/schema/beans"
       xmlns:mvc="http://www.springframework.org/schema/mvc"
       xmlns:xsi="http://www.w3.org/2001/XMLSchema-instance"
       xmlns:p="http://www.springframework.org/schema/p"
       xmlns:aop="http://www.springframework.org/schema/aop"
       xmlns:tx="http://www.springframework.org/schema/tx"
       xmlns:context="http://www.springframework.org/schema/context"
       xsi:schemaLocation="
http://www.springframework.org/schema/beans
http://www.springframework.org/schema/beans/spring-beans.xsd
http://www.springframework.org/schema/mvc
http://www.springframework.org/schema/mvc/spring-mvc.xsd
http://www.springframework.org/schema/aop
http://www.springframework.org/schema/aop/spring-aop.xsd
http://www.springframework.org/schema/tx
    http://www.springframework.org/schema/tx/spring-tx-4.0.xsd
http://www.springframework.org/schema/context
http://www.springframework.org/schema/context/spring-context.xsd">

    <beans>
        <bean class="com.bolingcavalry.bean.Simple"></bean>
    </beans>
</beans>
- 创建一个类:com.bolingcavalry.bean.Simple.java:
public class Simple {
    public void execute() {
        System.out.println("Simple execute method");
    }
}
- 创建启动类com.bolingcavalry.DemoApplication.java:
public class DemoApplication {

    public static void main(String[] args) {
        ClassPathXmlApplicationContext context = new ClassPathXmlApplicationContext("${CONFIG_PATH}");
        Simple bean = context.getBean(Simple.class);
        bean.execute();
        context.close();
    }
}
-
注意以上代码中有个变量**${CONFIG_PATH}**,这个变量的值不在代码和配置文件中,留待运行的时候再设置;
-
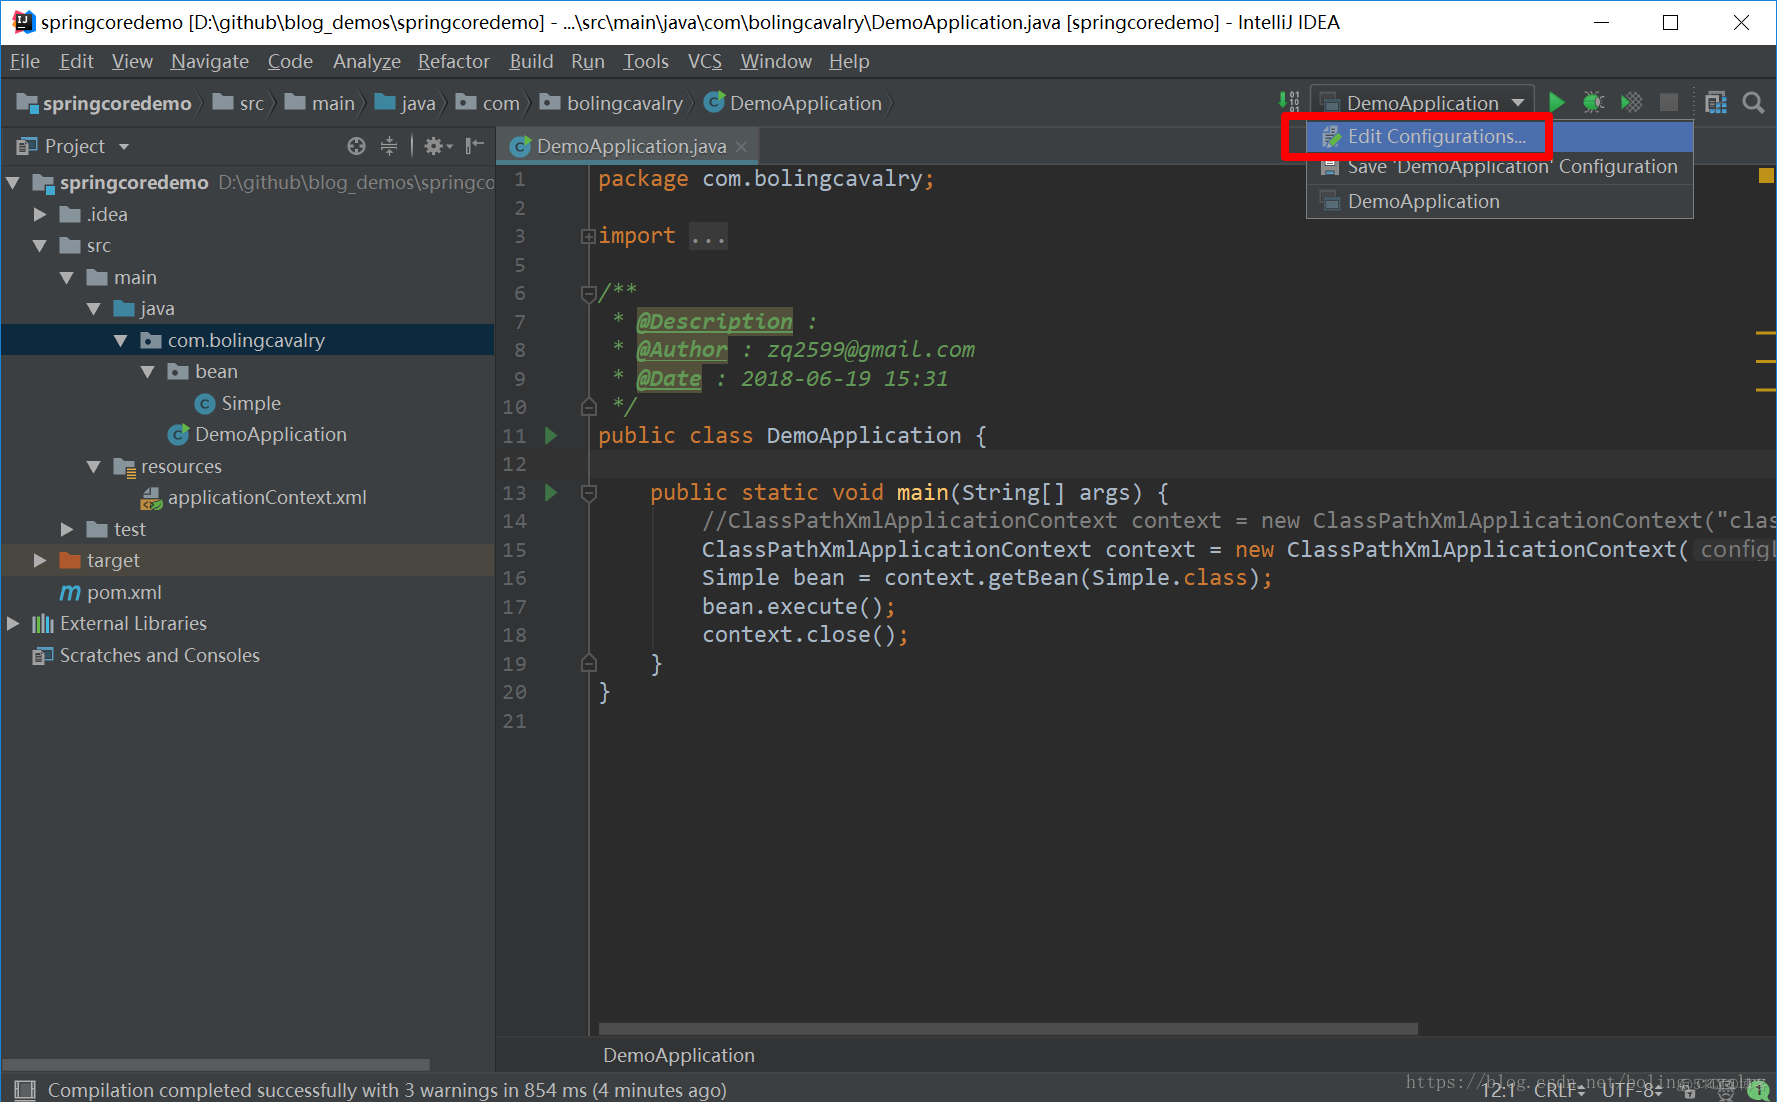
运行DemoApplication.java的时候,注意传入环境变量CONFIG_PATH的值,在IDEAL上的做法如下,点击红框中的"Edit Configurations…":
-
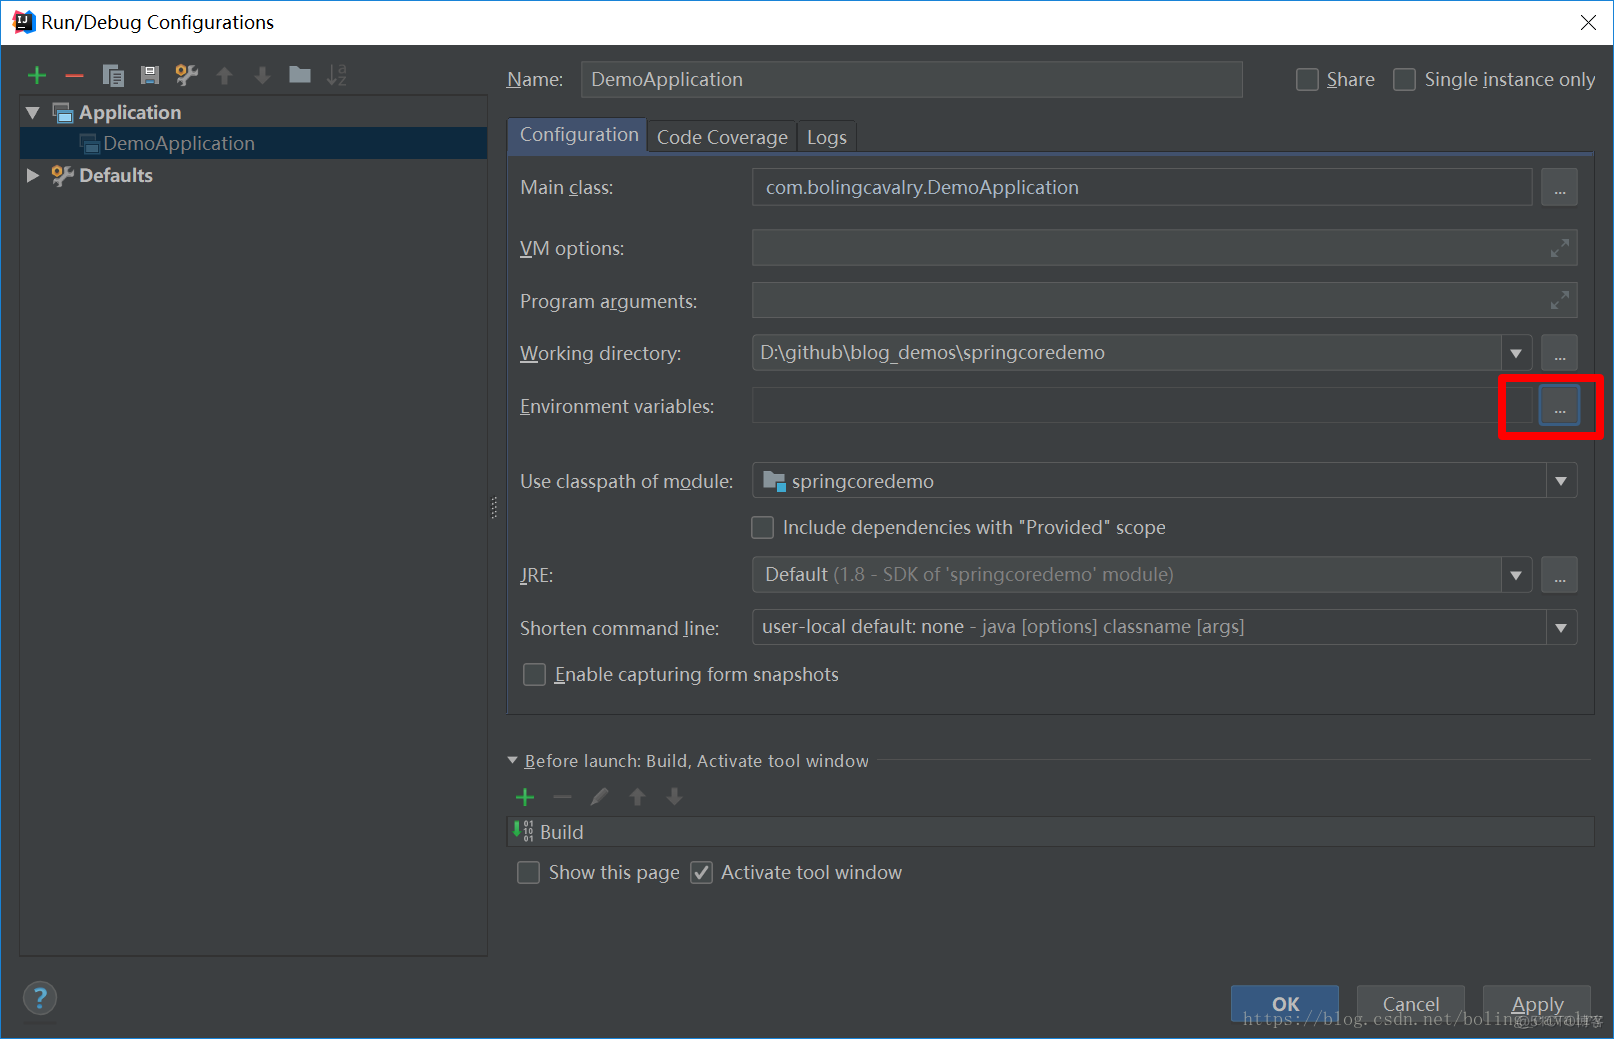
如下图,点击红框中的按钮:
-
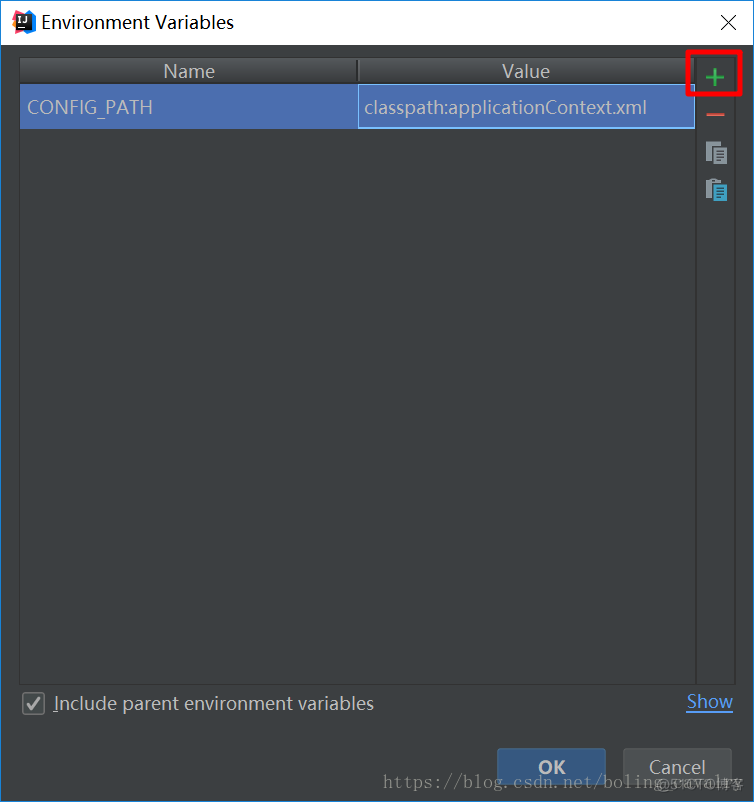
如下图,点击红框中的加号,然后添加一个键值对,Name是"CONFIG_PATH",Value是"classpath:applicationContext.xml"
-
配置完毕后,点击下图红框中的绿色三角形按钮,即可运行DemoApplication的main方法,并且刚刚设置的环境变量也生效了:

-
运行结果如下:
C:\jdk\bin\java.exe -javaagent:C:\software\JetBrains\IntelliJIDEA\lib\idea_rt.jar=60748:C:\software\JetBrains\IntelliJIDEA\bin -Dfile.encoding=UTF-8 -classpath C:\jdk\jre\lib\charsets.jar;C:\jdk\jre\lib\deploy.jar;C:\jdk\jre\lib\ext\access-bridge-64.jar;C:\jdk\jre\lib\ext\cldrdata.jar;C:\jdk\jre\lib\ext\dnsns.jar;C:\jdk\jre\lib\ext\jaccess.jar;C:\jdk\jre\lib\ext\jfxrt.jar;C:\jdk\jre\lib\ext\localedata.jar;C:\jdk\jre\lib\ext\nashorn.jar;C:\jdk\jre\lib\ext\sunec.jar;C:\jdk\jre\lib\ext\sunjce_provider.jar;C:\jdk\jre\lib\ext\sunmscapi.jar;C:\jdk\jre\lib\ext\sunpkcs11.jar;C:\jdk\jre\lib\ext\zipfs.jar;C:\jdk\jre\lib\javaws.jar;C:\jdk\jre\lib\jce.jar;C:\jdk\jre\lib\jfr.jar;C:\jdk\jre\lib\jfxswt.jar;C:\jdk\jre\lib\jsse.jar;C:\jdk\jre\lib\management-agent.jar;C:\jdk\jre\lib\plugin.jar;C:\jdk\jre\lib\resources.jar;C:\jdk\jre\lib\rt.jar;D:\github\blog_demos\springcoredemo\target\classes;C:\Users\12167\.m2\repository\org\springframework\spring-core\4.1.88.RELEASE\spring-core-4.1.88.RELEASE.jar;C:\Users\12167\.m2\repository\commons-logging\commons-logging\1.2\commons-logging-1.2.jar;C:\Users\12167\.m2\repository\org\springframework\spring-context\4.1.88.RELEASE\spring-context-4.1.88.RELEASE.jar;C:\Users\12167\.m2\repository\org\springframework\spring-aop\4.1.88.RELEASE\spring-aop-4.1.88.RELEASE.jar;C:\Users\12167\.m2\repository\aopalliance\aopalliance\1.0\aopalliance-1.0.jar;C:\Users\12167\.m2\repository\org\springframework\spring-beans\4.1.88.RELEASE\spring-beans-4.1.88.RELEASE.jar;C:\Users\12167\.m2\repository\org\springframework\spring-expression\4.1.88.RELEASE\spring-expression-4.1.88.RELEASE.jar com.bolingcavalry.DemoApplication
七月 07, 2018 7:18:14 下午 org.springframework.util.PropertyPlaceholderHelper printTrack
信息: start parseStringValue
java.lang.Thread.getStackTrace() 1,559 <-
org.springframework.util.PropertyPlaceholderHelper.printTrack() 231 <-
org.springframework.util.PropertyPlaceholderHelper.parseStringValue() 132 <-
org.springframework.util.PropertyPlaceholderHelper.replacePlaceholders() 126 <-
org.springframework.core.env.AbstractPropertyResolver.doResolvePlaceholders() 204 <-
org.springframework.core.env.AbstractPropertyResolver.resolveRequiredPlaceholders() 178 <-
org.springframework.core.env.AbstractEnvironment.resolveRequiredPlaceholders() 571 <-
org.springframework.context.support.AbstractRefreshableConfigApplicationContext.resolvePath() 122 <-
org.springframework.context.support.AbstractRefreshableConfigApplicationContext.setConfigLocations() 80 <-
org.springframework.context.support.ClassPathXmlApplicationContext.<init>() 137 <-
org.springframework.context.support.ClassPathXmlApplicationContext.<init>() 83 <-
com.bolingcavalry.DemoApplication.main() 14
七月 07, 2018 7:18:14 下午 org.springframework.util.PropertyPlaceholderHelper parseStringValue
信息: before parse : [${CONFIG_PATH}]
七月 07, 2018 7:18:14 下午 org.springframework.util.PropertyPlaceholderHelper printTrack
信息: start parseStringValue
java.lang.Thread.getStackTrace() 1,559 <-
org.springframework.util.PropertyPlaceholderHelper.printTrack() 231 <-
org.springframework.util.PropertyPlaceholderHelper.parseStringValue() 132 <-
org.springframework.util.PropertyPlaceholderHelper.parseStringValue() 148 <-
org.springframework.util.PropertyPlaceholderHelper.replacePlaceholders() 126 <-
org.springframework.core.env.AbstractPropertyResolver.doResolvePlaceholders() 204 <-
org.springframework.core.env.AbstractPropertyResolver.resolveRequiredPlaceholders() 178 <-
org.springframework.core.env.AbstractEnvironment.resolveRequiredPlaceholders() 571 <-
org.springframework.context.support.AbstractRefreshableConfigApplicationContext.resolvePath() 122 <-
org.springframework.context.support.AbstractRefreshableConfigApplicationContext.setConfigLocations() 80 <-
org.springframework.context.support.ClassPathXmlApplicationContext.<init>() 137 <-
org.springframework.context.support.ClassPathXmlApplicationContext.<init>() 83 <-
com.bolingcavalry.DemoApplication.main() 14
七月 07, 2018 7:18:14 下午 org.springframework.util.PropertyPlaceholderHelper parseStringValue
信息: before parse : [CONFIG_PATH]
七月 07, 2018 7:18:14 下午 org.springframework.util.PropertyPlaceholderHelper parseStringValue
信息: after parse : [CONFIG_PATH]
七月 07, 2018 7:18:14 下午 org.springframework.util.PropertyPlaceholderHelper printTrack
信息: start parseStringValue
java.lang.Thread.getStackTrace() 1,559 <-
org.springframework.util.PropertyPlaceholderHelper.printTrack() 231 <-
org.springframework.util.PropertyPlaceholderHelper.parseStringValue() 132 <-
org.springframework.util.PropertyPlaceholderHelper.parseStringValue() 165 <-
org.springframework.util.PropertyPlaceholderHelper.replacePlaceholders() 126 <-
org.springframework.core.env.AbstractPropertyResolver.doResolvePlaceholders() 204 <-
org.springframework.core.env.AbstractPropertyResolver.resolveRequiredPlaceholders() 178 <-
org.springframework.core.env.AbstractEnvironment.resolveRequiredPlaceholders() 571 <-
org.springframework.context.support.AbstractRefreshableConfigApplicationContext.resolvePath() 122 <-
org.springframework.context.support.AbstractRefreshableConfigApplicationContext.setConfigLocations() 80 <-
org.springframework.context.support.ClassPathXmlApplicationContext.<init>() 137 <-
org.springframework.context.support.ClassPathXmlApplicationContext.<init>() 83 <-
com.bolingcavalry.DemoApplication.main() 14
七月 07, 2018 7:18:14 下午 org.springframework.util.PropertyPlaceholderHelper parseStringValue
信息: before parse : [classpath:applicationContext.xml]
七月 07, 2018 7:18:14 下午 org.springframework.util.PropertyPlaceholderHelper parseStringValue
信息: after parse : [classpath:applicationContext.xml]
七月 07, 2018 7:18:14 下午 org.springframework.util.PropertyPlaceholderHelper parseStringValue
信息: after parse : [classpath:applicationContext.xml]
七月 07, 2018 7:18:14 下午 org.springframework.context.support.ClassPathXmlApplicationContext prepareRefresh
信息: Refreshing org.springframework.context.support.ClassPathXmlApplicationContext@20ad9418: startup date [Sat Jul 07 19:18:14 GMT+08:00 2018]; root of context hierarchy
七月 07, 2018 7:18:14 下午 org.springframework.beans.factory.xml.XmlBeanDefinitionReader loadBeanDefinitions
信息: Loading XML bean definitions from class path resource [applicationContext.xml]
七月 07, 2018 7:18:14 下午 org.springframework.context.support.ClassPathXmlApplicationContext doClose
信息: Closing org.springframework.context.support.ClassPathXmlApplicationContext@20ad9418: startup date [Sat Jul 07 19:18:14 GMT+08:00 2018]; root of context hierarchy
Simple execute method

Process finished with exit code 0
-
上述结果我们看到堆栈信息,能反映出该方法在运行时的调用情况,另外before parse和after parse反映了解析前和解析后的字符串变化,至于为何堆栈会打印多次,那是因为parseStringValue方法自身存在迭代调用的情况,每次都会打印,这从堆栈信息中也能看出来(parseStringValue() 148 );
-
这个demo的源码可以在github下载,地址和链接信息如下表所示:
| 名称 | 链接 | 备注 |
|---|---|---|
| 项目主页 | https://github.com/zq2599/blog_demos | 该项目在GitHub上的主页 |
| git仓库地址(https) | https://github.com/zq2599/blog_demos.git | 该项目源码的仓库地址,https协议 |
| git仓库地址(ssh) | [email protected]:zq2599/blog_demos.git | 该项目源码的仓库地址,ssh协议 |
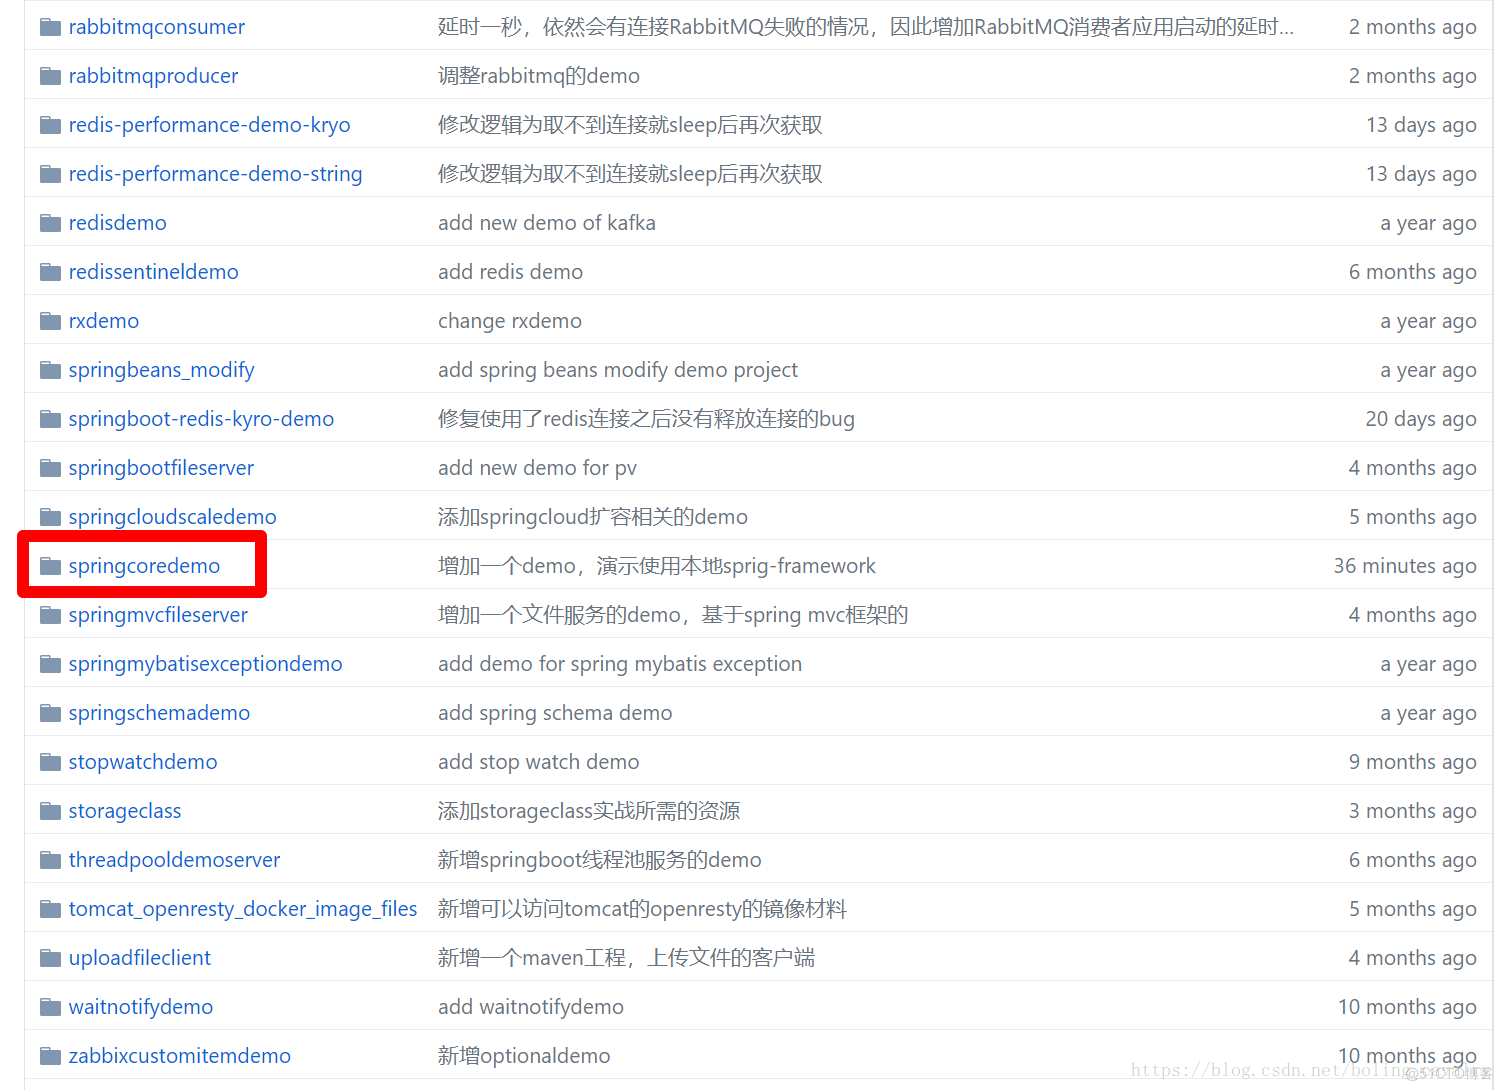
- 这个git项目中有多个文件夹,本章源码在springcoredemo文件夹中,如下图红框所示:
- 至此,修改spring-framwork源码的实战就完成了,希望您在学习spring-framwork的时候也能动手修改和构建自己有兴趣的地方,也希望本文能给您一些参考;
欢迎关注51CTO博客:程序员欣宸
- 赞
- 收藏
- 评论
- 分享
- 举报
Recommend
About Joyk
Aggregate valuable and interesting links.
Joyk means Joy of geeK