

万字详解本地缓存之王 Caffeine 的高性能设计之道!
source link: https://jishuin.proginn.com/p/763bfbd34443
Go to the source link to view the article. You can view the picture content, updated content and better typesetting reading experience. If the link is broken, please click the button below to view the snapshot at that time.

Alben|https://albenw.github.io/posts/a4ae1aa2/
Caffeine[1]是一个高性能,高命中率,低内存占用,near optimal 的本地缓存,简单来说它是 Guava Cache 的优化加强版,有些文章把 Caffeine 称为“新一代的缓存”、“现代缓存之王”。
本文将重点讲解 Caffeine 的高性能设计,以及对应部分的源码分析。
与 Guava Cache 比较
如果你对 Guava Cache 还不理解的话,可以点击这里[2]来看一下我之前写过关于 Guava Cache 的文章。
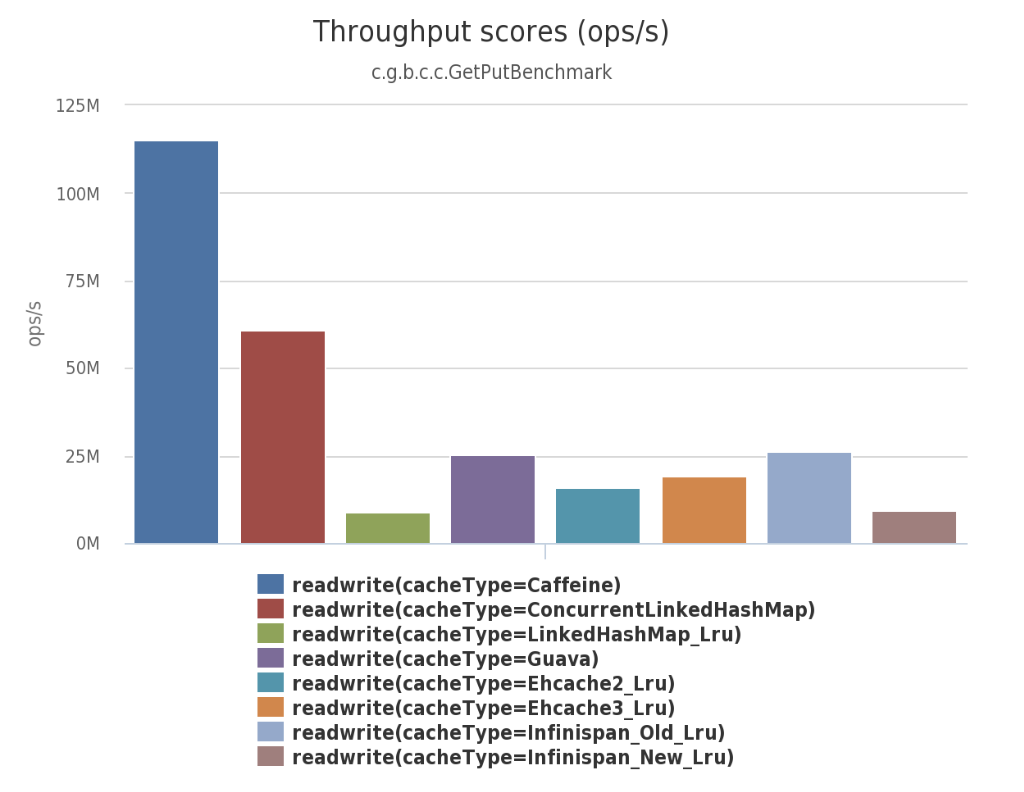
大家都知道,Spring5 即将放弃掉 Guava Cache 作为缓存机制,而改用 Caffeine 作为新的本地 Cache 的组件,这对于 Caffeine 来说是一个很大的肯定。为什么 Spring 会这样做呢?其实在 Caffeine 的Benchmarks[3]里给出了好靓仔的数据,对读和写的场景,还有跟其他几个缓存工具进行了比较,Caffeine 的性能都表现很突出。
使用 Caffeine
Caffeine 为了方便大家使用以及从 Guava Cache 切换过来(很有针对性啊~),借鉴了 Guava Cache 大部分的概念(诸如核心概念Cache、LoadingCache、CacheLoader、CacheBuilder等等),对于 Caffeine 的理解只要把它当作 Guava Cache 就可以了。
使用上,大家只要把 Caffeine 的包引进来,然后换一下 cache 的实现类,基本应该就没问题了。这对与已经使用过 Guava Cache 的同学来说没有任何难度,甚至还有一点熟悉的味道,如果你之前没有使用过 Guava Cache,可以查看 Caffeine 的官方 API 说明文档[4],其中Population,Eviction,Removal,Refresh,Statistics,Cleanup,Policy等等这些特性都是跟 Guava Cache 基本一样的。
下面给出一个例子说明怎样创建一个 Cache:
private static LoadingCache cache = Caffeine.newBuilder()
            //最大个数限制
            .maximumSize(256L)
            //初始化容量
            .initialCapacity(1)
            //访问后过期(包括读和写)
            .expireAfterAccess(2, TimeUnit.DAYS)
            //写后过期
            .expireAfterWrite(2, TimeUnit.HOURS)
            //写后自动异步刷新
            .refreshAfterWrite(1, TimeUnit.HOURS)
            //记录下缓存的一些统计数据,例如命中率等
            .recordStats()
            //cache对缓存写的通知回调
            .writer(new CacheWriter() {
                @Override
                public void write(@NonNull Object key, @NonNull Object value) {
                    log.info("key={}, CacheWriter write", key);
                }

@Override
                public void delete(@NonNull Object key, @Nullable Object value, @NonNull RemovalCause cause) {
                    log.info("key={}, cause={}, CacheWriter delete", key, cause);
                }
            })
            //使用CacheLoader创建一个LoadingCache
            .build(new CacheLoader() {
                //同步加载数据
                @Nullable
                @Override
                public String load(@NonNull String key) throws Exception {
                    return "value_" + key;
                }

//异步加载数据
                @Nullable
                @Override
                public String reload(@NonNull String key, @NonNull String oldValue) throws Exception {
                    return "value_" + key;
                }
            });
, string>, object>, string>
更多从 Guava Cache 迁移过来的使用说明,请看这里[5]
Caffeine 的高性能设计
判断一个缓存的好坏最核心的指标就是命中率,影响缓存命中率有很多因素,包括业务场景、淘汰策略、清理策略、缓存容量等等。如果作为本地缓存, 它的性能的情况,资源的占用也都是一个很重要的指标。下面
我们来看看 Caffeine 在这几个方面是怎么着手的,如何做优化的。
(注:本文不会分析 Caffeine 全部源码,只会对核心设计的实现进行分析,但我建议读者把 Caffeine 的源码都涉猎一下,有个 overview 才能更好理解本文。如果你看过 Guava Cache 的源码也行,代码的数据结构和处理逻辑很类似的。
源码基于:caffeine-2.8.0.jar)
W-TinyLFU 整体设计
上面说到淘汰策略是影响缓存命中率的因素之一,一般比较简单的缓存就会直接用到 LFU(Least Frequently Used,即最不经常使用) 或者LRU(Least Recently Used,即最近最少使用) ,而 Caffeine 就是使用了 W-TinyLFU 算法。
W-TinyLFU 看名字就能大概猜出来,它是 LFU 的变种,也是一种缓存淘汰算法。那为什么要使用 W-TinyLFU 呢?
LRU 和 LFU 的缺点
- LRU 实现简单,在一般情况下能够表现出很好的命中率,是一个“性价比”很高的算法,平时也很常用。虽然 LRU 对突发性的稀疏流量(sparse bursts)表现很好,但同时也会产生缓存污染,举例来说,如果偶然性的要对全量数据进行遍历,那么“历史访问记录”就会被刷走,造成污染。
- 如果数据的分布在一段时间内是固定的话,那么 LFU 可以达到最高的命中率。但是 LFU 有两个缺点,第一,它需要给每个记录项维护频率信息,每次访问都需要更新,这是个巨大的开销;第二,对突发性的稀疏流量无力,因为前期经常访问的记录已经占用了缓存,偶然的流量不太可能会被保留下来,而且过去的一些大量被访问的记录在将来也不一定会使用上,这样就一直把“坑”占着了。
无论 LRU 还是 LFU 都有其各自的缺点,不过,现在已经有很多针对其缺点而改良、优化出来的变种算法。
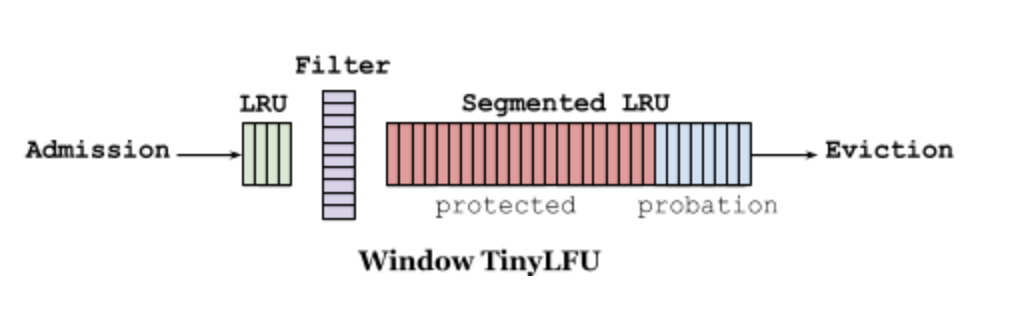
TinyLFU
TinyLFU 就是其中一个优化算法,它是专门为了解决 LFU 上述提到的两个问题而被设计出来的。
解决第一个问题是采用了 Count–Min Sketch 算法。
解决第二个问题是让记录尽量保持相对的“新鲜”(Freshness Mechanism),并且当有新的记录插入时,可以让它跟老的记录进行“PK”,输者就会被淘汰,这样一些老的、不再需要的记录就会被剔除。
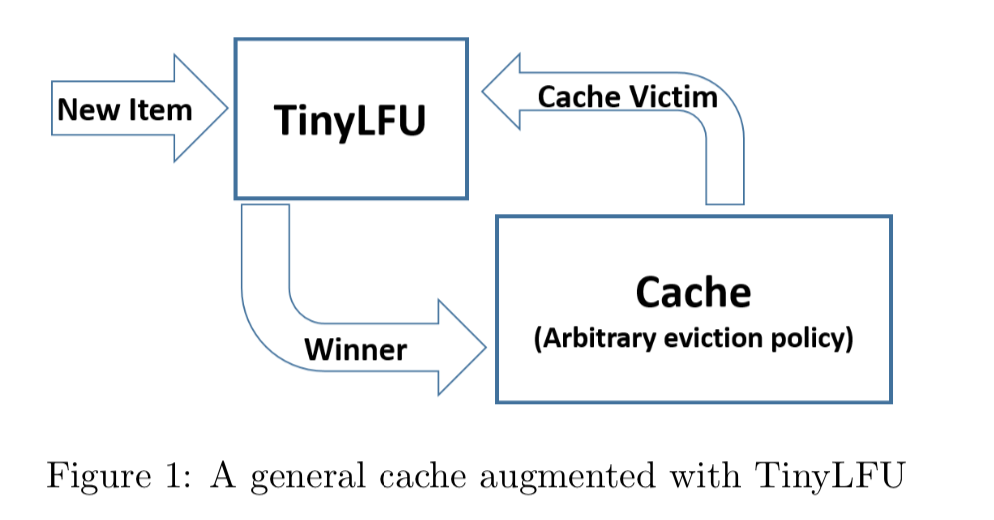
下图是 TinyLFU 设计图(来自官方)
统计频率 Count–Min Sketch 算法
如何对一个 key 进行统计,但又可以节省空间呢?(不是简单的使用HashMap,这太消耗内存了),注意哦,不需要精确的统计,只需要一个近似值就可以了,怎么样,这样场景是不是很熟悉,如果你是老司机,或许已经联想到布隆过滤器(Bloom Filter)的应用了。
没错,将要介绍的 Count–Min Sketch 的原理跟 Bloom Filter 一样,只不过 Bloom Filter 只有 0 和 1 的值,那么你可以把 Count–Min Sketch 看作是“数值”版的 Bloom Filter。
更多关于 Count–Min Sketch 的介绍请自行搜索。
在 TinyLFU 中,近似频率的统计如下图所示:
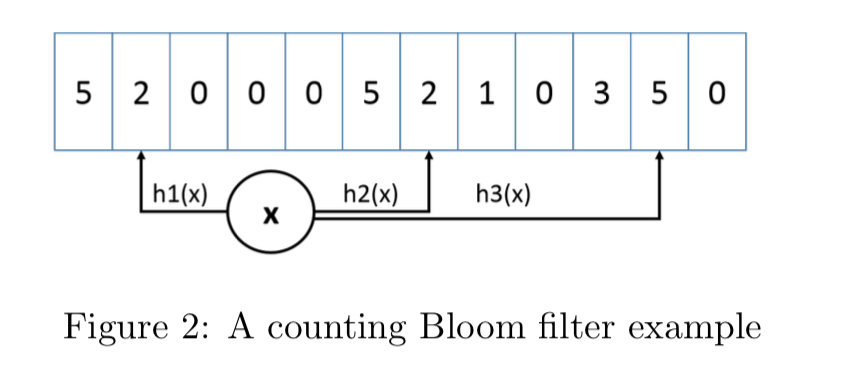
对一个 key 进行多次 hash 函数后,index 到多个数组位置后进行累加,查询时取多个值中的最小值即可。
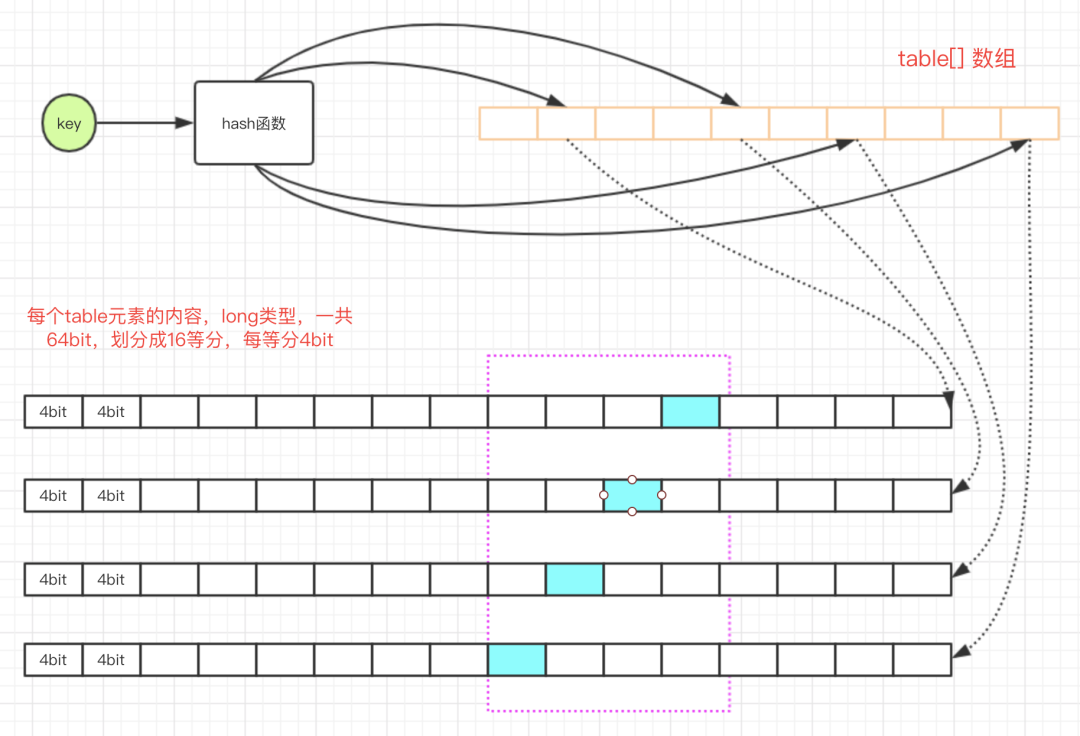
Caffeine 对这个算法的实现在FrequencySketch类。但 Caffeine 对此有进一步的优化,例如 Count–Min Sketch 使用了二维数组,Caffeine 只是用了一个一维的数组;再者,如果是数值类型的话,这个数需要用 int 或 long 来存储,但是 Caffeine 认为缓存的访问频率不需要用到那么大,只需要 15 就足够,一般认为达到 15 次的频率算是很高的了,而且 Caffeine 还有另外一个机制来使得这个频率进行衰退减半(下面就会讲到)。如果最大是 15 的话,那么只需要 4 个 bit 就可以满足了,一个 long 有 64bit,可以存储 16 个这样的统计数,Caffeine 就是这样的设计,使得存储效率提高了 16 倍。
Caffeine 对缓存的读写(afterRead和afterWrite方法)都会调用onAccesss 方法,而onAccess方法里有一句:
frequencySketch().increment(key);
这句就是追加记录的频率,下面我们看看具体实现
//FrequencySketch的一些属性

//种子数
static final long[] SEED = { // A mixture of seeds from FNV-1a, CityHash, and Murmur3
    0xc3a5c85c97cb3127L, 0xb492b66fbe98f273L, 0x9ae16a3b2f90404fL, 0xcbf29ce484222325L};
static final long RESET_MASK = 0x7777777777777777L;
static final long ONE_MASK = 0x1111111111111111L;

int sampleSize;
//为了快速根据hash值得到table的index值的掩码
//table的长度size一般为2的n次方,而tableMask为size-1,这样就可以通过&操作来模拟取余操作,速度快很多,老司机都知道
int tableMask;
//存储数据的一维long数组
long[] table;
int size;

/**
 * Increments the popularity of the element if it does not exceed the maximum (15). The popularity
 * of all elements will be periodically down sampled when the observed events exceeds a threshold.
 * This process provides a frequency aging to allow expired long term entries to fade away.
 *
 * @param e the element to add
 */
public void increment(@NonNull E e) {
  if (isNotInitialized()) {
    return;
  }

//根据key的hashCode通过一个哈希函数得到一个hash值
  //本来就是hashCode了,为什么还要再做一次hash?怕原来的hashCode不够均匀分散,再打散一下。
  int hash = spread(e.hashCode());
  //这句光看有点难理解
  //就如我刚才说的,Caffeine把一个long的64bit划分成16个等分,每一等分4个bit。
  //这个start就是用来定位到是哪一个等分的,用hash值低两位作为随机数,再左移2位,得到一个小于16的值
  int start = (hash & 3) << 2;

//indexOf方法的意思就是,根据hash值和不同种子得到table的下标index
  //这里通过四个不同的种子,得到四个不同的下标index
  int index0 = indexOf(hash, 0);
  int index1 = indexOf(hash, 1);
  int index2 = indexOf(hash, 2);
  int index3 = indexOf(hash, 3);

//根据index和start(+1, +2, +3)的值,把table[index]对应的等分追加1
  //这个incrementAt方法有点难理解,看我下面的解释
  boolean added = incrementAt(index0, start);
  added |= incrementAt(index1, start + 1);
  added |= incrementAt(index2, start + 2);
  added |= incrementAt(index3, start + 3);

//这个reset等下说
  if (added && (++size == sampleSize)) {
    reset();
  }
}

/**
 * Increments the specified counter by 1 if it is not already at the maximum value (15).
 *
 * @param i the table index (16 counters)
 * @param j the counter to increment
 * @return if incremented
 */
boolean incrementAt(int i, int j) {
  //这个j表示16个等分的下标,那么offset就是相当于在64位中的下标(这个自己想想)
  int offset = j << 2;
  //上面提到Caffeine把频率统计最大定为15,即0xfL
  //mask就是在64位中的掩码,即1111后面跟很多个0
  long mask = (0xfL << offset);
  //如果&的结果不等于15,那么就追加1。等于15就不会再加了
  if ((table[i] & mask) != mask) {
    table[i] += (1L << offset);
    return true;
  }
  return false;
}

/**
 * Returns the table index for the counter at the specified depth.
 *
 * @param item the element's hash
 * @param i the counter depth
 * @return the table index
 */
int indexOf(int item, int i) {
  long hash = SEED[i] * item;
  hash += hash >>> 32;
  return ((int) hash) & tableMask;
}

/**
 * Applies a supplemental hash function to a given hashCode, which defends against poor quality
 * hash functions.
 */
int spread(int x) {
  x = ((x >>> 16) ^ x) * 0x45d9f3b;
  x = ((x >>> 16) ^ x) * 0x45d9f3b;
  return (x >>> 16) ^ x;
}
知道了追加方法,那么读取方法frequency就很容易理解了。
/**
 * Returns the estimated number of occurrences of an element, up to the maximum (15).
 *
 * @param e the element to count occurrences of
 * @return the estimated number of occurrences of the element; possibly zero but never negative
 */
@NonNegative
public int frequency(@NonNull E e) {
  if (isNotInitialized()) {
    return 0;
  }

//得到hash值,跟上面一样
  int hash = spread(e.hashCode());
  //得到等分的下标,跟上面一样
  int start = (hash & 3) << 2;
  int frequency = Integer.MAX_VALUE;
  //循环四次,分别获取在table数组中不同的下标位置
  for (int i = 0; i < 4; i++) {
    int index = indexOf(hash, i);
    //这个操作就不多说了,其实跟上面incrementAt是一样的,定位到table[index] + 等分的位置,再根据mask取出计数值
    int count = (int) ((table[index] >>> ((start + i) << 2)) & 0xfL);
    //取四个中的较小值
    frequency = Math.min(frequency, count);
  }
  return frequency;
}
通过代码和注释或者读者可能难以理解,下图是我画出来帮助大家理解的结构图。
注意紫色虚线框,其中蓝色小格就是需要计算的位置:
为了让缓存保持“新鲜”,剔除掉过往频率很高但之后不经常的缓存,Caffeine 有一个 Freshness Mechanism。做法很简答,就是当整体的统计计数(当前所有记录的频率统计之和,这个数值内部维护)达到某一个值时,那么所有记录的频率统计除以 2。
从上面的代码
//size变量就是所有记录的频率统计之,即每个记录加1,这个size都会加1
//sampleSize一个阈值,从FrequencySketch初始化可以看到它的值为maximumSize的10倍
if (added && (++size == sampleSize)) {
      reset();
}
看到reset方法就是做这个事情
/** Reduces every counter by half of its original value. */
void reset() {
  int count = 0;
  for (int i = 0; i < table.length; i++) {
    count += Long.bitCount(table[i] & ONE_MASK);
    table[i] = (table[i] >>> 1) & RESET_MASK;
  }
  size = (size >>> 1) - (count >>> 2);
}
关于这个 reset 方法,为什么是除以 2,而不是其他,及其正确性,在最下面的参考资料的 TinyLFU 论文中 3.3 章节给出了数学证明,大家有兴趣可以看看。
增加一个 Window?
Caffeine 通过测试发现 TinyLFU 在面对突发性的稀疏流量(sparse bursts)时表现很差,因为新的记录(new items)还没来得及建立足够的频率就被剔除出去了,这就使得命中率下降。
于是 Caffeine 设计出一种新的 policy,即 Window Tiny LFU(W-TinyLFU),并通过实验和实践发现 W-TinyLFU 比 TinyLFU 表现的更好。
W-TinyLFU 的设计如下所示(两图等价):
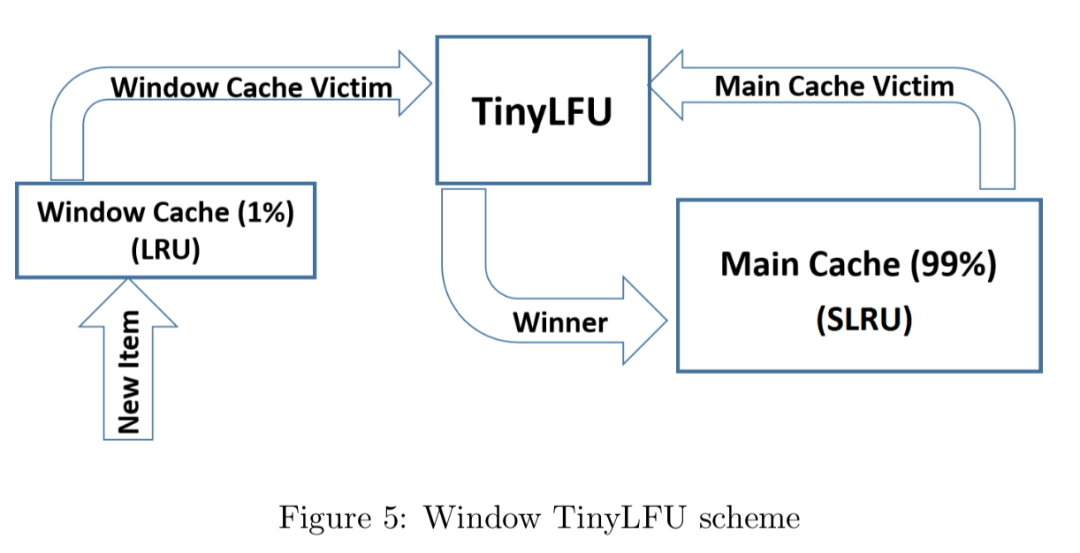
它主要包括两个缓存模块,主缓存是 SLRU(Segmented LRU,即分段 LRU),SLRU 包括一个名为 protected 和一个名为 probation 的缓存区。通过增加一个缓存区(即 Window Cache),当有新的记录插入时,会先在 window 区呆一下,就可以避免上述说的 sparse bursts 问题。
淘汰策略(eviction policy)
当 window 区满了,就会根据 LRU 把 candidate(即淘汰出来的元素)放到 probation 区,如果 probation 区也满了,就把 candidate 和 probation 将要淘汰的元素 victim,两个进行“PK”,胜者留在 probation,输者就要被淘汰了。
而且经过实验发现当 window 区配置为总容量的 1%,剩余的 99%当中的 80%分给 protected 区,20%分给 probation 区时,这时整体性能和命中率表现得最好,所以 Caffeine 默认的比例设置就是这个。
不过这个比例 Caffeine 会在运行时根据统计数据(statistics)去动态调整,如果你的应用程序的缓存随着时间变化比较快的话,那么增加 window 区的比例可以提高命中率,相反缓存都是比较固定不变的话,增加 Main Cache 区(protected 区 +probation 区)的比例会有较好的效果。
下面我们看看上面说到的淘汰策略是怎么实现的:
一般缓存对读写操作后都有后续的一系列“维护”操作,Caffeine 也不例外,这些操作都在maintenance方法,我们将要说到的淘汰策略也在里面。
这方法比较重要,下面也会提到,所以这里只先说跟“淘汰策略”有关的evictEntries和climb。
/**
   * Performs the pending maintenance work and sets the state flags during processing to avoid
   * excess scheduling attempts. The read buffer, write buffer, and reference queues are
   * drained, followed by expiration, and size-based eviction.
   *
   * @param task an additional pending task to run, or {@code null} if not present
   */
  @GuardedBy("evictionLock")
  void maintenance(@Nullable Runnable task) {
    lazySetDrainStatus(PROCESSING_TO_IDLE);

try {
      drainReadBuffer();

drainWriteBuffer();
      if (task != null) {
        task.run();
      }

drainKeyReferences();
      drainValueReferences();

expireEntries();
      //把符合条件的记录淘汰掉
      evictEntries();
      //动态调整window区和protected区的大小
      climb();
    } finally {
      if ((drainStatus() != PROCESSING_TO_IDLE) || !casDrainStatus(PROCESSING_TO_IDLE, IDLE)) {
        lazySetDrainStatus(REQUIRED);
      }
    }
  }
先说一下 Caffeine 对上面说到的 W-TinyLFU 策略的实现用到的数据结构:
//最大的个数限制
long maximum;
//当前的个数
long weightedSize;
//window区的最大限制
long windowMaximum;
//window区当前的个数
long windowWeightedSize;
//protected区的最大限制
long mainProtectedMaximum;
//protected区当前的个数
long mainProtectedWeightedSize;
//下一次需要调整的大小(还需要进一步计算)
double stepSize;
//window区需要调整的大小
long adjustment;
//命中计数
int hitsInSample;
//不命中的计数
int missesInSample;
//上一次的缓存命中率
double previousSampleHitRate;

final FrequencySketch sketch;
//window区的LRU queue(FIFO)
final AccessOrderDeque> accessOrderWindowDeque;
//probation区的LRU queue(FIFO)
final AccessOrderDeque> accessOrderProbationDeque;
//protected区的LRU queue(FIFO)
final AccessOrderDeque> accessOrderProtectedDeque;
以及默认比例设置(意思看注释)
/** The initial percent of the maximum weighted capacity dedicated to the main space. */
static final double PERCENT_MAIN = 0.99d;
/** The percent of the maximum weighted capacity dedicated to the main's protected space. */
static final double PERCENT_MAIN_PROTECTED = 0.80d;
/** The difference in hit rates that restarts the climber. */
static final double HILL_CLIMBER_RESTART_THRESHOLD = 0.05d;
/** The percent of the total size to adapt the window by. */
static final double HILL_CLIMBER_STEP_PERCENT = 0.0625d;
/** The rate to decrease the step size to adapt by. */
static final double HILL_CLIMBER_STEP_DECAY_RATE = 0.98d;
/** The maximum number of entries that can be transfered between queues. */
重点来了,evictEntries和climb方法:
/** Evicts entries if the cache exceeds the maximum. */
@GuardedBy("evictionLock")
void evictEntries() {
  if (!evicts()) {
    return;
  }
  //淘汰window区的记录
  int candidates = evictFromWindow();
  //淘汰Main区的记录
  evictFromMain(candidates);
}

/**
 * Evicts entries from the window space into the main space while the window size exceeds a
 * maximum.
 *
 * @return the number of candidate entries evicted from the window space
 */
//根据W-TinyLFU,新的数据都会无条件的加到admission window
//但是window是有大小限制,所以要“定期”做一下“维护”
@GuardedBy("evictionLock")
int evictFromWindow() {
  int candidates = 0;
  //查看window queue的头部节点
  Node node = accessOrderWindowDeque().peek();
  //如果window区超过了最大的限制,那么就要把“多出来”的记录做处理
  while (windowWeightedSize() > windowMaximum()) {
    // The pending operations will adjust the size to reflect the correct weight
    if (node == null) {
      break;
    }
    //下一个节点
    Node next = node.getNextInAccessOrder();
    if (node.getWeight() != 0) {
      //把node定位在probation区
      node.makeMainProbation();
      //从window区去掉
      accessOrderWindowDeque().remove(node);
      //加入到probation queue,相当于把节点移动到probation区(晋升了)
      accessOrderProbationDeque().add(node);
      candidates++;
      //因为移除了一个节点,所以需要调整window的size
      setWindowWeightedSize(windowWeightedSize() - node.getPolicyWeight());
    }
    //处理下一个节点
    node = next;
  }

return candidates;
}
, v>, v>evictFromMain方法:
/**
 * Evicts entries from the main space if the cache exceeds the maximum capacity. The main space
 * determines whether admitting an entry (coming from the window space) is preferable to retaining
 * the eviction policy's victim. This is decision is made using a frequency filter so that the
 * least frequently used entry is removed.
 *
 * The window space candidates were previously placed in the MRU position and the eviction
 * policy's victim is at the LRU position. The two ends of the queue are evaluated while an
 * eviction is required. The number of remaining candidates is provided and decremented on
 * eviction, so that when there are no more candidates the victim is evicted.
 *
 * @param candidates the number of candidate entries evicted from the window space
 */
//根据W-TinyLFU,从window晋升过来的要跟probation区的进行“PK”,胜者才能留下
@GuardedBy("evictionLock")
void evictFromMain(int candidates) {
  int victimQueue = PROBATION;
  //victim是probation queue的头部
  Node victim = accessOrderProbationDeque().peekFirst();
  //candidate是probation queue的尾部,也就是刚从window晋升来的
  Node candidate = accessOrderProbationDeque().peekLast();
  //当cache不够容量时才做处理
  while (weightedSize() > maximum()) {
    // Stop trying to evict candidates and always prefer the victim
    if (candidates == 0) {
      candidate = null;
    }

//对candidate为null且victim为bull的处理
    if ((candidate == null) && (victim == null)) {
      if (victimQueue == PROBATION) {
        victim = accessOrderProtectedDeque().peekFirst();
        victimQueue = PROTECTED;
        continue;
      } else if (victimQueue == PROTECTED) {
        victim = accessOrderWindowDeque().peekFirst();
        victimQueue = WINDOW;
        continue;
      }

// The pending operations will adjust the size to reflect the correct weight
      break;
    }

//对节点的weight为0的处理
    if ((victim != null) && (victim.getPolicyWeight() == 0)) {
      victim = victim.getNextInAccessOrder();
      continue;
    } else if ((candidate != null) && (candidate.getPolicyWeight() == 0)) {
      candidate = candidate.getPreviousInAccessOrder();
      candidates--;
      continue;
    }

// Evict immediately if only one of the entries is present
    if (victim == null) {
      @SuppressWarnings("NullAway")
      Node previous = candidate.getPreviousInAccessOrder();
      Node evict = candidate;
      candidate = previous;
      candidates--;
      evictEntry(evict, RemovalCause.SIZE, 0L);
      continue;
    } else if (candidate == null) {
      Node evict = victim;
      victim = victim.getNextInAccessOrder();
      evictEntry(evict, RemovalCause.SIZE, 0L);
      continue;
    }

// Evict immediately if an entry was collected
    K victimKey = victim.getKey();
    K candidateKey = candidate.getKey();
    if (victimKey == null) {
      @NonNull Node evict = victim;
      victim = victim.getNextInAccessOrder();
      evictEntry(evict, RemovalCause.COLLECTED, 0L);
      continue;
    } else if (candidateKey == null) {
      candidates--;
      @NonNull Node evict = candidate;
      candidate = candidate.getPreviousInAccessOrder();
      evictEntry(evict, RemovalCause.COLLECTED, 0L);
      continue;
    }

//放不下的节点直接处理掉
    if (candidate.getPolicyWeight() > maximum()) {
      candidates--;
      Node evict = candidate;
      candidate = candidate.getPreviousInAccessOrder();
      evictEntry(evict, RemovalCause.SIZE, 0L);
      continue;
    }

//根据节点的统计频率frequency来做比较,看看要处理掉victim还是candidate
    //admit是具体的比较规则,看下面
    candidates--;
    //如果candidate胜出则淘汰victim
    if (admit(candidateKey, victimKey)) {
      Node evict = victim;
      victim = victim.getNextInAccessOrder();
      evictEntry(evict, RemovalCause.SIZE, 0L);
      candidate = candidate.getPreviousInAccessOrder();
    } else {
      //如果是victim胜出,则淘汰candidate
      Node evict = candidate;
      candidate = candidate.getPreviousInAccessOrder();
      evictEntry(evict, RemovalCause.SIZE, 0L);
    }
  }
}

/**
 * Determines if the candidate should be accepted into the main space, as determined by its
 * frequency relative to the victim. A small amount of randomness is used to protect against hash
 * collision attacks, where the victim's frequency is artificially raised so that no new entries
 * are admitted.
 *
 * @param candidateKey the key for the entry being proposed for long term retention
 * @param victimKey the key for the entry chosen by the eviction policy for replacement
 * @return if the candidate should be admitted and the victim ejected
 */
@GuardedBy("evictionLock")
boolean admit(K candidateKey, K victimKey) {
  //分别获取victim和candidate的统计频率
  //frequency这个方法的原理和实现上面已经解释了
  int victimFreq = frequencySketch().frequency(victimKey);
  int candidateFreq = frequencySketch().frequency(candidateKey);
  //谁大谁赢
  if (candidateFreq > victimFreq) {
    return true;

//如果相等,candidate小于5都当输了
  } else if (candidateFreq <= 5) {
    // The maximum frequency is 15 and halved to 7 after a reset to age the history. An attack
    // exploits that a hot candidate is rejected in favor of a hot victim. The threshold of a warm
    // candidate reduces the number of random acceptances to minimize the impact on the hit rate.
    return false;
  }
  //如果相等且candidate大于5,则随机淘汰一个
  int random = ThreadLocalRandom.current().nextInt();
  return ((random & 127) == 0);
}
, v>, v>, v>, v>, v>, v>, v>, v>, v>, v>climb方法主要是用来调整 window size 的,使得 Caffeine 可以适应你的应用类型(如 OLAP 或 OLTP)表现出最佳的命中率。
下图是官方测试的数据:
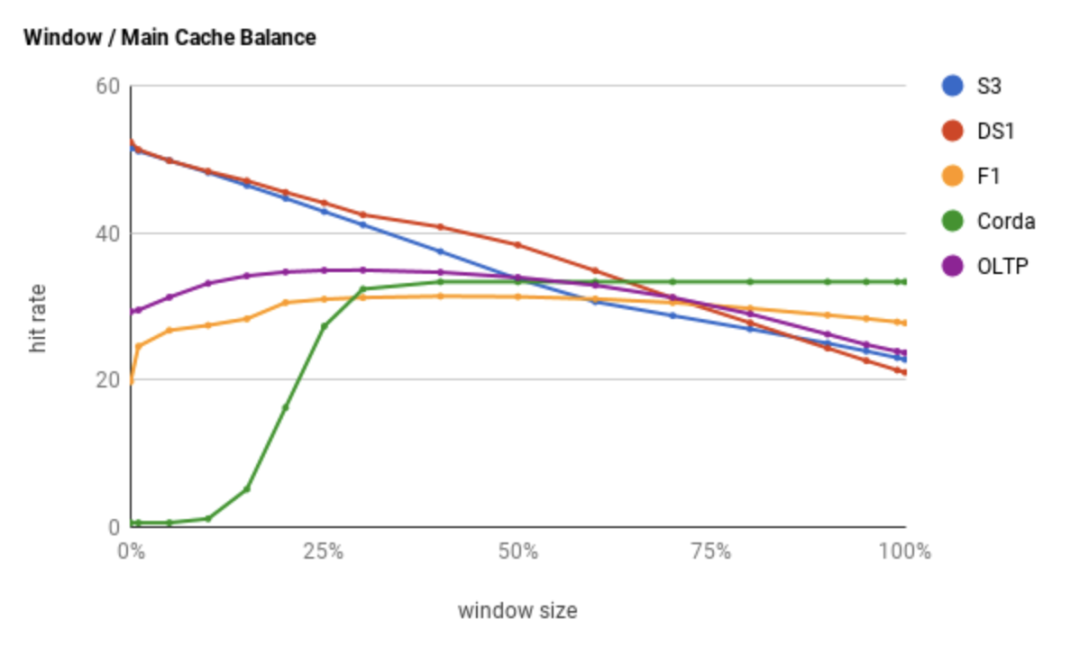
我们看看 window size 的调整是怎么实现的。
调整时用到的默认比例数据:
//与上次命中率之差的阈值
static final double HILL_CLIMBER_RESTART_THRESHOLD = 0.05d;
//步长(调整)的大小(跟最大值maximum的比例)
static final double HILL_CLIMBER_STEP_PERCENT = 0.0625d;
//步长的衰减比例
static final double HILL_CLIMBER_STEP_DECAY_RATE = 0.98d;
  /** Adapts the eviction policy to towards the optimal recency / frequency configuration. */
//climb方法的主要作用就是动态调整window区的大小(相应的,main区的大小也会发生变化,两个之和为100%)。
//因为区域的大小发生了变化,那么区域内的数据也可能需要发生相应的移动。
@GuardedBy("evictionLock")
void climb() {
  if (!evicts()) {
    return;
  }
  //确定window需要调整的大小
  determineAdjustment();
  //如果protected区有溢出,把溢出部分移动到probation区。因为下面的操作有可能需要调整到protected区。
  demoteFromMainProtected();
  long amount = adjustment();
  if (amount == 0) {
    return;
  } else if (amount > 0) {
    //增加window的大小
    increaseWindow();
  } else {
    //减少window的大小
    decreaseWindow();
  }
}
下面分别展开每个方法来解释:
/** Calculates the amount to adapt the window by and sets {@link #adjustment()} accordingly. */
@GuardedBy("evictionLock")
void determineAdjustment() {
  //如果frequencySketch还没初始化,则返回
  if (frequencySketch().isNotInitialized()) {
    setPreviousSampleHitRate(0.0);
    setMissesInSample(0);
    setHitsInSample(0);
    return;
  }
  //总请求量 = 命中 + miss
  int requestCount = hitsInSample() + missesInSample();
  //没达到sampleSize则返回
  //默认下sampleSize = 10 * maximum。用sampleSize来判断缓存是否足够”热“。
  if (requestCount < frequencySketch().sampleSize) {
    return;
  }

//命中率的公式 = 命中 / 总请求
  double hitRate = (double) hitsInSample() / requestCount;
  //命中率的差值
  double hitRateChange = hitRate - previousSampleHitRate();
  //本次调整的大小,是由命中率的差值和上次的stepSize决定的
  double amount = (hitRateChange >= 0) ? stepSize() : -stepSize();
  //下次的调整大小:如果命中率的之差大于0.05,则重置为0.065 * maximum,否则按照0.98来进行衰减
  double nextStepSize = (Math.abs(hitRateChange) >= HILL_CLIMBER_RESTART_THRESHOLD)
      ? HILL_CLIMBER_STEP_PERCENT * maximum() * (amount >= 0 ? 1 : -1)
      : HILL_CLIMBER_STEP_DECAY_RATE * amount;
  setPreviousSampleHitRate(hitRate);
  setAdjustment((long) amount);
  setStepSize(nextStepSize);
  setMissesInSample(0);
  setHitsInSample(0);
}

/** Transfers the nodes from the protected to the probation region if it exceeds the maximum. */

//这个方法比较简单,减少protected区溢出的部分
@GuardedBy("evictionLock")
void demoteFromMainProtected() {
  long mainProtectedMaximum = mainProtectedMaximum();
  long mainProtectedWeightedSize = mainProtectedWeightedSize();
  if (mainProtectedWeightedSize <= mainProtectedMaximum) {
    return;
  }

for (int i = 0; i < QUEUE_TRANSFER_THRESHOLD; i++) {
    if (mainProtectedWeightedSize <= mainProtectedMaximum) {
      break;
    }

Node demoted = accessOrderProtectedDeque().poll();
    if (demoted == null) {
      break;
    }
    demoted.makeMainProbation();
    accessOrderProbationDeque().add(demoted);
    mainProtectedWeightedSize -= demoted.getPolicyWeight();
  }
  setMainProtectedWeightedSize(mainProtectedWeightedSize);
}

/**
 * Increases the size of the admission window by shrinking the portion allocated to the main
 * space. As the main space is partitioned into probation and protected regions (80% / 20%), for
 * simplicity only the protected is reduced. If the regions exceed their maximums, this may cause
 * protected items to be demoted to the probation region and probation items to be demoted to the
 * admission window.
 */

//增加window区的大小,这个方法比较简单,思路就像我上面说的
@GuardedBy("evictionLock")
void increaseWindow() {
  if (mainProtectedMaximum() == 0) {
    return;
  }

long quota = Math.min(adjustment(), mainProtectedMaximum());
  setMainProtectedMaximum(mainProtectedMaximum() - quota);
  setWindowMaximum(windowMaximum() + quota);
  demoteFromMainProtected();

for (int i = 0; i < QUEUE_TRANSFER_THRESHOLD; i++) {
    Node candidate = accessOrderProbationDeque().peek();
    boolean probation = true;
    if ((candidate == null) || (quota < candidate.getPolicyWeight())) {
      candidate = accessOrderProtectedDeque().peek();
      probation = false;
    }
    if (candidate == null) {
      break;
    }

int weight = candidate.getPolicyWeight();
    if (quota < weight) {
      break;
    }

quota -= weight;
    if (probation) {
      accessOrderProbationDeque().remove(candidate);
    } else {
      setMainProtectedWeightedSize(mainProtectedWeightedSize() - weight);
      accessOrderProtectedDeque().remove(candidate);
    }
    setWindowWeightedSize(windowWeightedSize() + weight);
    accessOrderWindowDeque().add(candidate);
    candidate.makeWindow();
  }

setMainProtectedMaximum(mainProtectedMaximum() + quota);
  setWindowMaximum(windowMaximum() - quota);
  setAdjustment(quota);
}

/** Decreases the size of the admission window and increases the main's protected region. */
//同上increaseWindow差不多,反操作
@GuardedBy("evictionLock")
void decreaseWindow() {
  if (windowMaximum() <= 1) {
    return;
  }

long quota = Math.min(-adjustment(), Math.max(0, windowMaximum() - 1));
  setMainProtectedMaximum(mainProtectedMaximum() + quota);
  setWindowMaximum(windowMaximum() - quota);

for (int i = 0; i < QUEUE_TRANSFER_THRESHOLD; i++) {
    Node candidate = accessOrderWindowDeque().peek();
    if (candidate == null) {
      break;
    }

int weight = candidate.getPolicyWeight();
    if (quota < weight) {
      break;
    }

quota -= weight;
    setMainProtectedWeightedSize(mainProtectedWeightedSize() + weight);
    setWindowWeightedSize(windowWeightedSize() - weight);
    accessOrderWindowDeque().remove(candidate);
    accessOrderProbationDeque().add(candidate);
    candidate.makeMainProbation();
  }

setMainProtectedMaximum(mainProtectedMaximum() - quota);
  setWindowMaximum(windowMaximum() + quota);
  setAdjustment(-quota);
}
, v>, v>, v>
以上,是 Caffeine 的 W-TinyLFU 策略的设计原理及代码实现解析。
异步的高性能读写
一般的缓存每次对数据处理完之后(读的话,已经存在则直接返回,不存在则 load 数据,保存,再返回;写的话,则直接插入或更新),但是因为要维护一些淘汰策略,则需要一些额外的操作,诸如:
- 计算和比较数据的是否过期
- 统计频率(像 LFU 或其变种)
- 维护 read queue 和 write queue
- 淘汰符合条件的数据
- 等等。。。
这种数据的读写伴随着缓存状态的变更,Guava Cache 的做法是把这些操作和读写操作放在一起,在一个同步加锁的操作中完成,虽然 Guava Cache 巧妙地利用了 JDK 的 ConcurrentHashMap(分段锁或者无锁 CAS)来降低锁的密度,达到提高并发度的目的。但是,对于一些热点数据,这种做法还是避免不了频繁的锁竞争。Caffeine 借鉴了数据库系统的 WAL(Write-Ahead Logging)思想,即先写日志再执行操作,这种思想同样适合缓存的,执行读写操作时,先把操作记录在缓冲区,然后在合适的时机异步、批量地执行缓冲区中的内容。但在执行缓冲区的内容时,也是需要在缓冲区加上同步锁的,不然存在并发问题,只不过这样就可以把对锁的竞争从缓存数据转移到对缓冲区上。
ReadBuffer
在 Caffeine 的内部实现中,为了很好的支持不同的 Features(如 Eviction,Removal,Refresh,Statistics,Cleanup,Policy 等等),扩展了很多子类,它们共同的父类是BoundedLocalCache,而readBuffer就是作为它们共有的属性,即都是用一样的 readBuffer,看定义:
final Buffer> readBuffer;

readBuffer = evicts() || collectKeys() || collectValues() || expiresAfterAccess()
        ? new BoundedBuffer<>()
        : Buffer.disabled();
上面提到 Caffeine 对每次缓存的读操作都会触发afterRead
/**
 * Performs the post-processing work required after a read.
 *
 * @param node the entry in the page replacement policy
 * @param now the current time, in nanoseconds
 * @param recordHit if the hit count should be incremented
 */
void afterRead(Node node, long now, boolean recordHit), v> {
  if (recordHit) {
    statsCounter().recordHits(1);
  }
  //把记录加入到readBuffer
  //判断是否需要立即处理readBuffer
  //注意这里无论offer是否成功都可以走下去的,即允许写入readBuffer丢失,因为这个
  boolean delayable = skipReadBuffer() || (readBuffer.offer(node) != Buffer.FULL);
  if (shouldDrainBuffers(delayable)) {
    scheduleDrainBuffers();
  }
  refreshIfNeeded(node, now);
}

/**
   * Returns whether maintenance work is needed.
   *
   * @param delayable if draining the read buffer can be delayed
   */

//caffeine用了一组状态来定义和管理“维护”的过程
  boolean shouldDrainBuffers(boolean delayable) {
    switch (drainStatus()) {
      case IDLE:
        return !delayable;
      case REQUIRED:
        return true;
      case PROCESSING_TO_IDLE:
      case PROCESSING_TO_REQUIRED:
        return false;
      default:
        throw new IllegalStateException();
    }
  }
重点看BoundedBuffer
/**
 * A striped, non-blocking, bounded buffer.
 *
 * @author [email protected] (Ben Manes)
 * @param  the type of elements maintained by this buffer
 */
final class BoundedBuffer<E> extends StripedBuffer<E>
它是一个 striped、非阻塞、有界限的 buffer,继承于StripedBuffer类。下面看看StripedBuffer的实现:
/**
 * A base class providing the mechanics for supporting dynamic striping of bounded buffers. This
 * implementation is an adaption of the numeric 64-bit {@link java.util.concurrent.atomic.Striped64}
 * class, which is used by atomic counters. The approach was modified to lazily grow an array of
 * buffers in order to minimize memory usage for caches that are not heavily contended on.
 *
 * @author [email protected] (Doug Lea)
 * @author [email protected] (Ben Manes)
 */

abstract class StripedBuffer<E> implements Buffer<E>
这个StripedBuffer设计的思想是跟Striped64类似的,通过扩展结构把竞争热点分离。
具体实现是这样的,StripedBuffer维护一个Buffer[]数组,每个元素就是一个RingBuffer,每个线程用自己threadLocalRandomProbe属性作为 hash 值,这样就相当于每个线程都有自己“专属”的RingBuffer,就不会产生竞争啦,而不是用 key 的hashCode作为 hash 值,因为会产生热点数据问题。
看看StripedBuffer的属性
/** Table of buffers. When non-null, size is a power of 2. */
//RingBuffer数组
transient volatile Buffer @Nullable[] table;

//当进行resize时,需要整个table锁住。tableBusy作为CAS的标记。
static final long TABLE_BUSY = UnsafeAccess.objectFieldOffset(StripedBuffer.class, "tableBusy");
static final long PROBE = UnsafeAccess.objectFieldOffset(Thread.class, "threadLocalRandomProbe");

/** Number of CPUS. */
static final int NCPU = Runtime.getRuntime().availableProcessors();

/** The bound on the table size. */
//table最大size
static final int MAXIMUM_TABLE_SIZE = 4 * ceilingNextPowerOfTwo(NCPU);

/** The maximum number of attempts when trying to expand the table. */
//如果发生竞争时(CAS失败)的尝试次数
static final int ATTEMPTS = 3;

/** Table of buffers. When non-null, size is a power of 2. */
//核心数据结构
transient volatile Buffer @Nullable[] table;

/** Spinlock (locked via CAS) used when resizing and/or creating Buffers. */
transient volatile int tableBusy;

/** CASes the tableBusy field from 0 to 1 to acquire lock. */
final boolean casTableBusy() {
  return UnsafeAccess.UNSAFE.compareAndSwapInt(this, TABLE_BUSY, 0, 1);
}

/**
 * Returns the probe value for the current thread. Duplicated from ThreadLocalRandom because of
 * packaging restrictions.
 */
static final int getProbe() {
  return UnsafeAccess.UNSAFE.getInt(Thread.currentThread(), PROBE);
}
offer方法,当没初始化或存在竞争时,则扩容为 2 倍。
实际是调用RingBuffer的 offer 方法,把数据追加到RingBuffer后面。
@Override
public int offer(E e) {
  int mask;
  int result = 0;
  Buffer buffer;
  //是否不存在竞争
  boolean uncontended = true;
  Buffer[] buffers = table
  //是否已经初始化
  if ((buffers == null)
      || (mask = buffers.length - 1) < 0
      //用thread的随机值作为hash值,得到对应位置的RingBuffer
      || (buffer = buffers[getProbe() & mask]) == null
      //检查追加到RingBuffer是否成功
      || !(uncontended = ((result = buffer.offer(e)) != Buffer.FAILED))) {
    //其中一个符合条件则进行扩容
    expandOrRetry(e, uncontended);
  }
  return result;
}

/**
 * Handles cases of updates involving initialization, resizing, creating new Buffers, and/or
 * contention. See above for explanation. This method suffers the usual non-modularity problems of
 * optimistic retry code, relying on rechecked sets of reads.
 *
 * @param e the element to add
 * @param wasUncontended false if CAS failed before call
 */

//这个方法比较长,但思路还是相对清晰的。
@SuppressWarnings("PMD.ConfusingTernary")
final void expandOrRetry(E e, boolean wasUncontended) {
  int h;
  if ((h = getProbe()) == 0) {
    ThreadLocalRandom.current(); // force initialization
    h = getProbe();
    wasUncontended = true;
  }
  boolean collide = false; // True if last slot nonempty
  for (int attempt = 0; attempt < ATTEMPTS; attempt++) {
    Buffer[] buffers;
    Buffer buffer;
    int n;
    if (((buffers = table) != null) && ((n = buffers.length) > 0)) {
      if ((buffer = buffers[(n - 1) & h]) == null) {
        if ((tableBusy == 0) && casTableBusy()) { // Try to attach new Buffer
          boolean created = false;
          try { // Recheck under lock
            Buffer[] rs;
            int mask, j;
            if (((rs = table) != null) && ((mask = rs.length) > 0)
                && (rs[j = (mask - 1) & h] == null)) {
              rs[j] = create(e);
              created = true;
            }
          } finally {
            tableBusy = 0;
          }
          if (created) {
            break;
          }
          continue; // Slot is now non-empty
        }
        collide = false;
      } else if (!wasUncontended) { // CAS already known to fail
        wasUncontended = true;      // Continue after rehash
      } else if (buffer.offer(e) != Buffer.FAILED) {
        break;
      } else if (n >= MAXIMUM_TABLE_SIZE || table != buffers) {
        collide = false; // At max size or stale
      } else if (!collide) {
        collide = true;
      } else if (tableBusy == 0 && casTableBusy()) {
        try {
          if (table == buffers) { // Expand table unless stale
            table = Arrays.copyOf(buffers, n << 1);
          }
        } finally {
          tableBusy = 0;
        }
        collide = false;
        continue; // Retry with expanded table
      }
      h = advanceProbe(h);
    } else if ((tableBusy == 0) && (table == buffers) && casTableBusy()) {
      boolean init = false;
      try { // Initialize table
        if (table == buffers) {
          @SuppressWarnings({"unchecked", "rawtypes"})
          Buffer[] rs = new Buffer[1];
          rs[0] = create(e);
          table = rs;
          init = true;
        }
      } finally {
        tableBusy = 0;
      }
      if (init) {
        break;
      }
    }
  }
}
最后看看RingBuffer,注意RingBuffer是BoundedBuffer的内部类。
/** The maximum number of elements per buffer. */
static final int BUFFER_SIZE = 16;

// Assume 4-byte references and 64-byte cache line (16 elements per line)
//256长度,但是是以16为单位,所以最多存放16个元素
static final int SPACED_SIZE = BUFFER_SIZE << 4;
static final int SPACED_MASK = SPACED_SIZE - 1;
static final int OFFSET = 16;
//RingBuffer数组
final AtomicReferenceArray buffer;

//插入方法
 @Override
 public int offer(E e) {
   long head = readCounter;
   long tail = relaxedWriteCounter();
   //用head和tail来限制个数
   long size = (tail - head);
   if (size >= SPACED_SIZE) {
     return Buffer.FULL;
   }
   //tail追加16
   if (casWriteCounter(tail, tail + OFFSET)) {
     //用tail“取余”得到下标
     int index = (int) (tail & SPACED_MASK);
     //用unsafe.putOrderedObject设值
     buffer.lazySet(index, e);
     return Buffer.SUCCESS;
   }
   //如果CAS失败则返回失败
   return Buffer.FAILED;
 }

//用consumer来处理buffer的数据
 @Override
 public void drainTo(Consumer consumer) {
   long head = readCounter;
   long tail = relaxedWriteCounter();
   //判断数据多少
   long size = (tail - head);
   if (size == 0) {
     return;
   }
   do {
     int index = (int) (head & SPACED_MASK);
     E e = buffer.get(index);
     if (e == null) {
       // not published yet
       break;
     }
     buffer.lazySet(index, null);
     consumer.accept(e);
     //head也跟tail一样,每次递增16
     head += OFFSET;
   } while (head != tail);
   lazySetReadCounter(head);
 }
注意,ring buffer 的 size(固定是 16 个)是不变的,变的是 head 和 tail 而已。
总的来说ReadBuffer有如下特点:
- 使用
Striped-RingBuffer来提升对 buffer 的读写 - 用 thread 的 hash 来避开热点 key 的竞争
- 允许写入的丢失
WriteBuffer
writeBuffer跟readBuffer不一样,主要体现在使用场景的不一样。本来缓存的一般场景是读多写少的,读的并发会更高,且 afterRead 显得没那么重要,允许延迟甚至丢失。写不一样,写afterWrite不允许丢失,且要求尽量马上执行。Caffeine 使用MPSC(Multiple Producer / Single Consumer)作为 buffer 数组,实现在MpscGrowableArrayQueue类,它是仿照JCTools的MpscGrowableArrayQueue来写的。
MPSC 允许无锁的高并发写入,但只允许一个消费者,同时也牺牲了部分操作。
MPSC 我打算另外分析,这里不展开了。
TimerWheel
除了支持expireAfterAccess和expireAfterWrite之外(Guava Cache 也支持这两个特性),Caffeine 还支持expireAfter。因为expireAfterAccess和expireAfterWrite都只能是固定的过期时间,这可能满足不了某些场景,譬如记录的过期时间是需要根据某些条件而不一样的,这就需要用户自定义过期时间。
先看看expireAfter的用法
private static LoadingCache cache = Caffeine.newBuilder()
        .maximumSize(256L)
        .initialCapacity(1)
        //.expireAfterAccess(2, TimeUnit.DAYS)
        //.expireAfterWrite(2, TimeUnit.HOURS)
        .refreshAfterWrite(1, TimeUnit.HOURS)
        //自定义过期时间
        .expireAfter(new Expiry() {
            //返回创建后的过期时间
            @Override
            public long expireAfterCreate(@NonNull String key, @NonNull String value, long currentTime) {
                return 0;
            }

//返回更新后的过期时间
            @Override
            public long expireAfterUpdate(@NonNull String key, @NonNull String value, long currentTime, @NonNegative long currentDuration) {
                return 0;
            }

//返回读取后的过期时间
            @Override
            public long expireAfterRead(@NonNull String key, @NonNull String value, long currentTime, @NonNegative long currentDuration) {
                return 0;
            }
        })
        .recordStats()
        .build(new CacheLoader() {
            @Nullable
            @Override
            public String load(@NonNull String key) throws Exception {
                return "value_" + key;
            }
        });
, string>, string>, string>
通过自定义过期时间,使得不同的 key 可以动态的得到不同的过期时间。
注意,我把expireAfterAccess和expireAfterWrite注释了,因为这两个特性不能跟expireAfter一起使用。
而当使用了expireAfter特性后,Caffeine 会启用一种叫“时间轮”的算法来实现这个功能。更多关于时间轮的介绍,可以看我的文章HashedWheelTimer 时间轮原理分析[6]。
好,重点来了,为什么要用时间轮?
对expireAfterAccess和expireAfterWrite的实现是用一个AccessOrderDeque双端队列,它是 FIFO 的,因为它们的过期时间是固定的,所以在队列头的数据肯定是最早过期的,要处理过期数据时,只需要首先看看头部是否过期,然后再挨个检查就可以了。但是,如果过期时间不一样的话,这需要对accessOrderQueue进行排序&插入,这个代价太大了。于是,Caffeine 用了一种更加高效、优雅的算法-时间轮。
时间轮的结构:
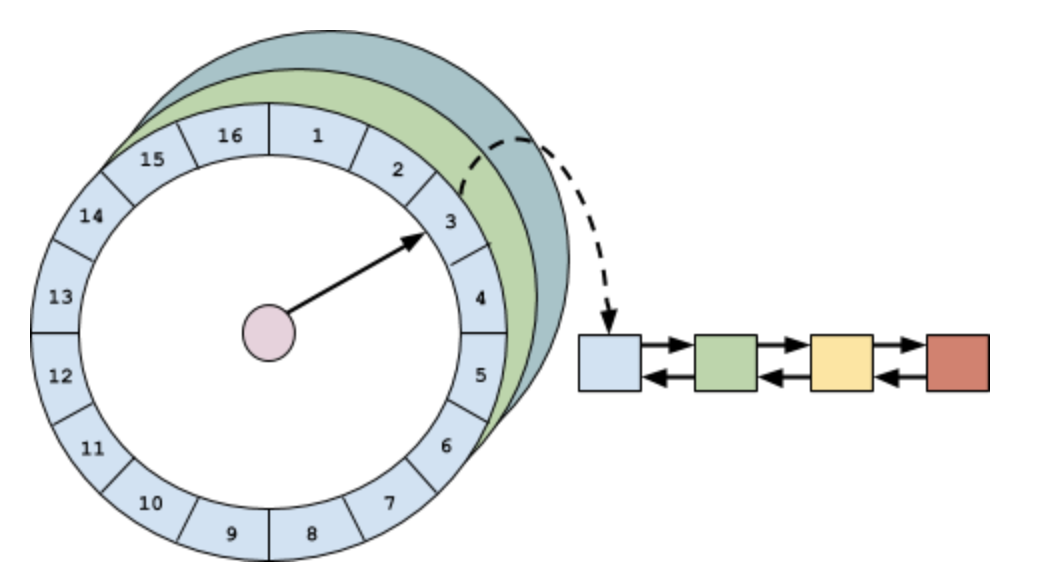
因为在我的对时间轮分析的文章里已经说了时间轮的原理和机制了,所以我就不展开 Caffeine 对时间轮的实现了。
Caffeine 对时间轮的实现在TimerWheel,它是一种多层时间轮(hierarchical timing wheels )。
看看元素加入到时间轮的schedule方法:
/**
 * Schedules a timer event for the node.
 *
 * @param node the entry in the cache
 */
public void schedule(@NonNull Node node), v> {
  Node sentinel = findBucket(node.getVariableTime());
  link(sentinel, node);
}

/**
 * Determines the bucket that the timer event should be added to.
 *
 * @param time the time when the event fires
 * @return the sentinel at the head of the bucket
 */
Node findBucket(long time) , v>{
  long duration = time - nanos;
  int length = wheel.length - 1;
  for (int i = 0; i < length; i++) {
    if (duration < SPANS[i + 1]) {
      long ticks = (time >>> SHIFT[i]);
      int index = (int) (ticks & (wheel[i].length - 1));
      return wheel[i][index];
    }
  }
  return wheel[length][0];
}

/** Adds the entry at the tail of the bucket's list. */
void link(Node sentinel, Node node), v>, v> {
  node.setPreviousInVariableOrder(sentinel.getPreviousInVariableOrder());
  node.setNextInVariableOrder(sentinel);

sentinel.getPreviousInVariableOrder().setNextInVariableOrder(node);
  sentinel.setPreviousInVariableOrder(node);
}
, v>
Caffeine 还有其他的优化性能的手段,如使用软引用和弱引用、消除伪共享、CompletableFuture异步等等。
Caffeien 是一个优秀的本地缓存,通过使用 W-TinyLFU 算法, 高性能的 readBuffer 和 WriteBuffer,时间轮算法等,使得它拥有高性能,高命中率(near optimal),低内存占用等特点。
TinyLFU 论文[7]
Design Of A Modern Cache[8]
Design Of A Modern Cache—Part Deux[9]
Caffeine 的 github[10]
[1]
Caffeine: https://github.com/ben-manes/caffeine
[2]
这里: https://albenw.github.io/posts/df42dc84/
[3]
Benchmarks: https://github.com/ben-manes/caffeine/wiki/Benchmarks
[4]
官方API说明文档: https://github.com/ben-manes/caffeine/wiki
[5]
这里: https://github.com/ben-manes/caffeine/wiki/Guava
[6]
HashedWheelTimer时间轮原理分析: https://albenw.github.io/posts/ec8df8c/
[7]
TinyLFU论文: https://arxiv.org/abs/1512.00727
[8]
Design Of A Modern Cache: http://highscalability.com/blog/2016/1/25/design-of-a-modern-cache.html
[9]
Design Of A Modern Cache—Part Deux: http://highscalability.com/blog/2019/2/25/design-of-a-modern-cachepart-deux.html
[10]
Caffeine的github: https://github.com/ben-manes/caffeine
Recommend
About Joyk
Aggregate valuable and interesting links.
Joyk means Joy of geeK