

《开源容器云OpenShift:构建基于Kubernetes的企业应用云平台》读书笔记
source link: https://liruilongs.github.io/2022/05/27/rhca/DO280/%E3%80%8A%E5%BC%80%E6%BA%90%E5%AE%B9%E5%99%A8%E4%BA%91OpenShift-%E6%9E%84%E5%BB%BA%E5%9F%BA%E4%BA%8EKubernetes%E7%9A%84%E4%BC%81%E4%B8%9A%E5%BA%94%E7%94%A8%E4%BA%91%E5%B9%B3%E5%8F%B0%E3%80%8B%E8%AF%BB%E4%B9%A6%E7%AC%94%E8%AE%B0/
Go to the source link to view the article. You can view the picture content, updated content and better typesetting reading experience. If the link is broken, please click the button below to view the snapshot at that time.
《开源容器云OpenShift:构建基于Kubernetes的企业应用云平台》读书笔记
傍晚时分,你坐在屋檐下,看着天慢慢地黑下去,心里寂寞而凄凉,感到自己的生命被剥夺了。当时我是个年轻人,但我害怕这样生活下去,衰老下去。在我看来,这是比死亡更可怕的事。——–王小波
- 准备RHCA认证,学习Openshift 所以看这本书
- 理解不足小伙伴帮忙指正
傍晚时分,你坐在屋檐下,看着天慢慢地黑下去,心里寂寞而凄凉,感到自己的生命被剥夺了。当时我是个年轻人,但我害怕这样生活下去,衰老下去。在我看来,这是比死亡更可怕的事。——–王小波
第1章开源容器云概述
1.1 容器时代的IT
随着容器成为了部署交付件的标准,大量的业务应用将会需要运行在容器环境中,或者换句话说,未来容器将会成为应用的标准运行环境。
那么下一个问题就是,应用如何在容器的环境中运行得更高效、更稳定?为了更好地运行在容器环境中,应用的架构也必然要发生变化,变得契合容器的特性。正因为这个背景,最近,业界在热烈地探讨容器之余,也非常关注应用的微服务化。
1.2 开源容器云
现今企业要基于已有的解决方案构建自有的容器云平台,我认为,开源的容器云平台是一个必然的选择。
1.3 OpenShift
OpenShift是一个开源容器云平台,是一个基于主流的容器技术Docker及Kubernetes构建的云平台。
作为一个开源项目,OpenShift已有5年的发展历史,其最早的定位是一个应用云平台(Platform as a Service,PaaS)。
pass平台,以服务器或者开发环境按需提供的服务,也可以说中间件即服务,比如提供数据库环境,消息中间件环境,可以按需弹性扩展节点。所以pass相对于iaas云来讲,不仅仅的单独提供基础设施,还包含对平台的技术支持,比如消息中间件集群的优化配置等。
OpenShift对Docker及Kubernetes的整合和OpenShit项目最大的贡献方红帽公司(Red Hat Inc.)有着很大的关系。
通过OpenShit这个平台,企业可以快速在内部网络中构建出一个多租户的云平台,在这朵云上提供应用开发、测试、部署、运维的各项服务
OpenShit在一个平台上贯通开发、测试、部署、运维的devops流程,实现高度的自动化,满足应用持续集成及持续交付和部署的需求;满足企业及组织对容器管理、容器编排的需求。通过OpenShift的灵活架构,企业可以以Openshift作为核心,在其上搭建一个企业的DevOps引擎,推动企业的DevOps变革和转型。
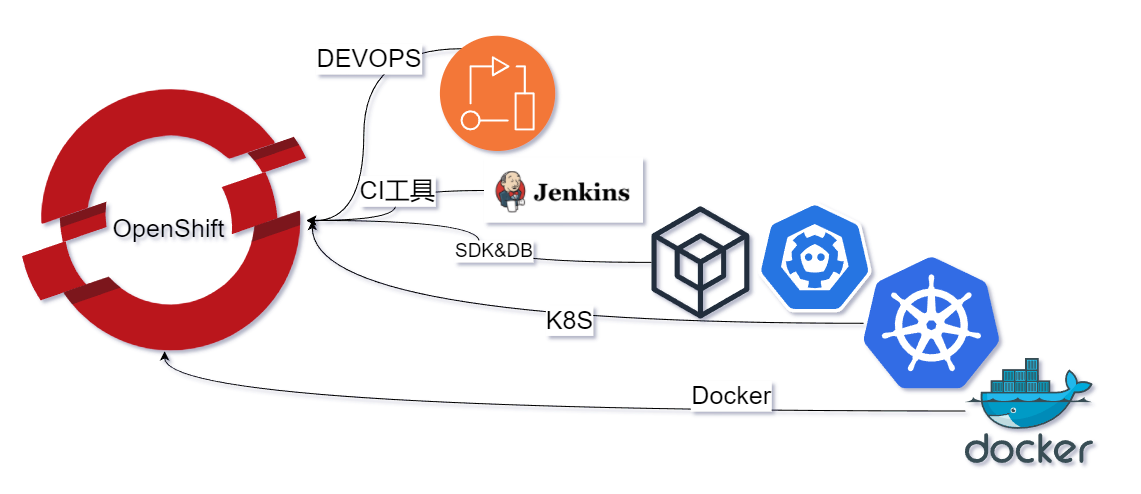
1.4 Docker、Kubernetes与OpenShift
许多刚接触OpenShift的朋友会有这样一个疑问:“Open-Shift与Docker及Kubernetes的关系究竟是什么?”
OpenShift是基于容器技术构建的一个云平台。这里所指的容器技术即包含Docker及Kubernetes,
- OpenShift底层以Docker作为容器引擎驱动,以Kubernetes作为容器编排引擎组件。
- OpenShift提供了开发语言、中间件、自动化流程工具及界面等元素,提供了一套完整的基于容器的应用云平台。
1.4.1 容器引擎
Docker的优势在于它可以构建一个隔离的、稳定的、安全的、高性能的容器运行环境。目前,OpenShift使用原生的Docker作为平台的容器引擎,为上层组件及用户应用提供可靠安全的运行环境具有十分重要的价值:
Docker有非常大的用户基础。以Docker为基础引擎,降低了用户学习的成本。熟悉Docker的用户可以非常容易地上手。
- Docker Hub上有海量的镜像资源。我们日常使用的绝大部分软件,都可以在Docker-Hub上找到官方的或社区贡献的镜像。所有的这些镜像都可以无缝地运行在OpenShift平台上。
- Red Hat本身就是Docker的一个主要贡献者,它们对社区有着很强的影响力,对这个技术的发展也有着很强的领导力。这一点对企业用户来说非常关键,因为谁也不想投资在一个没有前景或过时的技术上。
- 这里值得关注的一点是OpenShift使用的Docker是原生的Docker,没有任何闭源的修改。
1.4.2 容器编排
为了满足容器集群所需的调度、网络、储存、性能及安全的需求,我们必须有专业的工具和平台。这些关于容器集群管理的问题,其实就是容器编排的问题,即Kubernetes要解决的问题。
Kubernetes是Google十多年容器使用经验的总结,虽然Google使用的容器是Docker时代之前的容器,但是业务应用对安全、性能、隔离、网络、储存及调度方面的需求,在最原始的本质上其实并没有发生变化。Google选择和Red Hat一同开源了Kubernetes,且目前在GitHub上的关注程度远远高于其他同类的平台,未来非常可能在容器编排领域成为类似Docker一样的“事实标准”。
OpenShift集成原生的Kubernetes作为容器编排组件。OpenShift 通过Kubernetes米管理容器集群中的机器节点及容器,为业务应用提供:
- 容器调度;按业务的要求快速部署容器至指定的目标。
- 弹性伸缩:按业务的需要快速扩展或收缩容器的运行实例数量。
- 异常自愈:当容器实例发生异常,集群能自动感知、处理并恢复服务状态。
- 持久化卷:为散布在集群不同机器上的容器提供持久化卷的智能对接。
- 服务发现:为业务微服务化提供服务发现及负载均衡等功能。
- 配置管理:为业务应用提供灵活的配置管理及分发规则。
1.4.3 容器应用云
OpenShift在Docker和Kubermetes的基础上提供了各种功能,以满足业务应用、研发用户及运维用户在生产效率上的诉求。
应用开发框架及中间件。OpenShift提供了丰富的开箱即用的编程开发框架及中间件,如Java、PHP、Ruby、Python、JBoss EAP、Tomcat、MySQL、MongoDB及JBoss系列中间件等。
应用及服务目录。OpenShift提供了如软件市场式的服务及应用目录,可以实现用户一键部署各类应用及服务,比如一键部署Hadoop 集群和Spark集群。
自动化流程及工具。OpenShift内置了自动化流程工具S2I(Source to lmage),帮助用户自动化完成代码的编译、构建及镜像发布。
软件自定义网络。通过OpenVSwitch,OpenShift为用户提供了灵活强键的软件定义网络。实现跨主机共享网络及多租户隔离网络模式。
性能监控及日志管理。OpenShift提供了开箱可用的性能监控及日志管理的组件。通过平台,业务能快速获取运行状态指标,对业务日志进行收集及分析。
多用户接口。OpenShift提供了友好的Web用户界面、命令行工具及RESTfulAPl。口自动化集群部署及管理。OpenShift通过Ansible实现了集群的自动化部署,为集群的自动化扩容提供了接口。
通过前面的介绍,我们可以了解到 OpenShift在Docker及Kubernetes的基础上做了方方面面的创新,最终目的就是为
用户及业务应用提供一个高效、高生产力的平台。
1.5 OpenShift 社区版与企业版
OpenShift是一个开源项目,所有的源代码都可以在GitHub仓库上查阅及下载。企业和个人都可以免费下载和使用OpenShift构建属于自己的容器云平台。我们也可以加入OpenShift的社区成为一名光荣的OpenShift社区贡献者。
OpenShift的开源社区版本叫OpenShift Origin,Red Hat在OpenShift Origin的基础上推出了OpenShift的企业版本,其中包含了公有云服务OpenShift Online及私有云产品OpenShift Container Platform(以前也称为OpenShift Enterprise)。
第2章 初探OpenShift 容器云
2.1 启动OpenShift Origin
OpenShift支持运行在基础架构之上,同时支持多种安装方式。
- 手工安装。用户下载OpenShift的二进制包,手动进行配置和启动。
- 快速安装。通过OpenShift提供的交互式Installer进行安装。
- 高级安装。在多节点集群的环境中,OpenShift可通过Ansible对多台集群主机进行自动化安装和配置。
- Docker镜像。通过运行OpenShift的Docker镜像启动一个All-in-One的OpenShift容器实例。这适合开发测试人员快速部署和验证。
这部分书里面的太旧了,所以网上找的一些小伙伴整理的
hostnamectl set-hostname vms$16.liruilongs.github.io
2.1.4 安装Docker,配置Docker加速
┌──[[email protected]]-[~]
└─$yum -y install docker-ce
┌──[[email protected]]-[~]
└─$systemctl enable  docker.service  --now
Created symlink from /etc/systemd/system/multi-user.target.wants/docker.service to /usr/lib/systemd/system/docker.service.
sudo mkdir -p /etc/docker
sudo tee /etc/docker/daemon.json <<-'EOF'
{
  "registry-mirrors": ["https://2tefyfv7.mirror.aliyuncs.com"]
}
EOF
sudo systemctl daemon-reload
sudo systemctl restart docker
配置镜像仓库
┌──[[email protected]]-[~]
└─$cat   /etc/docker/daemon.json
{
  "registry-mirrors": ["https://2tefyfv7.mirror.aliyuncs.com"],
   "insecure-registries": [
     "172.30.0.0/16"
   ]
}
配置防火墙
┌──[[email protected]]-[~]
└─$firewall-cmd --permanent --new-zone dockerc
┌──[[email protected]]-[~]
└─$firewall-cmd --permanent --zone dockerc --add-source 172.17.0.0/16
success
┌──[[email protected]]-[~]
└─$firewall-cmd --permanent --zone dockerc --add-port 8443/tcp
success
┌──[[email protected]]-[~]
└─$firewall-cmd --permanent --zone dockerc --add-port 53/udp
success
┌──[[email protected]]-[~]
└─$firewall-cmd --permanent --zone dockerc --add-port 8053/udp
success
┌──[[email protected]]-[~]
└─$firewall-cmd --reload
success
配置Selinux
┌──[[email protected]]-[~]
└─$setenforce 0
setenforce: SELinux is disabled
┌──[[email protected]]-[~]
└─$getsebool
getsebool:  SELinux is disabled
┌──[[email protected]]-[~]
└─$
2.1.5 下载OpenShift Origin 安装包
┌──[[email protected]]-[~]
└─$wget http://dl.dawnlab.cn/skrman/openshift-origin-server-v3.11.0-0cbc58b-linux-64bit.tar.gz
--2022-05-28 15:53:17--  http://dl.dawnlab.cn/skrman/openshift-origin-server-v3.11.0-0cbc58b-linux-64bit.tar.gz
正在解析主机 dl.dawnlab.cn (dl.dawnlab.cn)... 81.69.59.74
正在连接 dl.dawnlab.cn (dl.dawnlab.cn)|81.69.59.74|:80... 已连接。
已发出 HTTP 请求,正在等待回应... 200 OK
长度:228058872 (217M) [application/gzip]
正在保存至: “openshift-origin-server-v3.11.0-0cbc58b-linux-64bit.tar.gz”

100%[==========================================================================>] 228,058,872 1005KB/s 用时 5m 24s

2022-05-28 15:58:42 (687 KB/s) - 已保存 “openshift-origin-server-v3.11.0-0cbc58b-linux-64bit.tar.gz” [228058872/228058872])

┌──[[email protected]]-[~]
└─$ls
anaconda-ks.cfg  calico.yaml            openshift-origin-server-v3.11.0-0cbc58b-linux-64bit.tar.gz
calico_3_14.tar  one-client-install.sh  set.sh
┌──[[email protected]]-[~]
└─$tar -xzf openshift-origin-server-v3.11.0-0cbc58b-linux-64bit.tar.gz
┌──[[email protected]]-[~]
└─$yum -y install git
2.1.6 安装及启动OpenShift Origin
┌──[[email protected]]-[~]
└─$mv openshift-origin-server-v3.11.0-0cbc58b-linux-64bit/o
oadm                   oc                     openshift              openshift-node-config
┌──[[email protected]]-[~]
└─$mv openshift-origin-server-v3.11.0-0cbc58b-linux-64bit/oc  /usr/local/bin/
┌──[[email protected]]-[~]
└─$chmod  755 /usr/local/bin/oc
┌──[[email protected]]-[~]
└─$echo $PATH
/usr/local/sbin:/usr/local/bin:/usr/sbin:/usr/bin:/root/bin
┌──[[email protected]]-[~]
└─$which oc
/usr/local/bin/oc
┌──[[email protected]]-[~]
└─$oc version
oc v3.11.0+0cbc58b
kubernetes v1.11.0+d4cacc0
features: Basic-Auth GSSAPI Kerberos SPNEGO
┌──[[email protected]]-[~]
└─$
┌──[[email protected]]-[~]
└─$oc cluster up --skip-registry-check=true --public-hostname=vms16.liruilongs.github.io
.....
Login to server ...
Creating initial project "myproject" ...
Server Information ...
OpenShift server started.

The server is accessible via web console at:
    https://192.168.26.16:8443:8443

You are logged in as:
    User:     developer
    Password: <any value>

To login as administrator:
    oc login -u system:admin
安装失败的处理
我是在虚机部署的,在物理机访问,一直受域名解析影响,后来找windows上的host文件配置了ip到域名的映射可以了。如果访问不成功。可以按照下面的方式重新试试
┌──[[email protected]]-[~]
└─$oc cluster down
┌──[[email protected]]-[~]
└─$docker images | grep -v IMAGE  | awk '{ print $3}' | xargs docker rmi
┌──[[email protected]]-[~]
└─$oc cluster up --skip-registry-check=true --public-hostname=192.168.26.16 --no-proxy=172.17.0.0/16,127.0.0.1
192.168.26.16 vms16.liruilongs.github.io
┌──[[email protected]]-[~]
└─$cat /etc/hosts
127.0.0.1   localhost localhost.localdomain localhost4 localhost4.localdomain4
::1         localhost localhost.localdomain localhost6 localhost6.localdomain6
192.168.26.16 vms16.liruilongs.github.io vms16
┌──[[email protected]]-[~]
└─$
2.1.7 登录OpenShift Origin 控制台

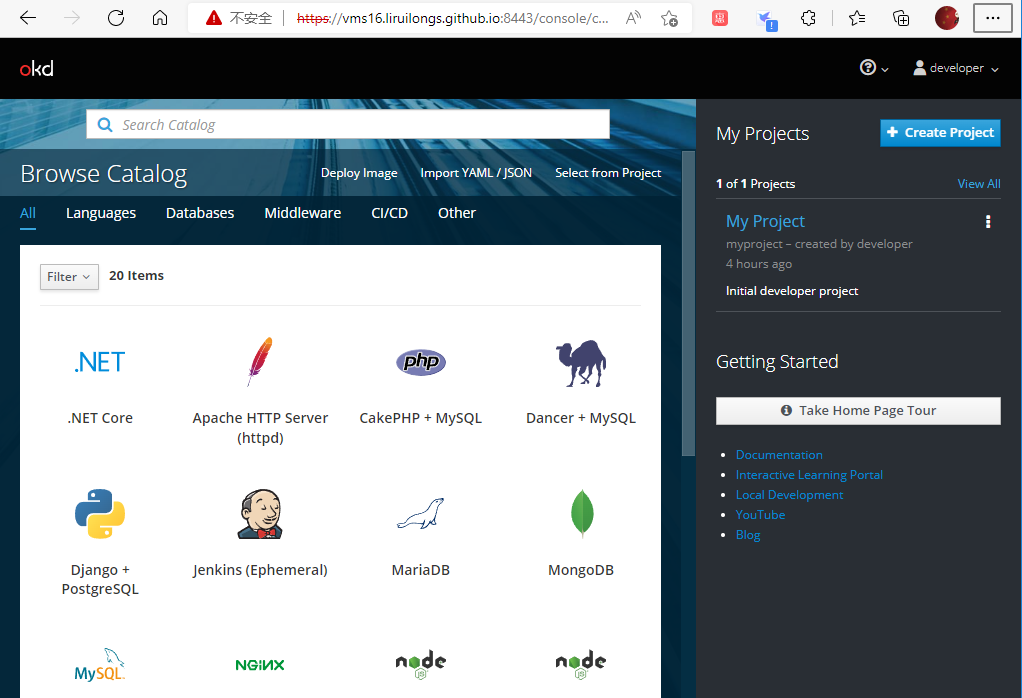
2.2 运行第一个容器应用
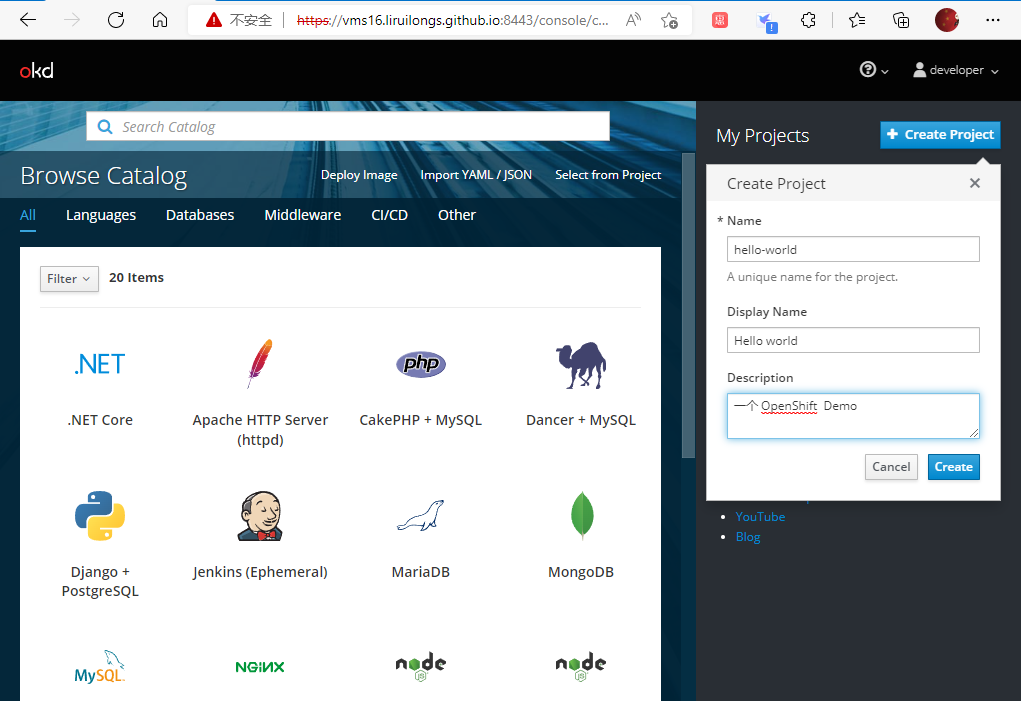
2.2.1 创建项目
2.2.2 部署Docker 镜像
2.2.3 访问容器应用
┌──[[email protected]]-[~]
└─$curl 172.17.0.10:8888
Hello OpenShift!
┌──[[email protected]]-[~]
└─$curl 172.17.0.10:8080
Hello OpenShift!
2.2.4 一些疑问
2.3 完善OpenShift集群
2.3.l 命令行工具
┌──[[email protected]]-[~]
└─$oc version
oc v3.11.0+0cbc58b
kubernetes v1.11.0+d4cacc0
features: Basic-Auth GSSAPI Kerberos SPNEGO

Server https://127.0.0.1:8443
kubernetes v1.11.0+d4cacc0
┌──[[email protected]]-[~]
└─$oc login -u developer
Logged into "https://127.0.0.1:8443" as "developer" using existing credentials.

You have access to the following projects and can switch between them with 'oc project <projectname>':

hello-world
  * myproject

Using project "myproject".
配置命令补全
┌──[[email protected]]-[~]
└─$cat /etc/profile
# /etc/profile

# System wide environment and startup programs, for login setup
# Functions and aliases go in /etc/bashrc

# It's NOT a good idea to change this file unless you know what you
# are doing. It's much better to create a custom.sh shell script in
# /etc/profile.d/ to make custom changes to your environment, as this
# will prevent the need for merging in future updates.

source <(oc completion bash)
....
┌──[[email protected]]-[~]
└─$source /etc/profile
┌──[[email protected]]-[~]
└─$oc new-project hello-world-oc
Now using project "hello-world-oc" on server "https://127.0.0.1:8443".

You can add applications to this project with the 'new-app' command. For example, try:

oc new-app centos/ruby-25-centos7~https://github.com/sclorg/ruby-ex.git

to build a new example application in Ruby.
┌──[[email protected]]-[~]
└─$docker pull openshift/hello-openshift
Using default tag: latest
latest: Pulling from openshift/hello-openshift
Digest: sha256:aaea76ff622d2f8bcb32e538e7b3cd0ef6d291953f3e7c9f556c1ba5baf47e2e
Status: Downloaded newer image for openshift/hello-openshift:latest
docker.io/openshift/hello-openshift:latest
┌──[[email protected]]-[~]
└─$oc new-app openshift/hello-openshift
--> Found Docker image 7af3297 (4 years old) from Docker Hub for "openshift/hello-openshift"

* An image stream tag will be created as "hello-openshift:latest" that will track this image
    * This image will be deployed in deployment config "hello-openshift"
    * Ports 8080/tcp, 8888/tcp will be load balanced by service "hello-openshift"
      * Other containers can access this service through the hostname "hello-openshift"

--> Creating resources ...
    imagestream.image.openshift.io "hello-openshift" created
    deploymentconfig.apps.openshift.io "hello-openshift" created
    service "hello-openshift" created
--> Success
    Application is not exposed. You can expose services to the outside world by executing one or more of the commands below:
     'oc expose svc/hello-openshift'
    Run 'oc status' to view your app.
┌──[[email protected]]-[~]
└─$
┌──[[email protected]]-[~]
└─$oc get  pods
NAME                      READY     STATUS    RESTARTS   AGE
hello-openshift-1-5sr5j   1/1       Running   0          1m
┌──[[email protected]]-[~]
└─$oc describe  pods hello-openshift-1-5sr5j
Name:               hello-openshift-1-5sr5j
Namespace:          hello-world-oc
Priority:           0
PriorityClassName:  <none>
Node:               localhost/192.168.26.16
Start Time:         Sat, 28 May 2022 21:05:19 +0800
Labels:             app=hello-openshift
                    deployment=hello-openshift-1
                    deploymentconfig=hello-openshift
Annotations:        openshift.io/deployment-config.latest-version=1
                    openshift.io/deployment-config.name=hello-openshift
                    openshift.io/deployment.name=hello-openshift-1
                    openshift.io/generated-by=OpenShiftNewApp
                    openshift.io/scc=restricted
Status:             Running
IP:                 172.17.0.11
Controlled By:      ReplicationController/hello-openshift-1
Containers:
2.3.2 以集群管理员登录
┌──[[email protected]]-[~]
└─$oc login -u system:admin
Logged into "https://127.0.0.1:8443" as "system:admin" using existing credentials.

You have access to the following projects and can switch between them with 'oc project <projectname>':

default
    hello-world
    kube-dns
    kube-proxy
    kube-public
    kube-system
  * myproject
    openshift
    openshift-apiserver
    openshift-controller-manager
    openshift-core-operators
    openshift-infra
    openshift-node
    openshift-service-cert-signer
    openshift-web-console

Using project "myproject".
┌──[[email protected]]-[~]
└─$cd  .kube/
┌──[[email protected]]-[~/.kube]
└─$ls
cache  config
┌──[[email protected]]-[~/.kube]
└─$cat config
apiVersion: v1
clusters:
- cluster:
    certificate-authority-data: LS0tLS1CRUdJTiBDRVJUSUZJQ0FURS0tLS0tCk1JSUM2akNDQWRLZ0F3SUJBZ0lCQVRBTkJna3Foa....
┌──[[email protected]]-[~/.kube]
└─$oc whoami
developer
┌──[[email protected]]-[~/.kube]
└─$oc login -u system:admin
Logged into "https://127.0.0.1:8443" as "system:admin" using existing credentials.

You have access to the following projects and can switch between them with 'oc project <projectname>':

default
    hello-world
  * hello-world-oc
    kube-dns
    kube-proxy
    kube-public
    kube-system
    myproject
    openshift
    openshift-apiserver
    openshift-controller-manager
    openshift-core-operators
    openshift-infra
    openshift-node
    openshift-service-cert-signer
    openshift-web-console

Using project "hello-world-oc".
┌──[[email protected]]-[~/.kube]
└─$oc whoami
system:admin
┌──[[email protected]]-[~/.kube]
└─$
┌──[[email protected]]-[~/.kube]
└─$oc get nodes
NAME        STATUS    ROLES     AGE       VERSION
localhost   Ready     <none>    4h        v1.11.0+d4cacc0
┌──[[email protected]]-[~/.kube]
└─$oc get ns
NAME                            STATUS    AGE
default                         Active    4h
hello-world                     Active    59m
hello-world-oc                  Active    16m
kube-dns                        Active    4h
kube-proxy                      Active    4h
kube-public                     Active    4h
kube-system                     Active    4h
myproject                       Active    4h
openshift                       Active    4h
openshift-apiserver             Active    4h
openshift-controller-manager    Active    4h
openshift-core-operators        Active    4h
openshift-infra                 Active    4h
openshift-node                  Active    4h
openshift-service-cert-signer   Active    4h
openshift-web-console           Active    4h
┌──[[email protected]]-[~/.kube]
└─$
┌──[[email protected]]-[~/.kube]
└─$oc project default
Now using project "default" on server "https://127.0.0.1:8443".
┌──[[email protected]]-[~/.kube]
└─$echo "source <(oadm completion bash)" >> /etc/profile
┌──[[email protected]]-[~/.kube]
└─$source  /etc/profile
-bash: oadm: 未找到命令
┌──[[email protected]]-[~]
└─$cd openshift-origin-server-v3.11.0-0cbc58b-linux-64bit/
┌──[[email protected]]-[~/openshift-origin-server-v3.11.0-0cbc58b-linux-64bit]
└─$ls
hyperkube   kubectl  oadm       openshift-node-config  template-service-broker
hypershift  LICENSE  openshift  README.md
┌──[[email protected]]-[~/openshift-origin-server-v3.11.0-0cbc58b-linux-64bit]
└─$mv ./oadm  /usr/local/bin/
┌──[[email protected]]-[~/openshift-origin-server-v3.11.0-0cbc58b-linux-64bit]
└─$mv ./kubectl  /usr/local/bin/
┌──[[email protected]]-[~/openshift-origin-server-v3.11.0-0cbc58b-linux-64bit]
└─$chmod  775 /usr/local/bin/oadm
┌──[[email protected]]-[~/openshift-origin-server-v3.11.0-0cbc58b-linux-64bit]
└─$chmod  775 /usr/local/bin/kubectl
┌──[[email protected]]-[~/openshift-origin-server-v3.11.0-0cbc58b-linux-64bit]
└─$source  /etc/profile
DEPRECATED: The 'oadm' command is deprecated, please use 'oc adm' instead.
提示弃用了,所以我们应该用 oc adm
┌──[[email protected]]-[~/openshift-origin-server-v3.11.0-0cbc58b-linux-64bit]
└─$echo "source <(kubectl completion bash )" >> /etc/profile
┌──[[email protected]]-[~/openshift-origin-server-v3.11.0-0cbc58b-linux-64bit]
└─$source  /etc/profile
DEPRECATED: The 'oadm' command is deprecated, please use 'oc adm' instead.
┌──[[email protected]]-[~/openshift-origin-server-v3.11.0-0cbc58b-linux-64bit]
└─$kubectl get  pods
NAME                            READY     STATUS      RESTARTS   AGE
docker-registry-1-7g7s2         1/1       Running     0          5h
persistent-volume-setup-c5h5g   0/1       Completed   0          5h
router-1-vnphx                  1/1       Running     0          5h
┌──[[email protected]]-[~/openshift-origin-server-v3.11.0-0cbc58b-linux-64bit]
└─$kubectl get nodes
NAME        STATUS    ROLES     AGE       VERSION
localhost   Ready     <none>    5h        v1.11.0+d4cacc0
┌──[[email protected]]-[~/openshift-origin-server-v3.11.0-0cbc58b-linux-64bit]
└─$
2.3.3 添加 Router
┌──[[email protected]]-[~/openshift-origin-server-v3.11.0-0cbc58b-linux-64bit]
└─$oc adm  router  router-demo --replicas=1 --service-account=router
info: password for stats user admin has been set to mJGgS56vY1
--> Creating router router-demo ...
    warning: serviceaccounts "router" already exists
    clusterrolebinding.authorization.openshift.io "router-router-demo-role" created
    deploymentconfig.apps.openshift.io "router-demo" created
    service "router-demo" created
--> Successkub
┌──[[email protected]]-[~/openshift-origin-server-v3.11.0-0cbc58b-linux-64bit]
└─$
当然,我们当前的环境默认已经添加了一个router组件
router组件本质上是一个通过RC提供能力的SVC
┌──[[email protected]]-[~]
└─$kubectl  get  svc
NAME              TYPE        CLUSTER-IP      EXTERNAL-IP   PORT(S)                   AGE
docker-registry   ClusterIP   172.30.1.1      <none>        5000/TCP                  5h
kubernetes        ClusterIP   172.30.0.1      <none>        443/TCP                   5h
router            ClusterIP   172.30.34.201   <none>        80/TCP,443/TCP,1936/TCP   5h
router-demo       ClusterIP   172.30.16.35    <none>        80/TCP,443/TCP,1936/TCP   17m
┌──[[email protected]]-[~]
└─$kubectl get rc
NAME                DESIRED   CURRENT   READY     AGE
docker-registry-1   1         1         1         5h
router-1            1         1         1         5h
router-demo-1       0         0         0         18m
┌──[[email protected]]-[~]
└─$k
2.3.4 添加Registry
┌──[[email protected]]-[~/openshift-origin-server-v3.11.0-0cbc58b-linux-64bit]
└─$oc project default
Already on project "default" on server "https://127.0.0.1:8443".
┌──[[email protected]]-[~/openshift-origin-server-v3.11.0-0cbc58b-linux-64bit]
└─$oc get pods
NAME                            READY     STATUS      RESTARTS   AGE
docker-registry-1-7g7s2         1/1       Running     0          7h
persistent-volume-setup-c5h5g   0/1       Completed   0          7h
router-1-vnphx                  1/1       Running     1          7h
┌──[[email protected]]-[~/openshift-origin-server-v3.11.0-0cbc58b-linux-64bit]
└─$
2.3.5 添加Image Stream
┌──[[email protected]]-[~/openshift-origin-server-v3.11.0-0cbc58b-linux-64bit]
└─$oc project openshift
Now using project "openshift" on server "https://127.0.0.1:8443".
┌──[[email protected]]-[~/openshift-origin-server-v3.11.0-0cbc58b-linux-64bit]
└─$oc get is
NAME         DOCKER REPO                            TAGS                           UPDATED
dotnet       172.30.1.1:5000/openshift/dotnet       2.0,latest                     7 hours ago
httpd        172.30.1.1:5000/openshift/httpd        2.4,latest                     7 hours ago
jenkins      172.30.1.1:5000/openshift/jenkins      1,2,latest                     7 hours ago
mariadb      172.30.1.1:5000/openshift/mariadb      10.1,10.2,latest               7 hours ago
mongodb      172.30.1.1:5000/openshift/mongodb      3.6,latest,2.4 + 3 more...     7 hours ago
mysql        172.30.1.1:5000/openshift/mysql        latest,5.5,5.6 + 1 more...     7 hours ago
nginx        172.30.1.1:5000/openshift/nginx        1.10,1.12,1.8 + 1 more...      7 hours ago
nodejs       172.30.1.1:5000/openshift/nodejs       latest,0.10,10 + 4 more...     7 hours ago
perl         172.30.1.1:5000/openshift/perl         5.24,5.26,latest + 2 more...   7 hours ago
php          172.30.1.1:5000/openshift/php          7.1,latest,5.5 + 2 more...     7 hours ago
postgresql   172.30.1.1:5000/openshift/postgresql   9.6,latest,10 + 3 more...      7 hours ago
python       172.30.1.1:5000/openshift/python       3.6,latest,2.7 + 3 more...     7 hours ago
redis        172.30.1.1:5000/openshift/redis        3.2,latest                     7 hours ago
ruby         172.30.1.1:5000/openshift/ruby         2.5,latest,2.0 + 3 more...     7 hours ago
wildfly      172.30.1.1:5000/openshift/wildfly      8.1,9.0,latest + 5 more...     7 hours ago
┌──[[email protected]]-[~/openshift-origin-server-v3.11.0-0cbc58b-linux-64bit]
└─$
2.3.6 添加Template
┌──[[email protected]]-[~/openshift-origin-server-v3.11.0-0cbc58b-linux-64bit]
└─$oc project openshift
Already on project "openshift" on server "https://127.0.0.1:8443".
┌──[[email protected]]-[~/openshift-origin-server-v3.11.0-0cbc58b-linux-64bit]
└─$oc get template
NAME                       DESCRIPTION                                                                        PARAMETERS        OBJECTS
cakephp-mysql-persistent   An example CakePHP application with a MySQL database. For more information ab...   20 (4 blank)      9
dancer-mysql-persistent    An example Dancer application with a MySQL database. For more information abo...   17 (5 blank)      9
django-psql-persistent     An example Django application with a PostgreSQL database. For more informatio...   20 (5 blank)      9
jenkins-ephemeral          Jenkins service, without persistent storage....                                    7 (all set)       6
jenkins-pipeline-example   This example showcases the new Jenkins Pipeline integration in OpenShift,...       16 (4 blank)      8
mariadb-persistent         MariaDB database service, with persistent storage. For more information about...   9 (3 generated)   4
mongodb-persistent         MongoDB database service, with persistent storage. For more information about...   9 (3 generated)   4
mysql-persistent           MySQL database service, with persistent storage. For more information about u...   9 (3 generated)   4
nodejs-mongo-persistent    An example Node.js application with a MongoDB database. For more information...    19 (4 blank)      9
postgresql-persistent      PostgreSQL database service, with persistent storage. For more information ab...   8 (2 generated)   4
rails-pgsql-persistent     An example Rails application with a PostgreSQL database. For more information...   21 (4 blank)      9
┌──[[email protected]]-[~/openshift-origin-server-v3.11.0-0cbc58b-linux-64bit]
└─$
┌──[[email protected]]-[~/openshift-origin-server-v3.11.0-0cbc58b-linux-64bit]
└─$oc get  template cakephp-mysql-persistent -o json -n openshift
{
    "apiVersion": "template.openshift.io/v1",
    "kind": "Template",
    "labels": {
        "app": "cakephp-mysql-persistent",
        "template": "cakephp-mysql-persistent"
    },
    "message": "The following service(s) have been created in your project: ${NAME}, ${DATABASE_SERVICE_NAME}.\n\nFor more information about using this template, including OpenShift considerations, see https://github.com/openshift/cake-ex/blob/master/README.md.",
    "metadata": {
2.4部署应用
2.5本章小结
第3章OpenShift架构探秘
3.1架构概览
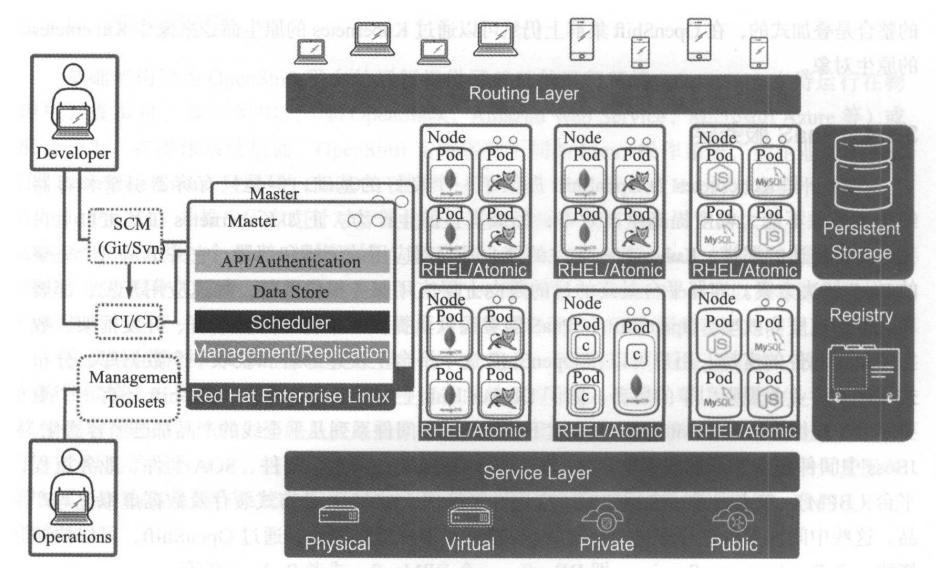
从技术堆栈的角度分析,作为一个容器云,OpenShift自底而上包含了以下几个层次:础架构层、容器引擎层、容器编排层、PaaS服务层、界面及工具层
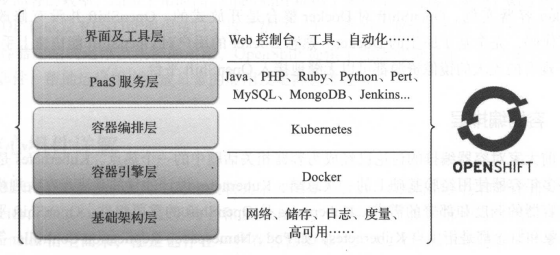
3.1.1基础架构层
基础架构层为OpenShift平台的运行提供了基础的运行环境。OpenShit支持运行在物理机、虚拟机、基础架构云(如OpenStack、Amazon Web Service、Microsoft Azure等)或混合云上。在操作系统层面,OpenShift支持多种不同的Linux操作系统.
3.1.2容器引擎层
OpenShift目前以Docker作为平台的容器引擎。Docker是当前主流的容器引擎,已经在社区及许多企业的环境中进行了检验。OpenShift运行的所有容器应用最终落到最底层的实现,其实就是一个个Docker容器实例。
OpenShift对Docker整合是开放式的。OpenShit并没有修改Docker的任何代码,完全基于原生的Docker。熟悉Docker的用户对OpenShit能快速上手。同时,Docker 现有的庞大的镜像资源都可以无缝地接入OpenShift平台。
3.1.3容器编排层
Kubernetes设计的目的是满足在大规模集群环境下对容器的调度和部署的需求。Kubernetes是OpenShift的重要组件,OpenShift平台上的许多对象和概念都是衍生自Kubernetes,如Pod、Namespace、Replication Controller等。
OpenShift并没有尝试从代码上定制Kubernetes,OpenShift对Kubernetes的整合是叠加式的,在OpenShift集群上仍然可以通过Kubernetes的原生命令来操作Kubernetes的原生对象。
3.1.4PaaS服务层
Kubernetes关注的核心是容器应用的编排和部署,它并不是一个完整的PaaS解决方案。容器平台最终的目的是向上层应用服务提供支持,加速应用开发、部署和运维的速度和效率。
OpenShift在PaaS服务层默认提供了丰富的开发语言、开发框架、数据库及中间件的支持。用户可以在OpenShit这个平台上快速部署和获取一个数据库、分布式缓存或者业务规则引擎的服务。Red Hat旗下的JBoss中间件系列几乎全线的产品都已经容器化。
通过OpenShift,可以快速搭建一个Database as a Service,即DBaas,一个BPMaas,或者Redis-aas等。
3.1.5界面及工具层
云平台一个很重要的特点是强调用户的自助服务,从而降低运维成本,提高服务效率
OpenShift提供了自动化流程Source to Image,即S21,帮助用户容器化用各种编程语言开发的应用源代码。用户可以直接使用S21或者把现有的流程与S2I整合,从而实现开发流程的持续集成和持续交付。提升开发、测试和部署的自动化程度,最终提高开发、测试及部署的效率,缩短上市时间。
针对容器应用的运维及集群的运维,OpenShift提供了性能度量采集、日志聚合模块及运维管理套件,帮助运维用户完成日常的应用及集群运维任务。
3.2核心组件详解
OpenShift的核心组件及其之间的关联关系如图所示。
OpenShift在容器编排层使用了Kubernetes,所以OpenShift在架构上和Kubernetes十分接近。其内部的许多组件和概念是从Kubernetes衍生而来,但是也存在一些在容器编排层之上,OpenShift特有的组件和概念。
Master节点:即主控节点。集群内的管理组件均运行于Master节点之上。Master节点负责管理和维护OpenShift集群的状态。
Node节点:即计算节点。集群内的容器实例均运行于Node节点之上。
3.2.1 Master节点
在Master节点上运行了众多集群的服务组件:
- API Server。负责提供集群的Web Console以及RESTfulAPI服务。集群内的所有Node 节点都会访问API Server更新各节点的状态及其上运行的容器的状态。
- 数据源(Data Store)。集群所有动态的状态信息都会存储在后端的一个etcd分布式数据库中。默认的etcd实例安装在Master节点上。如有需要,也可以将etcd节点部署在集群之外。
- 调度控制器(Scheduler)。调度控制器在容器部署时负责按照用户输入的要求寻找合适的计算节点。
- 复制控制器(Replication Controller)。对容器云而言,一个很重要的特性是异常自恢复。
3.2.2 Node节点
在Node节点上没有这么多系统组件,其主要职责就是接收Master节点的指令,运行和维护Docker容器。
这里要指出的是,Master节点本身也是一个Node节点,只是在一般环境中会将其运行容器的功能关闭
。但是在我们这个实验集群中,由于只有一个节点,所以这个Master节点也必须承担运行容器的责任。
┌──[[email protected]]-[~/openshift-origin-server-v3.11.0-0cbc58b-linux-64bit]
└─$oc get  nodes
NAME        STATUS    ROLES     AGE       VERSION
localhost   Ready     <none>    9h        v1.11.0+d4cacc0
┌──[[email protected]]-[~/openshift-origin-server-v3.11.0-0cbc58b-linux-64bit]
└─$oc describe nodes localhost
Name:               localhost
Roles:              <none>
Labels:             beta.kubernetes.io/arch=amd64
                    beta.kubernetes.io/os=linux
                    kubernetes.io/hostname=localhost
Annotations:        volumes.kubernetes.io/controller-managed-attach-detach=true
CreationTimestamp:  Sat, 28 May 2022 16:25:29 +0800
Taints:             <none>
Unschedulable:      false
3.2.3Project与Namespace
每一个Project会和一个Namespace相关联,甚至可以简单地认为,Project就是Namespace。所以在OpenShift中进行操作时,首先要确认当前执行的上下文是哪一个Project。
┌──[[email protected]]-[~/openshift-origin-server-v3.11.0-0cbc58b-linux-64bit]
└─$oc project
Using project "myproject" on server "https://127.0.0.1:8443".
┌──[[email protected]]-[~/openshift-origin-server-v3.11.0-0cbc58b-linux-64bit]
└─$oc get project
NAME                            DISPLAY NAME   STATUS
default                                        Active
kube-dns                                       Active
kube-proxy                                     Active
kube-public                                    Active
kube-system                                    Active
myproject                       My Project     Active
openshift                                      Active
openshift-apiserver                            Active
openshift-controller-manager                   Active
openshift-core-operators                       Active
openshift-infra                                Active
openshift-node                                 Active
openshift-service-cert-signer                  Active
openshift-web-console                          Active
┌──[[email protected]]-[~/openshift-origin-server-v3.11.0-0cbc58b-linux-64bit]
└─$oc project kube-system
Now using project "kube-system" on server "https://127.0.0.1:8443".
3.2.4Pod
┌──[[email protected]]-[~/openshift-origin-server-v3.11.0-0cbc58b-linux-64bit]
└─$kubectl  get pods
NAME                                READY     STATUS    RESTARTS   AGE
kube-controller-manager-localhost   1/1       Running   1          9h
kube-scheduler-localhost            1/1       Running   1          9h
master-api-localhost                1/1       Running   2          9h
master-etcd-localhost               1/1       Running   0          9h
┌──[[email protected]]-[~/openshift-origin-server-v3.11.0-0cbc58b-linux-64bit]
└─$
┌──[[email protected]]-[~/openshift-origin-server-v3.11.0-0cbc58b-linux-64bit]
└─$oc get pods
NAME                                READY     STATUS    RESTARTS   AGE
kube-controller-manager-localhost   1/1       Running   1          9h
kube-scheduler-localhost            1/1       Running   1          9h
master-api-localhost                1/1       Running   2          9h
master-etcd-localhost               1/1       Running   0          9h
┌──[[email protected]]-[~/openshift-origin-server-v3.11.0-0cbc58b-linux-64bit]
└─$oc get pods -o wide
NAME                                READY     STATUS    RESTARTS   AGE       IP              NODE        NOMINATED NODE
kube-controller-manager-localhost   1/1       Running   1          9h        192.168.26.16   localhost   <none>
kube-scheduler-localhost            1/1       Running   1          9h        192.168.26.16   localhost   <none>
master-api-localhost                1/1       Running   2          9h        192.168.26.16   localhost   <none>
master-etcd-localhost               1/1       Running   0          9h        192.168.26.16   localhost   <none>
┌──[[email protected]]-[~/openshift-origin-server-v3.11.0-0cbc58b-linux-64bit]
└─$
┌──[[email protected]]-[~/openshift-origin-server-v3.11.0-0cbc58b-linux-64bit]
└─$oc describe  pods kube-controller-manager-localhost
Name:               kube-controller-manager-localhost
Namespace:          kube-system
Priority:           0
PriorityClassName:  <none>
Node:               localhost/192.168.26.16
Start Time:         Sat, 28 May 2022 19:28:49 +0800
Labels:             openshift.io/component=controllers
                    openshift.io/control-plane=true
Annotations:        kubernetes.io/config.hash=9d8ef32be31e9a6172eb7ab20224f293
                    kubernetes.io/config.mirror=9d8ef32be31e9a6172eb7ab20224f293
                    kubernetes.io/config.seen=2022-05-28T08:24:21.737948444Z
                    kubernetes.io/config.source=file
Status:             Running
IP:                 192.168.26.16
Containers:
  controllers:
    Container ID:  docker://004de0a22cf05668f1ffb6a2fe2c1ecf7d31f6a7dc985952a491d031a19caa97
    Image:         openshift/origin-hyperkube:v3.11
    Image ID:      docker-pullable://openshift/origin-hyperkube@sha256:9cd0f5d23216db62a3a1659e8d07b40721c221779928ce3ae58a1a5ed38e61e8
┌──[[email protected]]-[~/openshift-origin-server-v3.11.0-0cbc58b-linux-64bit]
└─$oc get pods -o wide
NAME                                READY     STATUS    RESTARTS   AGE       IP              NODE        NOMINATED NODE
kube-controller-manager-localhost   1/1       Running   1          9h        192.168.26.16   localhost   <none>
kube-scheduler-localhost            1/1       Running   1          9h        192.168.26.16   localhost   <none>
master-api-localhost                1/1       Running   2          9h        192.168.26.16   localhost   <none>
master-etcd-localhost               1/1       Running   0          9h        192.168.26.16   localhost   <none>
┌──[[email protected]]-[~/openshift-origin-server-v3.11.0-0cbc58b-linux-64bit]
└─$oc logs kube-scheduler-localhost
I0528 15:09:15.474701       1 server.go:126] Version: v1.11.0+d4cacc0
W0528 15:09:15.475558       1 authorization.go:47] Authorization is disabled
W0528 15:09:15.475582       1 authentication.go:55] Authentication is disabled
I0528 15:09:15.475593       1 insecure_serving.go:47] Serving healthz insecurely on [::]:10251
E0528 15:09:15.482479       1 reflector.go:136] k8s.io/client-go/informers/factory.go:130: Failed to list *v1beta1.StatefulSet: Get https://127.0.0.1:8443/apis/apps/v1beta1/statefulsets?limit=500&resourceVersion=0: dial tcp 127.0.0.1:8443: connect: connection refused
┌──[[email protected]]-[~/openshift-origin-server-v3.11.0-0cbc58b-linux-64bit]
└─$oc rsh master-api-localhost
sh-4.2# ls
anaconda-post.log  bin  dev  etc  home  lib  lib64  media  mnt  opt  proc  root  run  sbin  srv  sys  tmp  usr  var
sh-4.2#
3.2.5 Service
为了克服容器变化引发的连接信息的变化,Kubernetes提供了一种叫Service(服务)的组件。当部署某个应用时,我们会为该应用创建一个Service对象。
Service对象会与该应用的一个或多个Pod关联。同时每个Service会被分配到一个IP地址,这个IP地址是相对恒定的。通过访问这个IP地址及相应的端口,请求就会被转发到对应Pod的相应端口。
┌──[[email protected]]-[~/openshift-origin-server-v3.11.0-0cbc58b-linux-64bit]
└─$oc get  svc -n default
NAME              TYPE        CLUSTER-IP      EXTERNAL-IP   PORT(S)                   AGE
docker-registry   ClusterIP   172.30.1.1      <none>        5000/TCP                  9h
kubernetes        ClusterIP   172.30.0.1      <none>        443/defaultTCP                   9h
router            ClusterIP   172.30.34.201   <none>        80/TCP,443/TCP,1936/TCP   9h
┌──[[email protected]]-[~/openshift-origin-server-v3.11.0-0cbc58b-linux-64bit]
└─$
这意味着,无论后端的Pod实例的数量或地址如何变化,前端的应用只需要访问Service的IP地址,就能连接到正确的后端容器实例。Service起到了代理的作用,在相互依赖的容器应用之间实现了解耦。
┌──[[email protected]]-[~]
└─$curl 172.30.34.201
<html>
  <head>
    <meta name="viewport" content="width=device-width, initial-scale=1">
    .......
除了通过IP地址访问Service所指向的服务外,还可以通过域名访问某一个Service。监听在Master上的集群内置DNS服务器会负责解析这个DNS请求。Service域名的格式是<SERVICE NAME>.<PROJECT NAME>.svc.cluster.local。
┌──[[email protected]]-[~]
└─$kubectl  run testpod-1 -it  --rm --image=yauritux/busybox-curl  --image-pull-policy=IfNotPresent
If you don t see a command prompt, try pressing enter.
/home $ curl hello-openshift.myproject.svc.cluster.local:8080
Hello OpenShift!
/home $ exit
Session ended, resume using 'kubectl attach testpod-1-b4d55675f-54855 -c testpod-1 -i -t' command when the pod is running
deployment.apps "testpod-1" deleted
3.2.6 Router与Route
Service提供了一个通往后端Pod集群的稳定的入口,但是Service的IP地址只是集群内部的节点及容器可见。对于外部的应用或者用户来说,这个地址是不可达的。那么外面的用户想要访问Service指向的服务应该怎么办呢?
OpenShift提供了Router(路由器)来解决这个问题。其实Router组件就是一个运行在容器内的Haproxy,是一个特殊定制的Haproxy。用户可以创建一种叫Route的对象,笔者称为路由规则。
一个Route会与一个Service相关联,并且绑定一个域名。Route规则会被Router加载。
当用户通过指定域名访问应用时,域名会被解析并指向Router所在的计算节点上。Router获取这个请求,然后根据Route规则定义转发给与这个域名对应的Service后端所关联的Pod容器实例。
当Pod的数量或者状态变化时,OpenShift负责更新Router内的配置,确保请求总是能被正确路由到对应的Pod。
┌──[[email protected]]-[~]
└─$oc get routes --all-namespaces
NAMESPACE   NAME              HOST/PORT         PATH      SERVICES          PORT       TERMINATION   WILDCARD
myproject   hello-openshift   hello.openshift             hello-openshift   8080-tcp                 None
┌──[[email protected]]-[~]
└─$
┌──[[email protected]]-[~]
└─$curl http://hello.openshift/
curl: (6) Could not resolve host: hello.openshift; 未知的名称或服务
┌──[[email protected]]-[~]
└─$echo '127.0.0.1 hello.openshift' >> /etc/hosts
┌──[[email protected]]-[~]
└─$curl http://hello.openshift/
Hello OpenShift!
┌──[[email protected]]-[~]
└─$
经常会有用户混淆了Router和Service的作用。Router负责将集群外的请求转发到集群的容器。Service则负责把来自集群内部的请求转发到指定的容器中。一个是对外,一个对内
┌──[[email protected]]-[~]
└─$oc get svc -n myproject
NAME              TYPE        CLUSTER-IP      EXTERNAL-IP   PORT(S)             AGE
hello-openshift   ClusterIP   172.30.166.53   <none>        8080/TCP,8888/TCP   51m
┌──[[email protected]]-[~]
└─$oc get rc -n myproject
NAME                DESIRED   CURRENT   READY     AGE
hello-openshift-1   1         1         1         51m
┌──[[email protected]]-[~]
└─$
3.2.7 Persistent Storage
容器默认是非持久化的,所有的修改在容器销毁时都会丢失。但现实是传统的应用大多都是有状态的,因此要求某些容器内的数据必须持久化,容器云平台必须为容器提供持久化储存(persistent storage)。
OpenShift除了支持Docker持久化卷的挂载方式外,还提供了一种持久化供给模型,即Persistent Volume(持久化卷,PV)及Persistent Volume Claim(持久化卷请求,PVC)模型。在PV和PVC模型中,集群管理员会创建大量不同大小和不同特性的PV。用户在部署应用时,显式声明对持久化的需求,创建PVC。用户在PVC中定义所需存储的大小、访问方式(只读或可读可写;独占或共享)。
OpenShift集群会自动寻找符合要求的PV与PVC自动对接。通过PV和PVC模型,OpenShift为用户提供了一种灵活的方式来消费存储资源。
3.2.8 Registry
┌──[[email protected]]-[~]
└─$kubectl  get pods -n default | egrep reg
docker-registry-1-7g7s2         1/1       Running     0          11h
┌──[[email protected]]-[~]
└─$
┌──[[email protected]]-[~]
└─$kubectl  get svc -n default | egrep reg
docker-registry   ClusterIP   172.30.1.1      <none>        5000/TCP                  11h
┌──[[email protected]]-[~]
└─$
一个常见的疑问是“是不是OpenShift用到的镜像都要存放到内置的仓库?”答案是否定的。内部的镜像仓库存放的只是S2I产生的镜像。其他镜像可以存放在集群外部的镜像仓库,如企业的镜像仓库或社区的镜像仓库。只要保证OpenShift的节点可以访问到这些镜像所在的镜像仓库即可。
3.2.9 Source to Image
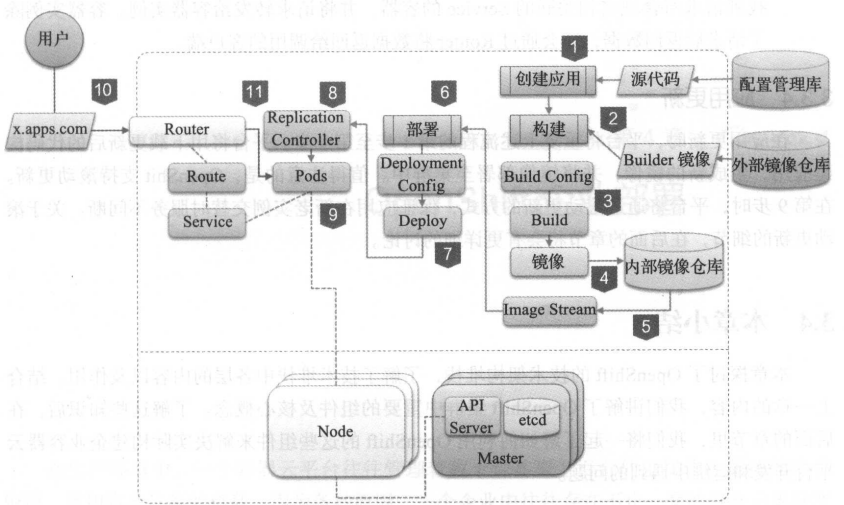
作为一个面向应用的平台,OpenShift提供了S2I的流程,使得企业内容器的构建变得标准化和自动化,从而提高了软件从开发到上线的效率。一个典型的S2I流程包含了以下几个步骤。
1)用户输入源代码仓库的地址。
2)用户选择S21构建的基础镜像(又称为Builder镜像)。Builder镜像中包含了操作系统、编程语言、框架等应用所需的软件及配置。OpenShift默认提供了多种编程语言的Builder镜像,如Java、PHP、Ruby、Python、Perl等。用户也可以根据自身需求定制自己的Builder镜像,并发布到服务目录中供用户选用。
3)用户或系统触发S2I构建。OpenShift将实例化S2I构建执行器。
4)S2I构建执行器将从用户指定的代码仓库下载源代码。
5)S2I构建执行器实例化Builder镜像。代码将会被注入Builder镜像中。
6)Builder镜像将根据预定义的逻辑执行源代码的编译、构建并完成部署。
7)S2l构建执行器将完成操作的Builder镜像并生成新的Docker镜像。
8)S2构建执行器将新的镜像推送到OpenShift内部的镜像仓库。
9)S2I构建执行器更新该次构建相关的Image Stream信息。
S2I构建完成后,根据用户定义的部署逻辑,OpenShit将把镜像实例化部署到集群中。
3.2.10开发及管理工具集
3.3核心流程详解
第1步,部署应用。流程的开始是用户通过OpenShift的Web控制台或命令行oc new-app创建应用。根据用户提供的源代码仓库地址及Builder镜像,平台将生成构建配置(Build Config)、部署配置(Deployment Config)、Service及Route等对象。
第2步,触发构建。应用相关的对象创建完毕后,平台将触发一次S2I构建。
第3步,实例化构建。平台依据应用的Build Config实例化一次构建,生成一个Build对象。Build对象生成后,平台将执行具体的构建操作,包括下载源代码、实例
第4步,生成镜像。构建成功后将生成一个可供部署的应用容器镜像。平台将把此镜像推送到内部的镜像仓库组件Registry中。
第5步,更新Image Stream。镜像推送至内部的仓库后,平台将创建或更新应用的Image Stream的镜像信息,使之指向最新的镜像。
3.3.1应用构建
3.3.2应用部署
3.3.3请求处理
3.3.4应用更新
Recommend
About Joyk
Aggregate valuable and interesting links.
Joyk means Joy of geeK