

Exchange Online PowerShell module gets rid of the WinRM dependence
source link: https://www.michev.info/Blog/Post/3883/exchange-online-powershell-module-gets-rid-of-the-winrm-dependence
Go to the source link to view the article. You can view the picture content, updated content and better typesetting reading experience. If the link is broken, please click the button below to view the snapshot at that time.
Exchange Online PowerShell module gets rid of the WinRM dependence
Exchange Online Remote PowerShell has been around for a long time. It is largely thanks to it that Exchange Online offers the best admin experience out of all Microsoft 365 workloads in terms of usability, breadth of operation coverage, automation capabilities, RBAC controls, auditing, and so on. One can even argue that Remote PowerShell is one of the building blocks that made the cloud service possible in the first place.
That said, the cloud did expose some of the weaknesses of Remote PowerShell, in the form or reliability and performance issues. Especially in large tenants, long running scripts are known to pose a challenge, and throttling controls imposed by Microsoft didn’t help either. As software inevitably evolves, the reliance on old components brought other problems. One such example is the dependance on WinRM, which forced Microsoft to use the basic authentication endpoint as a workaround to facilitate OAuth/OIDC implementation.
With the release of the V2 Exchange Online PowerShell module, Microsoft addressed some of these shortcomings. In addition, the set of new REST-based cmdlets helped alleviate some of the stress when running operations against a large number of objects. And now, as an update to the V2 module, Microsoft is tackling the dependence on WinRM, promising to bring a slew of performance and reliability improvements in the process.
Improvements to PowerShell cmdlet execution
In order to bypass the WinRM layer, the Exchange Online V2 module (version 2.0.6 or later) by default no longer establishes a remote PowerShell session. It sounds crazy I know, but you can easily verify this. First, connect to the service via Connect-ExchangeOnline cmdlet, then run the Get-PSSession cmdlet. You should see no PSSession established, yet Exchange Online cmdlets seem to run just fine, how come? In short, Exchange Online PowerShell cmdlets have been reworked to “proxy” their payload over HTTPS, effectively using the Invoke-WebRequest cmdlet as a wrapper!
So how does it work? Just like with a “traditional” Remote PowerShell session, all the Exchange Online cmdlets you have access to as per the RBAC model will be downloaded to a temporary file and loaded as a new module. To distinguish from the “old” type of module, the name has been changed to tmpEXO_xxxxxxxx.xxx (whereas the old ones looked like tmp_xxxxxxxx.xxx). The most revealing piece of information is the cmdlet definition itself. For example, let’s take a look at the definition of Get-AcceptedDomain:

To find out what exactly this Execute-Command does, one can peek into the temp module file containing its definition. Long story short, using the cmdlet results in sending a POST request against a RESTful endpoint, with a JSON payload and an OAuth token. If all of this sounds familiar, you’re not wrong – the process is very similar to what the set of REST-based “V2” cmdlets do. And if you are too lazy to look up the cmdlet definition, using the –Verbose switch will also give you a clue:
 In effect, Microsoft has “rewritten” the Exchange Online cmdlets and is now proxying them over an HTTPS REST-based endpoint, getting rid of the Remote PowerShell session and its dependencies, and reaping some benefits in the process. This solution inherently supports Modern authentication – whereas previously an OAuth token was passed over the WinRM basic auth endpoint, now all communication is done in a Graph API-like manner. This in turn brings many of the improvements we’ve already seen as part of the REST-based cmdlets, such as increased reliability thanks to the stateless nature of the protocol. Performance is also greatly improved, both in terms of establishing the initial connection and subsequent cmdlet executions, with up to 50% boosts observed.
Probably the biggest benefit of all is the fact that the reworked cmdlets are at functional parity with the “old” ones, meaning that you will be able to reuse your scripts and modules with minimal or no changes. Well, apart from some output formatting annoyances. That said, not every cmdlet has been updated to take advantage of this new method, and at the time of writing this article 421 out of 800+ Exchange Online cmdlets are available:

Keep in mind that the numbers above represent the cmdlets available to the current user, as per his role(s) within Exchange’s RBAC model. Microsoft continues to add (or occasionally remove when a fix is needed) cmdlets, and by the time the 2.0.6 version of the Exchange Online PowerShell module gets released in GA, we can expect all but the least used cmdlets to be part of it. Should you need to use any of the “missing” cmdlets or switch to the older version for some reason, you can do so by utilizing the –UseRPSSession switch:
Connect-ExchangeOnline -UserPrincipalName user@domain.com -UseRPSSession |
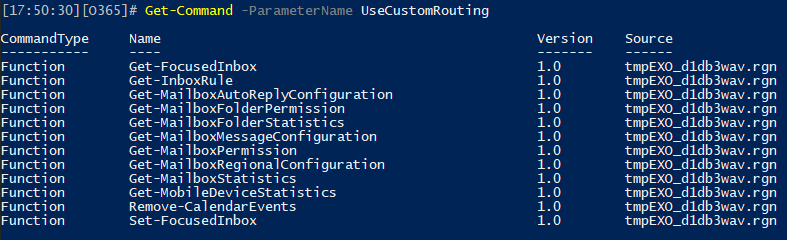
And while we’re on the topic of new parameters, you might have noticed that few cmdlets now feature the -UseCustomRouting one, which takes a mailbox identifier as value. The idea is that using this parameter should help route requests to the most appropriate mailbox server, which should in turn increase performance in some scenarios. This parameter is not available when using the old Remote PowerShell session connectivity method. For the time being, a total of 12 cmdlets take advantage of the -UseCustomRouting parameter:
As mentioned already, the “new” cmdlets are backwards compatible for the most part and the experience when using them should remain the same. There are some minor annoyances with the output and “shortcut” notations I’ve become accustomed to, but important things such as pipeline support are taken care of. One important addition is the automatic use of batches, as hinted by the cmdlet definition screenshot above. Batching works by combining several cmdlet executions into a single request and is available out of the box for many cmdlets. For example, if you take the output of Get-Mailbox and pass it to the Get-CASMailbox cmdlet, the execution happens in batches of 10 objects, which brings noticeable performance increase compared to cmdlets that do not support batching.
Lastly, it’s worth mentioning that none of the changes detailed above affect any of the REST-based cmdlets. Those are still available in any version of the V2 module and any connectivity mode.
Executing Exchange Online cmdlets outside of PowerShell
Now that we have some idea on how the new Exchange Online cmdlets work, let’s get to the best part – bypassing them completely! Much like we did back when the original REST-based cmdlets were first released, we can obtain an access token and pass it along with a web request against the REST endpoint. All the details we need were revealed from the quick exploration we did in the previous section, so let’s get started.
First, we will need an access token. To obtain one, we can either use the built-in “Microsoft Exchange REST API Based PowerShell” application, with appID of fb78d390-0c51-40cd-8e17-fdbfab77341b, or use our own app, with at least Exchange.ManageAsApp permissions. Here’s an example of how to obtain an access token for the current user by leveraging the MSAL binaries:
Add-Type -Path "C:\Program Files\WindowsPowerShell\Modules\MSAL\Microsoft.Identity.Client.dll" #Load the MSAL binaries$app = [Microsoft.Identity.Client.PublicClientApplicationBuilder]::Create("fb78d390-0c51-40cd-8e17-fdbfab77341b").WithRedirectUri("https://login.microsoftonline.com/organizations/oauth2/nativeclient").WithBroker().Build()$Scopes = New-Object System.Collections.Generic.List[string]$Scope = "https://outlook.office365.com/.default"$Scopes.Add($Scope)$token = $app.AcquireTokenInteractive($Scopes).ExecuteAsync().Result |
Other methods will also work, including methods leveraging other flows. If you plan to use the client credentials flow, you must use your own app registration. Once a valid token is obtained, we have to prepare the web request body and headers. Apart from providing the token as part of the Authorization header, few additional headers can be added. The X-ResponseFormat header can be used to specify the format in which we want to obtain any output, with available values of JSON or CliXML. The latter is what’s used by default for any of the “reworked” cmdlets. For most other purposes, you will likely want a JSON-formatted output.
It’s recommended to also include the X-AnchorMailbox header, which serves as hint to properly route the request. The value you need to specify for it is in the UPN:[email protected] format. The Accept-Language header can be used to specify the locale, though it doesn’t seem to make much difference. The Accept-Encoding header is also supported, with a gzip value. Here’s how a sample set of headers should look like:
$authHeader = @{'Content-Type'='application\json''Authorization'="Bearer $($token.AccessToken)"'X-ResponseFormat'= "json"} |
Now, we need to construct the request body, which represents the cmdlet we want to execute and any relevant parameters, all packaged in JSON formatted string. The CmdletName element specifies the name of the cmdlet we want to run, and the Parameters array lists each individual parameter and their corresponding values. It’s all then packaged in a CmdletInput element and looks something like this:
$body = @{CmdletInput = @{CmdletName="Get-Mailbox"Parameters=@{Identity="vasil"}}} |
Two more pieces of information are needed. First, the endpoint URL, which as we saw in the previous section is https://outlook.office365.com/adminapi/beta/xxxxxxxx-xxxx-xxxx-xxxx-xxxxxxxxxxxx/InvokeCommand, where the GUID represents your tenant identifier (you can also use tenant.onmicrosoft.com). Lastly, we need to know the type of request, which is POST. Putting it all together, we can now run our simple Get-Mailbox cmdlet without having to load the Exchange Online PowerShell module, or PowerShell itself.
$uri = "https://outlook.office365.com/adminapi/beta/michev.onmicrosoft.com/InvokeCommand"$res = Invoke-WebRequest -Method POST -Uri $uri -Headers $authHeader -Body ($body | ConvertTo-Json -Depth 5) -Verbose -Debug -ContentType 'application/json'($res.Content | ConvertFrom-Json).Value |
The JSON-formatted output we requested is not very suitable for display purposes, so we can transform it a bit. The end result will be a PSCustomObject, containing all the mailbox properties as displayed below. One thing to keep in mind is that the format data entries will be visible in the output for anything but string properties, so some additional handling might be needed:

And that’s all it there is to it. We’re now effectively running Exchange Online PowerShell cmdlets against an HTTPS endpoint, in a manner similar to the Graph API. Which is likely what many ISVs will end up doing, until Microsoft provides proper Graph API endpoints for Exchange Online management. Well, assuming the method outlined above is considered a “supported” one, that is. For the time being, this is all in preview, so no official support (as also hinted by the /beta endpoint notation). Things might change once the 2.0.6 version of the module GA’s.
In addition, you can also batch multiple requests together, then send them as a single JSON payload over the https://outlook.office365.com/adminapi/beta/{tenantid}/$batch endpoint. But that’s a topic for another article 
Recommend
About Joyk
Aggregate valuable and interesting links.
Joyk means Joy of geeK