

Hexo 博客美化
source link: https://blog.hclonely.com/posts/57bd67ce/
Go to the source link to view the article. You can view the picture content, updated content and better typesetting reading experience. If the link is broken, please click the button below to view the snapshot at that time.

注意,本文方法主要用于 Butterfly 主题,其他主题需要有一定的前端知识 !!!
DIY 前请先备份!!!
本文基于 Butterfly 主题 3.0.0 之前的版本修改!
3.0.0 版本之后的部分内容可能需要调整!
对前端及自己使用的主题不太了解的话建议不要随意修改!
Pixiv 日榜
Butterfly 主题
在
themes\Butterfly\layout\includes\widget文件夹新建card_pixiv.pug文件,文件内容如下:https://cloud.mokeyjay.com/pixiv使用的是超能小紫提供的服务,也可以自行搭建,搭建方式请看这里编辑
themes\Butterfly\layout\includes\widget\index.pug文件,在你想要显示的位置插入以下代码:编辑
butterfly.yml文件,在card_webinfo下面添加一行card_pixiv: true编辑
themes\Butterfly\languages\zh-CN.yml文件(请根据你的网站语言选择),找到card_announcement: 公告, 在下面添加一行card_pixiv: Pixiv日榜Top50(后面的文本可自定义)如果不想显示,直接把
butterfly.yml文件的card_pixiv: true改为card_pixiv: false即可
将以下内容插入到需要显示的地方:
Butterfly 主题
前往clustrmaps网站注册一个帐号
找到
Free Tools下面的Website Widget, 点击Get Map Widget输入你的博客网址,点击
Next根据你自己的喜好选择样式
Map widget或Globe Widget找到如下代码,记住 src(
******的部分):在
themes\Butterfly\layout\includes\widget文件夹新建card_map.pug文件,文件内容如下:******部分填写上面的 src, 3D 地图和平面地图任选一个,不用的把代码删掉编辑
themes\Butterfly\layout\includes\widget\index.pug文件,在你想要显示的位置插入以下代码:编辑
butterfly.yml文件,在card_webinfo下面添加一行card_map: true编辑
themes\Butterfly\languages\zh-CN.yml文件(请根据你的网站语言选择),找到card_announcement: 公告, 在下面添加一行card_map: 访客地图(后面的文本可自定义)如果不想显示,直接把
butterfly.yml文件的card_map: true改为card_map: false即可
将上面第 5 步中的代码插入到需要显示的地方。
本方法只适用于 Butterfly 主题!
安装
hexo-generator-calendar插件Shell下载
calendar.js和languages.js文件,保存到themes\Butterfly\source\js目录编辑
calendar.js文件,在文件最后}(jQuery));之前添加:JavaScript编辑
butterfly.yml文件, 以下两个你butterfly.yml文件里有哪个就用那个,不要都用!- 在
CDN_USE->js下面添加如下内容:
- 在
inject->bottom下面添加如下内容:
- 在
下载calendar.styl文件,保存到
themes\Butterfly\source\css\_layout目录在
themes\Butterfly\layout\includes\widget文件夹新建card_calendar.pug文件,文件内容如下:编辑
themes\Butterfly\layout\includes\widget\index.pug文件,在你想要显示的位置插入以下代码:编辑
butterfly.yml文件,在card_webinfo下面添加一行card_calendar: true编辑
themes\Butterfly\languages\zh-CN.yml文件(请根据你的网站语言选择),找到card_announcement: 公告, 在下面添加一行card_calendar: 文章日历(后面的文本可自定义)如果不想显示,直接把
butterfly.yml文件的card_calendar: true改为card_calendar: false即可
Butterfly 主题
前往widgetpack注册账号
登陆后在点击左侧侧边栏
Rating->Install, 你会看到如下代码,记住id:在
博客根目录/themes/Butterfly/layout/includes/post/目录内新建文件rate.pug, 内容如下:编辑
博客根目录/themes/Butterfly/layout/post.pug文件,在!=partial('includes/post/reward', {}, {cache:theme.fragment_cache})下方添加:注意缩进
if与上面的if对齐在
Butterfly.yml文件内添加:
将第 2 步生成的代码插入到需要显示的位置。
加载中动画
Butterfly 主题
更新到最新版即可。
将以下内容添加到
<head></head>标签内:将以下内容添加到
<body>标签后面:将以下内容添加到
</body>标签前面:
页脚跳动的♥
Butterfly 主题
编辑
博客根目录/themes/Butterfly/layout/includes/footer.pug文件,将©${theme.since} - ${nowYear} By ${config.author}改为©${theme.since} - ${nowYear + ' '} <i id="heartbeat" class="fa fas fa-heartbeat"></i> ${config.author}, 将©${nowYear} By ${config.author}改为©${nowYear + ' '} <i id="heartbeat" class="fa fas fa-heartbeat"></i> ${config.author}编辑
butterfly.yml文件, 以下两个你butterfly.yml文件里有哪个就用那个,不要都用!- 在
CDN_USE->css下面添加如下内容:
- 在
inject->head下面添加如下内容:
- 在
将
<i id="heartbeat" class="fa fas fa-heartbeat"></i>添加到需要显示的位置将以下内容添加到
<head></head>标签内:
页脚显示网站运行时间
Butterfly 主题
- 编辑
博客根目录/themes/Butterfly/layout/includes/footer.pug文件,在最后span=theme.ICP.text下一行添加以下内容:
注意#running-time与上面的if theme.ICP.enable对齐!
要将2020-01-03 00:00:00改为你网站的起始时间!
- 将以下内容添加到需要显示的位置
要将2020-01-03 00:00:00改为你网站的起始时间!
双评论系统
此方法只适用于 Butterfly 主题!
这里以同时使用Valine和Gitalk, 默认使用Valine为例。
请确认Valine和Gitalk已开启并正确配置。
修改
themes/Butterfly/layout/includes/comments/index.pug文件,将所有的else if改为if, 并在span= ' ' + _p('comment')下面添加:index.pug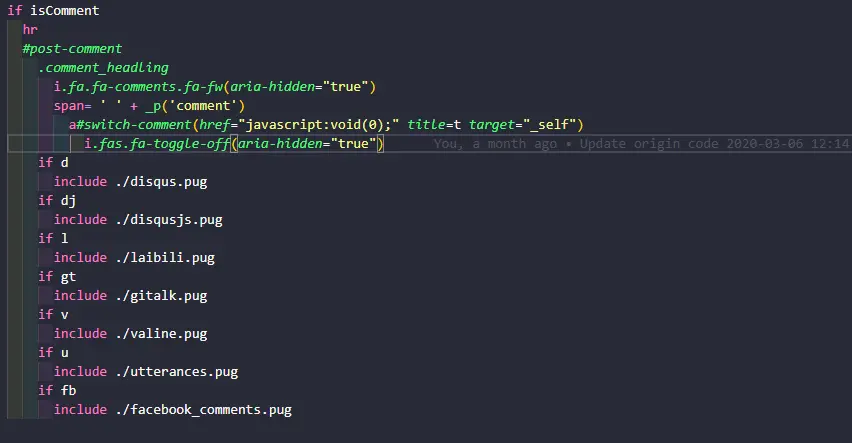
隐藏一个评论,保留一个默认评论
- 隐藏
valine: 修改themes/Butterfly/layout/includes/comments/valine.pug文件,在#vcomment.vcomment后面添加(style=‘display:none;’) - 隐藏
gitalk: 修改themes/Butterfly/layout/includes/comments/gitalk.pug文件,在#gitalk-container后面添加(style=‘display:none;’) - 隐藏其他评论系统方法与上面类似
- 隐藏
在
themes/Butterfly/source/js/third-party/目录新建switch_comments.js文件,内容如下:JavaScript编辑
butterfly.yml文件, 以下两个你butterfly.yml文件里有哪个就用那个,不要都用!- 在
CDN_USE->js下面添加如下内容:
- 在
inject->bottom下面添加如下内容:
- 在
如果你使用的其他评论系统注意替换上面的切换为Gitalk,切换为Valine,#gitalk-container,#vcomment
切换图标使用的fontawesome, 兼容V4和V5, 如果你是用的其他图标库,请替换fa-toggle-on和fa-toggle-off
随机文章跳转
在
博客根目录/scripts(没有请自行创建)下新建random.js文件,内容如下:JavaScript打开
/random/就会随机跳转一篇文章可以在
_config.yml添加以下配置:如果不想随机跳转到某篇文章,只需在这篇文章
Front-matter添加random: false
文章统计图表
从matery 主题上看到了文章发布统计图、标签统计图和文章分类统计图,觉得挺好看,就扒下来做了个插件。
因为使用 Tag 会导致文章获取不全,所以本插件直接使用 html 标签渲染,而不是使用 Tag。由于使用了 cheerio 模块,如果你使用了 html 压缩插件,可能会出现压缩报错,暂时无解。
注意!下面的标签可以放到post和不含type的page的md文件中,含有type的page请自行修改相应的模板文件,这个就不要来问我了,因为每个人用的主题可能都不一样,建议去问主题的作者。
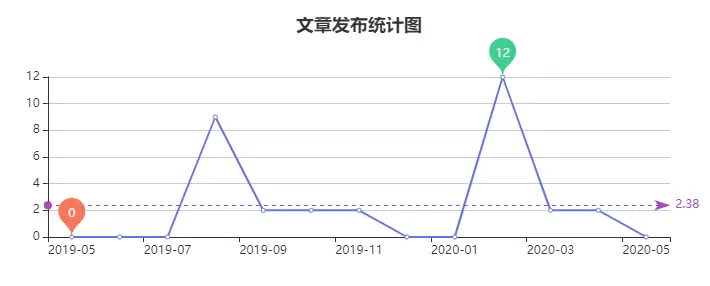
文章发布统计图
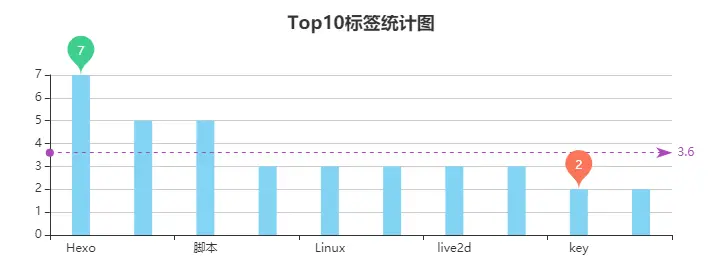
标签统计图
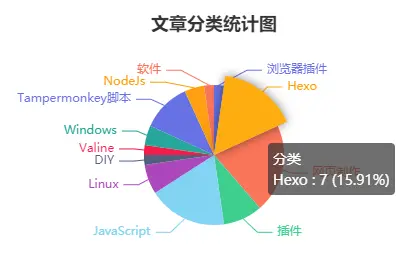
文章分类统计图
Butterfly 主题将图表添加到归档、分类、标签页面
将文章发布统计图添加到归档页面
在主题目录/Butterfly/layout/archive.pug文件的#archive下面添加一行#posts-chart, 新添加的比上一行多缩进两个空格。
将标签统计图和分类统计图分别添加到标签和分类页面
- 编辑
主题目录/Butterfly/layout/page.pug文件,在.tag-cloud下面添加一行#tags-chart,在.category-content下面添加一行#categories-chart,新添加的比上一行多缩进两个空格。
文章二维码(仅 Butterfly 主题)
- 安装hexo-helper-qrcode插件:
- 编辑
主题目录/Butterfly/layout/includes/header/post-info.pug, 在文件最后添加以下内容:
注意span.post-qrcode要与上面的span.post-meta-commentcount对齐!
valine 评论添加博主等标签(仅 Butterfly 主题)
以下内容仅适用于 Butterfly 主题 <= V2.3.5,其他主题可以根据本教程和这篇文章自行修改!
Butterfly 主题 >= V4.0 请往下翻!
下载valine.pug文件,替换
themes/Butterfly/layout/includes/comments/valine.pug编辑
butterfly.yml文件,找到valine配置,添加以下配置项:
编辑
butterfly.yml文件,将CDN中的valine链接改为https://cdn.jsdelivr.net/gh/HCLonely/Valine@latest/dist/Valine.min.js改完之后
hexo clean一下,不然不会生效
以下内容仅适用于 Butterfly 主题 >= V4.0!
- 编辑
butterfly.yml文件,找到valine配置,在option下添加以下配置项(注意缩进!):
编辑
butterfly.yml文件,将CDN中的valine链接改为https://cdn.jsdelivr.net/gh/HCLonely/Valine@latest/dist/Valine.min.js改完之后
hexo clean一下,不然不会生效
Recommend
-
101
[博客美化]新年啦,给自己博客加个雪花效果吧~ - YJLAugus - 博客园 YJLAugus 博客主题 5...
-
73
技巧1:优质软件小编建议大家使用新软件,因为优化好、效果多的Office可以提高工作效率。但是,软件不是最主要的因素,不是所有人用最新的软件就能做出优质PPT。Office最好高于2010版本,WPS最好高于2013版本。如果电脑性能实在不给力,就不要逞强,要不然反而会拖...
-
92
文章发布于800天前,可能有所发展或是改变 一直有人问关于博客园看板娘的是如何加上去的,一开始的时候的确踩了很多坑,还有,这个美化博客这个事情,大家还是时刻适可而止的好,不然永远没有尽头,把自己...
-
72
-
22
很多小伙伴是不是对于自己的博客主题用久了就会产生些许厌烦呢?每个人都会有,也就是 '贝勃定律' 。那么为了解决这样的问题呢,许多小伙伴就会再次的更改自己的样式。这样一来,原来的博客样式就会被丢弃,这样
-
15
什么是 Hexo?Hexo 是一个快速、简洁且高效的博客框架。Hexo 使用 Markdown(或其他渲染引擎)解析文章,在几秒内,即可利用靓丽的主题生成静态网页。 Node.js 所带来的超快生成速度,让上百个页面在几秒内瞬间完成渲染。 Hexo 支...
-
11
上一篇文章介绍了 Emacs 的理念以及其强大的扩展功能,基本上能在 Emacs 里面做到事,我都在 Emacs 里面做。之前的博客一直都是用的 markdown 来书写,虽然 Emacs 也有 markdown 插件,但是总感觉体验不如 org-mode。这周末就趁着手热,把博客系统进行了升级,...
-
7
光的瞬间2021-02-26 887Hexo Boot 博客系统断断续续更好了好几个版本,除了新增后台管理系统的功能外,还对默认主题 UI 进行调整。但众口难调,并不是每次 UI 的修改都符合每个人的审美。故默认主题 UI 此后不再随后端代码进行同步美化和修改,本篇...
-
4
webstack 钻芒博客二开typecho美化版外链转内链 废话不多说!直接上代码!Demo:
-
7
Hexo Boot 博客系统断断续续更新了好几个版本,除了新增后台管理系统的功能外,还对默认主题 UI 进行调整。但众口难调,并不是每次 UI 的修改都符合每个人的审美。故默认主题 UI 此后不再随后端代码进行同步美化和修改,本篇将介绍默认主题美化步骤。
About Joyk
Aggregate valuable and interesting links.
Joyk means Joy of geeK