

Getting Started with the BLoC Pattern [FREE]
source link: https://www.raywenderlich.com/31973428-getting-started-with-the-bloc-pattern
Go to the source link to view the article. You can view the picture content, updated content and better typesetting reading experience. If the link is broken, please click the button below to view the snapshot at that time.

Getting Started with the BLoC Pattern
See how to use the popular BLoC pattern to build your Flutter app architecture and manage the flow of data through your widgets using Dart streams.
Version

How to design the structure of an app is among the most heavily debated topics that arise in app development. Everyone seems to have their favorite architectural pattern with a fancy acronym.
iOS and Android developers are well versed in Model-View-Controller (MVC) and have used this pattern as a default choice when building apps. The model and view are separated, with the controller sending signals between them.
But Flutter brings a new, reactive style that’s not entirely compatible with MVC. A variation of this classical pattern has emerged from the Flutter community: BLoC.
BLoC stands for Business Logic Components. The gist of BLoC is that everything in the app should be represented as a stream of events: Widgets submit events, and other widgets will respond. BLoC sits in the middle, managing the conversation. Dart even comes with syntax for working with streams baked into the language!
The best part about this pattern is you won’t need to import any plugins or learn any custom syntax. Flutter already comes with everything you need.
In this tutorial, you’ll create an app to find articles using an API provided by raywenderlich.com. At the tutorial’s end, the app will do the following:
- Wrap API calls with the BLoC pattern
- Search for articles and show the results asynchronously
- Display detail of article
Getting Started
Download the starter project by clicking the Download Materials button and open it up with your favorite IDE. This tutorial will use Android Studio, but you can also use Visual Studio Code. Make sure to run flutter packages get, either at the command line or when prompted by your IDE, to pull down the latest version of the HTTP package.
The starter project contains some basic models and networking files. When you open up the project it should look like this.

As you can see, rw_client.dart handles communicating with Raywenderlich servers. article.dart contains the Article model class, which represents article objects from the API response.
You’ll learn more about the Raywenderlich API platform and network communication in the next section.
Raywenderlich API
The tutorial uses the Raywenderlich (RW) API to display a list of articles. You can check the data structure of the article model at raywenderlich.docs.apiary.io.
In this tutorial, you don’t need any setup to integrate RW API into the app. The tutorial already includes all necessary classes to work with RW API. The RWClient class in rw_client.dart uses the http library to make network requests. That is nothing complex.
Building the Application Architecture
When writing apps, whether using Flutter or another framework, it’s important to organize classes into layers. This is an informal convention; it’s not something concrete you can see in the code.
Each layer, or group of classes, handles one general task. The starter project comes with a folder called data. The data layer manages the app’s models and the connections to the back end; it knows nothing about the UI.
Every project is slightly different. But in general, you’ll want to build something like this:
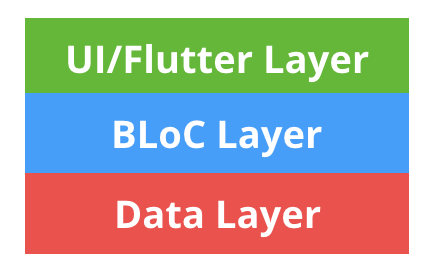
This architectural contract is not too unlike classical MVC. The UI/Flutter layer can only talk to the BLoC layer. The BLoC layer receives input events, processes business logic using the data layer and responds with output events to the UI layers or other listeners. This structure can scale nicely as the app grows.
Anatomy of a BLoC
The BLoC Pattern is just an interface around Dart streams:

dart:async provides an object called StreamController. StreamControllers are manager objects that instantiate both a stream and a sink. A sink is the opposite of a stream. You add data to the StreamController using Sink and listen with the Stream.
In the Bloc architecture, you use Stream with Future most of the time. dart:async provides both of them. A Future represents a potential value, or error, that will be available sometime in the future. Future uses async and await keywords to perform asynchronous operations in Dart.
Future tells you when the result is ready. A Stream is a sequence of asynchronous events.
To summarize, BLoCs are objects that process and store business logic, use sinks to accept input and provide output via streams.
Enough theory. It’s time to build some screens with the appropriate BLoC.
Article List Screen
To search articles, you need to display a list of articles. In this section, you’ll create a simple screen with a search field at the top and a list view to show the results.
In the lib/ui folder of the project, create a file called article_list_screen.dart. Add a StatelessWidget named ArticleListScreen to the file:
class ArticleListScreen extends StatelessWidget {

  const ArticleListScreen({Key? key}) : super(key: key);

  @override
  Widget build(BuildContext context) {
    // 1
    return Scaffold(
      appBar: AppBar(
          title: const Text(
              'Articles'
          )
      ),
      body: Column(
        children: [
          Padding(
            padding: const EdgeInsets.all(16),
            child: TextField(
              decoration: const InputDecoration(
                  border: OutlineInputBorder(), hintText: 'Search ...'),
              onChanged: (query) {
                   // 2
              },
            ),
          ),
          Expanded(
            // 3
            child:_buildResults(),
          )
        ],
      ),
    );
  }

  Widget _buildResults() {
    return const Center(child: Text('No Results'));
  }
}
The code above does the following:
- You create a screen with a
Scaffoldwidget, which contains standard widgets such as:AppBar,ColumnandExpanded. - The
TextFieldwidget triggers theonChange{}method when the user types keywords. In the next sections of this tutorial, you’ll update theonChange{}method to submit keywords to BLoC. -
_buildResults()builds the list withArticleobjects. Right now, it shows only the message “No Results”. You’ll change it later in the tutorial.
If you build and run the app, it displays an empty, black screen. This is because main.dart doesn’t have a reference to ArticleListScreen. Go to the ArticleFinder class in main.dart and change the home: property to return the new screen:
...
return MaterialApp(
      title: 'RW Finder',
      home: const ArticleListScreen(),
...
Build and run the app. It should look like this:
That’s better, but it still doesn’t do anything. It’s time to create some BLoCs!
Creating Your First BLoC
Before creating any BLoCs for screens, you’ll build a base class for all BLoCs in the project. Create a directory named bloc in the lib folder. This will be the home for all your BLoC classes.
Create a file in that directory called bloc.dart and add the following:
abstract class Bloc {
  void dispose();
}
All your BLoC classes will conform to this interface. The interface doesn’t do much except force you to add a dispose method. But there’s one small caveat to keep in mind with streams: You have to close them when you don’t need them anymore or they can cause a memory leak. The dispose method is where the app will check for this.
The first BLoC manages the user’s queries and displays the list of articles.
In the bloc directory, create a file, article_list_bloc.dart, and add the following code:
class ArticleListBloc implements Bloc {
  // 1
  final _client = RWClient();
  // 2
  final _searchQueryController = StreamController<String?>();
  // 3
  Sink<String?> get searchQuery => _searchQueryController.sink;
  // 4
  late Stream<List<Article>?> articlesStream;

  ArticleListBloc() {
    // 5
    articlesStream = _searchQueryController.stream
        .asyncMap((query) => _client.fetchArticles(query));
  }

  // 6
  @override
  void dispose() {
    _searchQueryController.close();
  }
}
Keep in mind that you create separate BLoCs for each screen. ArticleListScreen uses ArticleListBloc.
The code in ArticleListBloc does the following:
- This line creates instance of
RWClientto communicate with raywenderlich.com based on HTTP protocol. - The code gives a private
StreamControllerdeclaration. It will manage the input sink for this BLoC.StreamControllers use generics to tell the type system what kind of object the stream will emit. -
Sink<String?>is a public sink interface for your input controller_searchQueryController. You’ll use this sink to send events to the BLoC. -
articlesStreamstream acts as a bridge betweenArticleListScreenandArticleListBloc. Basically, the BLoC will stream a list of articles onto the screen. You’ll seelatesyntax here. It means you have to initialize the variable in the future before you first use it. Thelatekeyword helps you avoid making these variables as null type.Note: Learn more about it and other features of null safety in this sound null safety tutorial. - This code processes the input queries sink and build an output stream with a list of articles.
asyncMaplistens to search queries and uses theRWClientclass from the starter project to fetch articles from the API. It pushes an output event toarticlesStreamwhenfetchArticlescompletes with some result. - Finally, in the cleanup method, you close
StreamController. If you don’t do this, the IDE complains that theStreamControlleris leaking.
When importing the base class using Option+Return (Alt+Enter), select the second option: Import library package:article_finder/bloc/bloc.dart.

Import all required packages using Option+Return(Alt+Enter) to solve all the errors.
If you build and run the app, nothing happens.
That’s because you haven’t integrated ArticleListBloc with the ArticleListScreen widget. Next, you’ll integrate the BLoC with the widget tree.
Injecting BLoCs Into the Widget Tree
Now that you have BLoC set up, you need a way to inject it into Flutter’s widget tree. It’s become a Flutter convention to call these types of widgets providers. A provider is a widget that stores data and, well, “provides” it to all its children.
Normally, this would be a job for InheritedWidget. But you need to dispose of BLoCs. The StatefulWidget provides the same service. The syntax is more complex, but the result is the same.
Create a file named bloc_provider.dart in the bloc directory and add the following:
// 1
class BlocProvider<T extends Bloc> extends StatefulWidget {
  final Widget child;
  final T bloc;

  BlocProvider({
    Key? key,
    required this.bloc,
    required this.child,
  }) : super(key: key);

  // 2
  static T of<T extends Bloc>(BuildContext context) {
    final BlocProvider<T> provider = context.findAncestorWidgetOfExactType()!;
    return provider.bloc;
  }

  @override
  State createState() => _BlocProviderState();
}

class _BlocProviderState extends State<BlocProvider> {
  // 3
  @override
  Widget build(BuildContext context) => widget.child;

  // 4
  @override
  void dispose() {
    widget.bloc.dispose();
    super.dispose();
  }
}
In the code above:
-
BlocProvideris a generic class. The generic typeTis scoped to be an object that implements theBlocinterface. This means the provider can store only BLoC objects. - The
ofmethod allows widgets to retrieve theBlocProviderfrom a descendant in the widget tree with the current build context. This is a common pattern in Flutter. - The widget’s
buildmethod is a passthrough to the widget’s child. This widget won’t render anything. - Finally, the only reason the provider inherits from
StatefulWidgetis to get access to thedisposemethod. When this widget is removed from the tree, Flutter calls the dispose method, which in turn closes the stream.
Wiring Up the Article List Screen
Now that you have your BLoC layer completed for finding articles, it’s time to put the layer to use.
First, in main.dart, place an Article List BLoC above the material app to store the app’s state. Put your cursor over the MaterialApp and press Option+Return (Alt+Enter on a PC). The IDE will bring up the Flutter widget menu. Select Wrap with a new widget.
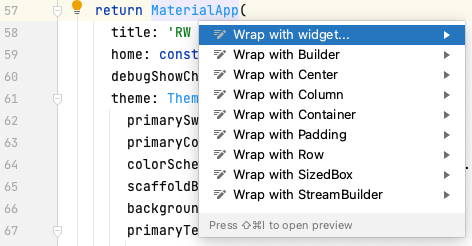
Wrap that with a BlocProvider of type ArticleListBloc and create an ArticleListBloc in the bloc property.
...
return BlocProvider(
      bloc: ArticleListBloc(),
      child: MaterialApp(
...
Adding widgets above the material app is a great way to add data that needs to be accessed from multiple screens.
Next, replace the build method in article_list_screen.dart to use the ArticleListBloc.
@override
Widget build(BuildContext context) {
  // 1
  final bloc = BlocProvider.of<ArticleListBloc>(context);
  return Scaffold(
    appBar: AppBar(title: const Text('Articles')),
    body: Column(
      children: [
        Padding(
          padding: const EdgeInsets.all(16),
          child: TextField(
            decoration: const InputDecoration(
              border: OutlineInputBorder(),
              hintText: 'Search ...',
            ),
            // 2
            onChanged: bloc.searchQuery.add,
          ),
        ),
        Expanded(
          // 3
          child:_buildResults(bloc),
        )
      ],
    ),
  );
}
Here’s a breakdown:
- First, the app instantiates a new
ArticleListBlocat the top of the build method. Here,BlocProviderhelps to find the required BLoC from the widget tree. - It updates
TextField‘sonChangedto submit the text toArticleListBloc.bloc.searchQuery.addis avoid add(T)function of theSinkclass. This kicks off the chain of callingRWClientand then emits the found articles to the stream. - It passes the BLoC to the
_buildResultsmethod.
Now, update the _buildResults method to add a stream builder and show the results in a list. You can use the ‘Wrap with StreamBuilder’ command to update the code faster.
Widget _buildResults(ArticleListBloc bloc) {
  // 1
  return StreamBuilder<List<Article>?>(
    stream: bloc.articlesStream,
    builder: (context, snapshot) {
      // 2
      final results = snapshot.data;
      if (results == null) {
        return const Center(child: Text('Loading ...'));
      } else if (results.isEmpty) {
        return const Center(child: Text('No Results'));
      }
      // 3
      return _buildSearchResults(results);
    },
  );
}

Widget _buildSearchResults(List<Article> results) {
  return Container();
}
StreamBuilders are the secret sauce to make the BLoC pattern tasty. These widgets listen for events from the stream. The widgets execute builder closure and update the widget tree when they receive new events. You don’t need to call setState() in this tutorial because of StreamBuilder and the BLoC pattern.
In the code above:
-
StreamBuilderdefines thestreamproperty usingArtliceListBlocto understand where to get the article list. - Initially, the stream has no data, which is normal. If there isn’t any data in your stream, the app displays the Loading… message. If there’s an empty list in your stream, the app displays the No Results message.
- It passes the search results into the regular method.
Build and run the app to see new states. When you run the app, you see the Loading … message. When you enter random keywords into the search field, you see a No Results message. Otherwise, there will be a blank screen.


Replace _buildSearchResults(List<Article> results) with the following code:
Widget _buildSearchResults(List<Article> results) {
  return ListView.builder(
    itemCount: results.length,
    itemBuilder: (context, index) {
      final article = results[index];
      return InkWell(
        child: Padding(
          padding: const EdgeInsets.symmetric(horizontal: 16),
          // 1
          child: ArticleListItem(article: article),
        ),
        // 2
        onTap: () {
          // TODO: Later will be implemented
        },
      );
    },
  );
}
In the code above:
-
ArticleListItemis an already defined widget that shows details of articles in the list. - The
onTapclosure redirects the user to an article’s details page.
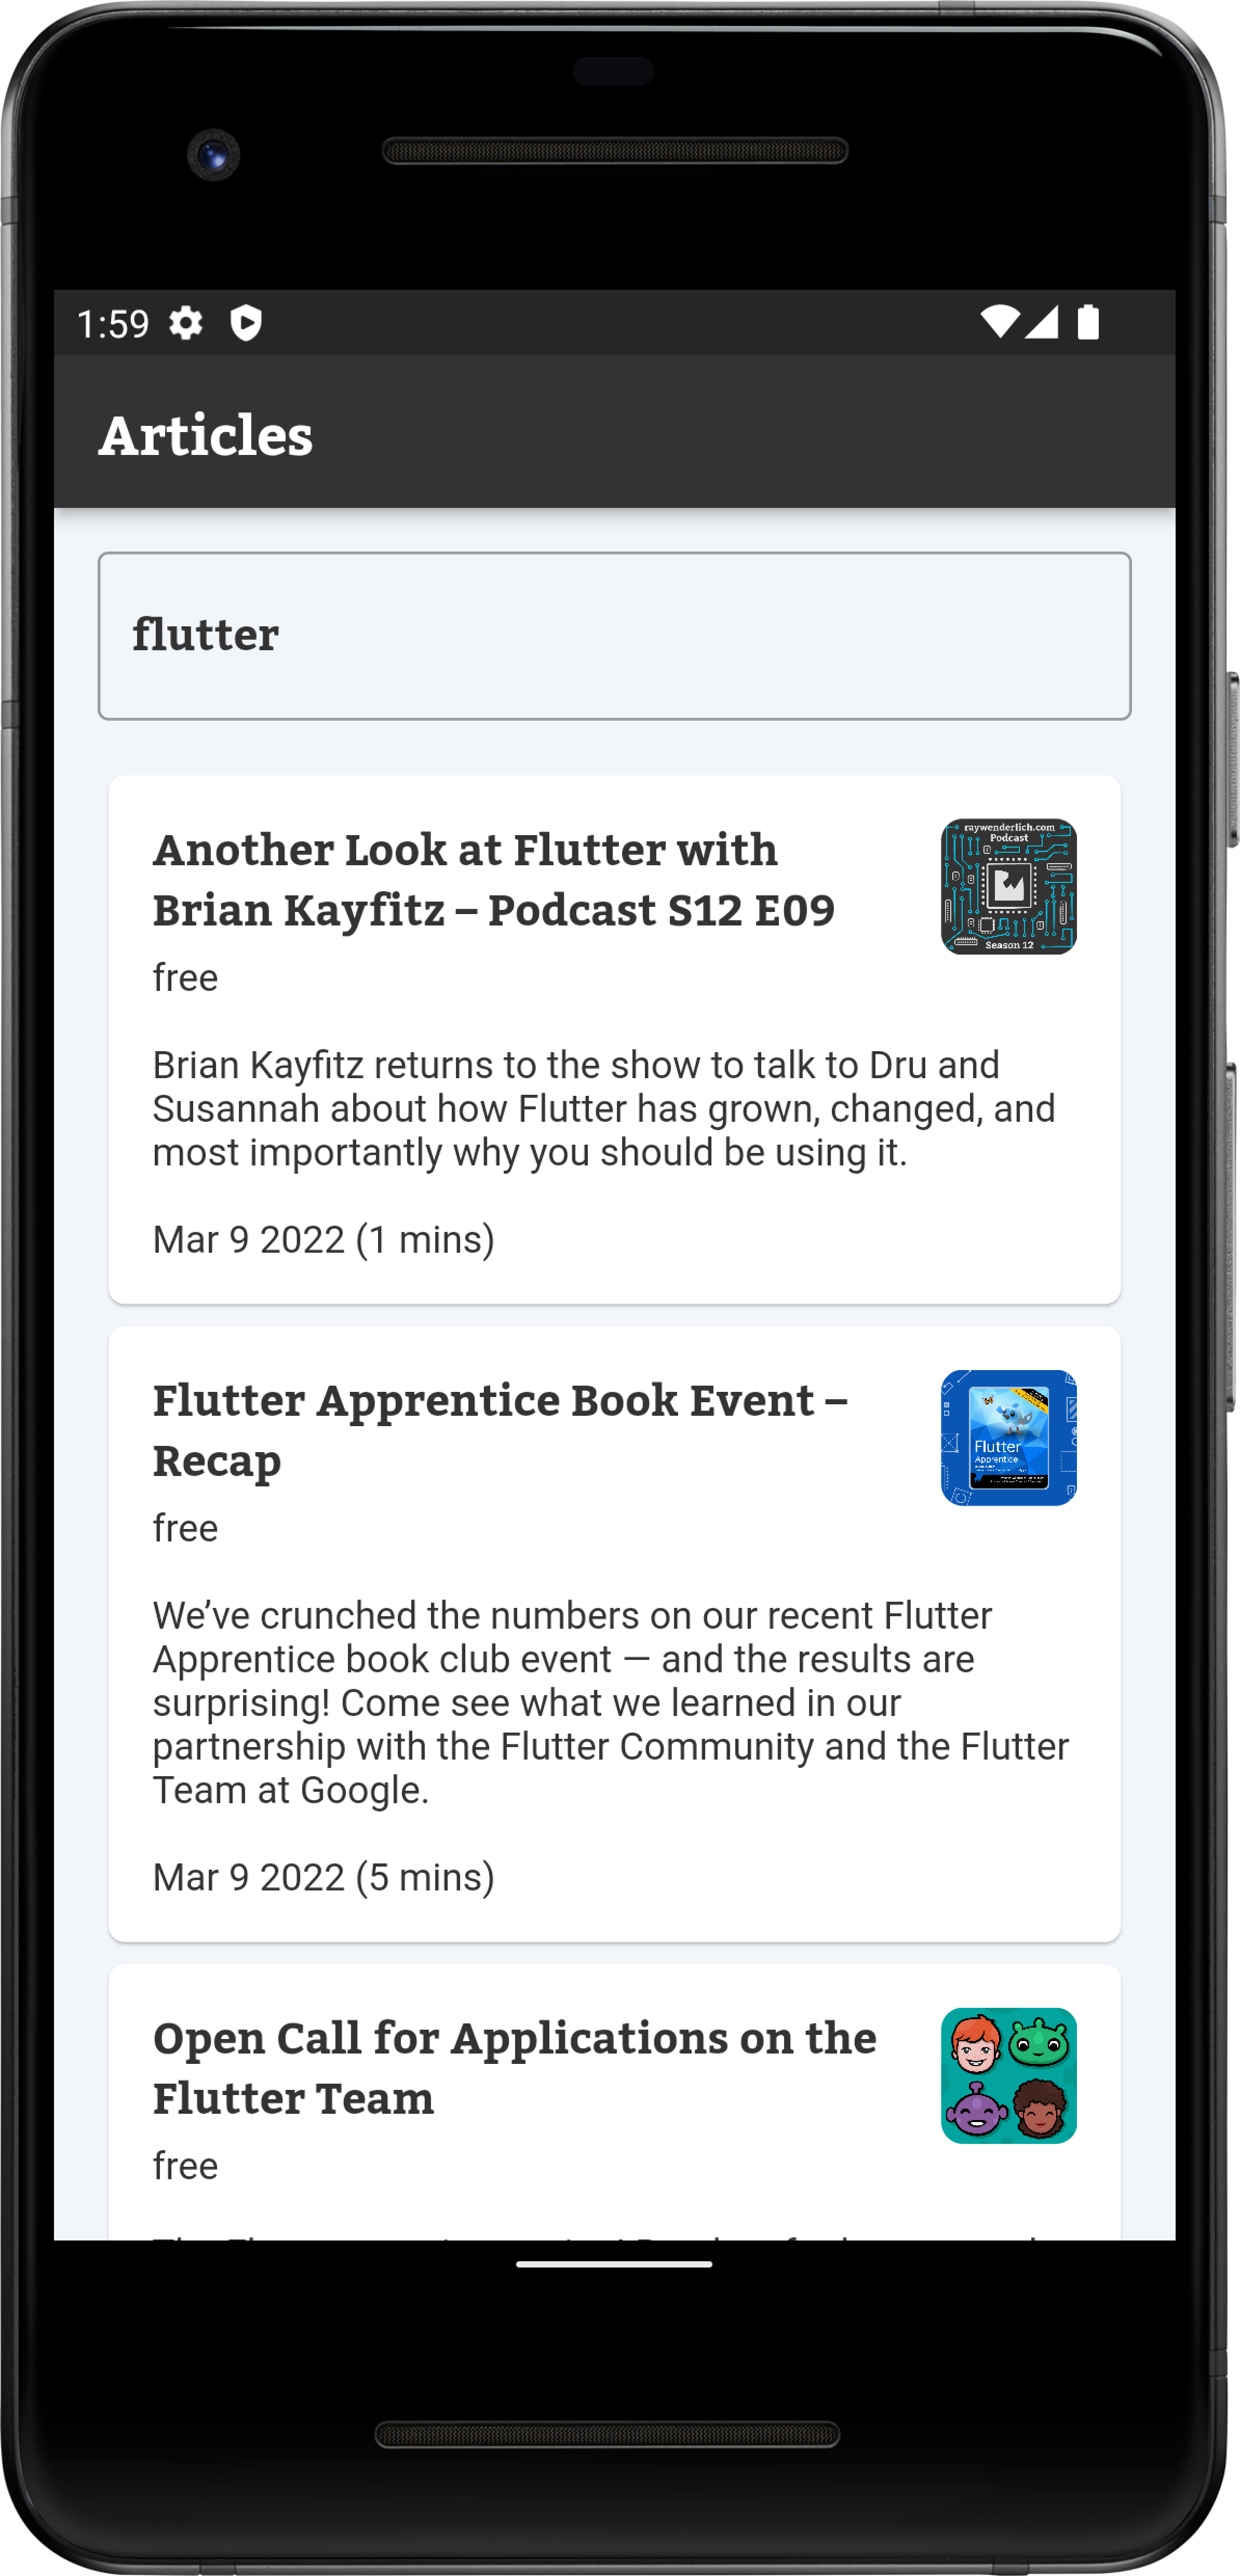
Build and run. Enter some keywords in the search field. The app should now get article results from RWClient and show them in a list.
Nice! That’s real progress.
The Touch of RxDart
At this moment, you can search articles and see results. But there are a few UX and performance issues you can solve:
-
ArticleListBlocsends a network request every time you change the search field character by character. Usually, users want to enter a reasonable query and see results for it. To solve this problem, you’ll debounce the input events and send a request when the user completes their query. Debouncing means the app skips input events that come in short intervals. - When you finish entering your query, you might think the screen is stuck because you don’t see any UI feedback. To improve the user experience, show the user the app is loading and isn’t stuck.
-
asyncMapwaits for request completion, so the user sees all entered query responses one by one. Usually, you have to ignore the previous request result to process a new query.
The main purpose of BLoC is to model Business Logic components. Thanks to this, you can solve the previous issues by editing BLoC code only without editing widgets at all on the UI layer.
Go to bloc/article_list_bloc.dart and add import 'package:rxdart/rxdart.dart'; at the top of the file. rxdart packages are already added in pubspec.yaml.
Replace ArticleListBloc() with the following:
ArticleListBloc() {
  articlesStream = _searchQueryController.stream
      .startWith(null) // 1
      .debounceTime(const Duration(milliseconds: 100)) // 2
      .switchMap( // 3
        (query) => _client.fetchArticles(query)
            .asStream() // 4
            .startWith(null), // 5
      );
}
The code above changes the output stream of articles in the following way:
-
startWith(null)produces an empty query to start loading all articles. If the user opens the search for the first time and doesn’t enter any query, they see a list of recent articles. -
debounceTimeskips queries that come in intervals of less than 100 milliseconds. When the user enters characters,TextFieldsends multipleonChanged{}events. debounce skips most of them and returns the last keyword event.Note: Read more about the debounce operator at ReactiveX – debounce documentation - Replace
asyncMapwithswitchMap. These operators are similar, butswitchMapallows you to work with other streams. - Convert
FuturetoStream. -
startWith(null)at this line sends anullevent to the article output at the start of every fetch request. So when the user completes the search query, UI erases the previous list of articles and shows the widget’s loading. It happens because_buildResultsin article_list_screen.dart listens to your stream and displays a loading indicator in the case ofnulldata.
Build and run the app. The app is more responsive. You see a loading indicator and only the latest entered requests.
Final Screen and BLoC
The second screen of the app shows a detail of the article. It also has its own BLoC objects to manage the state.
Create a file called article_detail_bloc.dart in the bloc folder with the following code:
class ArticleDetailBloc implements Bloc {
  final String id;
  final _refreshController = StreamController<void>();
  final _client = RWClient();

  late Stream<Article?> articleStream;

  ArticleDetailBloc({
    required this.id,
  }) {
    articleStream = _refreshController.stream
        .startWith({})
        .mapTo(id)
        .switchMap(
          (id) => _client.getDetailArticle(id).asStream(),
    )
    .asBroadcastStream();
  }

  @override
  void dispose() {
    _refreshController.close();
  }
}
This code is very similar to ArticleListBloc. The difference is the API and the data type that’s returned. You’ll add refresh later to see another way to send input events. You need asBroadcastStream() here to allow multiple stream subscriptions for the refresh functionality.
Now, create an article_detail_screen.dart file with an ArticleDetailScreen class in the UI folder to put the new BLoC to use.
class ArticleDetailScreen extends StatelessWidget {
  const ArticleDetailScreen({Key? key}) : super(key: key);

  @override
  Widget build(BuildContext context) {
    // 1
    final bloc = BlocProvider.of<ArticleDetailBloc>(context);
    return Scaffold(
      appBar: AppBar(
        title: const Text('Articles detail'),
      ),
      body: Container(
        alignment: Alignment.center,
        // 2
        child: _buildContent(bloc),
      ),
    );
  }

  Widget _buildContent(ArticleDetailBloc bloc) {
    return StreamBuilder<Article?>(
      stream: bloc.articleStream,
      builder: (context, snapshot) {
        final article = snapshot.data;
        if (article == null) {
          return const Center(child: CircularProgressIndicator());
        }
        // 3
        return ArticleDetail(article);
      },
    );
  }
}
ArticleDetailScreen does the following:
- Fetches the
ArticleDetailBlocinstance. - The
body:property displays the content with data received fromArticleDetailBloc. - Displays details using prepared widget
ArticleDetail.
Build and run the app. After seeing an article list, tap one of them.

It doesn’t navigate to ArticleDetailScreen.
That’s because you didn’t add navigation from ArticleListScreen to ArticleDetailScreen. Go to article_list_screen.dart and replace the code of the onTap{} property in _buildSearchResults() with the following:
onTap: () {
  Navigator.push(
    context,
    MaterialPageRoute(
      builder: (context) => BlocProvider(
        bloc: ArticleDetailBloc(id: article.id),
        child: const ArticleDetailScreen(),
      ),
    ),
  );
},
Build and run the app, then tap the article. It displays a detail screen of the selected article.

Next, you’ll implement the missing bit to refresh the content to fetch the latest updates or reload after a network error.
Replace body:property in article_detail_screen.dart with following code:
...
// 1
body: RefreshIndicator(
  // 2
  onRefresh: bloc.refresh,
  child: Container(
    alignment: Alignment.center,
    child: _buildContent(bloc),
  ),
),
...
Here’s a breakdown:
- The
RefreshIndicatorwidget allows use of the swipe-to-refresh gesture and invokesonRefreshmethod. -
onRefreshmay use BLoC sinkbloc.refresh.add, but there’s a problem.onRefreshneeds to get someFutureback to know when to hide the loading indicator. To provide this, you’ll create a new BLoC methodFuture refresh()to supportRefreshIndicatorfunctionality.
Add a new method, Future refresh(), to article_detail_bloc.dart:
Future refresh() {
  final future = articleStream.first;
  _refreshController.sink.add({});
  return future;
}
The code above solves two cases: requesting an update and returning Future for RefreshIndicator. It:
- Sends a new refresh event to sink so
ArticleDetailBlocwill refresh the article data. - The operator
firstof theStreaminstance returnsFuture, which completes when any article is available in the stream at the time of this call. It helps to wait when the article update is available to render. - Do you remember the
asBroadcastStream()call before? It’s required because of this line.firstcreates another subscription toarticleStream.
refresh is called at the same time an API fetch is in progress. Returned Future completes early, then the new update comes to articleStream and RefreshIndicator hides itself before the final update. It’s also wrong to send an event to sink and then request the first future. If a refresh event is processed immediately and a new Article comes before the call of first, the user sees infinity loading.Build and run the app. It should support the swipe-to-refresh gesture.
Looks elegant! Now, users of raywenderlich.com can view and search their favorite articles from the app.
Where to Go From Here?
Congratulations on mastering the BLoC pattern. BLoC is a simple but powerful pattern to tame app states as it flies up and down the widget tree.
You can find the final sample project in the Download Materials for the tutorial.
Other architectural patterns worth looking into include:
Also check out the official documentation on streams and a Google IO talk about the BLoC Pattern.
I hope you enjoyed this Flutter BLoC tutorial. If you have any questions or comments, please join the forum discussion below!
raywenderlich.com Weekly
The raywenderlich.com newsletter is the easiest way to stay up-to-date on everything you need to know as a mobile developer.
Get a weekly digest of our tutorials and courses, and receive a free in-depth email course as a bonus!
Recommend
-
61
响应式编程:从 Streams 到 BLoC 原文 这篇文章主要介绍 Streams,BLoC 和 Reactive Programming 的概念、理论和实...
-
12
Using BLoC pattern with service layer 2020-10-142020-10-14 by marc A BLoC that only processes events from a widget and emits states based on its own lo...
-
13
Applying the BLoC pattern in practice 2020-10-082020-10-07 by marc There are numerous documentations on the web explaining the purpose of the BLoC patt...
-
8
Architecture Flutter App the Bloc_Redux Way 2019-01-05 这是项目地址,下面来阐述下产生背景和它的一些特点。 接触 Flutter 也有一段时间了,在如何...
-
10
June 3, 2021 ...
-
10
Home Flutter & Dart Tutorials...
-
11
БИНГО ошибок при создании BLoC'а БИНГО ошибок при создании BLoC'а ОШИБКИ: Начать писать логи...
-
6
Flutter: Breaking the BloC RulesDecember 28, 2022FlutterBloC is a common UI pattern in the Flutter world. Google originally created th...
-
8
Eight EU countries oppose bloc's car emissions limits
-
7
The 5-Country Economic Bloc Emerging as an Alternative to the Western Global Order – BitcoinKE
About Joyk
Aggregate valuable and interesting links.
Joyk means Joy of geeK