

MyBatis-Plus 入门学习笔记
source link: https://lemon-cs.github.io/2020/07/28/%E5%90%8E%E7%AB%AF/Java/%E6%A1%86%E6%9E%B6/MyBatis/MyBatis-Plus%E5%85%A5%E9%97%A8%E5%AD%A6%E4%B9%A0%E7%AC%94%E8%AE%B0/#12-MybatisX-%E5%BF%AB%E9%80%9F%E5%BC%80%E5%8F%91%E6%8F%92%E4%BB%B6
Go to the source link to view the article. You can view the picture content, updated content and better typesetting reading experience. If the link is broken, please click the button below to view the snapshot at that time.

MyBatis-Plus 入门学习笔记
1. Mybatis-Plus 概念
1.1 Mybatis-Plus 介绍
官⽹: https://mybatis.plus/ 或 https://mp.baomidou.com/
Mybatis-Plus 介绍
MyBatis-Plus(简称 MP)是⼀个 MyBatis 的增强⼯具,在 MyBatis 的基础上只做增强不做改变,为简化开发、提⾼效率⽽⽣。
1.2 特性
- 无侵入:只做增强不做改变,引入它不会对现有工程产生影响,如丝般顺滑
- 损耗小:启动即会自动注入基本 CURD,性能基本无损耗,直接面向对象操作
- 强大的 CRUD 操作:内置通用 Mapper、通用 Service,仅仅通过少量配置即可实现单表大部分 CRUD 操作,更有强大的条件构造器,满足各类使用需求
- 支持 Lambda 形式调用:通过 Lambda 表达式,方便的编写各类查询条件,无需再担心字段写错
- 支持主键自动生成:支持多达 4 种主键策略(内含分布式唯一 ID 生成器 - Sequence),可自由配置,完美解决主键问题
- 支持 ActiveRecord 模式:支持 ActiveRecord 形式调用,实体类只需继承 Model 类即可进行强大的 CRUD 操作
- 支持自定义全局通用操作:支持全局通用方法注入( Write once, use anywhere )
- 内置代码生成器:采用代码或者 Maven 插件可快速生成 Mapper 、 Model 、 Service 、 Controller 层代码,支持模板引擎,更有超多自定义配置等您来使用
- 内置分页插件:基于 MyBatis 物理分页,开发者无需关心具体操作,配置好插件之后,写分页等同于普通 List 查询
- 分页插件支持多种数据库:支持 MySQL、MariaDB、Oracle、DB2、H2、HSQL、SQLite、Postgre、SQLServer 等多种数据库
- 内置性能分析插件:可输出 SQL 语句以及其执行时间,建议开发测试时启用该功能,能快速揪出慢查询
- 内置全局拦截插件:提供全表 delete 、 update 操作智能分析阻断,也可自定义拦截规则,预防误操作
1.3 支持数据库
任何能使用
MyBatis进行 CRUD, 并且支持标准 SQL 的数据库,具体支持情况如下,如果不在下列表查看分页部分教程 PR 您的支持。
- MySQL,Oracle,DB2,H2,HSQL,SQLite,PostgreSQL,SQLServer,Phoenix,Gauss ,ClickHouse,Sybase,OceanBase,Firebird,Cubrid,Goldilocks,csiidb
- 达梦数据库,虚谷数据库,人大金仓数据库,南大通用 (华库) 数据库,南大通用数据库,神通数据库,瀚高数据库
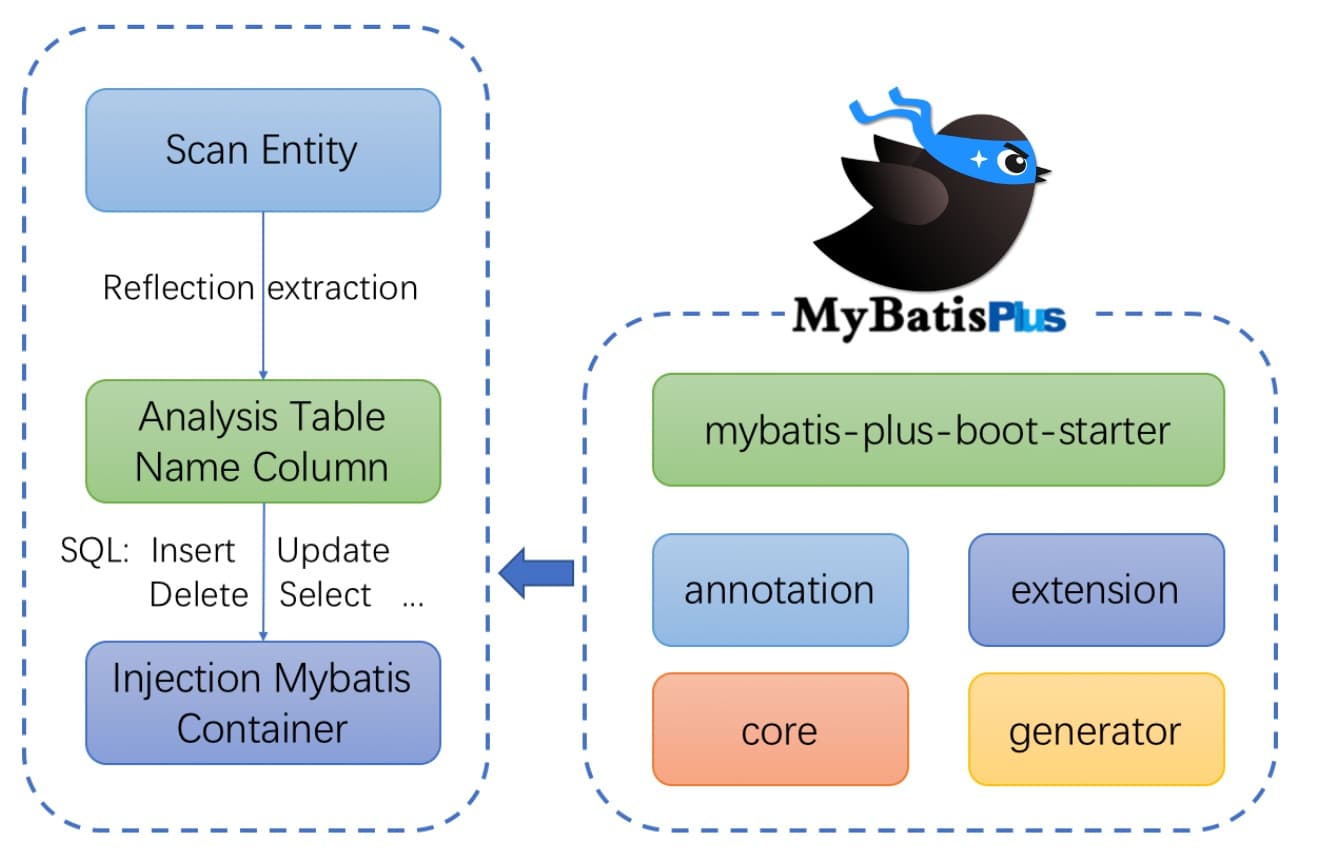
1.4 框架结构
2. Mybatis-Plus 快速⼊⻔
2.1 安装
全新的 MyBatis-Plus 3.0 版本基于 JDK8,提供了 lambda 形式的调⽤,所以安装集成 MP3.0 要求如下:
- JDK 8+
- Maven or Gradle
Spring Boot 添加依赖
<dependency>
	<groupId>com.baomidou</groupId>
	<artifactId>mybatis-plus-boot-starter</artifactId>
	<version>3.4.0</version>
</dependency>
Spring 添加依赖
<dependency>
	<groupId>com.baomidou</groupId>
	<artifactId>mybatis-plus</artifactId>
	<version>3.4.0</version>
</dependency>
引入 MyBatis-Plus 依赖后,不要再次引入 MyBatis 和 MyBatis-Spring 依赖,以避免因版本差异导致的问题。
对于 Mybatis 整合 MP 有常常有三种⽤法,分别是 Mybatis+MyBatis-Plus、Spring+Mybatis+MyBatis-Plus、Spring
Boot+Mybatis+MyBatis-Plus。
2.2 创建数据库和表
-- 创建测试表
DROP TABLE IF EXISTS tb_user;
CREATE TABLE user
(
	id BIGINT(20) NOT NULL COMMENT '主键ID',
	name VARCHAR(30) NULL DEFAULT NULL COMMENT '姓名',
	age INT(11) NULL DEFAULT NULL COMMENT '年龄',
	email VARCHAR(50) NULL DEFAULT NULL COMMENT '邮箱',
	PRIMARY KEY (id)
);
-- 插⼊测试数据
INSERT INTO user (id, name, age, email) VALUES
(1, 'Jone', 18, '[email protected]'),
(2, 'Jack', 20, '[email protected]'),
(3, 'Tom', 28, '[email protected]'),
(4, 'Sandy', 21, '[email protected]'),
(5, 'Billie', 24, '[email protected]');
2.3 创建 Maven 工程
<?xml version="1.0" encoding="UTF-8"?>
<project xmlns="http://maven.apache.org/POM/4.0.0"
         xmlns:xsi="http://www.w3.org/2001/XMLSchema-instance"
         xsi:schemaLocation="http://maven.apache.org/POM/4.0.0 http://maven.apache.org/xsd/maven-4.0.0.xsd">
    <modelVersion>4.0.0</modelVersion>

<groupId>com.lemon</groupId>
    <artifactId>mybatis-plus</artifactId>
    <packaging>pom</packaging>
    <version>1.0-SNAPSHOT</version>
    <modules>
        <module>mybatis-plus-simple</module>
    </modules>

<properties>
        <maven.compiler.source>8</maven.compiler.source>
        <maven.compiler.target>8</maven.compiler.target>
    </properties>

<dependencies>
        <!-- mybatis-plus插件依赖 -->
        <dependency>
            <groupId>com.baomidou</groupId>
            <artifactId>mybatis-plus</artifactId>
            <version>3.4.0</version>
        </dependency>

<!--Mysql-->
        <dependency>
            <groupId>mysql</groupId>
            <artifactId>mysql-connector-java</artifactId>
            <version>5.1.47</version>
        </dependency>

<!--连接池-->
        <dependency>
            <groupId>com.alibaba</groupId>
            <artifactId>druid</artifactId>
            <version>1.0.11</version>
        </dependency>

<!--简化bean代码的工具包-->
        <dependency>
            <groupId>org.projectlombok</groupId>
            <artifactId>lombok</artifactId>
            <version>1.18.4</version>
        </dependency>

<dependency>
            <groupId>junit</groupId>
            <artifactId>junit</artifactId>
            <version>4.12</version>
        </dependency>

<dependency>
            <groupId>org.slf4j</groupId>
            <artifactId>slf4j-log4j12</artifactId>
            <version>1.6.4</version>
        </dependency>

</dependencies>

<build>
        <plugins>
            <plugin>
                <groupId>org.apache.maven.plugins</groupId>
                <artifactId>maven-compiler-plugin</artifactId>
                <configuration>
                    <source>1.8</source>
                    <target>1.8</target>
                </configuration>
            </plugin>
        </plugins>
    </build>

</project>
2.4 Mybatis + MyBatis-Plus
下⾯演示,通过纯 Mybatis 与 Mybatis-Plus 整合。
1. 创建⼦ Module
pom.xml:
<?xml version="1.0" encoding="UTF-8"?>
<project xmlns="http://maven.apache.org/POM/4.0.0"
         xmlns:xsi="http://www.w3.org/2001/XMLSchema-instance"
         xsi:schemaLocation="http://maven.apache.org/POM/4.0.0 http://maven.apache.org/xsd/maven-4.0.0.xsd">
    <parent>
        <artifactId>mybatis-plus</artifactId>
        <groupId>com.lemon</groupId>
        <version>1.0-SNAPSHOT</version>
    </parent>
    <modelVersion>4.0.0</modelVersion>

<artifactId>mybatis-plus-simple</artifactId>

<properties>
        <maven.compiler.source>8</maven.compiler.source>
        <maven.compiler.target>8</maven.compiler.target>
    </properties>

</project>
log4j.properties:
log4j.rootLogger=DEBUG,A1

log4j.appender.A1=org.apache.log4j.ConsoleAppender
log4j.appender.A1.layout=org.apache.log4j.PatternLayout
log4j.appender.A1.layout.ConversionPattern=[%t] [%c]-[%p] %m%n
2. Mybatis 实现查询 User
编写 mybatis-config.xml ⽂件
<?xml version="1.0" encoding="UTF-8" ?>
<!DOCTYPE configuration
        PUBLIC "-//mybatis.org//DTD Config 3.0//EN"
        "http://mybatis.org/dtd/mybatis-3-config.dtd">

<configuration>

<properties resource="jdbc.properties"></properties>

<!--environments: 运行环境-->
    <environments default="development">
        <environment id="development">
            <!--当前的事务事务管理器是JDBC-->
            <transactionManager type="JDBC"></transactionManager>
            <!--数据源信息 POOLED:使用mybatis的连接池-->
            <dataSource type="POOLED">
                <property name="driver" value="${jdbc.driver}"/>
                <property name="url" value="${jdbc.url}"/>
                <property name="username" value="${jdbc.username}"/>
                <property name="password" value="${jdbc.password}"/>
            </dataSource>
        </environment>
    </environments>

<!--引入映射配置文件-->
    <mappers>
       <package name="com.lemon.mapper"/>
    </mappers>


</configuration>
编写 User 实体对象
@Data // getter setter toString
@NoArgsConstructor //生成无参构造
@AllArgsConstructor // 生成全参构造
@TableName("user")
public class User {

private Long id;
    private String name;
    private Integer age;
    private String email;

}
编写 UserMapper 接⼝
public interface UserMapper {
	List<User> findAll();
}
编写 UserMapper.xml ⽂件
<?xml version="1.0" encoding="UTF-8" ?>
<!DOCTYPE mapper
        PUBLIC "-//mybatis.org//DTD Mapper 3.0//EN"
        "http://mybatis.org/dtd/mybatis-3-mapper.dtd">

<mapper namespace="com.lemon.mapper.UserMapper">
    <insert id="insert" parameterType="com.lemon.pojo.User">
        insert into ....
    </insert>

<!--查询所有用户信息-->
    <select id="findAll" resultType="com.lemon.pojo.User">
        select * from user
    </select>

</mapper>
编写 TestMybatis 测试⽤例
public class MPTest {

@Test
    public void mybatisTest() throws Exception {
        InputStream inputStream = Resources.getResourceAsStream("sqlMapConfig.xml");

SqlSessionFactory sqlSessionFactory = new MybatisSqlSessionFactoryBuilder().build(inputStream);

SqlSession sqlSession = sqlSessionFactory.openSession();

UserMapper userMapper = sqlSession.getMapper(UserMapper.class);
         List<User> userList = userMapper.findAll();

for (User user : userList) {
            System.out.println(user);
        }
    }

}
测试结果:
User(id=1, name=Jone, age=18, [email protected])
User(id=2, name=Jack, age=20, [email protected])
User(id=3, name=Tom, age=28, [email protected])
User(id=4, name=Sandy, age=21, [email protected])
User(id=5, name=Billie, age=24, [email protected])
注:如果实体类名称和表名称不⼀致,可以在实体类上添加注解 @TableName("指定数据库表名")
3. Mybatis+MyBatis-Plus 实现查询 User
将 UserMapper 继承 BaseMapper,将拥有了 BaseMapper 中的所有⽅法
public interface UserMapper extends BaseMapper<User> {
}
使⽤ MP 中的 MybatisSqlSessionFactoryBuilder 进程构建
@Test
public void mybatisTest() throws Exception {
 InputStream inputStream = Resources.getResourceAsStream("sqlMapConfig.xml");

SqlSessionFactory sqlSessionFactory = new MybatisSqlSessionFactoryBuilder().build(inputStream);

SqlSession sqlSession = sqlSessionFactory.openSession();

UserMapper userMapper = sqlSession.getMapper(UserMapper.class);
    // List<User> all = userMapper.findAll();
 List<User> userList = userMapper.selectList(null);
    for (User user : userList) {
 System.out.println(user);
    }
}
User(id=1, name=Jone, age=18, [email protected])
User(id=2, name=Jack, age=20, [email protected])
User(id=3, name=Tom, age=28, [email protected])
User(id=4, name=Sandy, age=21, [email protected])
User(id=5, name=Billie, age=24, [email protected])
注:如果实体类名称和表名称不⼀致,可以在实体类上添加注解 @TableName (“指定数据库表名”)
简单说明:
由于使⽤了 MybatisSqlSessionFactoryBuilder 进⾏了构建,继承的 BaseMapper 中的⽅法就载⼊到了 SqlSession 中,所以就可以直接使⽤相关的⽅法;
2.5 Spring + Mybatis + MyBatis-Plus
引⼊了 Spring 框架,数据源、构建等⼯作就交给了 Spring 管理。
1. 创建⼦ Module
<?xml version="1.0" encoding="UTF-8"?>
<project xmlns="http://maven.apache.org/POM/4.0.0"
         xmlns:xsi="http://www.w3.org/2001/XMLSchema-instance"
         xsi:schemaLocation="http://maven.apache.org/POM/4.0.0 http://maven.apache.org/xsd/maven-4.0.0.xsd">
    <parent>
        <artifactId>mybatis-plus</artifactId>
        <groupId>com.lemon</groupId>
        <version>1.0-SNAPSHOT</version>
    </parent>
    <modelVersion>4.0.0</modelVersion>

<artifactId>mybatis-plus-spring</artifactId>

<properties>
        <maven.compiler.source>8</maven.compiler.source>
        <maven.compiler.target>8</maven.compiler.target>
        <spring.version>5.1.6.RELEASE</spring.version>
    </properties>

<dependencies>
        <dependency>
            <groupId>org.springframework</groupId>
            <artifactId>spring-webmvc</artifactId>
            <version>${spring.version}</version>
        </dependency>
        <dependency>
            <groupId>org.springframework</groupId>
            <artifactId>spring-jdbc</artifactId>
            <version>${spring.version}</version>
        </dependency>
        <dependency>
            <groupId>org.springframework</groupId>
            <artifactId>spring-test</artifactId>
            <version>${spring.version}</version>
        </dependency>
    </dependencies>
</project>
2. 实现查询 User
编写 jdbc.properties
jdbc.driver=com.mysql.jdbc.Driver
jdbc.url=jdbc:mysql://127.0.0.1:3306/mp?serverTimezone=GMT%2B8&useSSL=false
jdbc.username=root
jdbc.password=root
编写 applicationContext.xml
<?xml version="1.0" encoding="UTF-8"?>
<beans xmlns="http://www.springframework.org/schema/beans"
       xmlns:xsi="http://www.w3.org/2001/XMLSchema-instance"
       xmlns:context="http://www.springframework.org/schema/context"
       xsi:schemaLocation="
       	http://www.springframework.org/schema/beans
		http://www.springframework.org/schema/beans/spring-beans.xsd
       	http://www.springframework.org/schema/context
		http://www.springframework.org/schema/context/spring-context.xsd">

<!-- 引入properties文件-->
    <context:property-placeholder location="classpath:jdbc.properties"></context:property-placeholder>

<!--数据源-->
    <bean id="dataSource" class="com.alibaba.druid.pool.DruidDataSource">
        <property name="driverClassName" value="${jdbc.driver}"/>
        <property name="url" value="${jdbc.url}"/>
        <property name="username" value="${jdbc.username}"/>
        <property name="password" value="${jdbc.password}"/>
    </bean>

<!--1. 将sqlSessionFactory对象的创建交给spring-->
    <bean id="sqlSessionFactory" class="com.baomidou.mybatisplus.extension.spring.MybatisSqlSessionFactoryBean">
        <property name="dataSource" ref="dataSource"></property>
        <property name="configLocation" value="classpath:sqlMapConfig.xml"/>
    </bean>

<!--2. mapper映射扫描-->
    <bean class="org.mybatis.spring.mapper.MapperScannerConfigurer">
        <property name="basePackage" value="com.lemon.mapper"/>
     </bean>

</beans>
编写 User 对象以及 UserMapper 接⼝
@Data // getter setter toString
@NoArgsConstructor //生成无参构造
@AllArgsConstructor // 生成全参构造
@TableName("user")
public class User {

private Long id;
    private String name;
    private Integer age;
    private String email;

}
public interface UserMapper extends BaseMapper<User> {
	List<User> findAll();
}
- 编写测试⽤例
@RunWith(SpringJUnit4ClassRunner.class)
@ContextConfiguration(locations = "classpath:applicationContext.xml")
public class TestSpringMP {

@Autowired
    private UserMapper userMapper;

@Test
    public void test() {

List<User> userList = userMapper.selectList(null);

for (User user : userList) {
            System.out.println(user);
        }
    }

}
2.6 SpringBoot + Mybatis + MyBatis-Plus
使⽤ SpringBoot 将进⼀步的简化 MyBatis-Plus 的整合,需要注意的是,由于使⽤ SpringBoot 需要继承 parent,所以需要重新创建⼯程,并不是创建⼦ Module。
1. 创建⼯程并导入依赖
<?xml version="1.0" encoding="UTF-8"?>
<project xmlns="http://maven.apache.org/POM/4.0.0" xmlns:xsi="http://www.w3.org/2001/XMLSchema-instance"
         xsi:schemaLocation="http://maven.apache.org/POM/4.0.0 https://maven.apache.org/xsd/maven-4.0.0.xsd">
    <modelVersion>4.0.0</modelVersion>
    <parent>
        <groupId>org.springframework.boot</groupId>
        <artifactId>spring-boot-starter-parent</artifactId>
        <version>2.3.4</version>
        <relativePath/> <!-- lookup parent from repository -->
    </parent>
    <groupId>com.lemon</groupId>
    <artifactId>mybatis-plus-springboot</artifactId>
    <version>0.0.1-SNAPSHOT</version>
    <name>mybatis-plus-springboot</name>
    <description>mybatis-plus-springboot</description>
    <properties>
        <java.version>1.8</java.version>
    </properties>

<dependencies>
        <dependency>
            <groupId>org.springframework.boot</groupId>
            <artifactId>spring-boot-starter</artifactId>
            <exclusions>
                <exclusion>
                    <groupId>org.springframework.boot</groupId>
                    <artifactId>spring-boot-starter-logging</artifactId>
                </exclusion>
            </exclusions>
        </dependency>
        <dependency>
            <groupId>org.springframework.boot</groupId>
            <artifactId>spring-boot-starter-test</artifactId>
            <scope>test</scope>
        </dependency>

<!--简化代码的工具包-->
        <dependency>
            <groupId>org.projectlombok</groupId>
            <artifactId>lombok</artifactId>
            <optional>true</optional>
        </dependency>
        <!--mybatis-plus的springboot支持-->
        <dependency>
            <groupId>com.baomidou</groupId>
            <artifactId>mybatis-plus-boot-starter</artifactId>
            <version>3.1.1</version>
        </dependency>
        <!--mysql驱动-->
        <dependency>
            <groupId>mysql</groupId>
            <artifactId>mysql-connector-java</artifactId>
            <version>5.1.47</version>
        </dependency>
        <dependency>
            <groupId>org.slf4j</groupId>
            <artifactId>slf4j-log4j12</artifactId>
        </dependency>
        <dependency>
            <groupId>junit</groupId>
            <artifactId>junit</artifactId>
            <version>RELEASE</version>
            <scope>test</scope>
        </dependency>
    </dependencies>

<build>
        <plugins>
            <plugin>
                <groupId>org.springframework.boot</groupId>
                <artifactId>spring-boot-maven-plugin</artifactId>
            </plugin>
        </plugins>
    </build>

</project>
2. 编写 application.properties
spring.datasource.driver-class-name=com.mysql.jdbc.Driver
spring.datasource.url=jdbc:mysql://127.0.0.1:3306/mp?useUnicode=true&characterEncoding=utf8&autoReconnect=true&allowMultiQueries=true&useSSL=false
spring.datasource.username=root
spring.datasource.password=123456
3. 编写 pojo
@Data // getter setter toString
@NoArgsConstructor //生成无参构造
@AllArgsConstructor // 生成全参构造
@TableName("user")
public class User {

private Long id;
    private String name;
    private Integer age;
    private String email;

}
4. 编写 mapper
public interface UserMapper extends BaseMapper<User> {
}
5. 编写启动类
@MapperScan("com.lemon.mapper")
@SpringBootApplication
public class MybatisPlusSpringbootApplication {

public static void main(String[] args) {
        SpringApplication.run(MybatisPlusSpringbootApplication.class, args);
    }

}
6. 编写测试⽤例
@RunWith(SpringRunner.class)
@SpringBootTest
class MybatisPlusSpringbootApplicationTests {

@Autowired
    private UserMapper userMapper;

@Test
    void testSelect() {
        List<User> userList = userMapper.selectList(null);
        for (User user : userList) {
            System.out.println(user);
        }
    }

}
测试结果:
User(id=1, name=Jone, age=18, [email protected])
User(id=2, name=Jack, age=20, [email protected])
User(id=3, name=Tom, age=28, [email protected])
User(id=4, name=Sandy, age=21, [email protected])
User(id=5, name=Billie, age=24, [email protected])
3. 通⽤ CRUD
通过前⾯的学习,我们了解到通过继承 BaseMapper 就可以获取到各种各样的单表操作,接下来我们将详细讲解这些操作。
3.1 插⼊操作
1. ⽅法定义
/**
* 插⼊⼀条记录
*
* @param entity 实体对象.
*/
int insert(T entity);
2. 测试⽤例
@Test
   public void testInsert() {
       User user = new User();
       user.setAge(18);
       user.setName("kobe");
       user.setEmail("[email protected]");

// 返回影响的行数
       int result = userMapper.insert(user);
       System.out.println(result);
       // 由MyBatis-plus生成id并回填
       System.out.println("id值为" + user.getId());
   }
测试结果:
可以看到,数据已经写⼊到了数据库,但是,id 的值不正确,我们期望的是数据库⾃增⻓,实际是 MyBatis-Plus ⽣成了 id 的值写⼊到了数据库。
如何设置 id 的⽣成策略呢?
MyBatis-Plus ⽀持的 id 策略:
// ⽣成ID类型枚举类
@Getter
public enum IdType {
    /**
     * 数据库ID自增
     */
    AUTO(0),
    /**
     * 该类型为未设置主键类型
     */
    NONE(1),
    /**
     * 用户输入ID
     * <p>该类型可以通过自己注册自动填充插件进行填充</p>
     */
    INPUT(2),

/* 以下3种类型、只有当插入对象ID 为空,才自动填充。 */
    /**
     * 全局唯一ID (idWorker)
     */
    ID_WORKER(3),
    /**
     * 全局唯一ID (UUID)
     */
    UUID(4),
    /**
     * 字符串全局唯一ID (idWorker 的字符串表示)
     */
    ID_WORKER_STR(5);

private final int key;

IdType(int key) {
        this.key = key;
    }
}
修改 User 对象:
@Data // getter setter toString
@NoArgsConstructor //生成无参构造
@AllArgsConstructor // 生成全参构造
@TableName("user")
public class User {

@TableId(type = IdType.AUTO)
    private Long id;
    private String name;
    private Integer age;
    private String email;

}
3. @TableField
在 MP 中通过 @TableField 注解可以指定字段的⼀些属性,常常解决的问题有 2 个:
- 对象中的属性名和字段名不⼀致的问题(⾮驼峰)
- 对象中的属性字段在表中不存在的问题
@Data // getter setter toString
@NoArgsConstructor //生成无参构造
@AllArgsConstructor // 生成全参构造
@TableName("user")
public class User {

@TableId(type = IdType.AUTO)
    private Long id;
    private String name;
    private Integer age;

@TableField(value = "email") // 解决字段名不一致问题
    private String mail;

}
其他⽤法,如⼤字段不加⼊查询字段:
@Data // getter setter toString
@NoArgsConstructor //生成无参构造
@AllArgsConstructor // 生成全参构造
@TableName("user")
public class User {

@TableId(type = IdType.AUTO)
    private Long id;

@TableField(select = false) ) //查询的时候,不返回该字段的值
    private String name;
    private Integer age;

@TableField(value = "email") // 解决字段名不一致问题
    private String mail;

}
还有数据表中不存在的字段以及版本号
@Data // getter setter toString
@NoArgsConstructor //生成无参构造
@AllArgsConstructor // 生成全参构造
@TableName("user")
public class User {

@TableId(type = IdType.AUTO)
    private Long id;

@TableField(select = true) //查询的时候,不返回该字段的值
    private String name;
    private Integer age;

@TableField(value = "email") // 解决字段名不一致问题
    private String mail;

@TableField(exist = false)  // 该字段在数据库表中不存在
    private String address;

@Version
    @TableField(fill = FieldFill.INSERT)
    private Integer version;

}
3.2 更新操作
在 MyBatis-Plus 中,更新操作有 2 种,⼀种是根据 id 更新,另⼀种是根据条件更新。
1. 根据 id 更新
⽅法定义:
/**
* 根据 ID 修改
*
* @param entity 实体对象
*/
int updateById(@Param(Constants.ENTITY) T entity);
@Test
    public void testUpdateById() {
        User user = new User();
        user.setId(6L);
        user.setAge(24);

int i = userMapper.updateById(user);
        System.out.println(i);
    }
2. 根据条件更新
⽅法定义:
/**
* 根据 whereEntity 条件,更新记录
*
* @param entity
实体对象 (set 条件值,可以为 null)
* @param updateWrapper 实体对象封装操作类(可以为 null,⾥⾯的 entity ⽤于⽣成
where 语句)
*/
int update(@Param(Constants.ENTITY) T entity, @Param(Constants.WRAPPER)
Wrapper<T> updateWrapper);
测试⽤例:
/*
    测试根据条件进行修改
   */
   @Test
   public void testUpate(){

// 1. 更新的字段
       User user = new User();
       user.setAge(35);

// 2.更新的条件
       QueryWrapper<User> queryWrapper = new QueryWrapper<>();
       queryWrapper.eq("name", "kobe");

int i = userMapper.update(user, queryWrapper);
       System.out.println(i);
   }
或者,通过 UpdateWrapper 进⾏更新:
@Test
    public void testUpate2(){

UpdateWrapper<User> updateWrapper = new UpdateWrapper<>();
        updateWrapper.eq("id", 6).set("age", 40);

int i = userMapper.update(null, updateWrapper);
        System.out.println(i);
    }
测试结果:
3.3 删除操作
1. deleteById
⽅法定义:
/**
* 根据 ID 删除
*
* @param id 主键ID
*/
int deleteById(Serializable id);
测试⽤例:
/*
        根据ID进行删除
     */
    @Test
    public void testDeleteById() {

int i = userMapper.deleteById(6L);
        System.out.println(i);

}
测试结果:
2. deleteByMap
⽅法定义:
/**
* 根据 columnMap 条件,删除记录
*
* @param columnMap 表字段 map 对象
*/
int deleteByMap(@Param(Constants.COLUMN_MAP) Map<String, Object>
columnMap);
测试⽤例:
/*
      根据columnMap进行删除
    */
    @Test
    public void testDeleteByMap(){

HashMap<String, Object> map = new HashMap<>();
        map.put("name", "kobe");
        map.put("age", 18);

// 将columnMap中的元素设置为删除的条件,多个条件是and的关系
        int i = userMapper.deleteByMap(map);
        System.out.println(i);
    }
测试结果:
3. delete
⽅法定义:
/**
* 根据 entity 条件,删除记录
*
* @param wrapper 实体对象封装操作类(可以为 null)
*/
int delete(@Param(Constants.WRAPPER) Wrapper<T> wrapper);
测试⽤例:
/*
       调用delete进行删除
    */
    @Test
    public void testDelete(){

QueryWrapper<User> queryWrapper = new QueryWrapper<>();
        queryWrapper.eq("name","kobe1").eq("age",18);

int i = userMapper.delete(queryWrapper);
        System.out.println(i);
    }
或者如下:(两个是等效的)
/*
       调用delete进行删除
    */
    @Test
    public void testDelete(){

User user = new User();
        user.setName("kobe2");
        user.setAge(18);

QueryWrapper<User> queryWrapper = new QueryWrapper<>(user);
        // queryWrapper.eq("name","kobe1").eq("age",18);

int i = userMapper.delete(queryWrapper);
        System.out.println(i);
    }
测试结果:
deleteBatchIds
⽅法定义:
/**
* 删除(根据ID 批量删除)
*
* @param idList 主键ID列表(不能为 null 以及 empty)
*/
int deleteBatchIds(@Param(Constants.COLLECTION) Collection<? extends
Serializable> idList);
测试⽤例:
/*
         调用deleteBatchIds进行批量删除
    */
    @Test
    public void testDeleteBatchIds(){

int i = userMapper.deleteBatchIds(Arrays.asList(6l, 7l, 8l, 9l));
        System.out.println(i);
    }
测试结果:
3.4 查询操作
MyBatis-Plus 提供了多种查询操作,包括根据 id 查询、批量查询、查询单条数据、查询列表、分⻚查询等操作。
1. selectById
⽅法定义:
/**
* 根据 ID 查询
*
* @param id 主键ID
*/
T selectById(Serializable id);
测试⽤例:
/*
        根据ID进行查询
     */
    @Test
    public void testSelectById(){
        User user = userMapper.selectById(2L);
        System.out.println(user);
    }
测试结果:
result = User(id=2, name=Jack, age=20, [email protected])
2. selectBatchIds
⽅法定义:
/**
* 查询(根据ID 批量查询)
*
* @param idList 主键ID列表(不能为 null 以及 empty)
*/
List<T> selectBatchIds(@Param(Constants.COLLECTION) Collection<? extends
Serializable> idList);
测试⽤例:
/*
      根据ID进行批量查询
    */
    @Test
    public void testSelectBatchIds(){

List<User> users = userMapper.selectBatchIds(Arrays.asList(1L, 2l, 3l, 4l, 5l));
        for (User user : users) {
            System.out.println(user);
        }
    }
测试结果:
3. selectOne
⽅法定义:
/**
* 根据 entity 条件,查询⼀条记录
*
* @param queryWrapper 实体对象封装操作类(可以为 null)
*/
T selectOne(@Param(Constants.WRAPPER) Wrapper<T> queryWrapper);
测试⽤例:
/*
       测试selectOne
    */
    @Test
    public void testSelectOne(){

QueryWrapper<User> queryWrapper = new QueryWrapper<>();
        queryWrapper.eq("name","Jack");

// 根据条件查询一条记录,如果查询结果超过一条,会报错
        User user = userMapper.selectOne(queryWrapper);
        System.out.println(user);

}
测试结果:
User(id=2, name=Jack, age=20, [email protected])
4. selectCount
⽅法定义:
/**
* 根据 Wrapper 条件,查询总记录数
*
* @param queryWrapper 实体对象封装操作类(可以为 null)
*/
Integer selectCount(@Param(Constants.WRAPPER) Wrapper<T> queryWrapper);
测试⽤例:
/*
        根据wrapper条件,查询总记录数
     */
    @Test
    public void testSelectCount(){

QueryWrapper<User> queryWrapper = new QueryWrapper<>();
        queryWrapper.gt("age",18); // 查询年龄大于18的

// 根据条件查询一条记录,如果查询结果超过一条,会报错
        Integer count = userMapper.selectCount(queryWrapper);

System.out.println(count);

}
测试结果:
5. selectList
⽅法定义:
/**
* 根据 entity 条件,查询全部记录
*
* @param queryWrapper 实体对象封装操作类(可以为 null)
*/
List<T> selectList(@Param(Constants.WRAPPER) Wrapper<T> queryWrapper);
测试用例:
@Test
public void testSelectList() {
	QueryWrapper<User> wrapper = new QueryWrapper<User>();
	wrapper.gt("age", 18); //年龄⼤于18

//根据条件查询数据
	List<User> users = this.userMapper.selectList(wrapper);
	for (User user : users) {
		System.out.println("user = " + user);
	}
}
测试结果:
6. selectPage
⽅法定义:
/**
* 根据 entity 条件,查询全部记录(并翻⻚)
*
* @param page
分⻚查询条件(可以为 RowBounds.DEFAULT)
* @param queryWrapper 实体对象封装操作类(可以为 null)
*/
IPage<T> selectPage(IPage<T> page, @Param(Constants.WRAPPER) Wrapper<T>
queryWrapper);
配置分⻚插件:
@Configuration
public class MybatisPlusConfig {

/*
        分页插件
     */
    @Bean
    public PaginationInterceptor paginationInterceptor() {
        return new PaginationInterceptor();
    }

}
测试⽤例:
/*
     分页查询
    */
    @Test
    public void testSelectPage() {

QueryWrapper<User> queryWrapper = new QueryWrapper<>();
        queryWrapper.gt("age", 18); // 查询年龄大于18的

// 第一个参数:当前页   第二个参数:每页显示条数
        Page<User> page = new Page<>(1, 2);

IPage<User> userIPage = userMapper.selectPage(page, queryWrapper);
        System.out.println("总条数" + userIPage.getTotal());
        System.out.println("总页数" + userIPage.getPages());

System.out.println("分页数据" + userIPage.getRecords());

}
测试结果:
3.5 SQL 注⼊的原理
前⾯我们已经知道,MP 在启动后会将 BaseMapper 中的⼀系列的⽅法注册到 meppedStatements 中,那么究竟是如何注⼊的呢?流程⼜是怎么样的?下⾯我们将⼀起来分析下。
在 MP 中,ISqlInjector 负责 SQL 的注⼊⼯作,它是⼀个接⼝,AbstractSqlInjector 是它的实现类。
在 AbstractSqlInjector 中,主要是由 inspectInject () ⽅法进⾏注⼊的,如下:
public abstract class AbstractSqlInjector implements ISqlInjector {

@Override
    public void inspectInject(MapperBuilderAssistant builderAssistant, Class<?> mapperClass) {
        Class<?> modelClass = extractModelClass(mapperClass);
        if (modelClass != null) {
            String className = mapperClass.toString();
            Set<String> mapperRegistryCache = GlobalConfigUtils.getMapperRegistryCache(builderAssistant.getConfiguration());
            if (!mapperRegistryCache.contains(className)) {
                List<AbstractMethod> methodList = this.getMethodList();
                if (CollectionUtils.isNotEmpty(methodList)) {
                    TableInfo tableInfo = TableInfoHelper.initTableInfo(builderAssistant, modelClass);
                    // 循环注入自定义方法
                    methodList.forEach(m -> m.inject(builderAssistant, mapperClass, modelClass, tableInfo));
                } else {
                    logger.debug(mapperClass.toString() + ", No effective injection method was found.");
                }
                mapperRegistryCache.add(className);
            }
        }
    }
}
在实现⽅法中,methodList.forEach(m -> m.inject(builderAssistant, mapperClass,modelClass, tableInfo)); 是关键,循环遍历⽅法,进⾏注⼊。
最终调⽤抽象⽅法 injectMappedStatement 进⾏真正的注⼊:
/**
* 注⼊⾃定义 MappedStatement
*
* @param mapperClass mapper 接⼝
* @param modelClass mapper 泛型
* @param tableInfo 数据库表反射信息
* @return MappedStatement
*/
public abstract MappedStatement injectMappedStatement(Class<?>
mapperClass, Class<?> modelClass, TableInfo tableInfo);
查看该⽅法的实现:
以 SelectById 为例查看:
/**
 * 根据ID 查询一条数据
 *
 * @author hubin
 * @since 2018-04-06
 */
public class SelectById extends AbstractMethod {

@Override
    public MappedStatement injectMappedStatement(Class<?> mapperClass, Class<?> modelClass, TableInfo tableInfo) {
        SqlMethod sqlMethod = SqlMethod.LOGIC_SELECT_BY_ID;
        SqlSource sqlSource = new RawSqlSource(configuration, String.format(sqlMethod.getSql(),
            sqlSelectColumns(tableInfo, false),
            tableInfo.getTableName(), tableInfo.getKeyColumn(), tableInfo.getKeyProperty(),
            tableInfo.getLogicDeleteSql(true, false)), Object.class);
        return this.addSelectMappedStatement(mapperClass, sqlMethod.getMethod(), sqlSource, modelClass, tableInfo);
    }
}
可以看到,⽣成了 SqlSource 对象,再将 SQL 通过 addSelectMappedStatement ⽅法添加到 meppedStatements 中。
在 MP 中有⼤量的配置,其中有⼀部分是 Mybatis 原⽣的配置,另⼀部分是 MP 的配置,详情:使用配置 | MyBatis-Plus (baomidou.com)
下⾯我们对常⽤的配置做讲解。
4.1 基本配置
1. configLocation
- 类型:
String - 默认值:
null
MyBatis 配置文件位置,如果您有单独的 MyBatis 配置,请将其路径配置到 configLocation 中.MyBatis Configuration 的具体内容请参考 MyBatis 官方文档 (opens new window)
Spring Boot:
mybatis-plus.config-location = classpath:mybatis-config.xmlSpring MVC:
<bean id="sqlSessionFactory"
class="com.baomidou.mybatisplus.extension.spring.MybatisSqlSessionFactoryBean"
>
	<property name="configLocation" value="classpath:mybatis-config.xml"/>
</bean>
2. mapperLocations
- 类型:
String[] - 默认值:
["classpath*:/mapper/**/*.xml"]
MyBatis Mapper 所对应的 XML 文件位置,如果您在 Mapper 中有自定义方法 (XML 中有自定义实现),需要进行该配置,告诉 Mapper 所对应的 XML 文件位置
注意
Maven 多模块项目的扫描路径需以classpath*:开头 (即加载多个 jar 包下的 XML 文件)
Spring Boot:
mybatis-plus.mapper-locations = classpath*:mybatis/*.xmlSpring MVC:
<bean id="sqlSessionFactory"
class="com.baomidou.mybatisplus.extension.spring.MybatisSqlSessionFactoryBean"
>
	<property name="mapperLocations" value="classpath*:mybatis/*.xml"/>
</bean>
3. typeAliasesPackage
- 类型:
String - 默认值:
null
MyBaits 别名包扫描路径,通过该属性可以给包中的类注册别名,注册后在 Mapper 对应的 XML 文件中可以直接使用类名,而不用使用全限定的类名 (即 XML 中调用的时候不用包含包名)
Spring Boot:
mybatis-plus.type-aliases-package = com.lemon.pojoSpring MVC:
<bean id="sqlSessionFactory"
class="com.baomidou.mybatisplus.extension.spring.MybatisSqlSessionFactoryBean"
>
	<property name="typeAliasesPackage"
value="com.baomidou.mybatisplus.samples.quickstart.entity"/>
</bean>
4.2 进阶配置
本部分(Configuration)的配置大都为 MyBatis 原生支持的配置,这意味着您可以通过 MyBatis XML 配置文件的形式进行配置。
1. mapUnderscoreToCamelCase
- 类型:
boolean - 默认值:
true
是否开启自动驼峰命名规则(camel case)映射,即从经典数据库列名 A_COLUMN(下划线命名) 到经典 Java 属性名 aColumn(驼峰命名) 的类似映射。
注意
此属性在 MyBatis 中原默认值为 false,在 MyBatis-Plus 中,此属性也将用于生成最终的 SQL 的 select body
如果您的数据库命名符合规则无需使用@TableField注解指定数据库字段名
示例(SpringBoot)
#关闭⾃动驼峰映射,该参数不能和mybatis-plus.config-location同时存在
mybatis-plus.configuration.map-underscore-to-camel-case=false
2. cacheEnabled
- 类型:
boolean - 默认值:
true
开启 Mybatis 二级缓存,默认为 true。
SpringBoot:
mybatis-plus.configuration.cache-enabled=false
4.3 DB 策略配置
1. idType
- 类型:
com.baomidou.mybatisplus.annotation.IdType - 默认值:
ASSIGN_ID
全局默认主键类型
SpringBoot:
// 设置全局主键的生成策略-自增
mybatis-plus.global-config.db-config.id-type=auto
SpringMVC:
<!--这⾥使⽤MP提供的sqlSessionFactory,完成了Spring与MP的整合-->
   <bean id="sqlSessionFactory"
         class="com.baomidou.mybatisplus.extension.spring.MybatisSqlSessionFactoryBean"
   >
       <property name="dataSource" ref="dataSource"/>
       <property name="globalConfig">
           <bean class="com.baomidou.mybatisplus.core.config.GlobalConfig">
               <property name="dbConfig">
                   <bean
                           class="com.baomidou.mybatisplus.core.config.GlobalConfig$DbConfig">
                       <property name="idType" value="AUTO"/>
                   </bean>
               </property>
           </bean>
       </property>
   </bean>
2. tablePrefix
- 类型:
String - 默认值:
null
SpringBoot:
mybatis-plus.global-config.db-config.table-prefix=tb_SpringMVC:
<bean id="sqlSessionFactory"
         class="com.baomidou.mybatisplus.extension.spring.MybatisSqlSessionFactoryBean"
   >
       <property name="dataSource" ref="dataSource"/>
       <property name="globalConfig">
           <bean class="com.baomidou.mybatisplus.core.config.GlobalConfig">
               <property name="dbConfig">
                   <bean
                           class="com.baomidou.mybatisplus.core.config.GlobalConfig$DbConfig">
                       <property name="idType" value="AUTO"/>
                       <property name="tablePrefix" value="tb_"/>
                   </bean>
               </property>
           </bean>
       </property>
   </bean>
5. 条件构造器
在 MyBatis-Plus 中,Wrapper 接⼝的实现类关系如下:
可以看到,AbstractWrapper 和 AbstractChainWrapper 是重点实现,接下来我们重点学习 AbstractWrapper 以及其⼦类。
说明:
QueryWrapper (LambdaQueryWrapper) 和 UpdateWrapper (LambdaUpdateWrapper) 的⽗类⽤于⽣成 sql 的 where 条件,entity 属性也⽤于⽣成 sql 的 where 条件。
注意: entity ⽣成的 where 条件与 使⽤各个 api ⽣成的 where 条件没有任何关联⾏为
5.1 allEq
allEq(Map<R, V> params)
allEq(Map<R, V> params, boolean null2IsNull)
allEq(boolean condition, Map<R, V> params, boolean null2IsNull)
- 全部 eq(或个别 isNull) 个别参数说明:
params:key为数据库字段名,value为字段值null2IsNull: 为true则在map的value为null时调用 isNull 方法,为false时则忽略value为null的 - 例 1:
allEq({id:1,name:"老王",age:null})—>id = 1 and name = '老王' and age is null - 例 2:
allEq({id:1,name:"老王",age:null}, false)—>id = 1 and name = '老王'
allEq(BiPredicate<R, V> filter, Map<R, V> params)
allEq(BiPredicate<R, V> filter, Map<R, V> params, boolean null2IsNull)
allEq(boolean condition, BiPredicate<R, V> filter, Map<R, V> params, boolean null2IsNull)
个别参数说明:
filter : 过滤函数,是否允许字段传入比对条件中params 与 null2IsNull : 同上
- 例 1:
allEq((k,v) -> k.indexOf("a") >= 0, {id:1,name:"老王",age:null})—>name = '老王' and age is null - 例 2:
allEq((k,v) -> k.indexOf("a") >= 0, {id:1,name:"老王",age:null}, false)—>name = '老王'
测试用例:
/*
        测试条件构建器 allEq
     */
    @Test
    public void testAllEq() {

QueryWrapper<User> queryWrapper = new QueryWrapper<>();

// 构建map
        Map<String, Object> map = new HashMap<>();
        map.put("name", "jack");
        map.put("age", null);

//  WHERE name = ? AND age IS NULL
        // queryWrapper.allEq(map);

// WHERE name = ?
        //  queryWrapper.allEq(map, false);

// SELECT id,name,age,email AS mail,user_name FROM tb_user
        // queryWrapper.allEq(false, map, true);

// WHERE age IS NULL
        queryWrapper.allEq((k,v) -> k.equals("name"),map);

List<User> users = userMapper.selectList(queryWrapper);
        for (User user : users) {
            System.out.println(user);
        }

}
5.2 基本比较操作
eq(R column, Object val)
eq(boolean condition, R column, Object val)
- 例:
eq("name", "老王")—>name = '老王'
ne(R column, Object val)
ne(boolean condition, R column, Object val)
- 不等于 <>
- 例:
ne("name", "老王")—>name <> '老王'
gt(R column, Object val)
gt(boolean condition, R column, Object val)
- 大于 >
- 例:
gt("age", 18)—>age > 18
ge(R column, Object val)
ge(boolean condition, R column, Object val)
- 大于等于 >=
- 例:
ge("age", 18)—>age >= 18
lt(R column, Object val)
lt(boolean condition, R column, Object val)
- 小于 <
- 例:
lt("age", 18)—>age < 18
le(R column, Object val)
le(boolean condition, R column, Object val)
- 小于等于 <=
- 例:
le("age", 18)—>age <= 18
7. between
between(R column, Object val1, Object val2)
between(boolean condition, R column, Object val1, Object val2)
- BETWEEN 值 1 AND 值 2
- 例:
between("age", 18, 30)—>age between 18 and 30
8. notBetween
notBetween(R column, Object val1, Object val2)
notBetween(boolean condition, R column, Object val1, Object val2)
- NOT BETWEEN 值 1 AND 值 2
- 例:
notBetween("age", 18, 30)—>age not between 18 and 30
in(R column, Collection<?> value)
in(boolean condition, R column, Collection<?> value)
- 字段 IN (value.get (0), value.get (1), …)
- 例:
in("age",{1,2,3})—>age in (1,2,3)
in(R column, Object... values)
in(boolean condition, R column, Object... values)
- 字段 IN (v0, v1, …)
- 例:
in("age", 1, 2, 3)—>age in (1,2,3)
10. notIn
notIn(R column, Collection<?> value)
notIn(boolean condition, R column, Collection<?> value)
- 字段 NOT IN (value.get (0), value.get (1), …)
- 例:
notIn("age",{1,2,3})—>age not in (1,2,3)
notIn(R column, Object... values)
notIn(boolean condition, R column, Object... values)
- 字段 NOT IN (v0, v1, …)
- 例:
notIn("age", 1, 2, 3)—>age not in (1,2,3)
5.3 模糊查询
1. like
like(R column, Object val)
like(boolean condition, R column, Object val)
- LIKE ‘% 值 %’
- 例:
like("name", "王")—>name like '%王%'
2. notLike
notLike(R column, Object val)
notLike(boolean condition, R column, Object val)
- NOT LIKE ‘% 值 %’
- 例:
notLike("name", "王")—>name not like '%王%'
3. likeLeft
likeLeft(R column, Object val)
likeLeft(boolean condition, R column, Object val)
- LIKE ‘% 值’
- 例:
likeLeft("name", "王")—>name like '%王'
4. likeRight
likeRight(R column, Object val)
likeRight(boolean condition, R column, Object val)
- LIKE ‘值 %’
- 例:
likeRight("name", "王")—>name like '王%'
测试用例:
/*
        模糊查询
    */
    @Test
    public void testWrapperLike(){

QueryWrapper<User> queryWrapper = new QueryWrapper<>();

queryWrapper.like("name","m");

List<User> users = userMapper.selectList(queryWrapper);
        for (User user : users) {
            System.out.println(user);
        }

}
5.4 排序
1. orderBy
orderBy(boolean condition, boolean isAsc, R... columns)
- 排序:ORDER BY 字段,…
- 例:
orderBy(true, true, "id", "name")—>order by id ASC,name ASC
2. orderByAsc
orderByAsc(R... columns)
orderByAsc(boolean condition, R... columns)
- 排序:ORDER BY 字段,… ASC
- 例:
orderByAsc("id", "name")—>order by id ASC,name ASC
3. orderByDesc
orderByDesc(R... columns)
orderByDesc(boolean condition, R... columns)
- 排序:ORDER BY 字段,… DESC
- 例:
orderByDesc("id", "name")—>order by id DESC,name DESC
测试用例:
/*
       排序查询、逻辑查询、select
   */
   @Test
   public void testWrapper2(){

QueryWrapper<User> queryWrapper = new QueryWrapper<>();

queryWrapper.orderByDesc("age");

List<User> users = userMapper.selectList(queryWrapper);
       for (User user : users) {
           System.out.println(user);
       }

}
5.5 逻辑查询
or()
or(boolean condition)
- 拼接 OR
注意事项:
主动调用or表示紧接着下一个方法不是用and连接!(不调用or则默认为使用and连接) - 例:
eq("id",1).or().eq("name","老王")—>id = 1 or name = '老王'
or(Consumer<Param> consumer)
or(boolean condition, Consumer<Param> consumer)
- 例:
or(i -> i.eq("name", "李白").ne("status", "活着"))—>or (name = '李白' and status <> '活着')
2. and
and(Consumer<Param> consumer)
and(boolean condition, Consumer<Param> consumer)
- AND 嵌套
- 例:
and(i -> i.eq("name", "李白").ne("status", "活着"))—>and (name = '李白' and status <> '活着')
测试用例:
@Test
   public void testWrapper2(){

QueryWrapper<User> queryWrapper = new QueryWrapper<>();

// queryWrapper.orderByDesc("age");

queryWrapper.eq("name","jack").or().eq("age",28);


       List<User> users = userMapper.selectList(queryWrapper);
       for (User user : users) {
           System.out.println(user);
       }

}
5.7 select
select(String... sqlSelect)
select(Predicate<TableFieldInfo> predicate)
select(Class<T> entityClass, Predicate<TableFieldInfo> predicate)
- 设置查询字段
说明:
以上方法分为两类.
第二类方法为:过滤查询字段 (主键除外), 入参不包含 class 的调用前需要wrapper内的entity属性有值!这两类方法重复调用以最后一次为准 - 例:
select("id", "name", "age") - 例:
select(i -> i.getProperty().startsWith("test"))
6. ActiveRecord 模式
ActiveRecord(简称 AR)⼀直⼴受动态语⾔( PHP 、 Ruby 等)的喜爱,⽽ Java 作为准静态语⾔,对于 ActiveRecord 往往只能感叹其优雅,所以我们也在 AR 道路上进⾏了⼀定的探索,希望⼤家能够喜欢。
什么是 ActiveRecord?
ActiveRecord 也属于 ORM(对象关系映射)层,由 Rails 最早提出,遵循标准的 ORM 模型:表映射到记录,记录映射到对象,字段映射到对象属性。配合遵循的命名和配置惯例,能够很⼤程度的快速实现模型的操作,⽽且简洁易懂。
ActiveRecord 的主要思想是:
- 每⼀个数据库表对应创建⼀个类,类的每⼀个对象实例对应于数据库中表的⼀⾏记录;通常表的每个字段在类中都有相应的 Field;
- ActiveRecord 同时负责把⾃⼰持久化,在 ActiveRecord 中封装了对数据库的访问,即 CURD;
- ActiveRecord 是⼀种领域模型 (Domain Model),封装了部分业务逻辑;
6.1 操作步骤
- 实体类只需继承 Model 类即可进行强大的 CRUD 操作
- 需要项目中已注入对应实体的 BaseMapper
1. 继承 Model
class User extends Model<User>{
    // fields...
}
2. 调用 CRUD 方法
User user = new User();
user.insert();
user.selectAll();
user.updateById();
user.deleteById();
// ...
@Data // getter setter toString
@NoArgsConstructor //生成无参构造
@AllArgsConstructor // 生成全参构造
@TableName("user")
public class User extends Model<User> {

@TableId(type = IdType.AUTO)
    private Long id;

@TableField(select = true) //查询的时候,不返回该字段的值
    private String name;
    private Integer age;

@TableField(value = "email") // 解决字段名不一致问题
    private String mail;

@TableField(exist = false)  // 该字段在数据库表中不存在
    private String address;

@Version
    @TableField(fill = FieldFill.INSERT)
    private Integer version;

}
6.2 根据主键查询
/*
        在AR模式下,完成根据主键查询
     */
    @Test
    public void testARSelectById(){

User user = new User();
        user.setId(1L);

User user1 = user.selectById();
        System.out.println(user1);

}
6.3 新增数据
/*
        在AR模式下,完成添加操作
    */
    @Test
    public void testARInsert(){

User user = new User();
        user.setName("墨竹");
        user.setAge(18);
        user.setMail("[email protected]");

boolean insert = user.insert();
        System.out.println(insert);

}
测试结果:
6.4 更新操作
/*
        在AR模式下,完成更新操作
    */
    @Test
    public void testARUpate(){


        User user = new User();
        User user1 = user.selectById(1L);

user.setId(6L);
        user.setName("青梅");
        user.setVersion(user1.getVersion());

boolean insert = user.updateById();
        System.out.println(insert);

}
6.5 删除操作
/*
        在AR模式下,完成删除操作
    */
    @Test
    public void testARDelete(){

User user = new User();
        //user.setId(6L);

boolean b = user.deleteById(6L);
        System.out.println(b);
    }
6.6 根据条件查询
/*
        在AR模式下,根据条件进行查询
    */
    @Test
    public void testARFindByWrapper(){

QueryWrapper<User> queryWrapper = new QueryWrapper<>();
        queryWrapper.ge("age","20");

User user = new User();
        List<User> users = user.selectList(queryWrapper);
        for (User user1 : users) {
            System.out.println(user1);
        }

}
7.1 MyBatis 的插件机制
MyBatis 允许你在已映射语句执⾏过程中的某⼀点进⾏拦截调⽤。默认情况下,MyBatis 允许使⽤插件来拦截的⽅法调⽤包括:
Executor (update, query, flushStatements, commit, rollback, getTransaction, close, isClosed)ParameterHandler (getParameterObject, setParameters)ResultSetHandler (handleResultSets, handleOutputParameters)StatementHandler (prepare, parameterize, batch, update, query)
我们看到了可以拦截 Executor 接⼝的部分⽅法,⽐如 update,query,commit,rollback 等⽅法,还有
其他接⼝的⼀些⽅法等。
总体概括为:
- 拦截执⾏器的⽅法
- 拦截参数的处理
- 拦截结果集的处理
- 拦截 Sql 语法构建的处理
拦截器示例
@Intercepts({//注意看这个大花括号,也就这说这里可以定义多个@Signature对多个地方拦截,都用这个拦截器
        @Signature(type = StatementHandler.class, //这是指拦截哪个接口
                method = "prepare",//这个接口内的哪个方法名,不要拼错了
                args = {Connection.class, Integer.class}),// 这是拦截的方法的入参,按顺序写到这,不要多也不要少,如果方法重载,可是要通过方法名和入参来确定唯一的
})
public class MyPlugin implements Interceptor {
    private final Logger logger = LoggerFactory.getLogger(this.getClass()); //这里是每次执行操作的时候,都会进行这个拦截器的方法内

/**
     * 拦截方法:只要被拦截的目标对象的目标方法被执行时,每次都会执行 intercept 方法
     */
    @Override
    public Object intercept(Invocation invocation) throws Throwable { //增强逻辑
        System.out.println("对方法进行了增强....");
        return invocation.proceed(); //执行原方法
    }

/**
     * 主要是为了把这个拦截器生成一个代理放到拦截器链中
     */
    @Override
    public Object plugin(Object target) {
        System.out.println("将要包装的目标对象:" + target);
        return Plugin.wrap(target, this);
    }

/**
     * 获取配置文件的参数
     * 插件初始化的时候调用,也只调用一次,插件配置的属性从这里设置进来
     */
    @Override
    public void setProperties(Properties properties) {
        System.out.println("插件配置的初始化参数:" + properties);
    }
}
注⼊到 Spring 容器:
/**
* ⾃定义拦截器
*/
@Bean
public MyInterceptor myInterceptor(){
	return new MyInterceptor();
}
或者通过 xml 配置,mybatis-config.xml:
<!--拦截器-->
<plugins>
  <plugin interceptor="com.lemon.plugin.MyPlugin">
    <!--配置参数-->
    <property name="name" value="syj"/>
  </plugin>
</plugins>
7.2 性能分析插件
在 MP 中提供了对 SQL 执⾏的分析的插件,可⽤作阻断全表更新、删除的操作,注意:该插件仅适⽤于开发环境,不适⽤于⽣产环境。
SpringBoot 配置 Bean:
/*
        性能分析插件
    */
    @Bean
    public PerformanceInterceptor performanceInterceptor(){

PerformanceInterceptor performanceInterceptor = new PerformanceInterceptor();
        // 设置sql语句的最大执行时间
        performanceInterceptor.setMaxTime(100);
        // 设置sql是否格式化显示
        performanceInterceptor.setFormat(true);

return performanceInterceptor;
    }
xml ⽅式
<?xml version="1.0" encoding="UTF-8" ?>
<!DOCTYPE configuration
        PUBLIC "-//mybatis.org//DTD Config 3.0//EN"
        "http://mybatis.org/dtd/mybatis-3-config.dtd">
<configuration>
    <plugins>
        <!-- SQL 执⾏性能分析,开发环境使⽤,线上不推荐。 maxTime 指的是 sql 最⼤执⾏时
        ⻓ -->
        <plugin
                interceptor="com.baomidou.mybatisplus.extension.plugins.PerformanceInterceptor
">
            <property name="maxTime" value="100" />
            <!--SQL是否格式化 默认false-->
            <property name="format" value="true" />
        </plugin>
    </plugins>
</configuration>
执⾏结果:
可以看到,执⾏时间为 35ms。如果将 maxTime 设置为 1,那么,该操作会抛出异常。
Caused by: com.baomidou.mybatisplus.core.exceptions.MybatisPlusException: The
SQL execution time is too large, please optimize !
at
com.baomidou.mybatisplus.core.toolkit.ExceptionUtils.mpe(ExceptionUtils.java:4
9)
at com.baomidou.mybatisplus.core.toolkit.Assert.isTrue(Assert.java:38)
................
7.3 乐观锁插件
1. 主要适⽤场景
意图:
当要更新⼀条记录的时候,希望这条记录没有被别⼈更新。
乐观锁实现⽅式:
- 取出记录时,获取当前 version
- 更新时,带上这个 version
- 执⾏更新时,
set version = newVersion where version = oldVersion - 如果 version 不对,就更新失败
2. 插件配置
spring xml:
<bean
class="com.baomidou.mybatisplus.extension.plugins.OptimisticLockerInterceptor"
/>
spring boot:
@Bean
public OptimisticLockerInterceptor optimisticLockerInterceptor() {
	return new OptimisticLockerInterceptor();
}
3. 注解实体字段
需要为实体字段添加 @Version 注解。
第⼀步,为表添加 version 字段,并且设置初始值为 1;
ALTER TABLE `tb_user`
ADD COLUMN `version` int(10) NULL AFTER `email`;
UPDATE `tb_user` SET `version`='1';
第⼆步,为 User 实体对象添加 version 字段,并且添加 @Version 注解:
@Version
private Integer version;
测试用例:
@Test
    public void testUpdateById() {
        User user = new User();
        user.setId(6L);
        user.setAge(24);
		user.setVersion(1); //获取到version为1

int i = userMapper.updateById(user);
        System.out.println(i);
    }
测试结果:
可以看到,更新的条件中有 version 条件,并且更新的 version 为 2。
如果再次执⾏,更新则不成功。这样就避免了多⼈同时更新时导致数据的不⼀致。
5. 特别说明
- ⽀持的数据类型只有:
int,Integer,long,Long,Date,Timestamp,LocalDateTime - 整数类型下
newVersion = oldVersion + 1 - newVersion 会回写到 entity 中
- 仅⽀持
updateById(id)与update(entity, wrapper)⽅法 - 在 update (entity, wrapper) ⽅法下,
wrapper 不能复⽤!!!
8. SQL 注入器
我们已经知道,在 MP 中,通过 AbstractSqlInjector 将 BaseMapper 中的⽅法注⼊到了 Mybatis 容器,这样这些⽅法才可以正常执⾏。
那么,如果我们需要扩充 BaseMapper 中的⽅法,⼜该如何实现呢?
下⾯我们以扩展 findAll ⽅法为例进⾏学习。
8.1 编写 MyBaseMapper
/*
    通用mapper接口,以后创建其他mapper接口时,不再继承BaseMapper,而是继承MyBaseMapper
 */
public interface MyBaseMapper<T> extends BaseMapper<T> {

public List<T> findAll();

}
其他的 Mapper 都可以继承该 Mapper,这样实现了统⼀的扩展。
public interface UserMapper extends MyBaseMapper<User> {
	User findById(Long id);
}
8.2 编写 MySqlInjector
如果直接继承 AbstractSqlInjector 的话,原有的 BaseMapper 中的⽅法将失效,所以我们选择继承 DefaultSqlInjector 进⾏扩展。
/*
    自定义sql注入器
 */
public class MySqlInjector extends DefaultSqlInjector {
    @Override
    public List<AbstractMethod> getMethodList() {

List<AbstractMethod> methodList = super.getMethodList();
        // 扩充自定义方法
        methodList.add(new FindAll());
        return methodList;
    }
}
8.3 编写 FindAll
public class FindAll extends AbstractMethod {

@Override
    public MappedStatement injectMappedStatement(Class<?> mapperClass, Class<?> modelClass, TableInfo tableInfo) {

String sql = "select * from " + tableInfo.getTableName();

SqlSource sqlSource = languageDriver.createSqlSource(configuration, sql, modelClass);
        return this.addSelectMappedStatement(mapperClass, "findAll", sqlSource, modelClass, tableInfo);
    }
}
8.4 注册到 Spring 容器
/*
        自定义的sql注入器
    */
    @Bean
    public MySqlInjector mySqlInjector(){
        return new MySqlInjector();
    }
8.5 测试
测试用例:
@Test
    public void testFindAll(){

List<User> all = userMapper.findAll();
        for (User user : all) {
            System.out.println(user);
        }
    }
测试结果:
⾄此,我们实现了全局扩展 SQL 注⼊器。
9. ⾃动填充功能
有些时候我们可能会有这样的需求,插⼊或者更新数据时,希望有些字段可以⾃动填充数据,⽐如密码、version 等。在 MP 中提供了这样的功能,可以实现⾃动填充。
9.1 添加 @TableField 注解
@TableField(fill = FieldFill.INSERT) //插⼊数据时进⾏填充
private String version;
为 email 添加⾃动填充功能,在新增数据时有效。
FieldFill 提供了多种模式选择:
9.2 编写 MyMetaObjectHandler
@Component
public class MyMetaObjectHandler implements MetaObjectHandler {
    @Override
    public void insertFill(MetaObject metaObject) {
        Object version = getFieldValByName("version", metaObject);
        if (version == null) {
            // 该属性为空,可以进行填充
            setFieldValByName("version", 1, metaObject);
        }
    }

@Override
    public void updateFill(MetaObject metaObject) {

}
}
9.3 测试
@Test
    public void testInsert() {
        User user = new User();
        user.setAge(18);
        user.setName("kobe");
        user.setMail("[email protected]");

// 返回影响的行数
        int result = userMapper.insert(user);
        System.out.println(result);
        // 由MyBatis-plus生成id并回填
        System.out.println("id值为" + user.getId());
    }
测试结果:
注意事项:
- 填充原理是直接给
entity的属性设置值!!!- 注解则是指定该属性在对应情况下必有值,如果无值则入库会是
nullMetaObjectHandler提供的默认方法的策略均为:如果属性有值则不覆盖,如果填充值为null则不填充- 字段必须声明
TableField注解,属性fill选择对应策略,该声明告知Mybatis-Plus需要预留注入SQL字段- 填充处理器
MyMetaObjectHandler在 Spring Boot 中需要声明@Component或@Bean注入- 要想根据注解
FieldFill.xxx和字段名以及字段类型来区分必须使用父类的strictInsertFill或者strictUpdateFill方法- 不需要根据任何来区分可以使用父类的
fillStrategy方法- update (T t,Wrapper updateWrapper) 时 t 不能为空,否则自动填充失效
10. 逻辑删除
开发系统时,有时候在实现功能时,删除操作需要实现逻辑删除,所谓逻辑删除就是将数据标记为删除,⽽并⾮真正的物理删除(⾮ DELETE 操作),查询时需要携带状态条件,确保被标记的数据不被查询到。这样做的⽬的就是避免数据被真正的删除。
MP 就提供了这样的功能,⽅便我们使⽤,接下来我们⼀起学习下。
只对自动注入的 sql 起效:
- 插入:不作限制
- 查找:追加 where 条件过滤掉已删除数据,且使用 wrapper.entity 生成的 where 条件会忽略该字段
- 更新:追加 where 条件防止更新到已删除数据,且使用 wrapper.entity 生成的 where 条件会忽略该字段
- 删除:转变为 更新
- 删除:
update user set deleted=1 where id = 1 and deleted=0 - 查找:
select id,name,deleted from user where deleted=0
字段类型支持说明:
- 支持所有数据类型 (推荐使用
Integer,Boolean,LocalDateTime) - 如果数据库字段使用
datetime, 逻辑未删除值和已删除值支持配置为字符串null, 另一个值支持配置为函数来获取值如now()
- 逻辑删除是为了方便数据恢复和保护数据本身价值等等的一种方案,但实际就是删除。
- 如果你需要频繁查出来看就不应使用逻辑删除,而是以一个状态去表示。
10.1 修改表结构
为 tb_user 表增加 deleted 字段,⽤于表示数据是否被删除,1 代表删除,0 代表未删除。
ALTER TABLE `tb_user`
ADD COLUMN `deleted` int(1) NULL DEFAULT 0 COMMENT '1代表删除,0代表未删除'
AFTER `version`;
同时,也修改 User 实体,增加 deleted 属性并且添加 @TableLogic 注解:
@TableLogic
private Integer deleted;
10.2 配置
application.properties:
# 逻辑已删除值(默认为 1)
mybatis-plus.global-config.db-config.logic-delete-value=1
# 逻辑未删除值(默认为 0)
mybatis-plus.global-config.db-config.logic-not-delete-value=0
10.3 测试
@Test
   public void testDeleteById() {

int i = userMapper.deleteById(6L);
       System.out.println(i);

}
测试结果:
测试查询:
@Test
   public void testSelectById() {
       User user = userMapper.selectById(6);
       System.out.println(user);
   }
执⾏的 SQL:
可⻅,已经实现了逻辑删除。
11. 代码生成器
AutoGenerator 是 MyBatis-Plus 的代码⽣成器,通过 AutoGenerator 可以快速⽣成 Entity、Mapper、Mapper XML、Service、Controller 等各个模块的代码,极⼤的提升了开发效率。
11.1 创建⼯程
pom.xml
<?xml version="1.0" encoding="UTF-8"?>
<project xmlns="http://maven.apache.org/POM/4.0.0" xmlns:xsi="http://www.w3.org/2001/XMLSchema-instance"
         xsi:schemaLocation="http://maven.apache.org/POM/4.0.0 https://maven.apache.org/xsd/maven-4.0.0.xsd">
    <modelVersion>4.0.0</modelVersion>
    <parent>
        <groupId>org.springframework.boot</groupId>
        <artifactId>spring-boot-starter-parent</artifactId>
        <version>2.6.3</version>
        <relativePath/> <!-- lookup parent from repository -->
    </parent>
    <groupId>com.lemon</groupId>
    <artifactId>mybatis-plus-generator</artifactId>
    <version>0.0.1-SNAPSHOT</version>
    <name>mybatis-plus-generator</name>
    <description>mybatis-plus-generator</description>
    <properties>
        <java.version>1.8</java.version>
    </properties>
    <dependencies>
        <dependency>
            <groupId>org.springframework.boot</groupId>
            <artifactId>spring-boot-starter-test</artifactId>
            <scope>test</scope>
        </dependency>

<!--mybatis-plus的springboot支持-->
        <dependency>
            <groupId>com.baomidou</groupId>
            <artifactId>mybatis-plus-boot-starter</artifactId>
            <version>3.1.1</version>
        </dependency>
        <dependency>
            <groupId>com.baomidou</groupId>
            <artifactId>mybatis-plus-generator</artifactId>
            <version>3.1.1</version>
        </dependency>
        <dependency>
            <groupId>org.springframework.boot</groupId>
            <artifactId>spring-boot-starter-freemarker</artifactId>
        </dependency>
        <!--mysql驱动-->
        <dependency>
            <groupId>mysql</groupId>
            <artifactId>mysql-connector-java</artifactId>
            <version>5.1.47</version>
        </dependency>
        <dependency>
            <groupId>org.slf4j</groupId>
            <artifactId>slf4j-log4j12</artifactId>
        </dependency>
        <dependency>
            <groupId>org.projectlombok</groupId>
            <artifactId>lombok</artifactId>
        </dependency>
    </dependencies>

<build>
        <plugins>
            <plugin>
                <groupId>org.springframework.boot</groupId>
                <artifactId>spring-boot-maven-plugin</artifactId>
            </plugin>
        </plugins>
    </build>

</project>
11.2 生成代码
/**
 * <p>
 * mysql 代码生成器演示例子
 * </p>
 */
public class MysqlGenerator {

/**
     * <p>
     * 读取控制台内容
     * </p>
     */
    public static String scanner(String tip) {
        Scanner scanner = new Scanner(System.in);
        StringBuilder help = new StringBuilder();
        help.append("请输入" + tip + ":");
        System.out.println(help.toString());
        if (scanner.hasNext()) {
            String ipt = scanner.next();
            if (StringUtils.isNotEmpty(ipt)) {
                return ipt;
            }
        }
        throw new MybatisPlusException("请输入正确的" + tip + "!");
    }

/**
     * RUN THIS
     */
    public static void main(String[] args) {
        // 代码生成器
        AutoGenerator mpg = new AutoGenerator();

// 全局配置
        GlobalConfig gc = new GlobalConfig();
        final String projectPath = System.getProperty("user.dir");
        gc.setOutputDir(projectPath + "/src/main/java");
        gc.setAuthor("zimu");
        gc.setOpen(false);
        mpg.setGlobalConfig(gc);

// 数据源配置
        DataSourceConfig dsc = new DataSourceConfig();
        dsc.setUrl("jdbc:mysql://127.0.0.1:3306/mp?useUnicode=true&useSSL=false&characterEncoding=utf8");
        // dsc.setSchemaName("public");
        dsc.setDriverName("com.mysql.jdbc.Driver");
        dsc.setUsername("root");
        dsc.setPassword("123456");
        mpg.setDataSource(dsc);

// 包配置
        final PackageConfig pc = new PackageConfig();
        pc.setModuleName(scanner("模块名"));
        pc.setParent("com.lemon.mp.generator");
        mpg.setPackageInfo(pc);

// 自定义配置
        InjectionConfig cfg = new InjectionConfig() {
            @Override
            public void initMap() {
                // to do nothing
            }
        };
        List<FileOutConfig> focList = new ArrayList<FileOutConfig>();
        focList.add(new FileOutConfig("/templates/mapper.xml.ftl") {
            @Override
            public String outputFile(TableInfo tableInfo) {
                // 自定义输入文件名称
                return projectPath + "/lemon-mp-generator/src/main/resources/mapper/" + pc.getModuleName()
                        + "/" + tableInfo.getEntityName() + "Mapper" + StringPool.DOT_XML;
            }
        });
        cfg.setFileOutConfigList(focList);
        mpg.setCfg(cfg);
        mpg.setTemplate(new TemplateConfig().setXml(null));

// 策略配置
        StrategyConfig strategy = new StrategyConfig();
        strategy.setNaming(NamingStrategy.underline_to_camel);
        strategy.setColumnNaming(NamingStrategy.underline_to_camel);
//        strategy.setSuperEntityClass("com.baomidou.mybatisplus.samples.generator.common.BaseEntity");
        strategy.setEntityLombokModel(true);
//        strategy.setSuperControllerClass("com.baomidou.mybatisplus.samples.generator.common.BaseController");
        strategy.setInclude(scanner("表名"));
        strategy.setSuperEntityColumns("id");
        strategy.setControllerMappingHyphenStyle(true);
        strategy.setTablePrefix(pc.getModuleName() + "_");
        mpg.setStrategy(strategy);
        // 选择 freemarker 引擎需要指定如下加,注意 pom 依赖必须有!
        mpg.setTemplateEngine(new FreemarkerTemplateEngine());
        mpg.execute();
    }

}
11.3 测试
代码已经生成:
12. MybatisX 快速开发插件
MybatisX 是⼀款基于 IDEA 的快速开发插件,为效率⽽⽣。
安装⽅法:打开 IDEA,进⼊ File -> Settings -> Plugins -> Browse Repositories,输⼊ mybatisx 搜索并安装。
- Java 与 XML 调回跳转
- Mapper ⽅法⾃动⽣成 XML
Recommend
About Joyk
Aggregate valuable and interesting links.
Joyk means Joy of geeK