

如何在 Linux 中导出和导入 KVM 虚拟机-51CTO.COM
source link: https://os.51cto.com/article/708013.html
Go to the source link to view the article. You can view the picture content, updated content and better typesetting reading experience. If the link is broken, please click the button below to view the snapshot at that time.

如何在 Linux 中导出和导入 KVM 虚拟机-51CTO.COM
译者 | 赵青窕
本文将介绍导出 KVM 虚拟机磁盘和配置的步骤,然后将它们导入同一台机器或不同的机器中。我还将向您展示如何使用 Bash 脚本导出和导入 KVM 虚拟机。
最近,我将我的虚拟机管理程序从 Oracle VirtualBox 切换到了 KVM,因为它具有原生特性和性能。我实测发现,与 Virtualbox VM 相比,KVM 虚拟机运行得更快。
定期备份您的虚拟机是非常有必要的。假如我们的KVM出现任何异常情况,我们就可以使用备份的KVM来恢复虚拟机。导出和导入 KVM 虚拟机是不同的两个过程。
首先,您必须检查磁盘映像的存储位置并将磁盘映像复制到备份位置。
其次,导出机器配置,以便以后用于创建域。
2.虚拟机的配置
有两种获取虚拟机配置信息的方法。你可以使用“Virsh”或者“Virt-manager”。
你可以使用Virt-manager或执行命令virsh获取虚拟机的名称。
$ virsh list --all
Id   Name                State
------------------------------------
Linux_Mint_20       shut off
mxlinux             shut off
popos_21_10         shut off
rocky_linux_8       shut off
ubuntu20.04         shut off
ubuntu20.04-clone   shut off
当需要查看某个虚拟机的整个信息(即虚拟机配置)时,可以执行以下命令。该命令会以XML的格式来显示结果。
$ virsh dumpxml vm_name | less
$ virsh dumpxml ubuntu20.04-clone | less
您还可以通过管道连接到grep命令来获取特定的机器配置。假设您想查看内存分配情况,那么可以运行以下命令。
$ virsh dumpxml ubuntu20.04-clone | grep -i "MEMORY"
<memory unit='KiB'>5632000</memory>
<currentMemory unit='KiB'>5632000</currentMemory>
如果您更喜欢使用Virt-manager工具,那么您可以通过“虚拟硬件详细信息窗口(show virtual hardware)”选项中的XML子选项来获取以XML格式显示的虚拟机配置信息。
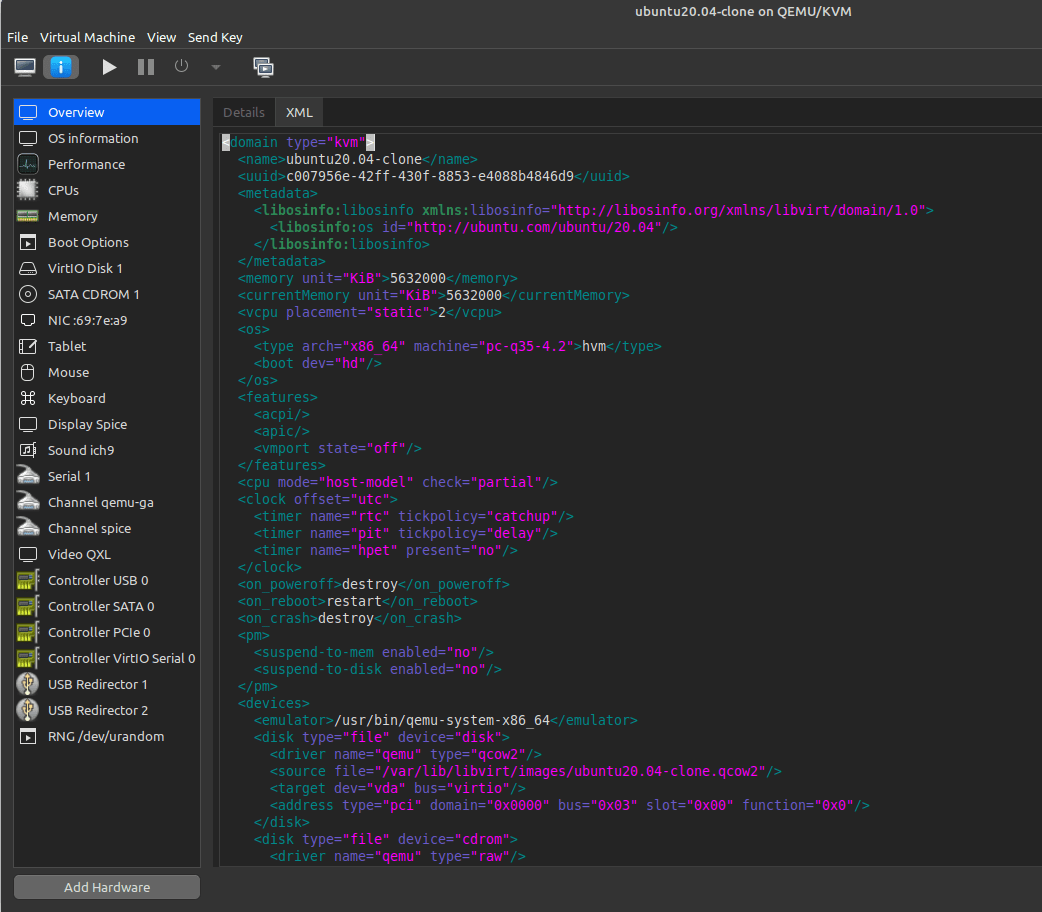
3.虚拟机磁盘位置
虚拟机的磁盘以 qcow2 格式创建。默认情况下,虚拟机磁盘存储在 /var/lib/libvirt/images/ 目录中,除非您明确指定了磁盘路径。
运行以下命令获取磁盘目录路径。
$ virsh dumpxml ubuntu20.04-clone | grep -i "source"
<source file='/var/lib/libvirt/images/ubuntu20.04-clone.qcow2'/>
如果您使用的是Virt-manager工具,可以通过上图中的disk选项来查看虚拟机磁盘信息。

您使用了不同的路径来存储磁盘映像,并且希望知道所有VM磁盘路径,那么您可以在终端或shell脚本内运行以下代码片段:
$ virsh dumpxml ubuntu20.04-clone | grep -i "source"
<source file='/var/lib/libvirt/images/ubuntu20.04-clone.qcow2'/>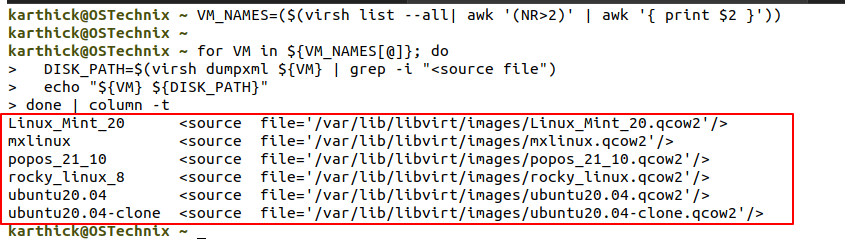
4.导出配置信息并备份磁盘镜像
现在您已经知道了如何获取磁盘路径和虚拟机的配置信息,接下来就可以导出VM的配置信息并将磁盘镜像复制到不同的位置。
要导出虚拟机信息,可以运行以下“virsh dumpxml”并将输出存储在XML文件中。
$ virsh dumpxml vm-name > /path/to/xm_file.xml
$ virsh dumpxml ubuntu20.04-clone > ~/Documents/ubuntu.xml
接下来,我们使用下面的命令将磁盘映像复制到其他位置,以便以后使用。
$ sudo cp /var/lib/libvirt/images/ubuntu20.04-clone.qcow2 ~/Documents/这样,导出KVM已经完成了。
注意:您应该使用 sudo 或使用 root 用户复制磁盘,因为磁盘归 root 用户所有。

5.导入虚拟机
要导入KVM虚拟机,您必须运行以下命令,利用导出的 XML 文件重新定义一个虚拟机。
$ virsh define --file <path-to-xml-file>
$ virsh define –file ~/Documents/ubuntu.xml
现在,您可以检查 Virt-manager 或执行virsh命令,成功创建域。同时您必须将磁盘映像复制到 XML 文件中定义的目录路径。在我的环境中,它是默认位置 /var/lib/libvirt/images/,因此我使用下面的命令进行复制。
sudo cp ~/Documents/ubuntu20.04-clone.qcow2 /var/lib/libvirt/images/导入KVM到此就完成了。
6.导出和导入KVM虚拟机的Bash脚本
我已经创建了一个bash脚本,用于导出所有配置和磁盘映像。如果你感兴趣,你可以在我的GitHub库中查看这个脚本。同时希望您能提供改进脚本的建议。
#!/usr/bin/env bash

# ----------------------------------------------------------------------------------------------------

# AUTHOR   : KARTHICK S

# PURPOSE  : THIS SCRIPT WILL EXPORT/IMPORT THE CONFIG AND VM DISK.

#

# usage:

# export function will take care of exporting the necessary for all VM. Run as "<scriptname.sh> export"

# import function will take care of importing the necessary for all VM. Run as "<scriptname.sh> import"

#

# NOTE: Do not add trailing / for the directory when giving export and import path.

#------------------------------------------------------------------------------------------------------
# Trigger the script with root user or exit.

if [[ ${UID} -ne 0 ]]; then

echo -e "[EXIT] - Run the script as root user or with sudo privilege..."

exit
fi
function export_vm(){
# Get the export location.
read -p "Provide the directory path where disk and config files to be exported: " EXPORT_LOCATION
# Create the destination directory if not exists.

[[ -d ${EXPORT_LOCATION} ]] || mkdir -p ${EXPORT_LOCATION}

# Exporting the config using virsh dumpxml command.

VM_NAMES=($(virsh list --all| awk '(NR>2)' | awk '{ print $2 }'))

for VM in ${VM_NAMES[@]}; do

virsh dumpxml ${VM} > ${EXPORT_LOCATION}/${VM}.xml

done

# Using rsync copy the entire directory from default location.

echo -e "\n[ Copying disk images ]\n" && sudo rsync -avxp --progress /var/lib/libvirt/images ${EXPORT_LOCATION}

echo -e "\n[ Exported Files ] \n" && ls -lR ${EXPORT_LOCATION}

}

function import_vm(){
# Get the source location.

read -p "Provide the directory path where disk and config files are stored: " SOURCE_LOCATION
# Throws error if directory is not available and exit.

[[ -d ${SOURCE_LOCATION} ]] || { echo "Directory not available"; exit 1 ; }
# Copy all the files to default disk location.

echo -e "[ Copying disk images ]\n" && sudo rsync -avxp --progress ${SOURCE_LOCATION}/images /var/lib/libvirt/

if [[ $? -eq 0 ]]; then

# Define VM

echo -e "\n[ Defining VM ]\n"

for XML_FILE in ${SOURCE_LOCATION}/*.xml; do

virsh define --file ${XML_FILE}

done

echo -e "\n[ Imported VM List ]\n" && virsh list --all

fi
}
case $1 in

export ) export_vm ;;

import ) import_vm ;;

*) echo -e "USAGE :

kvm_export_import.sh export - Export config and disk

kvm_export_import.sh import - Define VM and copy the disk"; exit

esac
该脚本的用法如下。
您可以运行以下命令从 GitHub中克隆 gist。
$ git clone https://gist.github.com/d6c671597592fe5634a39b7974bc8029.git该脚本执行备份(即导出)和恢复(即导出)。
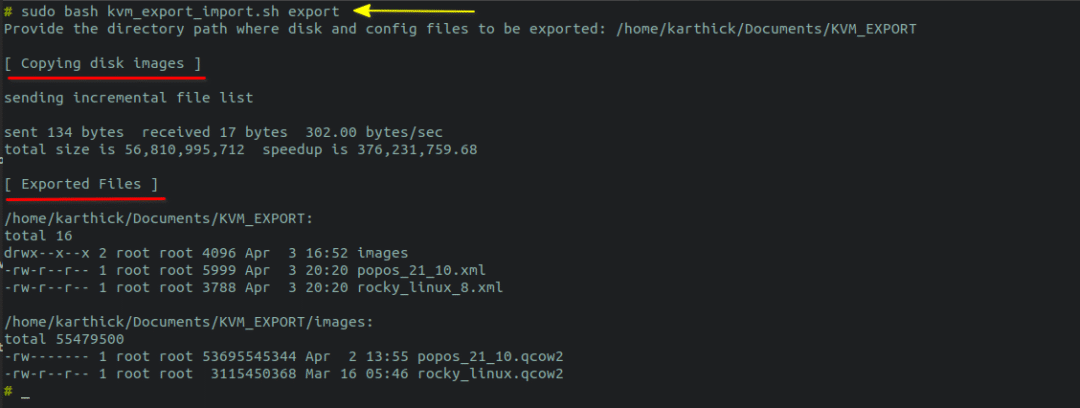
让我们使用如下脚本导出 KVM 虚拟机。
$ sudo bash kvm_export_import.sh export您必须提供要导出XML文件和磁盘映像的目录路径。给出导出目录时,不要在路径后面添加斜杠(’ / ‘)。它将首先复制磁盘映像(.qcow2)并运行“virsh dumpxml”命令以导出所有的虚拟机配置。
下图显示了导出的工作原理。
当您将“import”作为参数传递时,它将首先将磁盘映像复制到默认位置 /var/lib/libvirt/ 并针对所有已导出的XML文件运行“virsh define”命令。
$ sudo bash kvm_export_import.sh import
在本文中,我向您展示了如何导出 KVM 虚拟机并将它们导入相同或不同的机器。从头开始构建虚拟机是一项耗时的任务。因此,使用适当的策略来保护我们的虚拟机环境不会因任何情况而损害。
赵青窕,51CTO社区编辑,从事多年驱动开发。研究兴趣包含安全OS和网络安全领域,发表过网络相关专利。

Recommend
-
12
KVM源代码分析2:虚拟机的创建与运行 2015-07-29 14:42:00 http://www.oenhan.com/kvm-src-2-vm-run 基本原理里面提到kvm虚拟化由用户态程序Qemu和内核...
-
13
ubuntu安装kvm虚拟机 2015-07-07 14:35:00 sudo apt-get install qemu-kvm libvirt-bin virt-manager用 virt-manager 参考
-
9
centos安装kvm虚拟机 2015-07-07 14:33:00 最好在centos6装 TODO 虚拟机网桥连接没试 ...
-
6
kvm虚拟机开机之后报错Failed to mount |坐而言不如起而行! 二丫讲梵对于注定会优秀的人来说,他所需要的,只是时间!手懒得,必受贫穷,手勤的,必得富足----《圣经》帮助别人,成就自己。愿君在本站能真正有所收获!如果你在...
-
8
Linux KVM 下安装 Windows 虚拟机 可能对于很多人来说很简单,但是我自己看起来还是有点东西,只能写一下. 首先需要Virtio的驱动包以及系统安装镜像,然后开始安装. virt-install --virt-type=kvm \ -...
-
7
在 Archlinux 中安装sudo pacman -Sy qemu libvirt ebtables dnsmasq bridge-utils virt-managerkvm 负责 CPU 和内存的虚拟化qemu 向 Guest OS 模拟硬件(例如,CPU,网卡,磁盘,等)ovmf 为虚拟机启用UEFI支持
-
10
在日常的数据库维护工作中,经常需要对数据库进行导入导出操作,备份、分析、迁移数据都需要用到导...
-
3
kvm总结(3)导入虚拟机以及virtio配置 开启精彩搜索 ...
-
8
前端必读2.0:如何在React 中使用SpreadJS导入和导出 Excel 文件 ...
-
9
KVM 是 内核虚拟机Kernel Virtualization Machine与大多数虚拟化平台一样,它将硬件资源(如 CPU、内...
About Joyk
Aggregate valuable and interesting links.
Joyk means Joy of geeK