

Secure Workloads in Google Kubernetes Engine: Challenge Lab
source link: https://chriskyfung.github.io/blog/qwiklabs/secure-workloads-in-google-kubernetes-engine-challenge-lab
Go to the source link to view the article. You can view the picture content, updated content and better typesetting reading experience. If the link is broken, please click the button below to view the snapshot at that time.
☁ Secure Workloads in Google Kubernetes Engine: Challenge Lab | logbook
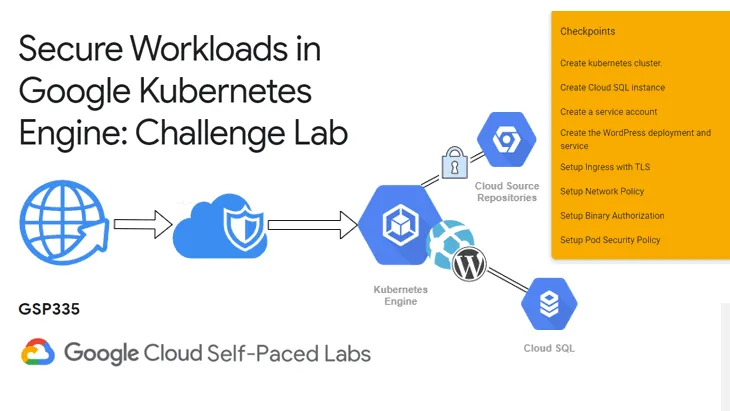
In this article, we will go through the lab GSP335 Secure Workloads in Google Kubernetes Engine: Challenge Lab, which is an advanced-level exercise on Qwiklabs. You will practice the skills in security at scale on Google Kubernetes Engine (GKE) including how to set up HTTPS and TLS certificate with cert-manager.io, restrict access in GKE with Network Policies, use Binary Authorization for security controls of your images, and deploy PodSecurityPolicy to control access to privileged containers based on role and groups.
Topics tested:
- Enable TLS access using nginx-ingress and cert-manager.io
- Secure traffic with a network policy
- Enable Binary Authorization to ensure only approved images are deployed
- Ensure that pods do not allow escalations to root
Your challenge
You need to secure a WordPress running on GKE that uses Cloud SQL as its database.
Task 0: Download the necessary files
Run the following to download all the files for this lab:
gsutil -m cp gs://cloud-training/gsp335/* .
Task 1: Setup Cluster
You need to create a Kubernetes cluster with the following values:
- zone: Us-central1-c
- machine-type: n1-standard-4
- number of nodes: 2
- enable network policy
Run the following gcloud command will create a cluster called kraken-cluster with the required specifications:
gcloud container clusters create kraken-cluster \
   --zone us-central1-c \
   --machine-type n1-standard-4 \
   --num-nodes 2 \
   --enable-network-policy
Tips: To learn more, open this Cloud SDK Documentation to study the flags for the command line.
Using Cloud Console
Alternatively, you can create the cluster using the Cloud Console.
- Click on the Navigation Menu > Kubernetes Engine > Clusters
- Click CREATE CLUSTER
-
Set up the cluster as required. Once the cluster is created, run the following in the Cloud Shell to establish a connection:
gcloud container clusters get-credentials kraken-cluster --zone us-central1-c
Task 2: Setup WordPress
This task involves the following three subtasks:
- a) Setup the Cloud SQL database and database username and password
- b) Create a service account for access to your WordPress database from your WordPress instances
- c) Create the WordPress deployment and service
You can perform the first two subtasks simultaneously, while you are creating the cluster in Task 1. It usually takes more time on GCP to create a Cloud SQL instance, compared to a Kubernetes cluster. Both the Cloud SQL and the cluster will be ready when you are going to conduct the rest of the tasks.
Setup the Cloud SQL database and database username and password
Create a Cloud SQL instance
You can create the Cloud SQL instance using either Cloud Console or Cloud Shell. In production, I will suggest you go for the Cloud Console because you can better look at all the configurations. But in this lab, you can simply run the following command to create a default MySQL instance in the region us-central1:
gcloud sql instances create kraken-cloud-sql --region us-central1
Related documentation:
It usually requires 5 - 10 minutes to process.
Create a database for WordPress
- In the Cloud Console, click on Navigation Menu > SQL.
- Once the Cloud SQL instance is ready, select the Databases tab on the left panel.
- Click CREATE DATABASE.
- Enter
wordpressas the database name. - Click Create.
Create a user for accessing the Cloud SQL
- In the Cloud SQL page, select the Users tab on the left panel.
- Click *ADD USER ACCOUNT.
- Enter
wordpressas the User name. - Enter a password that you can remember.
- Select Allow any host (%) for the name of the Host.
- Click Add.
Command-line method
You may also try using the following command line to create the database and the user:
gcloud sql databases create wordpress --instance kraken-cloud-sql --charset utf8 --collation utf8_general_ci

gcloud sql users create wordpress --host % --instance kraken-cloud-sql --password Passw0rd
Tips: Read this Cloud SQL Documentation to learn more.
Remark: However, I got some feedback that it will occasionally fail to pass the checkpoint if using the command line.
Create a service account for access to your WordPress database from your WordPress instances
Now you need a service account with binding the role roles/cloudsql.client and save its credentials as a JSON file. In the Cloud Shell, run the following commands:
gcloud iam service-accounts create kraken-wordpress-sa

gcloud projects add-iam-policy-binding $DEVSHELL_PROJECT_ID \
   --member="serviceAccount:kraken-wordpress-sa@$DEVSHELL_PROJECT_ID.iam.gserviceaccount.com" \
   --role="roles/cloudsql.client"

gcloud iam service-accounts keys create key.json --iam-account=kraken-wordpress-sa@$DEVSHELL_PROJECT_ID.iam.gserviceaccount.com
Tips: Read this documentation to learn more about how to authenticate an application as a service account.
After that, save the service account file as a secret in your Kubernetes cluster using the command provided in the official lab instruction.
kubectl create secret generic cloudsql-instance-credentials --from-file key.json
Also, the WordPress database username and password as well.
kubectl create secret generic cloudsql-db-credentials \
   --from-literal username=wordpress \
   --from-literal password='Passw0rd'
Create the WordPress deployment and service
Run the following to create a persistent volume for your WordPress application:
kubectl create -f volume.yaml
Go to the overview page of your Cloud SQL instance, and copy the Connection name as shown below.
Open wordpress.yaml with your favorite editor, and replace INSTANCE_CONNECTION_NAME (in line 61) with the Connection name of your Cloud SQL instance.
Save the file changes, and run the following to apply the file to create the WordPress environment in the cluster.
kubectl apply -f wordpress.yaml
To verify the deployment, navigate to the Kubernetes Engine page in the Cloud Console. Now you should see wordpress in the Workloads tab as well as the Services tab.
Task 3: Setup Ingress with TLS
Tips: Review the lab GSP181 NGINX Ingress Controller on Google Kubernetes Engine on Qwiklabs before you start doing Task 3. For more information, you may read the community tutorial Ingress with NGINX controller on Google Kubernetes Engine on the Google Cloud’s website.
In this challenge lab, please note that you have to install the same nginx-ingress version, which is used in lab GSP181. Otherwise, you will not able to create nginx-ingress-controller for continuing the lab.
Set up nginx-ingress environment
The nginx-ingress will be installed using Helm. A recent, stable version of Helm should be pre-installed on your Cloud Shell. Run helm version to check which version you are using and also ensure that Helm is installed:
helm version
Run the following to add the chart repository and ensure the chart list is up to date:
helm repo add stable https://charts.helm.sh/stable
helm repo update
Install Helm
If your environment does not install with Helm, you can run the following to automatically grab the latest version of Helm and install it locally.
curl -fsSL -o get_helm.sh https://raw.githubusercontent.com/helm/helm/master/scripts/get-helm-3
chmod 700 get_helm.sh
./get_helm.sh
Go ahead and use the following helm command to install stable nginx-ingress:
helm install nginx-ingress stable/nginx-ingress --set rbac.create=true
Wait until the load balancer gets deployed and exposes an external IP. You get to monitor the nginx-ingress-controller service by running the following command:
kubectl get service nginx-ingress-controller -w
Set up your DNS record
Once the service obtained an external IP address, press Ctrl + C to stop the previous command. You can now continue to set up your DNS record.
A shell script called add_ip.sh is provided, and you have downloaded it to the Cloud Shell at the beginning of the lab. Execute it by running this command:
. add_ip.sh
Set up cert-manager.io
You can find the official installation guide for Kubernetes from the cert-manager website.
Run the following commands to deploy the cert-manager:
kubectl apply -f https://github.com/jetstack/cert-manager/releases/download/v1.2.0/cert-manager.yaml

kubectl create clusterrolebinding cluster-admin-binding \
   --clusterrole=cluster-admin \
   --user=$(gcloud config get-value core/account)
Navigate to the Kubernetes Engine page in the Cloud Console, now you should have the workloads look like this:
Edit issuer.yaml and set the email address. The file should become like this:
Save the file changes and run the following to apply them to setup the letsencrypt prod issuer:
kubectl apply -f issuer.yaml
Configure nginx-ingress to use an encrypted certificate for your site
Edit ingress.yaml and set your YOUR_LAB_USERNAME.labdns.xyz DNS record to lines 11 and 14 like this:
Save the file changes and run the following:
kubectl apply -f ingress.yaml
Tips: To learn more, read the Securing NGINX-ingress tutorial on the cert-manager website.
Open your domain name https://YOUR_LAB_USERNAME.labdns.xyz with HTTPS in a new tab. Now the WordPress application should be accessible like this:
Task 4: Set up Network Policy
Open the network-policy.yaml in an editor. You should see there are already two network policies. The first one is to deny all ingress from the internet and the second one is to allow the traffic from ngnix-ingress to wordpress.
You need to add one more network policy to allow ingress traffic from the internet into nginx-ingress. Use the second network policy as a template to compose a new policy. Change values of name and spec to the configuration like this:
---
apiVersion: networking.k8s.io/v1
kind: NetworkPolicy
metadata:
   name: allow-world-to-nginx-ingress
   namespace: default
spec:
   podSelector:
      matchLabels:
         app: nginx-ingress
   policyTypes:
   - Ingress
   ingress:
   - {}
Append the new policy to the network-policy.yaml, and save the file.
Run the following to apply the configuration file:
kubectl apply -f network-policy.yaml
Related documentation:
Task 5: Setup Binary Authorization
Tips: Review the lab GSP479 Google Kubernetes Engine Security: Binary Authorization on Qwiklabs before start doing Task 5.
Configure Binary Authorization Policy
- In the Cloud Console, navigate to Security > Binary Authorization.
- Enable the Binary Authorization API.
- On the Binary Authorization page, click on CONFIGURE POLICY.
- Select Disallow all images for the Default rule.
- Scroll down to Images exempt from this policy, click ADD IMAGE PATH.
- Paste
docker.io/library/wordpress:latestto the textbox, and click DONE. - Repeat the above two steps to add the following image paths:
- us.gcr.io/k8s-artifacts-prod/ingress-nginx/*
- gcr.io/cloudsql-docker/*
- quay.io/jetstack/*
- Click SAVE POLICY.
Enable Binary Authorization in Google Kubernetes Engine
- Navigate to Kubernetes Engine > Clusters.
- Click your cluster name to view its detail page.
- Click on the pencil icon for Binary authorization under the Security section.
- Check Enable Binary Authorization in the dialog.
- Click SAVE CHANGES.
Your cluster will start updating its binary authorization settings. Wait until the update finish.
Task 6: Setup Pod Security Policy
Tips: Review the lab GSP496 Hardening Default GKE Cluster Configurations on Qwiklabs to get some ideas about how to deploy the PodSecurityPolicy objects. To learn more, you can find more details from the following documentation:
The challenge lab provides the following Pod Security Policy demo files for you to use:
psp-restrictive.yamlpsp-role.yamlpop-use.yaml
Running the following command to deploy each file:
kubectl apply -f <filename>.yaml
Unfortunately, you will fail to delopy psp-restrictive.yaml and receive the following error message:
Open psp-restrictive.yaml with an editor, and replace appVersion: extensions/v1beta1 with policy/v1beta1.
Save the changes, and run the kubectl apply command again.
Congratulations! You completed this challenge lab.
Demonstration Video
⏱Timestamps:
00:00 Task0: Download the necessary files
00:19 Task1: Setup Cluster
Task2: Setup WordPress
00:37 - a) Create a Cloud SQL instance
00:59 - b) Create a service account
01:54 - c) Create MySQL user and password
03:14 - d) Create secrets for access to WP
03:52 - e) Create WP deployment and service
Task3: Setup Ingress with TLS
04:58 - a) Set up cert-manager.io
06:30 - b) Set up cert-manager.io
07:43 - c) Configure nginx-ingress to use an  encrypted certificate for your site
09:04 Task4: Set up Network Policy
10:10 Task5: Setup Binary Authorization
12:40 Task6: Setup Pod Security Policy
Keep on reading:
Recommend
About Joyk
Aggregate valuable and interesting links.
Joyk means Joy of geeK