

Ubuntu 下添加新硬盘操作
source link: https://ppzz.github.io/posts/a702/
Go to the source link to view the article. You can view the picture content, updated content and better typesetting reading experience. If the link is broken, please click the button below to view the snapshot at that time.

Ubuntu 下添加新硬盘操作
最近在安装 ESXI 环境,记录一下在 ubuntu 添加新硬盘的步骤,从中可以窥见硬盘设备的管理逻辑。
- 下文操作环境是 ESXI 上的虚拟机,理论上对物理机同样适用
- 文中内容包括
- 对硬盘建分区
- 格式化分区
- 将硬盘挂载到一个已经存在的目录
- 设置开机自动挂载
在 esxi 的虚拟机管理页时,在第一行可以为虚拟机添加额外的硬盘,网卡等设备。
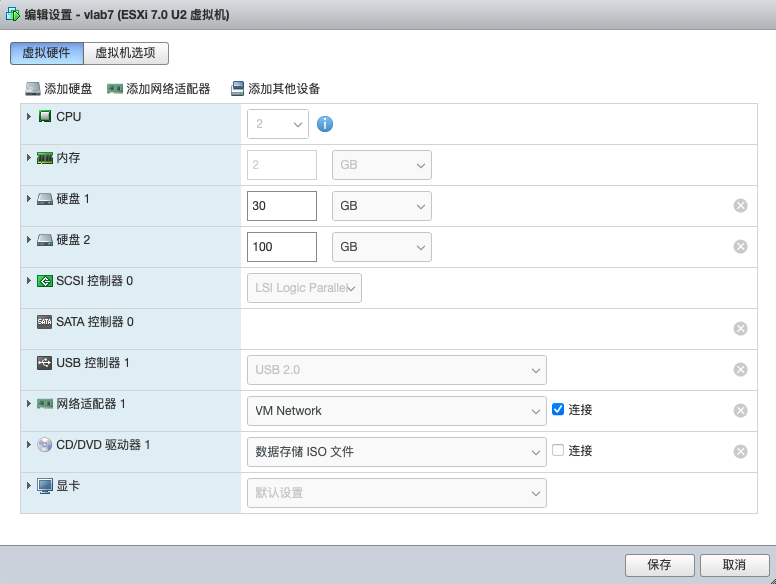
增加硬盘后开机,硬盘连接到了 ubunut 系统,但是并没有做任何初始化工作,此时需要:
- 格式化分区
- 将硬盘挂载到一个已经存在的目录
- 设置开机自动挂载
之后才能够无感的使用。
查看硬盘信息
用这个命令:
sudo fdisk -l |
截图如下:
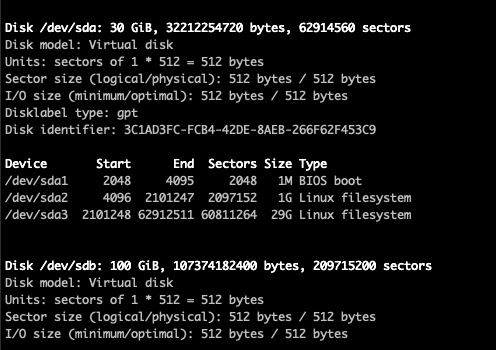
实际输出:
Disk /dev/sda: 30 GiB, 32212254720 bytes, 62914560 sectors
Disk model: Virtual disk
Units: sectors of 1 * 512 = 512 bytes
Sector size (logical/physical): 512 bytes / 512 bytes
I/O size (minimum/optimal): 512 bytes / 512 bytes
Disklabel type: gpt
Disk identifier: 3C1AD3FC-FCB4-42DE-8AEB-266F62F453C9Device Start End Sectors Size Type
/dev/sda1 2048 4095 2048 1M BIOS boot
/dev/sda2 4096 2101247 2097152 1G Linux filesystem
/dev/sda3 2101248 62912511 60811264 29G Linux filesystemDisk /dev/sdb: 100 GiB, 107374182400 bytes, 209715200 sectors
Disk model: Virtual disk
Units: sectors of 1 * 512 = 512 bytes
Sector size (logical/physical): 512 bytes / 512 bytes
I/O size (minimum/optimal): 512 bytes / 512 bytes
其中 sda 是已经在使用中的硬盘,包括三个分区: sda1, sda2, sda3
而 sdb 还没有分区存在。
使用这个命令对硬盘进行分区:
sudo fdisk /dev/sdb |
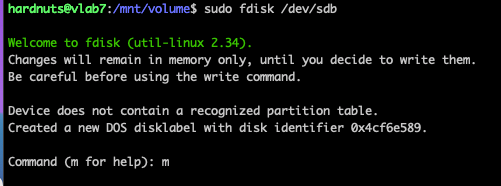
hardnuts@vlab7:/mnt/volume$ sudo fdisk /dev/sdb
Welcome to fdisk (util-linux 2.34).
Changes will remain in memory only, until you decide to write them.
Be careful before using the write command.Device does not contain a recognized partition table.
Created a new DOS disklabel with disk identifier 0x4cf6e589.Command (m for help): m
根据提示,依次执行以下命令:
- n (新建分区)
- p (打印详情)
- w (写入磁盘)
- q (退出)
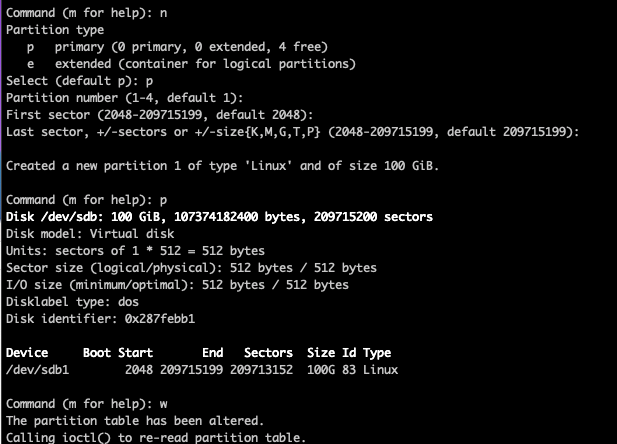
输出如下:
Command (m for help): n
Partition type
p primary (0 primary, 0 extended, 4 free)
e extended (container for logical partitions)
Select (default p): p
Partition number (1-4, default 1):
First sector (2048-209715199, default 2048):
Last sector, +/-sectors or +/-size{K,M,G,T,P} (2048-209715199, default 209715199):Created a new partition 1 of type ‘Linux’ and of size 100 GiB.
Command (m for help): p
Disk /dev/sdb: 100 GiB, 107374182400 bytes, 209715200 sectors
Disk model: Virtual disk
Units: sectors of 1 * 512 = 512 bytes
Sector size (logical/physical): 512 bytes / 512 bytes
I/O size (minimum/optimal): 512 bytes / 512 bytes
Disklabel type: dos
Disk identifier: 0x287febb1Device Boot Start End Sectors Size Id Type
/dev/sdb1 2048 209715199 209713152 100G 83 LinuxCommand (m for help): w
The partition table has been altered.
Calling ioctl() to re-read partition table.
Syncing disks.
再查看看硬盘信息:
sudo fdisk -l |
可以看见已经存在分区了:
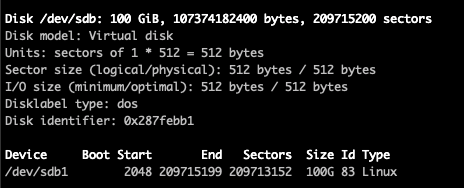
Disk /dev/sdb: 100 GiB, 107374182400 bytes, 209715200 sectors
Disk model: Virtual disk
Units: sectors of 1 * 512 = 512 bytes
Sector size (logical/physical): 512 bytes / 512 bytes
I/O size (minimum/optimal): 512 bytes / 512 bytes
Disklabel type: dos
Disk identifier: 0x287febb1Device Boot Start End Sectors Size Id Type
/dev/sdb1 2048 209715199 209713152 100G 83 Linux
但是这个时候分区还不能够使用,需要格式化之后才能够正常使用。
格式化和挂载分区
格式化命令
sudo mkfs -t ext4 /dev/sdb1 |
挂载分区即可使用
sudo mount -t auto /dev/sdb1 /mnt/volume |
挂载的分区重启之后会消失掉。需要在每次开机之后再手动执行挂载命令。
当然应该做成自动挂载。
开机自动挂载
这里使用硬盘分区的 uuid 来定位一个分区,
查看磁盘的 UUID
blkid /dev/sdb1 |
/dev/sdb1: UUID=”c41fa94b-7789-4f22-bb69-3a7f7c924147” TYPE=”ext4” PARTUUID=”287febb1-01”
我们需要记录下来 UUID 这部分:“c41fa94b-7789-4f22-bb69-3a7f7c924147”
另一种查看 uuid 的方式是这样:
cd /dev/disk/by-uuid |
可以看到有多个 uuid 以及其连接的分区,其中也可以找到 sdb1 这个分区的 UUID。
接下来编辑 fstab
sudo vim /etc/fstab |
加入以下行:(其中用到了 sdb1 的 UUID)
/dev/disk/by-uuid/c41fa94b-7789-4f22-bb69-3a7f7c924147 /mnt/volume ext4 defaults 0 0 |
- /dev/disk/by-uuid/c41fa94b-7789-4f22-bb69-3a7f7c924147 是磁盘的定位符
- /mnt/volume 挂载点
- ext4 文件系统类型
- defaults 挂载选项
- 0 dump 选项:是否让备份程序 dump 备份文件系统,0 为忽略,1 为备份,如果上次用 dump 备份,将显示备份至今的天数。
- 0 fsck 选项:fsck 程序以什么顺序检查文件系统,为 0 就表示不检查,(/)分区永远都是 1,其它的分区只能从 2 开始,当数字相同就同时检查(但不能有两 1)
之后重启系统就可以自动挂载分区了。
Recommend
-
10
新硬盘装机出现Disk Read Error解决方案
-
7
将 Arch Linux 转移到新硬盘上In ENV By Rapiz 2020-02-28 Linux128G 小盘实在不够用,每天都看还剩多少空间提心吊胆。我买了东芝...
-
8
Linux系统添加新硬盘 Nov 17, 20202020-11-18T00:00:00+08:00 by JuZi Updated Jan 26, 20212021-01-26T16:23:09+08:00 4 min本文所有操作都需要root来执行插上新硬盘或...
-
7
最近要给小伙伴们写几篇文章,关于《linux下误删除文件之后该如何恢复》。对于没有进程占用的文件想要进行数据恢复,不同的文件系统格式需要使用不同的工具,比如:ext4、xfs等。我找遍了我所有的虚拟机服务器,都没找到ext4文件格式的。因为ext4毕竟还是非常常用的...
-
5
V2EX › 硬件 为什么受伤的总是我,新硬盘又翻车了。
-
9
SSD、机械硬盘不淡定!新硬盘技术来了:10TB不到350元 2022-09-03 18:41 出处/作者:快科技 整合编辑:佚名 0
-
1
助力数字经济 东芝在中国的新硬盘生产线正式落成-存储在线 当前位置:存储在线 > 技术
-
12
您现在的位置:首页 --> Linux --> Centos挂载新硬盘开机自动挂载 Cent...
-
12
近期得到一个 Ryzen U5500U 的迷你主机,一番配置后采用了免费的 PVE 虚拟机环境。 我对 LVM 的感觉一直都是“过于复杂”,日常使用也会经常放弃它来使用简单的 ext4 凑合着用。 但是!对于虚拟机平...
-
7
NAS容量告急 但没空余硬盘位怎么办?群晖教你换上新硬盘 2023-03-26 18:16 出处/作者:快科技 整合编辑:佚名 0
About Joyk
Aggregate valuable and interesting links.
Joyk means Joy of geeK