
5

Go in Action 不完全阅读笔记
source link: https://imnisen.github.io/read-go-in-action.html
Go to the source link to view the article. You can view the picture content, updated content and better typesetting reading experience. If the link is broken, please click the button below to view the snapshot at that time.
2 Arrays,slices, and maps
2.1 Array
2.1.1 声明和初始化数组
创建数组时要确定类型和长度,一旦创建好不能再改,如果需要变动长度,就得新建一个的数组,把需要的元素复制过去
// declare an integer array of five elements
var array [5]int

//采用字面量创建数组
array :=[5]int{10, 20, 30, 40, 50}

// 使用...时会根据初始化的元素数量觉得数组长度
array := [...]int{10, 20, 30, 40, 50}

// 指定第一个和第二个元素, 其它元素用0填充
array := [5]int{1: 10, 2: 20}

// 定义一个数组,元素是指向整形的指针,初始化前两个指针(后面的为nil指针)
//Declare an integer pointer array of five elements.
// Initialize index 0 and 1 of the array with integer pointers.
array := [5]*int{0: new(int), 1: new(int)}
// Assign values to index 0 and 1.
*array[0] = 10
*array[1] = 20


// 相同类型的数组直接赋值
// Declare a string array of five elements.
var array1 [5]string
// Declare a second string array of five elements.
// Initialize the array with colors.
array2 := [5]string{"Red", "Blue", "Green", "Yellow", "Pink"}
// Copy the values from array2 into array1.
array1 = array2


// 当赋值的数组时指针数组时,复制的是指针的值,不是指向的元素
// Declare a string pointer array of three elements.
var array1 [3]*string
// Declare a second string pointer array of three elements.
// Initialize the array with string pointers.
array2 := [3]*string{new(string), new(string), new(string)}
// Add colors to each element
*array2[0] = "Red"
*array2[1] = "Blue"
*array2[2] = "Green"
// Copy the values from array2 into array1.
array1 = array2

//参见下面图片:
[[file:static/images/go-goinaction-ch3.png]]


// 声明和初始化多维数组
// Declare a two dimensional integer array of four elements
// by two elements.
var array [4][2]int
// Use an array literal to declare and initialize a two
// dimensional integer array.
array := [4][2]int{{10, 11}, {20, 21}, {30, 31}, {40, 41}}
// Declare and initialize index 1 and 3 of the outer array.
array := [4][2]int{1: {20, 21}, 3: {40, 41}}
// Declare and initialize individual elements of the outer
// and inner array.
array := [4][2]int{1: {0: 20}, 3: {1: 41}}


// 多维数组间也可以赋值,只要他们长度和类型相同
2.1.2 做参数传递时考虑传递数组的地址
// Allocate an array of 8 megabytes.
var array [1e6]int

// Pass the address of the array to the function foo.
foo(&array)

// Function foo accepts a pointer to an array of one million integers.
func foo(array *[1e6]int) {
...
}
2.2 Slice
Slice类似python里的列表,是可变的数组。Slice的底层是用array实现的。包含3部分信息,参见下图:
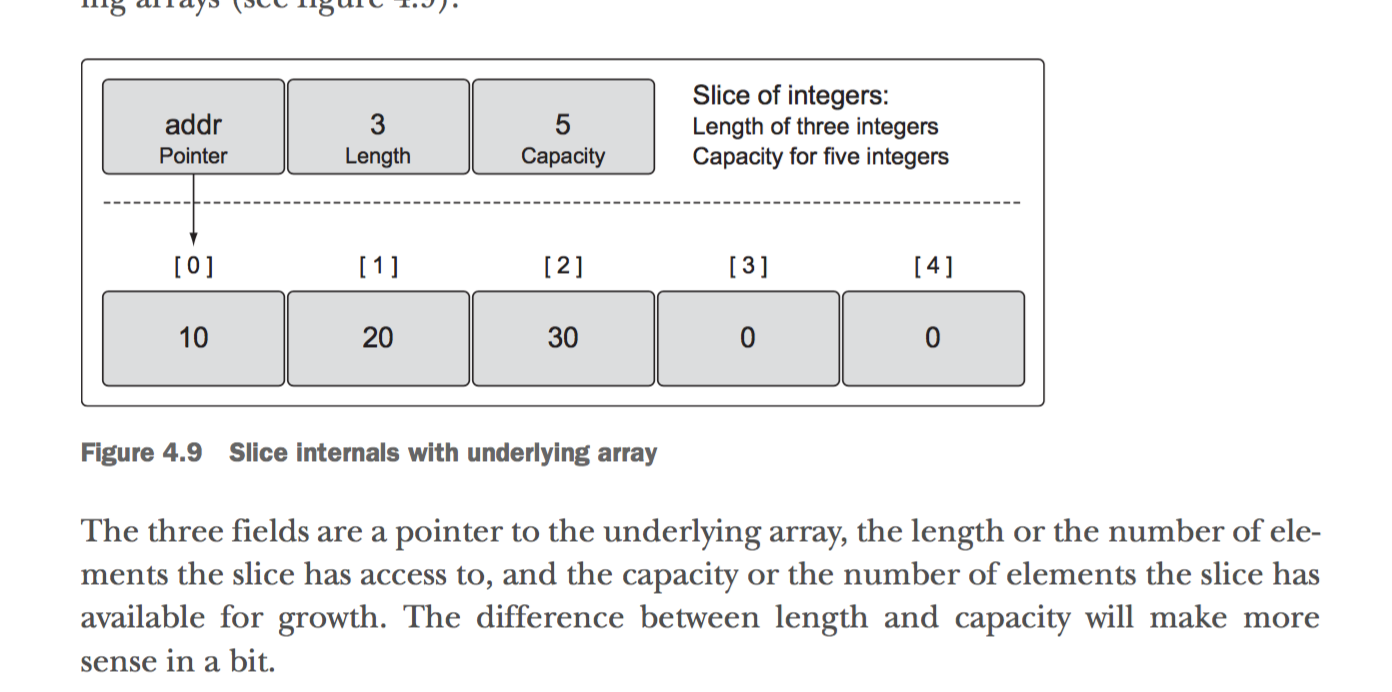 包括指向底层数组的指针、slice可使用的长度、底层数组的总长度
2.2.1 创建slice
/* 1. 使用make */
// Create a slice of strings.
// Contains a length and capacity of 5 elements.
slice := make([]string, 5)

// Create a slice of integers.
// Contains a length of 3 and has a capacity of 5 elements.
slice := make([]int, 3, 5)


/* 2. 使用字面量  */
// Create a slice of strings.
// Contains a length and capacity of 5 elements.
slice := []string{"Red", "Blue", "Green", "Yellow", "Pink"}

/ Create a slice of integers.
// Contains a length and capacity of 3 elements.
slice := []int{10, 20, 30}

// Create a slice of strings.
// Initialize the 100th element with an empty string.
slice := []string{99: ""}


/* 3. WTF  使用字面量时指定长度就是创建数组,不指定就是创建slice*/
// Create an array of three integers.
array := [3]int{10, 20, 30}
// Create a slice of integers with a length and capacity of three.
slice := []int{10, 20, 30}

/* 4 nil and empty  slice */
// Create a nil slice of integers.
var slice []int

// Use make to create an empty slice of integers.
slice := make([]int, 0)
// Use a slice literal to create an empty slice of integers.
slice := []int{}
2.2.2 操作slice的方法
/* 1. slice切片 */

// Create a slice of integers.
// Contains a length and capacity of 5 elements.
slice := []int{10, 20, 30, 40, 50}

/ Create a new slice.
newSlice := slice[1:3]

结果参见图片:
[[file:static/images/go-goincation-ch4-02.png]]

/* 2 */
slice的length以内是可被访问的,capacity长度是用来增长的

/* 3 使用append给slice添加元素*/

// Create a slice of integers.
// Contains a length and capacity of 5 elements.
slice := []int{10, 20, 30, 40, 50}
// Create a new slice.
// Contains a length of 2 and capacity of 4 elements.
newSlice := slice[1:3]
// Allocate a new element from capacity.
// Assign the value of 60 to the new element.
newSlice = append(newSlice, 60)

模型图如下:
[[file:static/images/go-goinaction-ch4-04.png]]

当底层数组长度不够时,会新建一个更大的数组替换它,把原来的元素复制过来
增加的算法(可能会改变)是:当长度1000以内时每次增长1倍,超过1000后,每次增长25%

/* 4. 当给一个切片添加元素时,会改变底层数组,如果当两个切片共享同一底层数组时,势必会相互影响
   可以采用一种模式来避免这种互相影响
*/

// Create a slice of strings.
// Contains a length and capacity of 5 elements.
source := []string{"Apple", "Orange", "Plum", "Banana", "Grape"}
// Slice the third element and restrict the capacity.
// Contains a length and capacity of 1 element.
slice := source[2:3:3]
// Append a new string to the slice.
slice = append(slice, "Kiwi")

如图:
[[file:static/images/go-goinaction-ch4-05.png]]
切片的时候,指定低3个元素和第二个一样,这样得到的切片是容量和长度一样的,这种情况下新切片上append新元素的话
因为底层容量不够,会新创建一个底层数组,把元素复制过去,和之前的切片底层数组就可以隔离开了。


/* 5. appendke接受多个元素, 使用...表示所有元素 */

// Create two slices each initialized with two integers.
s1 := []int{1, 2}
s2 := []int{3, 4}
// Append the two slices together and display the results.
fmt.Printf("%v\n", append(s1, s2...))
Output:
[1 2 3 4]

/* 6. 遍历slice */

// 可用range配合for
// Create a slice of integers.
// Contains a length and capacity of 4 elements.
slice := []int{10, 20, 30, 40}
// Iterate over each element and display each value.
for index, value := range slice {
  fmt.Printf("Index: %d  Value: %d\n", index, value)
}

Output:
Index: 0  Value: 10
Index: 1  Value: 20
Index: 2  Value: 30
Index: 3  Value: 40

要注意的是,循环里的index 是索引位置,value是slice元素值的copy.而不是指向元素的地址, 看下面的例子
// Create a slice of integers.
// Contains a length and capacity of 4 elements.
slice := []int{10, 20, 30, 40}
// Iterate over each element and display the value and addresses.
for index, value := range slice {
   fmt.Printf("Value: %d  Value-Addr: %X  ElemAddr: %X\n",
       value, &value, &slice[index])
}
Output:
Value: 10  Value-Addr: 10500168  ElemAddr: 1052E100
Value: 20  Value-Addr: 10500168  ElemAddr: 1052E104
Value: 30  Value-Addr: 10500168  ElemAddr: 1052E108
Value: 40  Value-Addr: 10500168  ElemAddr: 1052E10C

// 通常的for循环遍 遍历切片,可以控制起始位置等

// Create a slice of integers.
// Contains a length and capacity of 4 elements.
slice := []int{10, 20, 30, 40}
// Iterate over each element starting at element 3.
for index := 2; index < len(slice); index++ {
    fmt.Printf("Index: %d  Value: %d\n", index, slice[index])
}
Output:
Index: 2  Value: 30
Index: 3  Value: 40


/* 7. 多维切片 */

// Create a slice of a slice of integers.
slice := [][]int{{10}, {100, 200}}

底层构造:
[[file:static/images/go-goinaction-ch4-07.png]]

// 同样使用append的结果

// Create a slice of a slice of integers.
slice := [][]int{{10}, {100, 200}}
// Append the value of 20 to the first slice of integers.
slice[0] = append(slice[0], 20)

底层构造:
[[file:static/images/go-goinaction-ch4-08.png]]


/* 8. 切片作为函数参数值,直接传递就好
   因为切片本身是由3部分组成: 一个addr, 一个length, 一个 Capacity,
   在64-bit架构上,每个部分各需8bytes,总共24bytes, 传递给函数是没问题的
*/
2.3 Map
2.3.1 底层实现
没看太懂:(, 需要了解下一般哈希表怎么实现的
2.3.2 创建和初始化
/* 使用make 或者 字面量创建 */

// Create a map with a key of type string and a value of type int.
dict := make(map[string]int)

// Create a map with a key and value of type string.
// Initialize the map with 2 key/value pairs.
dict := map[string]string{"Red": "#da1337", "Orange": "#e95a22"}

/* map的key只用能用 == 操作符比较即可。
切片,函数,struct type that contains slice 不能用作map keys, 作value没问题
*/

// Create a map using a slice of strings as the key.
dict := map[[]string]int{}
Compiler Exception:
invalid map key type []string

// Create a map using a slice of strings as the value.
dict := map[int][]string{}
2.3.3 操作map
/* 1. 赋值方法和python类似 */

// Create an empty map to store colors and their color codes.
colors := map[string]string{}
// Add the Red color code to the map.
colors["Red"] = "#da1337"

/* 2. nil map 赋值的时候会报运行时错误 */

// Create a nil map by just declaring the map.
var colors map[string]string
// Add the Red color code to the map.
colors["Red"] = "#da1337"
Runtime Error:
panic: runtime error: assignment to entry in nil map

/* 3. 从map 取值时, 会返回两个值,第一个是值,第二个是表示存不存在*/

// Retrieve the value for the key "Blue".
value, exists := colors["Blue"]
// Did this key exist?
if exists {
    fmt.Println(value)
}


/* 4. 当然也可以直接根据但回到值是不是零值来判断key是否存在,
当然这局限于零值不是map里的有效值
零值的意思是,比如整形是0,字符串是""等
*/

// Retrieve the value for the key "Blue".
value := colors["Blue"]
// Did this key exist?
if value != "" {
    fmt.Println(value)
}


/* 5 遍历map 用for range */

// Create a map of colors and color hex codes.
colors := map[string]string{
    "AliceBlue":   "#f0f8ff",
    "Coral":       "#ff7F50",
    "DarkGray":    "#a9a9a9",
    "ForestGreen": "#228b22",
}
// Display all the colors in the map.
for key, value := range colors {
    fmt.Printf("Key: %s  Value: %s\n", key, value)
}

/* 6. 删除key/value pair 用 delete */
// Remove the key/value pair for the key "Coral".
delete(colors, "Coral")


/* 7. 函数间传递map 也只是传递的它的引用 */
Recommend
About Joyk
Aggregate valuable and interesting links.
Joyk means Joy of geeK