

Kubernetes ConfigMap on Dynamic Applications
source link: https://reyhansofian.github.io/en/post/kubernetes-configmap-on-dynamic-applications/
Go to the source link to view the article. You can view the picture content, updated content and better typesetting reading experience. If the link is broken, please click the button below to view the snapshot at that time.
Kubernetes has a feature called ConfigMap where it can be used as a configuration file or environment variables. We will talk about what is ConfigMap and what are the possibilities using ConfigMap?
What is ConfigMap
ConfigMap allows you to decouple configuration artifacts from image content to keep containerized applications portable.
As per Kubernetes documentation, ConfigMap is a mechanism to separate configuration from a containerized application (since we’re talking Kubernetes, all application inside Kubernetes is containerized). This will lead the applications to be more portable and more configurable. ConfigMap usage is more suitable for a configuration that doesn’t contain sensitive information since it doesn’t have any encryption.
How ConfigMap works?
 Image 1.1 — Create ConfigMap
There are 3 ways to create ConfigMap:
--from-fileflag. Example:kubectl create configmap myConfigMap --from-file /my/path/to/directory/or/file--from-literalflag. Example:kubectl create configmap myConfigMap --from-literal KEY1=VALUE1 KEY2=VALUE2- With Kubernetes manifest with kind
ConfigMap. We can create a file with.yamlor.json, and the we can apply it usingkubectl apply -f myConfigMap.yaml
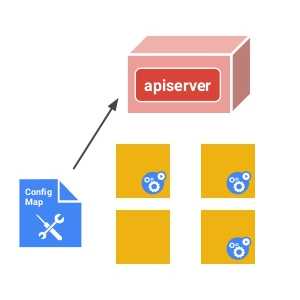 Image 1.2 — Apply ConfigMap
kubectl create configmap or kubectl apply -f <file> command will upload the ConfigMap definition to the Kubernetes Apiserver that lives inside Kubernetes cluster.
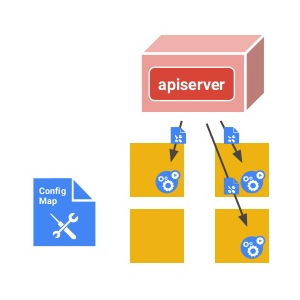 Image 1.3 — ConfigMap distribution by Apiserver
The Apiserver will distribute the ConfigMap definition to all Pods inside the cluster.
How to use ConfigMap?
There are 2 ways to use ConfigMap
1. As environment variable
As an example, we will create a ConfigMap like this
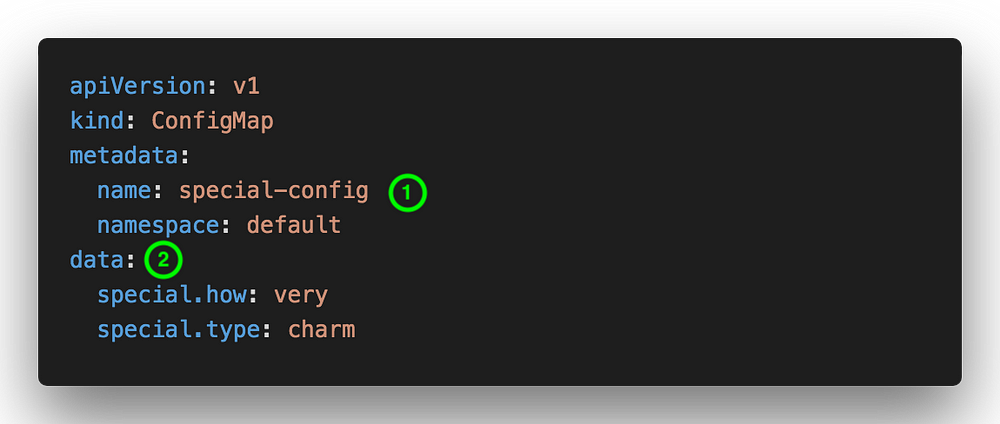 Image 2.1 - ConfigMap
Descriptions:
1. ConfigMap name
2. ConfigMap data (can be in KEY-VALUE format or filename format)
We will attach the ConfigMap values to a Pod and use it as environment variables
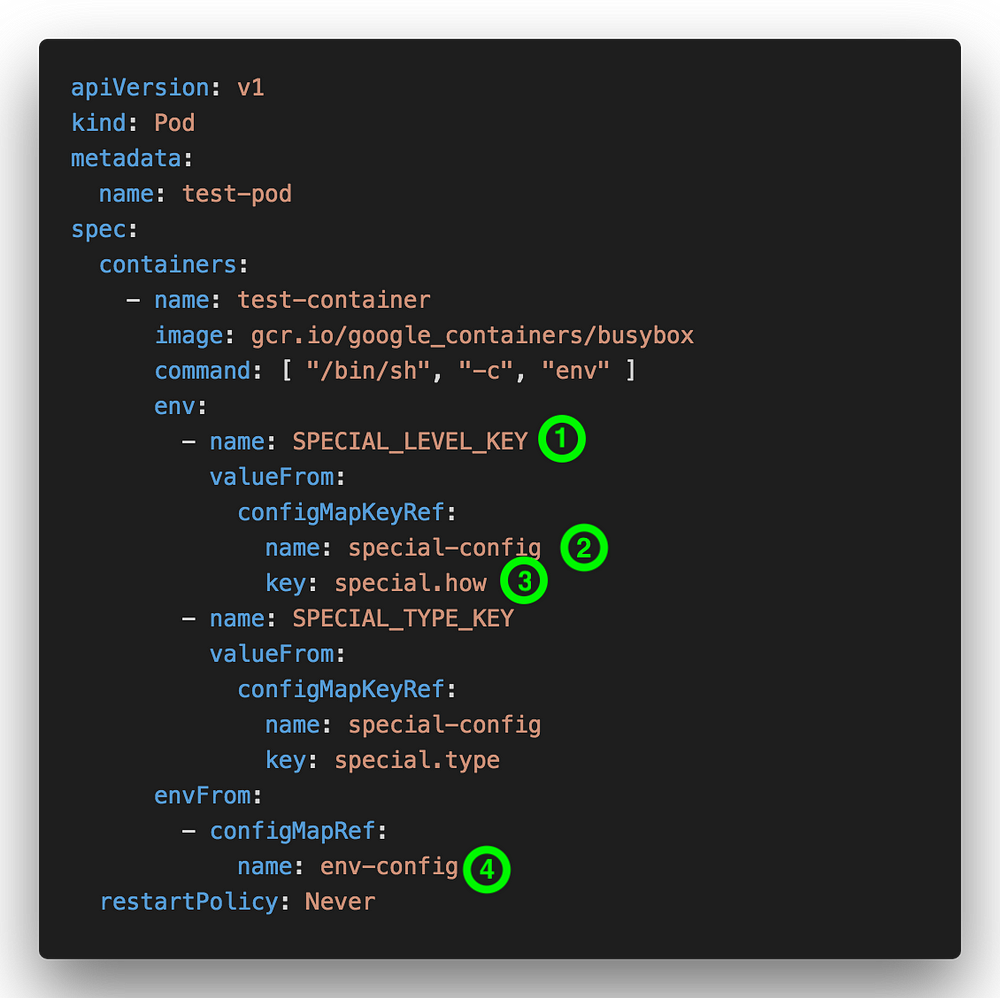 Image 2.2 - Pod Manifest
Descriptions:
1. Environment variable’s name that will be injected into Pod
2. Reference to a particular ConfigMap name. This can be found from metada.name on the ConfigMap manifest
3. ConfigMap key name that we will use
4. Load all key and values from another ConfigMap \
2. As a volume that attached to a Pod
ConfigMap also supports the Volume plugin. For instances, we will use the same ConfigMap manifest and we will create a Pod manifest like this
 Image 2.3 - Pod manifest using Volume plugin
Descriptions:
1. Volume name that will be used. In this example, it will use the volume from number 3 which is “config-volume” volume
2. Volume mount path
3. Volume name
4. ConfigMap name that will be used by the “config-volume” volume \
Using the ConfigMap as environment variables using volume will lead us to a possibility where we can update Pod’s environment variables without the need to restart. This method usually called as “live-update” or “hot-config”.
Why do we need “live-update”? In the world of the container, the environment variables will be set in stone if the application (or container) is already running. This means we can’t change the environment variables on the fly if we are injecting environment variables using docker run -e <KEY>=<VALUE> (for Docker) or using env (for Kubernetes Pod). Instead, we can use a file to store the environment variables. And in this example, we will use ConfigMap that will be attached to a Pod volume.
Let’s examine the ConfigMap behavior if it got an update. Let’s create a simple ConfigMap manifest like this
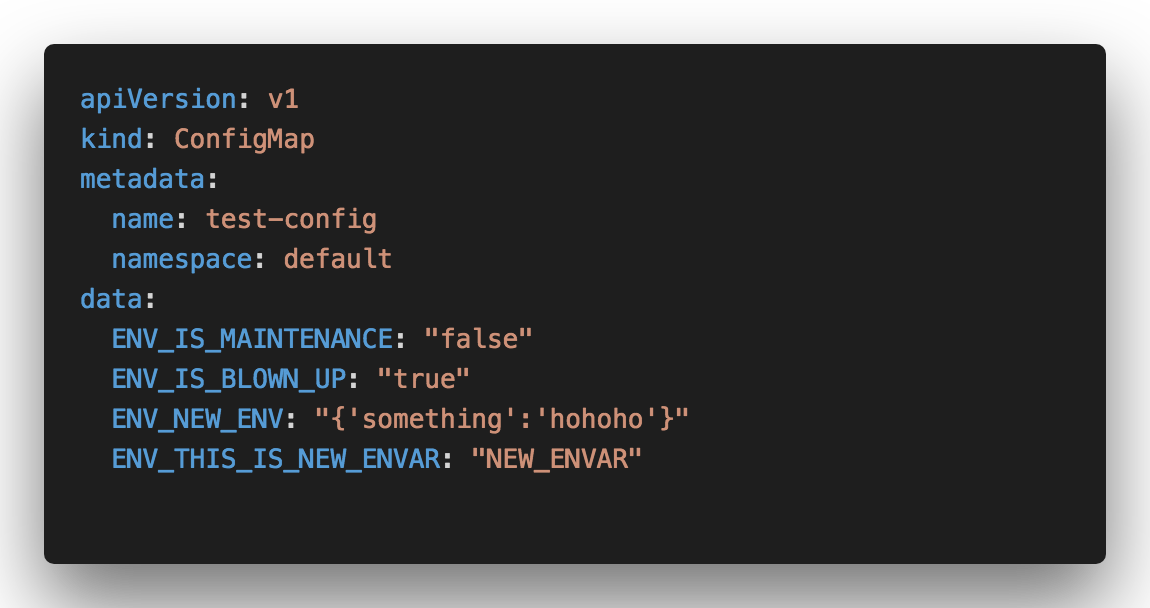 Image 3.1 - Simple ConfigMap
After applied it using kubectl apply -f, let’s take a look inside the Pod’s container how ConfigMap works as environment variables. We will go to the volume mount path directory based on the Pod configuration (in this case, it mounts to /etc/config)
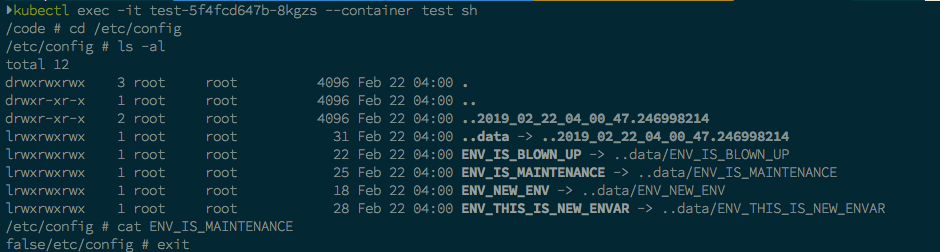 Image 3.2 - ConfigMap inside a Pod's container
If we look at the image above, every key that we define on ConfigMap will be mounted as files by Kubernetes. These files have symlinks to ...data folder and inside that folder have the same names. For example Misal ENV_IS_MAINTENANCE symlinked to ..data/ENV_IS_MAINTENACE, etc. Also ..data folder symlinked to another folder called ..2019_02_22_04_00_47.246998214.
Now for proof of concept, let’s create a simple application using NodeJS and ExpressJS and ship it as a container. This application main purpose is to read the environment variables from ConfigMap and listen to that folder if there is an update
// @ts-check

const express = require("express");
const app = express();
const fs = require("fs");
const bodyParser = require('body-parser');

// volume mount path
const mountPath = "/etc/config";

// ConfigMap filename
const configMapFile = "..data";

// watching file
fs.watch(`${mountPath}`, (event, filename) => {
  // only listen to event "rename".
  // kubelet will rename the reference folder on ConfigMap update.
  if (event === "rename" && filename) {
    if (filename === configMapFile) {
      console.log(`process.env BEFORE: ${JSON.stringify(process.env)}`);

      // get all files from `..data` directory
      const dir = fs.readdirSync(`${mountPath}/${configMapFile}`);

      console.log(`Env list: ${dir}`);

      // read all files inside `..data` directory
      dir.forEach(env => {
        // inject the new envar value to `process.env` object (not recommended)
        process.env[env] = fs.readFileSync(
          `${mountPath}/${configMapFile}/${env}`
        );
      });

      console.log(`process.env AFTER: ${JSON.stringify(process.env)}`);
    }
  }
});

// for readinessProbe and livelinessProbe Kubernetes
app.get("/info", (req, res) => {
  res.sendStatus(200);
});

app.get("/isMaintenance", (req, res) => {
  const isMaintenace = process.env.ENV_IS_MAINTENANCE;

  res.status(200).send(`Is it maintenance? ${isMaintenace}`);
})

app.listen(3000, err => {
  if (err) {
    console.error(err);
    process.exit(1);
  }

  console.log(`Server is up on port 3000`);
});
Those code above will listen to a “rename” event inside /etc/config folder. Let’s containerized it and deploy it to Kubernetes. As usual, we will run kubectl apply -f to create the Kubernetes Service, Deployment, and Pod at the same time.
apiVersion: v1
kind: Service
metadata:
  labels:
    test-app: test
  name: test
  namespace: default
spec:
  externalTrafficPolicy: Cluster
  ports:
  - nodePort: 30321
    port: 3000
    protocol: TCP
    targetPort: 3000
  selector:
    test-app: test
  sessionAffinity: None
  type: NodePort
status:
  loadBalancer: {}
---
apiVersion: extensions/v1
kind: Deployment
metadata:
  name: test
spec:
  revisionHistoryLimit: 2
  strategy:
    type: RollingUpdate
  replicas: 1
  selector:
    matchLabels:
      test-app: test
  template:
    metadata:
      labels:
        test-app: test
    spec:
      volumes:
        - name: config-volume
          configMap:
            name: test-config
      containers:
        - name: test
          image: reyhan/docker-try-config:1.0.0
          command: ["npm", "start"]
          imagePullPolicy: Never
          livenessProbe:
            httpGet:
              path: /info
              port: 3000
            initialDelaySeconds: 90
            periodSeconds: 5
          readinessProbe:
            httpGet:
              path: /info
              port: 3000
            initialDelaySeconds: 5
            periodSeconds: 5
          ports:
            - containerPort: 3000
          volumeMounts:
            - name: config-volume
              mountPath: /etc/config
          resources:
            requests:
              memory: "256Mi"
              cpu: "64m"
            limits:
              memory: "512Mi"
              cpu: "256m"
          env:
            - name: ENV_SQL_CLIENT
              value: "mysql"
            - name: ENV_SQL_HOST
              value: "13.67.44.182"
            - name: ENV_IS_MAINTENANCE
              valueFrom:
                configMapKeyRef:
                  name: test-config
                  key: ENV_IS_MAINTENANCE
            - name: ENV_IS_BLOWN_UP
              valueFrom:
                configMapKeyRef:
                  name: test-config
                  key: ENV_IS_BLOWN_UP
Next, let’s update the ConfigMap value to
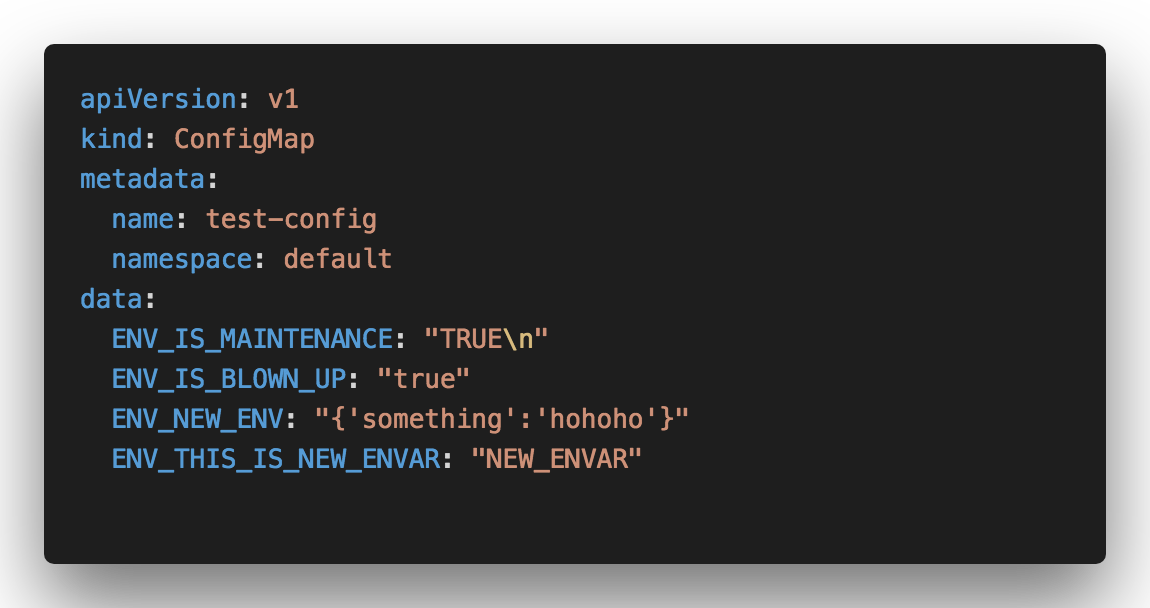 Image 3.3 - Change the "ENV_IS_MAINTENTANCE" key on ConfigMap
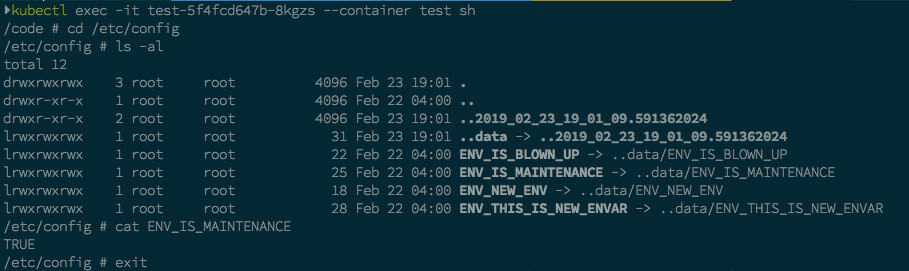 Image 3.4 — Environment variables inside container has been modified
From the image above, the symlinks between environment variables files didn’t change at all. The only change is the symlink for ...data changed to a new folder called ..2019_02_23_19_01_09.591362024. For more clarity, take a look at the short gif below
As we can see, updating environment variables using this method is quite easy since we don’t need to redeploy the Pod at all!
But there are some things worth to note:
- ConfigMap only “live” inside a namespace. Which mean it can’t be shared to another namespace
- ConfigMap update is eventually consistent which means it doesn’t update immediately after we update it. This is the default behavior from the Kubernetes (kubelet to be specific) where the sync frequency every 60 seconds. If we want to make it faster, we can change the
--sync-frequencyon the kubelet. Please look at the official documentation for more reference
Extra!
The implementation of the “live-update” above can only work on NodeJS applications since it has fs standard library which can listen to the filesystem events (fs.watch). If we want to implement “live-update” on other than NodeJS, so we need to adjust our code and our Pod’s deployment. For simplicity, we still using NodeJS but not using fs.watch.
apiVersion: v1
kind: Service
metadata:
  labels:
    test-app: test
  name: test
  namespace: default
spec:
  externalTrafficPolicy: Cluster
  ports:
  - nodePort: 30321
    port: 3000
    protocol: TCP
    targetPort: 3000
  selector:
    test-app: test
  sessionAffinity: None
  type: NodePort
status:
  loadBalancer: {}
---
apiVersion: extensions/v1
kind: Deployment
metadata:
  name: test
spec:
  revisionHistoryLimit: 2
  strategy:
    type: RollingUpdate
  replicas: 1
  selector:
    matchLabels:
      test-app: test
  template:
    metadata:
      labels:
        test-app: test
    spec:
      volumes:
        - name: config-volume
          configMap:
            name: test-config
      containers:
        - name: configmap-reload
          image: "jimmidyson/configmap-reload:v0.1"
          imagePullPolicy: "IfNotPresent"
          args:
            - --volume-dir=/etc/config
            - --webhook-url=http://localhost:3000/-/reload
          volumeMounts:
            - name: config-volume
              mountPath: /etc/config
              readOnly: true
        - name: test
          image: reyhan/docker-try-config:1.0.3
          command: ["npm", "start"]
          imagePullPolicy: Never
          livenessProbe:
            httpGet:
              path: /info
              port: 3000
            initialDelaySeconds: 90
            periodSeconds: 5
          readinessProbe:
            httpGet:
              path: /info
              port: 3000
            initialDelaySeconds: 5
            periodSeconds: 5
          ports:
            - containerPort: 3000
          volumeMounts:
            - name: config-volume
              mountPath: /etc/config
          resources:
            requests:
              memory: "256Mi"
              cpu: "64m"
            limits:
              memory: "512Mi"
              cpu: "256m"
          env:
            - name: ENV_SQL_CLIENT
              value: "mysql"
            - name: ENV_SQL_HOST
              value: "13.67.44.182"
            - name: ENV_IS_MAINTENANCE
              valueFrom:
                configMapKeyRef:
                  name: test-config
                  key: ENV_IS_MAINTENANCE
            - name: ENV_IS_BLOWN_UP
              valueFrom:
                configMapKeyRef:
                  name: test-config
                  key: ENV_IS_BLOWN_UP
If we look closely at the container’s configuration above, we add a new container from jimmidyson/configmap-reload with its configurations to read the ConfigMap. This method usually called “sidecar container”.
// @ts-check

const express = require("express");
const app = express();
const fs = require("fs");
const bodyParser = require('body-parser');

const mountPath = "/etc/config";
const configMapFile = "..data";

function readConfig() {
  const dir = fs.readdirSync(`${mountPath}/${configMapFile}`);

  console.log(`Available envar: ${dir}`);

  dir.forEach(env => {
    process.env[env] = fs.readFileSync(
      `${mountPath}/${configMapFile}/${env}`
    );
  });
}

app.get("/info", (req, res) => {
  res.sendStatus(200);
});

app.use(bodyParser.json());

// configmap reload webhook
app.post("/-/reload", (req, res) => {
  // read new ConfigMap value
  readConfigMap();

  console.log(`process.env AFTER: ${JSON.stringify(process.env)}`);

  res.sendStatus(200);
});

app.get("/isMaintenance", (req, res) => {
  const isMaintenace = process.env.ENV_IS_MAINTENANCE;

  res.status(200).send(`Is it maintenance? ${isMaintenace}`);
})

app.listen(3000, err => {
  if (err) {
    console.error(err);
    process.exit(1);
  }

  console.log(`Server is up on port 3000`);
});
On the NodeJS application, we need to add a new endpoint to receive the notification from the sidecar container (“configmap-reload” container).
With this method, the application flow will be like this
- Sidecar container “configmap-reload” will watch if there is any update on the environment variables files inside the volume
- If those files got updated, sidecar container “configmap-reload” will send a notification (HTTP call) to our main container’s endpoint
/-/reload(same with the--webhook-urlparameter on the sidecar container) - The main application will re-read all environment variables files and then store it on the global object
process.env
Using this method, we can implement “live-update” to every programming language that we like. Happy coding!
References
Recommend
About Joyk
Aggregate valuable and interesting links.
Joyk means Joy of geeK