

使用 protobuf & AFLplusplus 进行简易 CTF 自动化 fuzz
source link: https://kiprey.github.io/2021/09/protobuf_ctf_fuzz/
Go to the source link to view the article. You can view the picture content, updated content and better typesetting reading experience. If the link is broken, please click the button below to view the snapshot at that time.
看 fuzz 的结构感知 时遇到了 protobuf,觉得很有意思,于是尝试使用 protobuf 来进行快速简易的 CTF fuzz。
以下以 TCTF2021-babyheap2021 为例,来简单说明一下自动化步骤。
这里主要用到以下项目:
需要注意的是,该 fuzz 目前处于实验性版本,可能不太稳定,仅作为学习研究使用。
二、操作流程
1. 下载依赖
git clone 下 AFL++ 和 afl-libprotobuf-mutator (链接在上面)即可。
2. 配置 afl-libprotobuf-mutator
-
首先,用 ida64 打开 babyheap2021, F5阅读伪代码并总结其输入模板,最后用 protobuf 描述输入结构:
这类菜单题的输入模板大体上比较固定,下面的代码随便改改就能换一道题目用用。
代码编写完成后,覆盖保存至
afl-libprotobuf-mutator/gen/out.proto。注意路径必须完成一致,若遇到重名文件 out.proto 则直接替换。如果不会写 protobuf 描述的话,可以看看这个 Protocol Buffers Tutorials。
// out.proto
syntax = "proto2";
package menuctf;

message AllocChoice {
  required int32 choice_id = 1 [default=1];
  required int32 size = 2;
  required string content = 3;
}

message UpdateChoice {
  required int32 choice_id = 1 [default=2];
  required int32 idx = 2;
  required int32 size = 3;
  required string content = 4;
}

message DeleteChoice {
  required int32 choice_id = 1 [default=3];
  required int32 idx = 2;
}

message ViewChoice {
  required int32 choice_id = 1 [default=4];
  required int32 idx = 2;
}

message ExitChoice {
  required int32 choice_id = 1 [default=5];
}

// Our address book file is just one of these.
message ChoiceList {
  message Choice {
    oneof the_choice{
      AllocChoice alloc_choice = 1;
      UpdateChoice update_choice = 2;
      DeleteChoice delete_choice = 3;
      ViewChoice view_choice = 4;
      ExitChoice exit_choice = 5;
    }
  }
  repeated Choice choice = 1;
} -
到了这里,我们需要理一理思路。对于CTF题来说,大多都是直接从 stdin 中获取输入的文本数据。因此首先,我们需要编写
Protobuf::Message转常规输入字符串的代码:void ProtoToDataHelper(std::stringstream &out, const google::protobuf::Message &msg) {
const google::protobuf::Descriptor *desc = msg.GetDescriptor();
const google::protobuf::Reflection *refl = msg.GetReflection();
const unsigned fields = desc->field_count();
// std::cout << msg.DebugString() << std::endl;
for (unsigned i = 0; i < fields; ++i) {
const google::protobuf::FieldDescriptor *field = desc->field(i);
// 对于单个 choice
if (field->cpp_type() == google::protobuf::FieldDescriptor::CPPTYPE_MESSAGE) {
// 如果当前是 choice list
if (field->is_repeated()) {
const google::protobuf::RepeatedFieldRef<google::protobuf::Message> &ptr = refl->GetRepeatedFieldRef<google::protobuf::Message>(msg, field);
// 将每个 choice 打出来
for (const auto &child : ptr) {
ProtoToDataHelper(out, child);
out << "\n";
}
// 如果当前是某个子 choice
} else if (refl->HasField(msg, field)) {
const google::protobuf::Message &child = refl->GetMessage(msg, field);
ProtoToDataHelper(out, child);
}
}
// 对于单个 field
else if (field->cpp_type() == google::protobuf::FieldDescriptor::CPPTYPE_INT32) {
out << refl->GetInt32(msg, field);
if(i < fields - 1)
out << " ";
}
else if (field->cpp_type() == google::protobuf::FieldDescriptor::CPPTYPE_STRING) {
out << refl->GetString(msg, field);
if(i < fields - 1)
out << " ";
}
else {
abort();
}
}
} -
之后,参照 AFL++ 的 Custom Mutators in AFL++,完成一些必要的 custom mutate 函数。
这里我们需要完成以下几种函数:
void *afl_custom_init(void *afl, unsigned int seed):在执行 custom mutate 前需要执行的初始化操作,这里只需初始化一下随机种子。size_t afl_custom_fuzz(void *data, unsigned char *buf, size_t buf_size, unsigned char **out_buf, unsigned char *add_buf, size_t add_buf_size, size_t max_size):变异逻辑,在该代码中编写自己的变异逻辑。size_t afl_custom_post_process(void* data, uint8_t *buf, size_t buf_size, uint8_t **out_buf):将 protobuf::Message 格式的二进制数据转换成 target 可读的数据。void afl_custom_deinit(void *data):变异完成后需要做的事情,目前没有什么事情需要在这里进行处理。int32_t afl_custom_init_trim(void *data, uint8_t *buf, size_t buf_size):自定义 trim 逻辑的初始化。为了防止 trim 逻辑破坏 protobuf::Message 的二进制数据,影响正常的 Parse 过程,这里可以让该函数直接返回0,跳过每次的 trim 阶段。size_t afl_custom_trim(void *data, uint8_t **out_buf):自定义 trim 逻辑。由于afl_custom_init_trim函数返回0,因此实际上该函数不会被调用,但我们仍然必须声明该函数以启用自定义 trim 逻辑。
需要注意的是,这一整个
extern "C"的代码以及内部用到的ProtoToDataHelper函数的代码,必须全部放在afl-libprotobuf-mutator/src/mutate.cc中。由于 afl-libprotobuf-mutator 较为久远,因此大部分 AFL++ 相关的接口需要修改亿下。
// AFLPlusPlus interface
extern "C" {
  static std::default_random_engine engine_pro;
  static std::uniform_int_distribution<unsigned int> dis(0, UINT32_MAX);

void *afl_custom_init(void *afl, unsigned int seed) {
    #pragma unused (afl)
    engine_pro.seed(seed);
    return nullptr;
  }

void afl_custom_deinit(void *data) {
    assert(!data);
  }

// afl_custom_fuzz
  size_t afl_custom_fuzz(void *data, unsigned char *buf, size_t buf_size, unsigned char **out_buf,
                         unsigned char *add_buf, size_t add_buf_size, size_t max_size) {
    #pragma unused (data)
    #pragma unused (add_buf)
    #pragma unused (add_buf_size)

static uint8_t *saved_buf = nullptr;

assert(buf_size <= max_size);

uint8_t *new_buf = (uint8_t *) realloc((void *)saved_buf, max_size);
    if (!new_buf) {
      *out_buf = buf;
      return buf_size;
    }
    saved_buf = new_buf;

memcpy(new_buf, buf, buf_size);

size_t new_size = LLVMFuzzerCustomMutator(
      new_buf,
      buf_size,
      max_size,
      dis(engine_pro)
    );
    *out_buf = new_buf;
    return new_size;
  }

size_t afl_custom_post_process(void* data, uint8_t *buf, size_t buf_size, uint8_t **out_buf) {
    #pragma unused (data)
    // new_data is never free'd by pre_save_handler
    // I prefer a slow but clearer implementation for now

static uint8_t *saved_buf = NULL;

menuctf::ChoiceList msg;
    std::stringstream stream;
    // 如果加载成功
    if (protobuf_mutator::libfuzzer::LoadProtoInput(true, buf, buf_size, &msg)) {
      ProtoToDataHelper(stream, msg);
    }
    else {
      // printf("[afl_custom_post_process] LoadProtoInput Error\n");
      // std::ofstream err_bin("err.bin");
      // err_bin.write((char*)buf, buf_size);

// abort();

// 如果加载失败,则返回 Exit Choice
      /// NOTE: 错误的变异 + 错误的 trim 将会导致 post process 加载失败,尤其是 trim 逻辑。
      /// TODO: 由于默认的 trim 会破坏样例,因此需要手动实现一个 trim,这里实现了一个空 trim,不进行任何操作
      ProtoToDataHelper(stream, menuctf::ExitChoice());
    }
    const std::string str = stream.str();

uint8_t *new_buf = (uint8_t *) realloc((void *)saved_buf, str.size());
    if (!new_buf) {
      *out_buf = buf;
      return buf_size;
    }
    *out_buf = saved_buf = new_buf;

memcpy((void *)new_buf, str.c_str(), str.size());

return str.size();
  }

int32_t  afl_custom_init_trim(void *data, uint8_t *buf, size_t buf_size) {
    /// NOTE: disable trim
    return 0;
  }

size_t afl_custom_trim(void *data, uint8_t **out_buf) {
    /// NOTE: unreachable
    return 0;
  }

} -
当然,编写上面的代码需要做一次又一次的测试,这里放上笔者的测试代码片段。这部分测试代码位于
afl-libprotobuf-mutator/src/dump.cc。inline std::string slurp(const std::string& path) {
std::ostringstream buf;
std::ifstream input (path.c_str());
buf << input.rdbuf();
return buf.str();
}
extern "C" {
void *afl_custom_init(void *afl, unsigned int seed);
size_t afl_custom_fuzz(void *data, unsigned char *buf, size_t buf_size, unsigned char **out_buf,
unsigned char *add_buf, size_t add_buf_size, size_t max_size);
size_t afl_custom_post_process(void* data, uint8_t *buf, size_t buf_size, uint8_t **out_buf);
void afl_custom_deinit(void *data);
}
int main(int argc, char *argv[]) {
menuctf::ChoiceList msg;
if (argc == 2) {
std::string data = slurp(argv[1]);
if(!protobuf_mutator::libfuzzer::LoadProtoInput(true, (const uint8_t *)data.c_str(), data.size(), &msg)) {
printf("[afl_custom_post_process] LoadProtoInput Error\n");
abort();
}
// 测试变异逻辑
void* init_data = afl_custom_init(nullptr, time(NULL));
for(int i = 0; i < 30; i++) {
uint8_t *out_buf = nullptr;
size_t new_size = afl_custom_fuzz(init_data, (uint8_t*)data.c_str(), data.size(),
&out_buf, nullptr, 0, data.size() + 100);
uint8_t *new_str = nullptr;
size_t new_str_size = afl_custom_post_process(init_data, out_buf, new_size, &new_str);
std::string new_str_str((char*)new_str, new_str_size);
std::cout << i << ": " << new_str_str << std::endl;
}
afl_custom_deinit(init_data);
} else {
// alloc 12 "[menuctf::AllocChoice]"
{
auto choice = new menuctf::AllocChoice();
choice->set_size(12);
choice->set_content("[menuctf::AllocChoice]");
msg.add_choice()->set_allocated_alloc_choice(choice);
}
// update 2 20 "[menuctf::UpdateChoice]"
{
auto choice = new menuctf::UpdateChoice();
choice->set_idx(2);
choice->set_size(20);
choice->set_content("[menuctf::UpdateChoice]");
msg.add_choice()->set_allocated_update_choice(choice);
}
// DeleteChoice 3
{
auto choice = new menuctf::DeleteChoice();
choice->set_idx(3);
msg.add_choice()->set_allocated_delete_choice(choice);
}
// ViewChoice 4
{
auto choice = new menuctf::ViewChoice();
choice->set_idx(4);
msg.add_choice()->set_allocated_view_choice(choice);
}
// ExitChoice
{
auto choice = new menuctf::ExitChoice();
msg.add_choice()->set_allocated_exit_choice(choice);
}
std::ofstream output_file("output.bin", std::ios::binary);
// 这里保存的 Serialize 必须使用 Partial 保存,
msg.SerializePartialToOstream(&output_file);
output_file.close();
}
// std::cout << "msg DebugString: " << msg.DebugString() << std::endl;
std::stringstream stream;
ProtoToDataHelper(stream, msg);
std::cout << stream.str() << std::endl;
return 0;
} -
接下来只需在
afl-libprotobuf-mutator文件夹下执行./build.sh && make即可,完成后,在当前工作路径下将会生成dumper、libmutator.so以及mutator三个文件。我们可以利用 dumper 对上面的代码进行测试,libmutator.so 用于 afl++ 中的自定义变异。
3. 配置 AFL++
现在压力来到了 AFL++ 这里(笑),我们先试试看能不能马上跑起来。
尝试执行以下命令来构建 AFL++:
# 构建 AFLplusplus
# 1. 安装依赖项
sudo apt-get update
sudo apt-get install -y ninja-build build-essential python3-dev automake git flex bison libglib2.0-dev libpixman-1-dev python3-setuptools
# try to install llvm 11 and install the distro default if that fails
sudo apt-get install -y lld-11 llvm-11 llvm-11-dev clang-11 || sudo apt-get install -y lld llvm llvm-dev clang
sudo apt-get install -y gcc-$(gcc --version|head -n1|sed 's/.* //'|sed 's/\..*//')-plugin-dev libstdc++-$(gcc --version|head -n1|sed 's/.* //'|sed 's/\..*//')-dev
# 2. 开始构建
cd AFLplusplus
make distrib # 这一步要等一段时间
# sudo make install # 将 AFL++ 安装至本机
# 如果不需要了可以使用 sudo make uninstall 卸载
执行以下命令运行 AFL++:
# AFL++ 构建完成后,进入 workdir 配置语料
mkdir workdir
[配置语料等等...]

# 设置相关环境变量
export AFL_CUSTOM_MUTATOR_ONLY=1 # 禁用除自定义 mutator 以外的其他自带 mutator
export AFL_CUSTOM_MUTATOR_LIBRARY=../afl-libprotobuf-mutator/libmutator.so # 指定自定义路径
export AFL_USE_QASAN=1  # 启用 QASAN

# 运行 AFL++
AFLplusplus/afl-fuzz -i workdir/fuzz_input -o workdir/fuzz_output -Q -- ./babyheap
别忘记在 workdir 中放点输入语料,语料可以通过 afl-libprotobuf-mutator/dumper 来随便生成一点。
运行时如果遇到 afl-quemu-trace 不存在,则单独执行AFLplusplus/qemu_mode/build_qemu_support.sh 构建即可。
三、源代码
相关源代码以及构建方式已开源至 github 上。
四、可改进的地方
- libprotobuf-mutator 的变异效果一般,最好手动改进一下
- 需要实现一下 trim 逻辑,空的 trim 逻辑可能会产生 样例爆炸
五、一些需要注意的点
如果在运行 AFL++ 后,发现 fuzz 始终无法发现新路径,即路径始终只有一个,那么就必须考虑目标CTF文件是否可执行。以当前的 babyheap2021 为例,笔者在测试时初始 AFL++ 状态如下:

尝试直接执行 babyheap,发现 Permission Denied无法执行。但即便赋以 excutable 权限,仍然无法执行,报错 no such file or directory:
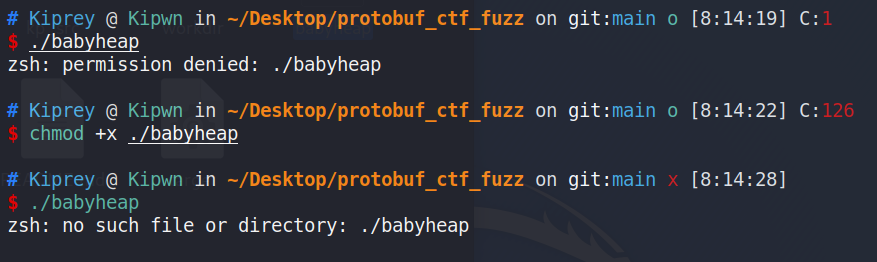
这一看,要么是架构问题,要么是 libc.so / ld.so 的问题。因此执行以下命令以更新 babyheap 所使用的 libc.so & ld.so,之后便可以正常执行。
patchelf --set-interpreter /lib64/ld-linux-x86-64.so.2 ./babyheap
patchelf --replace-needed libc.so libc.so.6 ./babyheap
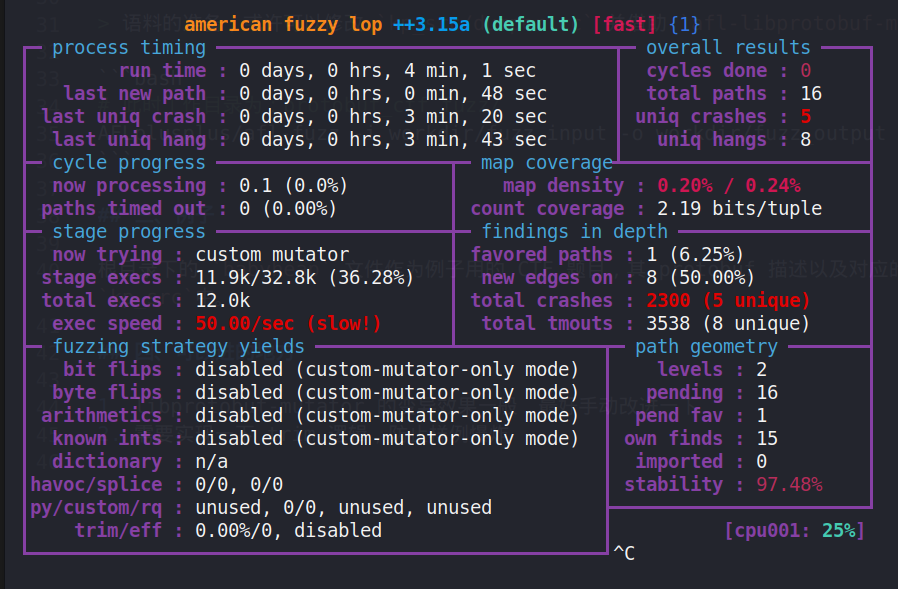
跑起来效果,还行?(不是很懂.jpg)
Recommend
About Joyk
Aggregate valuable and interesting links.
Joyk means Joy of geeK