

在 GKE 上的 Istio 实践
source link: https://supereagle.github.io/2018/09/23/istio-on-gke/
Go to the source link to view the article. You can view the picture content, updated content and better typesetting reading experience. If the link is broken, please click the button below to view the snapshot at that time.
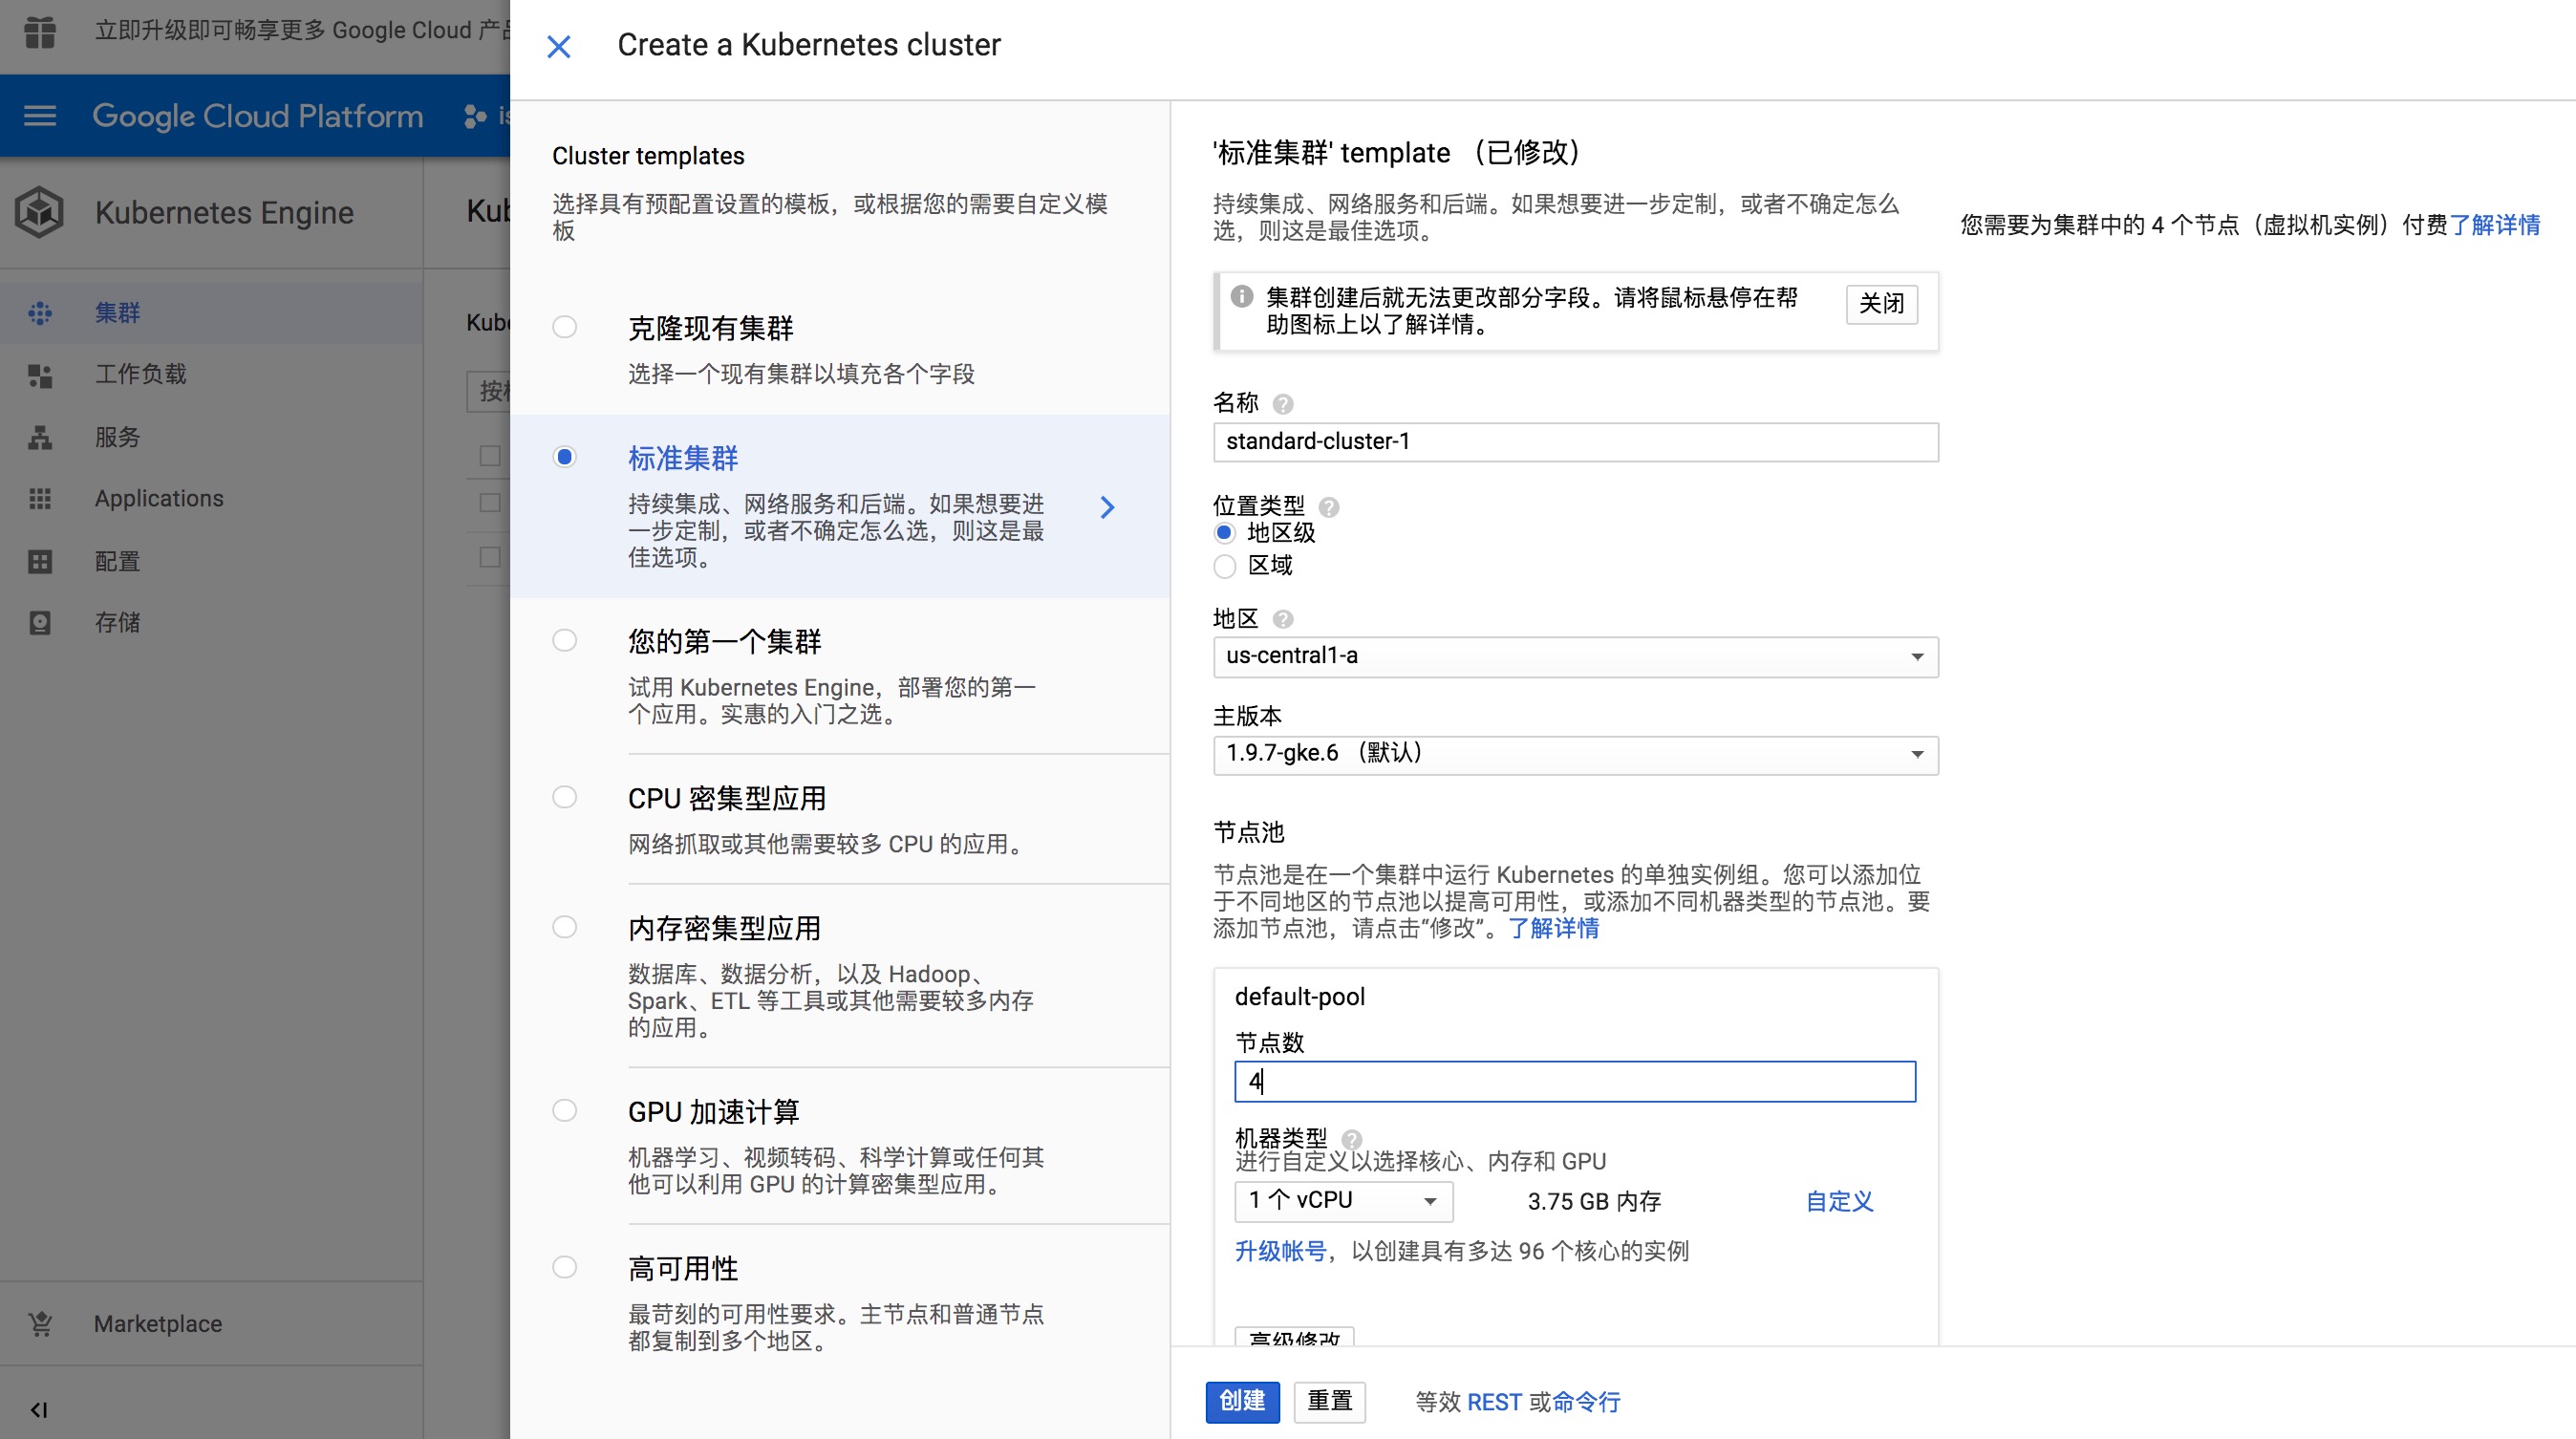
GKE 中新建 K8s 集群
GKE 是 Google Cloud 提供的 K8s 托管式环境,能够一键快速部署 K8s 集群。
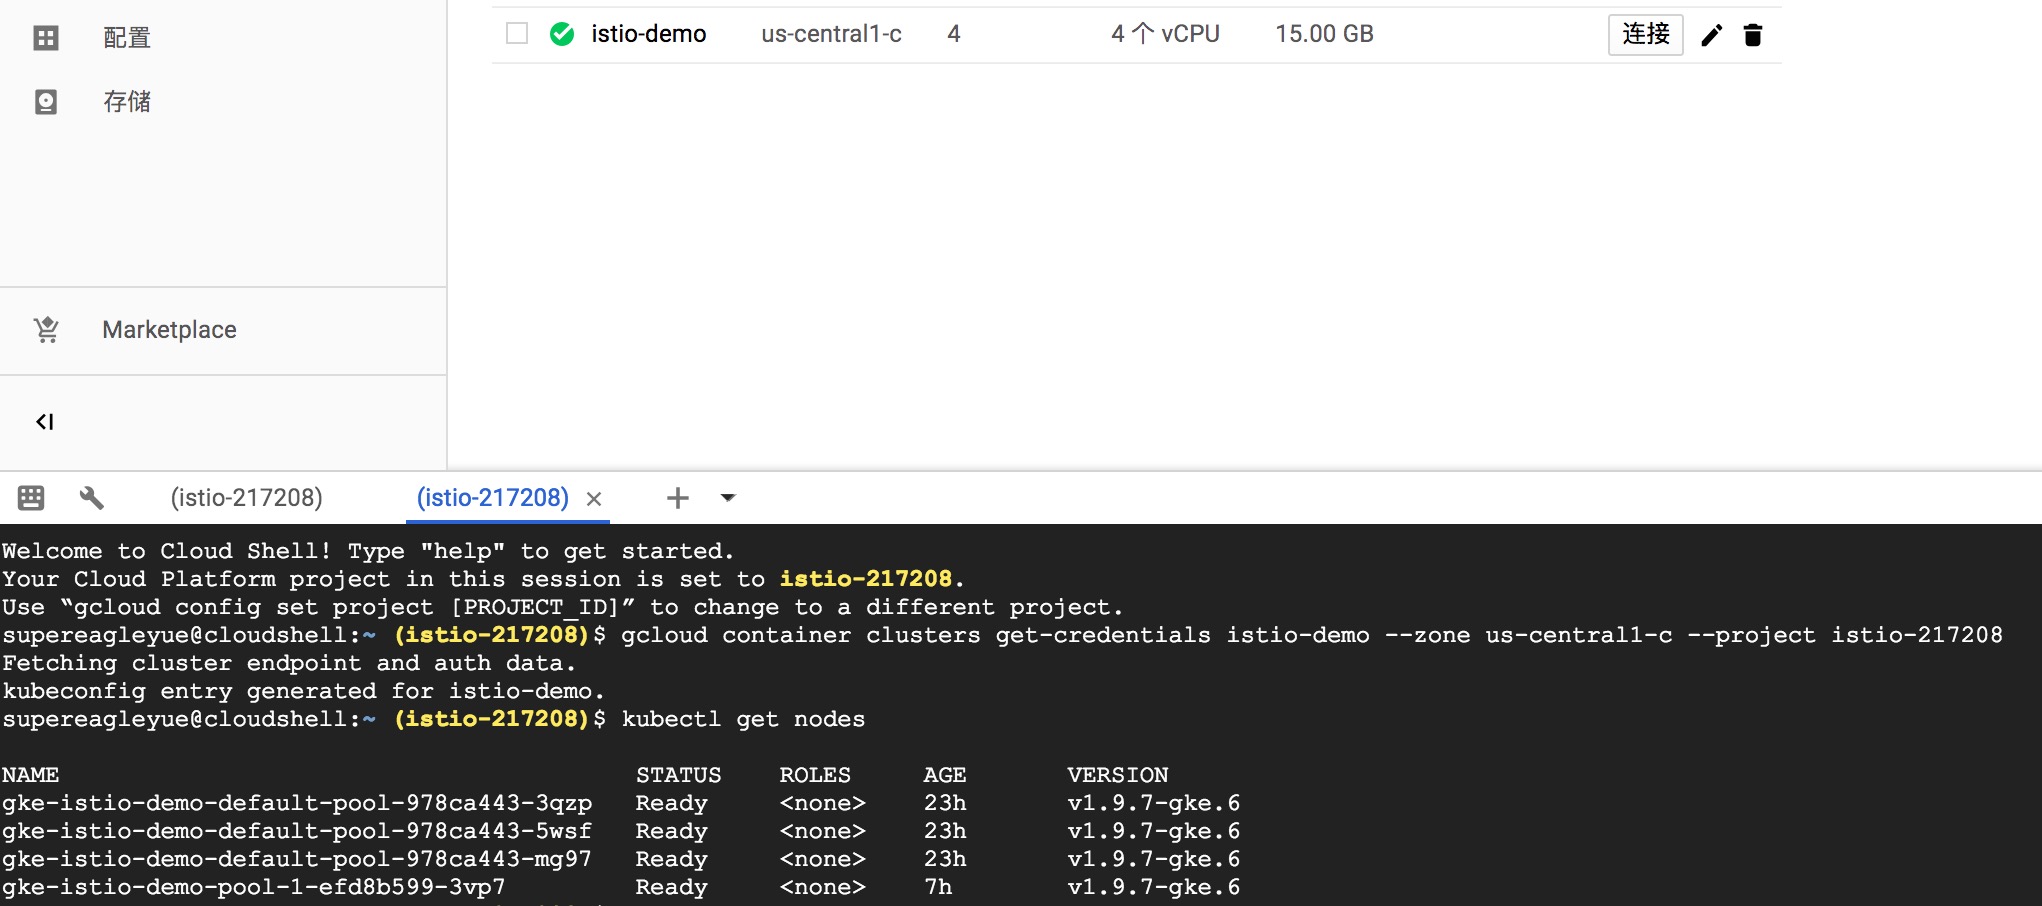
K8s 需要几分钟才能创建成功。通过 Cloud Shell 连接到 K8s 环境中进行操作。例如,查看所有节点信息:
Install Istio
-
下载 Istio 安装包
$ curl -L https://git.io/getLatestIstio | ISTIO_VERSION=1.0.0 sh - -
将 Istio 加入 PATH 环境变量中
$ export PATH="$PATH:/home/supereagleyue/istio-1.0.0/bin"如果想设置的 PATH 永久生效,需要将这条命令加入到
~/.profile末尾。注意:上述路径中的 user 替换成自己的账号。
-
安装 Istio
Istio 安装包中,包含了安装 Istio 和示例应用 Bookinfo 需要的所有 YAML。
 # 进入 Istio 安装包目录
 $ cd istio-1.0.0

 # 创建 Istio 自定义的 CRD
 $ kubectl apply -f install/kubernetes/helm/istio/templates/crds.yaml -n istio-system

 # 安装 Istio
 $ kubectl apply -f install/kubernetes/istio-demo-auth.yaml

 # 检查 Istio 所有组件状态是否为 Running 或者 Completed
 $ kubectl get pods -n istio-system
安装 Istio 过程中,会出现权限不足的问题:
 Error from server (Forbidden): error when creating "install/kubernetes/istio-demo-auth.yaml": clusterroles.rbac.authorization.k8s.io "istio-grafana-post-install-istio-system" is forbidden: attempt to grant extra privileges: [PolicyRule{Resources:["*"], APIGroups:["authentication.istio.io"], Verbs:["*"]}] user=&{[email protected]  [system:authenticated] map[user-assertion.cloud.google.com:[AF1jyJB+lII3L3toyZbwIJQXKdBKhUmyLlJ5CFgWJOl7zybAn3W4nkDjWBdp+KSkTukOFeaM2gO2Zf+Yx7jKEBoYCo7FLzV8teG3SWnPFsx83doMC/HDaAci70nxgQRpZ0C7mzu3GyR6Ix2o0yotMzF7XLGJaBNV54vEp6zkyCAp3GFHqWUKeZYoucwTx4JFs7NuA1FCQVHbWzrl1i4UdU+iM4qvB4p+Zjz4gThXHK1G]]} ownerrules=[PolicyRule{Resources:["selfsubjectaccessreviews" "selfsubjectrulesreviews"], APIGroups:["authorization.k8s.io"], Verbs:["create"]} PolicyRule{NonResourceURLs:["/api" "/api/*" "/apis" "/apis/*" "/healthz" "/swagger-2.0.0.pb-v1" "/swagger.json" "/swaggerapi" "/swaggerapi/*" "/version"], Verbs:["get"]}] ruleResolutionErrors=[]
 Error from server (Forbidden): error when creating "install/kubernetes/istio-demo-auth.yaml": clusterroles.rbac.authorization.k8s.io "istio-cleanup-secrets-istio-system" is forbidden: attempt to grant extra privileges: [PolicyRule{Resources:["secrets"], APIGroups:[""], Verbs:["list"]} PolicyRule{Resources:["secrets"], APIGroups:[""], Verbs:["delete"]}] user=&{[email protected]  [system:authenticated] map[user-assertion.cloud.google.com:[AF1jyJB+lII3L3toyZbwIJQXKdBKhUmyLlJ5CFgWJOl7zybAn3W4nkDjWBdp+KSkTukOFeaM2gO2Zf+Yx7jKEBoYCo7FLzV8teG3SWnPFsx83doMC/HDaAci70nxgQRpZ0C7mzu3GyR6Ix2o0yotMzF7XLGJaBNV54vEp6zkyCAp3GFHqWUKeZYoucwTx4JFs7NuA1FCQVHbWzrl1i4UdU+iM4qvB4p+Zjz4gThXHK1G]]} ownerrules=[PolicyRule{Resources:["selfsubjectaccessreviews" "selfsubjectrulesreviews"], APIGroups:["authorization.k8s.io"], Verbs:["create"]} PolicyRule{NonResourceURLs:["/api" "/api/*" "/apis" "/apis/*" "/healthz" "/swagger-2.0.0.pb-v1" "/swagger.json" "/swaggerapi" "/swaggerapi/*" "/version"], Verbs:["get"]}] ruleResolutionErrors=[]
解决办法是,为当前账号创建
clusterrolebinding:kubectl create clusterrolebinding cluster-admin-binding \ --clusterrole=cluster-admin \ --user=$(gcloud config get-value core/account)注意:
gcloud config get-value core/account获得的账号,并不一定跟错误日志中的 user 相同,以错误日志中的 user 为准。
Deploy Bookinfo
Bookinfo 是一个由四个微服务组成的示例应用,能够充分展示 Istio 对微服务的治理能力。
-
部署 Bookinfo
Istio 提供两种方式向应用的 pod 中注入 sidecar:
- 手动注入:通过修改 Pod template,Istio 的命令行工具
istioctl提供手动注入的功能。
$ kubectl apply -f <(istioctl kube-inject -f samples/bookinfo/platform/kube/bookinfo.yaml)- 自动注入:通过 K8s 提供的 mutating webhook admission controller 机制,要求 K8s 1.9+。只需要再 namespace 上设置标签
istio-injection=enabled.
# 给 default namespace 设置标签 $ kubectl label namespace default istio-injection=enabled $ kubectl get namespace -L istio-injection NAME STATUS AGE ISTIO-INJECTION default Active 1h enabled istio-system Active 1h kube-public Active 1h kube-system Active 1h # 部署 Bookinfo $ kubectl apply -f samples/bookinfo/kube/bookinfo.yaml - 手动注入:通过修改 Pod template,Istio 的命令行工具
-
部署 BookInfo Gateway
Gateway 类似于 K8s 的 Ingress,是外部流量进入集群的入口,Istio 通过它控制进入的 HTTP/TCP 流量。
$ kubectl apply -f samples/bookinfo/networking/bookinfo-gateway.yaml
Show Results
通过 LB 将 Istio 的一些插件的服务暴露出来,使它们能够被外部直接访问。因此,新建了一个 lb-svc.yaml,内容如下:
apiVersion: v1
kind: Service
metadata:
  labels:
    app: servicegraph
    chart: servicegraph-0.1.0
    heritage: Tiller
    release: RELEASE-NAME
  name: lb-servicegraph
  namespace: istio-system
spec:
  ports:
  - name: http
    port: 8088
    protocol: TCP
    targetPort: 8088
  selector:
    app: servicegraph
  type: LoadBalancer
---
apiVersion: v1
kind: Service
metadata:
  labels:
    app: grafana
    chart: grafana-0.1.0
    heritage: Tiller
    release: RELEASE-NAME
  name: lb-grafana
  namespace: istio-system
spec:
  ports:
  - name: http
    port: 3000
    protocol: TCP
    targetPort: 3000
  selector:
    app: grafana
  sessionAffinity: None
  type: LoadBalancer
---
apiVersion: v1
kind: Service
metadata:
  labels:
    app: jaeger
    chart: tracing-0.1.0
    heritage: Tiller
    jaeger-infra: jaeger-service
    release: RELEASE-NAME
  name: lb-jaeger-query
  namespace: istio-system
spec:
  ports:
  - name: query-http
    port: 16686
    protocol: TCP
    targetPort: 16686
  selector:
    app: jaeger
  type: LoadBalancer
---
apiVersion: v1
kind: Service
metadata:
  labels:
    name: prometheus
  name: lb-prometheus
  namespace: istio-system
spec:
  ports:
  - name: http-prometheus
    port: 9090
    protocol: TCP
    targetPort: 9090
  selector:
    app: prometheus
  type: LoadBalancer
# 通过 LB 暴露 Istio 组件服务
$ kubectl create -f lb-svc.yaml

# 查看 services
$ kubectl -n istio-system get svc
NAME                       TYPE           CLUSTER-IP      EXTERNAL-IP      PORT(S)                                                                                                     AGE
grafana                    ClusterIP      10.23.253.150   <none>           3000/TCP                                                                                                    5h
istio-citadel              ClusterIP      10.23.255.178   <none>           8060/TCP,9093/TCP                                                                                           5h
istio-egressgateway        ClusterIP      10.23.255.18    <none>           80/TCP,443/TCP                                                                                              5h
istio-galley               ClusterIP      10.23.248.131   <none>           443/TCP,9093/TCP                                                                                            5h
istio-ingressgateway       LoadBalancer   10.23.253.225   35.224.99.70     80:31380/TCP,443:31390/TCP,31400:31400/TCP,15011:30676/TCP,8060:31007/TCP,15030:32233/TCP,15031:31979/TCP   5h
istio-pilot                ClusterIP      10.23.247.42    <none>           15010/TCP,15011/TCP,8080/TCP,9093/TCP                                                                       5h
istio-policy               ClusterIP      10.23.255.61    <none>           9091/TCP,15004/TCP,9093/TCP                                                                                 5h
istio-sidecar-injector     ClusterIP      10.23.243.82    <none>           443/TCP                                                                                                     5h
istio-statsd-prom-bridge   ClusterIP      10.23.244.153   <none>           9102/TCP,9125/UDP                                                                                           5h
istio-telemetry            ClusterIP      10.23.254.247   <none>           9091/TCP,15004/TCP,9093/TCP,42422/TCP                                                                       5h
jaeger-agent               ClusterIP      None            <none>           5775/UDP,6831/UDP,6832/UDP                                                                                  5h
jaeger-collector           ClusterIP      10.23.249.69    <none>           14267/TCP,14268/TCP                                                                                         5h
jaeger-query               ClusterIP      10.23.242.150   <none>           16686/TCP                                                                                                   5h
lb-grafana                 LoadBalancer   10.23.247.121   104.198.156.45   3000:31459/TCP                                                                                              5h
lb-jaeger-query            LoadBalancer   10.23.244.196   35.193.144.224   16686:32708/TCP                                                                                             5h
lb-prometheus              LoadBalancer   10.23.253.125   35.184.215.99    9090:30665/TCP                                                                                              5h
lb-servicegraph            LoadBalancer   10.23.240.66    35.232.255.2     8088:31142/TCP                                                                                              5h
prometheus                 ClusterIP      10.23.250.251   <none>           9090/TCP                                                                                                    5h
servicegraph               ClusterIP      10.23.255.24    <none>           8088/TCP                                                                                                    5h
tracing                    ClusterIP      10.23.254.143   <none>           80/TCP                                                                                                      5h
zipkin                     ClusterIP      10.23.247.57    <none>           9411/TCP                                                                                                    5h
先给服务加一些负载,然后才能更好地看到 Istio 的效果。
$ export GATEWAY_URL=$(kubectl -n istio-system get service istio-ingressgateway -o jsonpath='{.status.loadBalancer.ingress[0].ip}')
$ echo $GATEWAY_URL

$ while true; do curl -s http://${GATEWAY_URL}/productpage > /dev/null; echo -n .; sleep 0.2; done
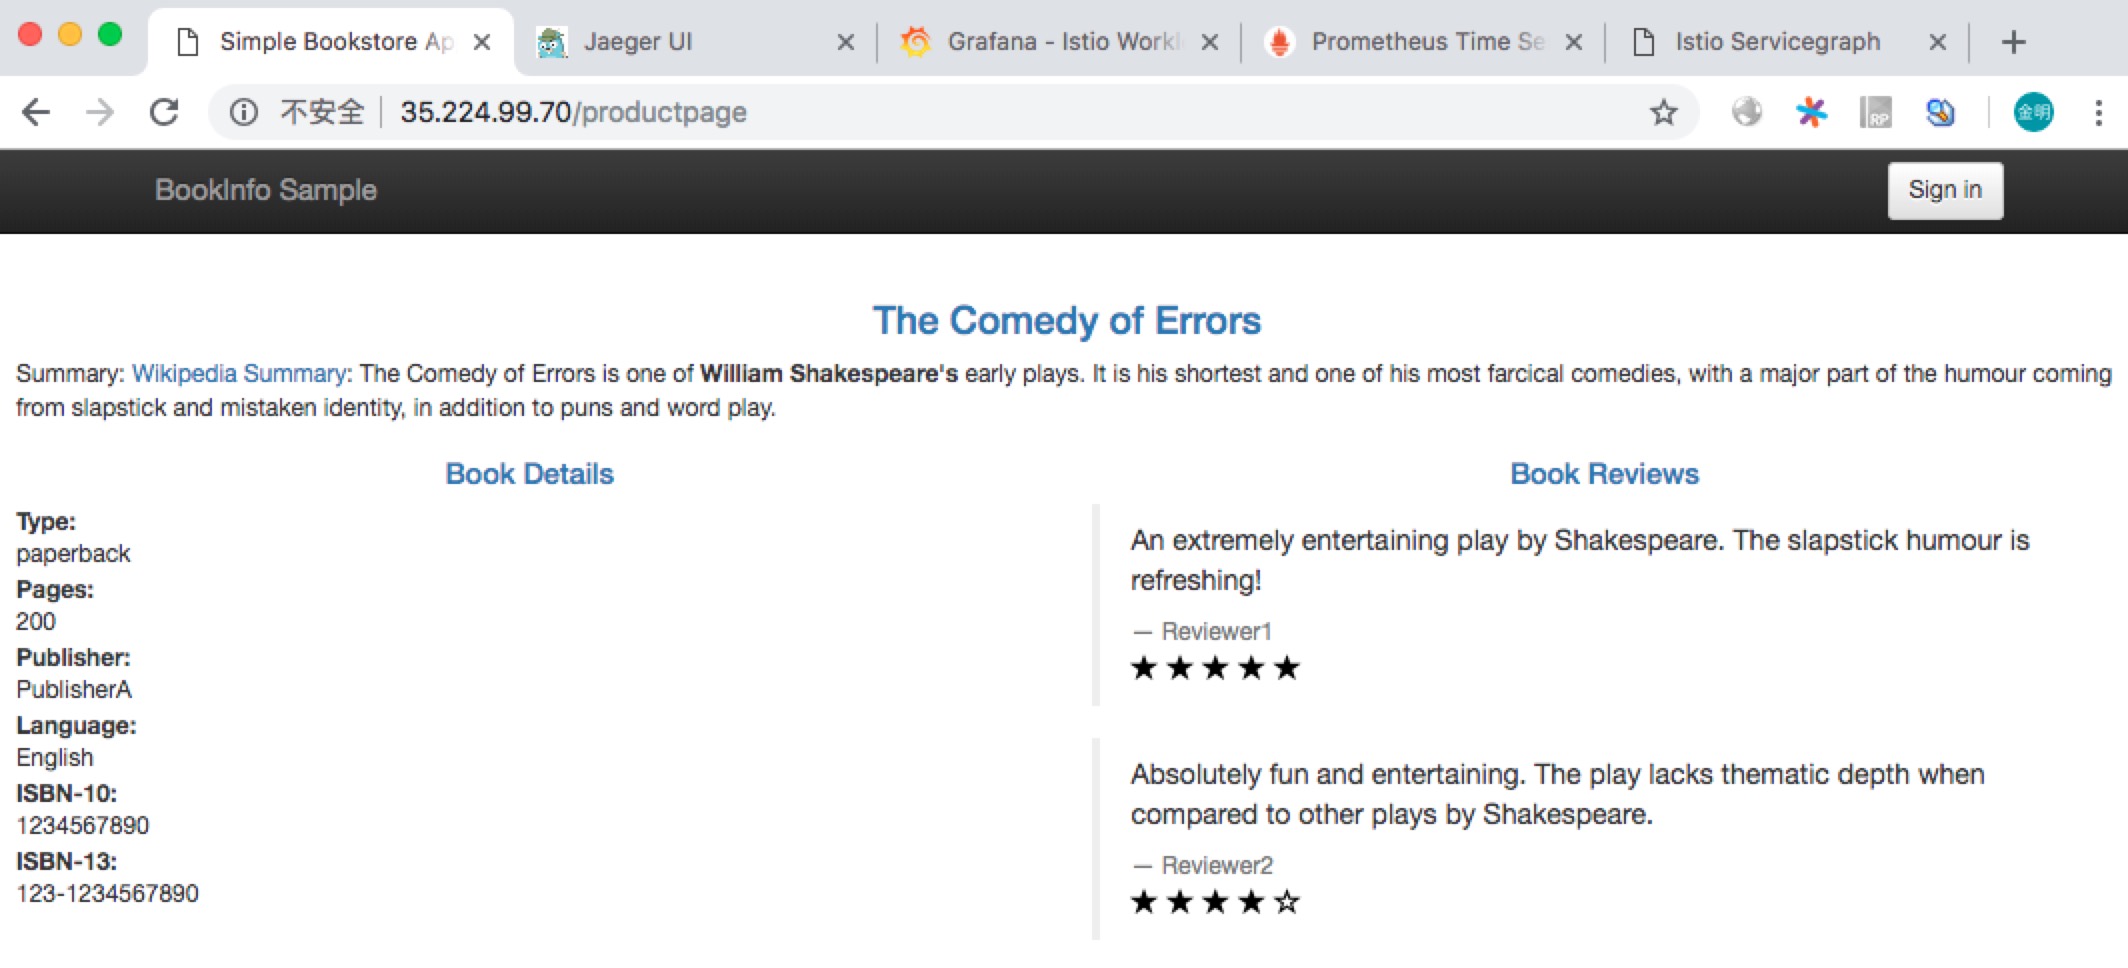
Product Page
访问 http://35.224.99.70/productpage 查看 Bookinfo 的前端界面,这是通过 istio-ingressgateway 转发的。如下图所示:
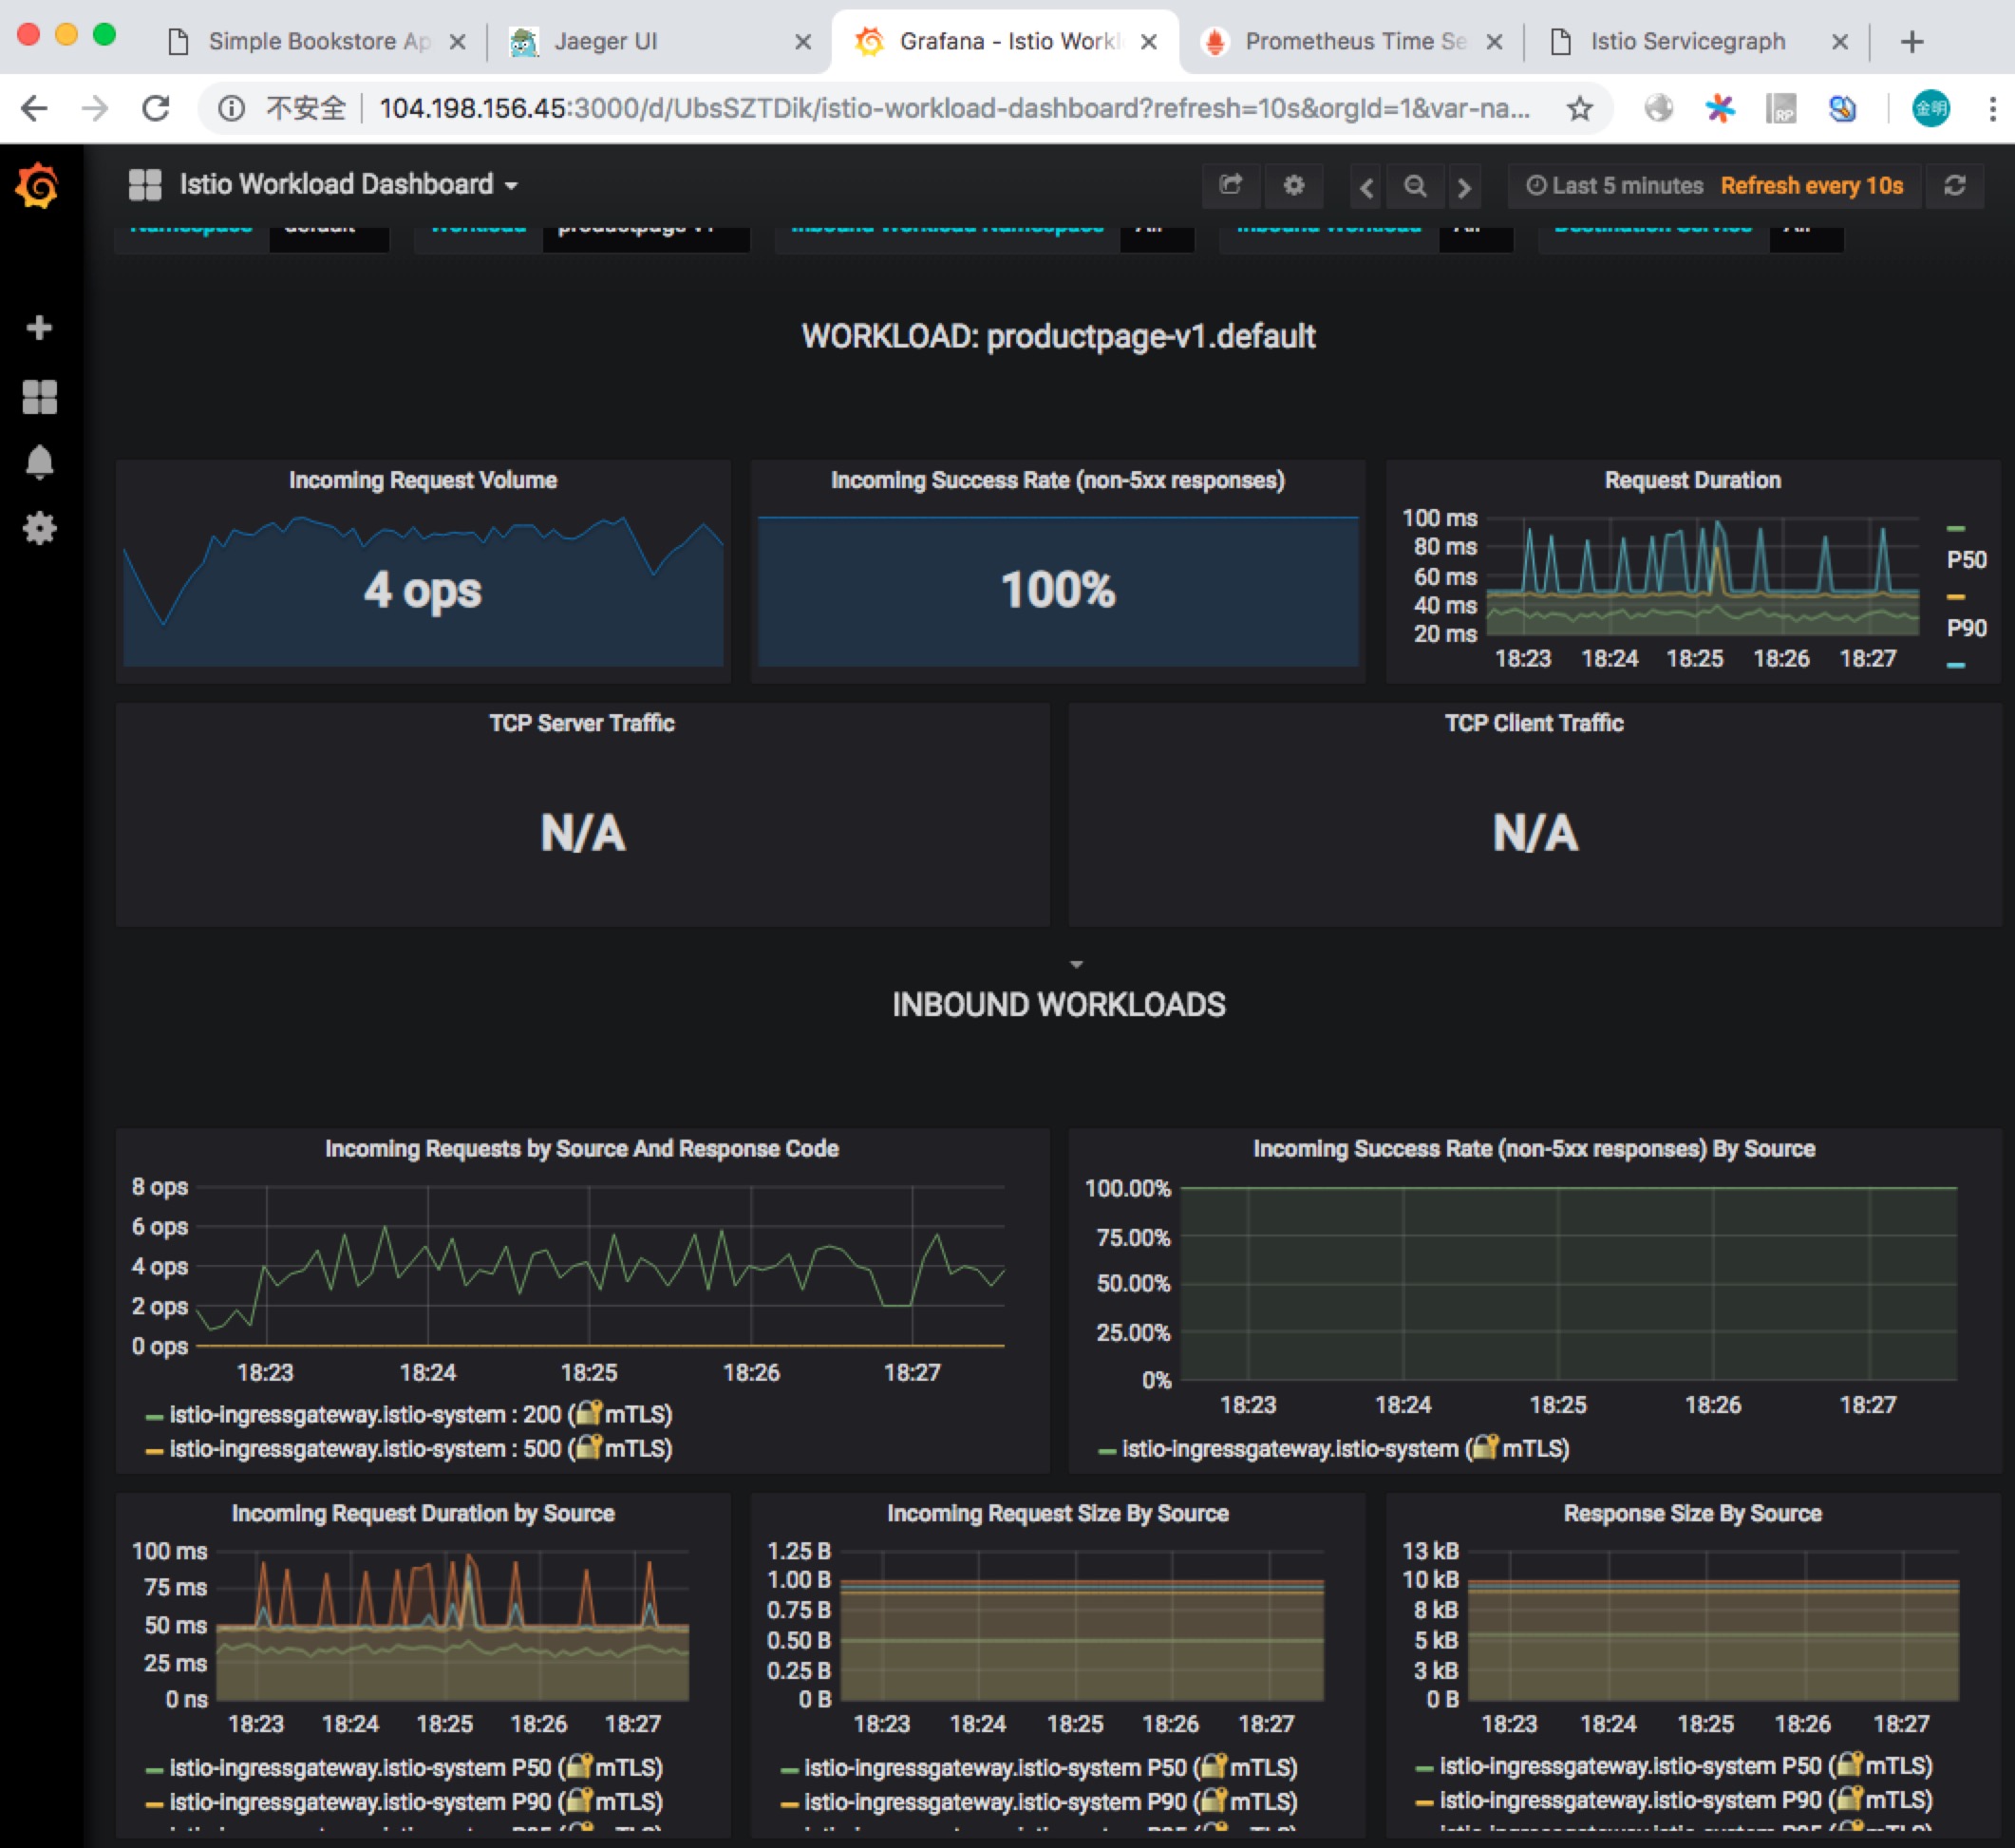
Grafana
访问 http://104.198.156.45:3000 查看 Grafana 结果,如下图所示:
Prometheus
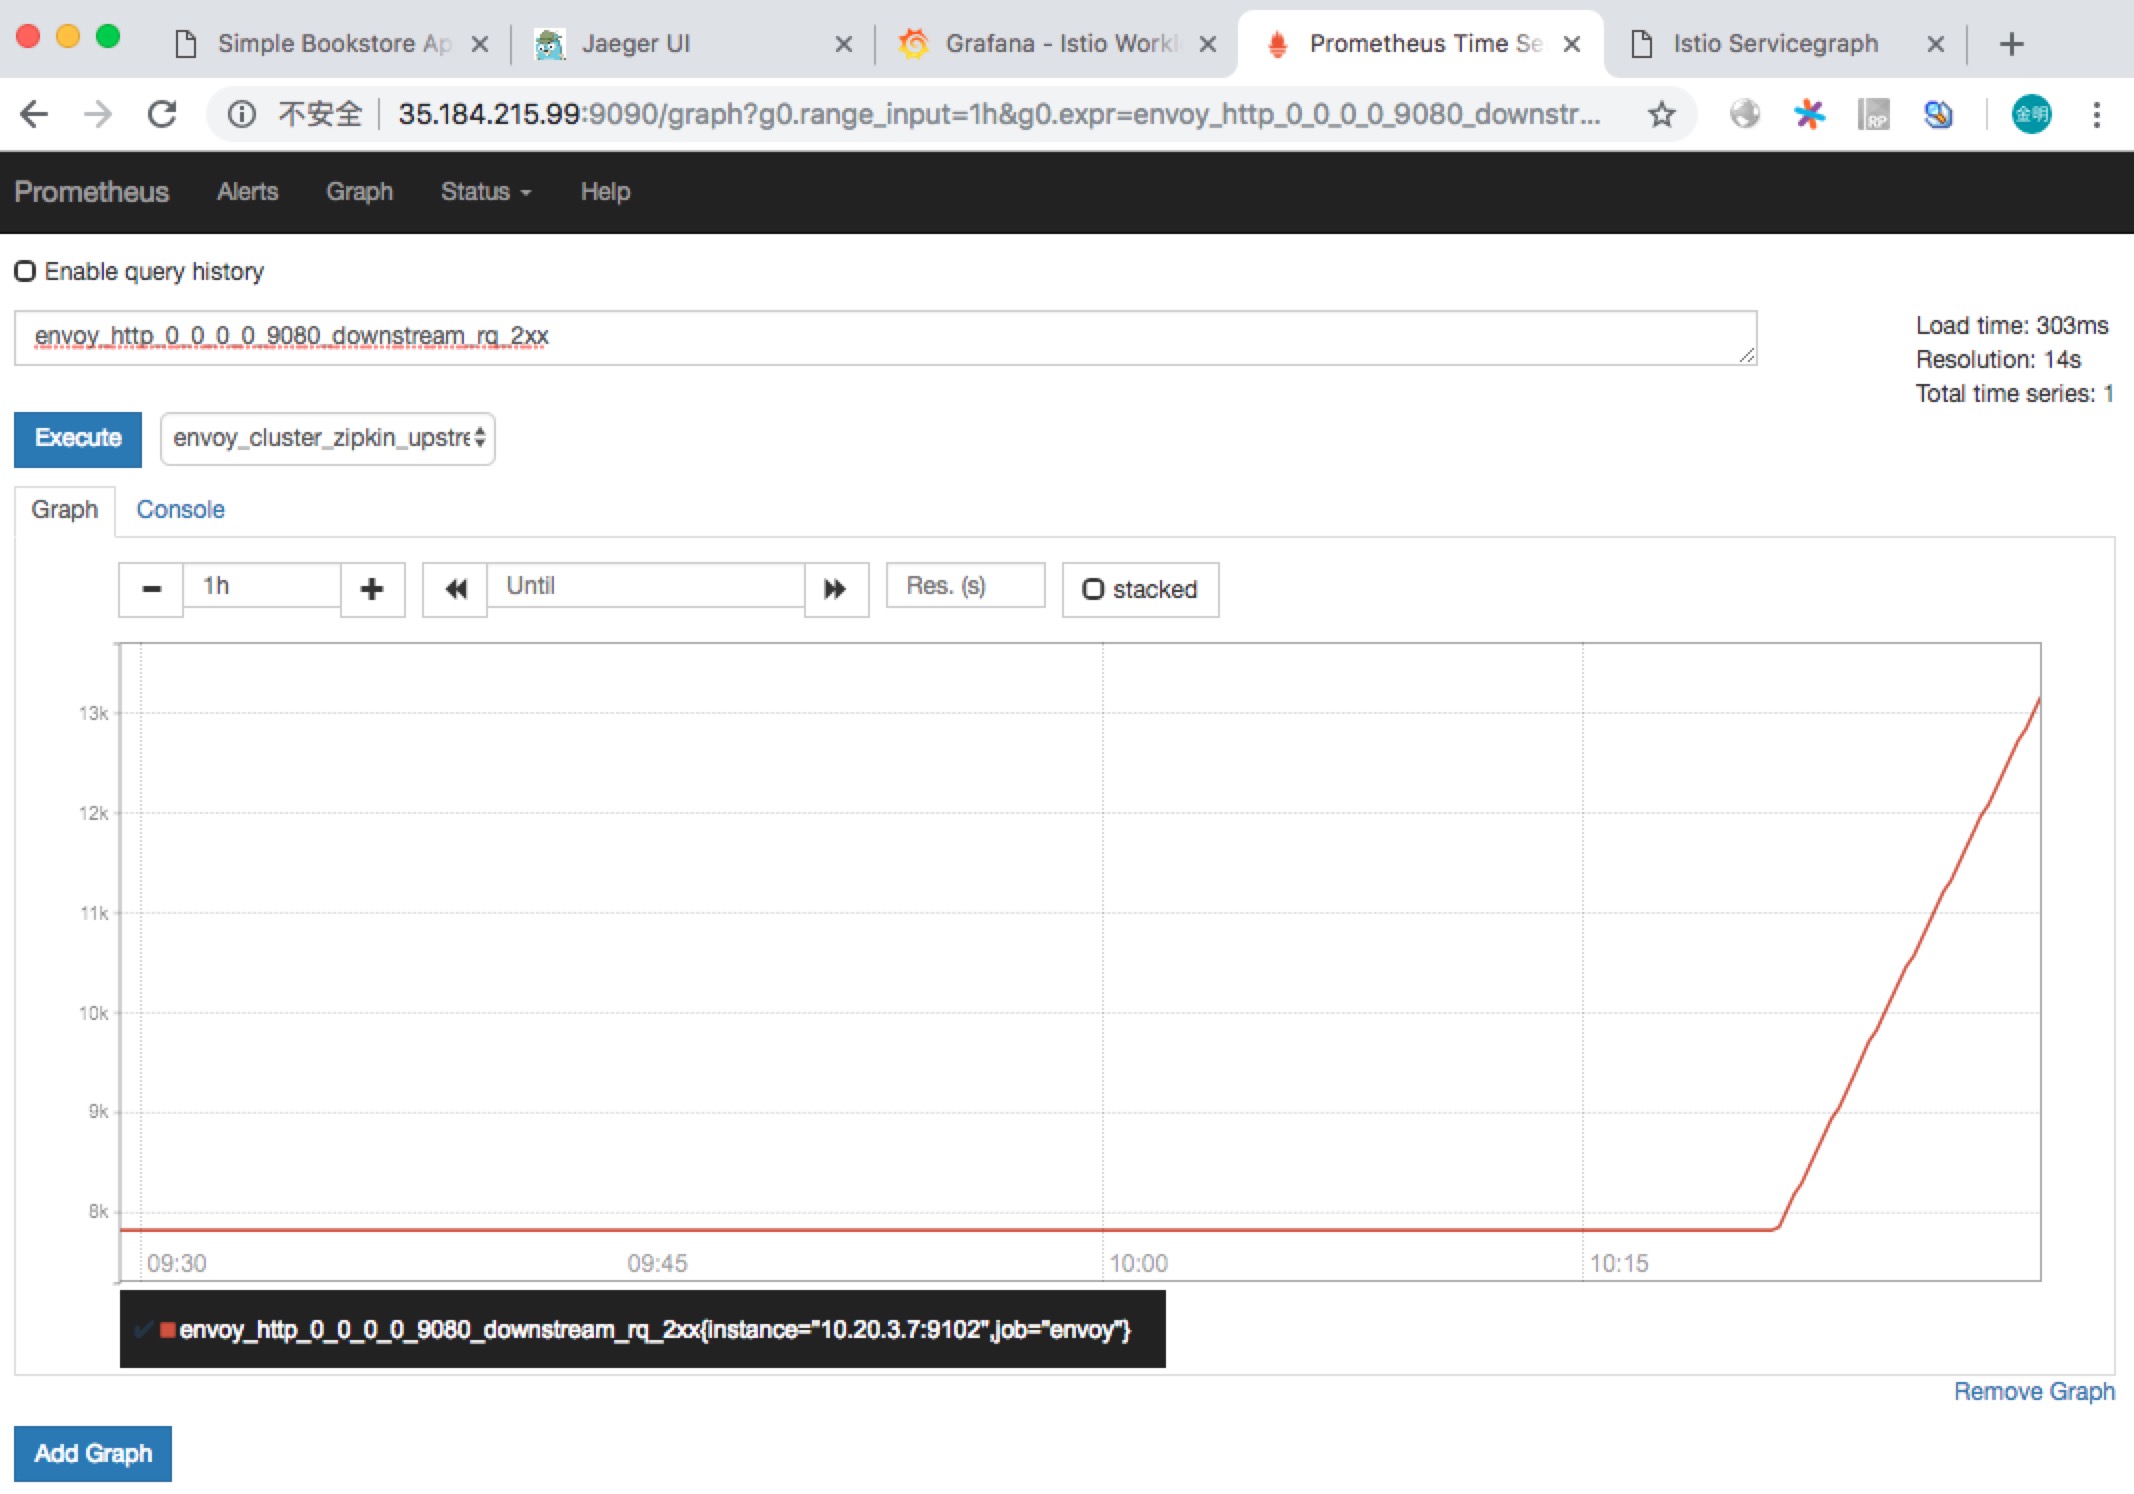
访问 http://35.184.215.99:9090/graph 查看 Prometheus 控制台,可以执行一些 Prom 查询语句。如下图所示:
ServiceGraph
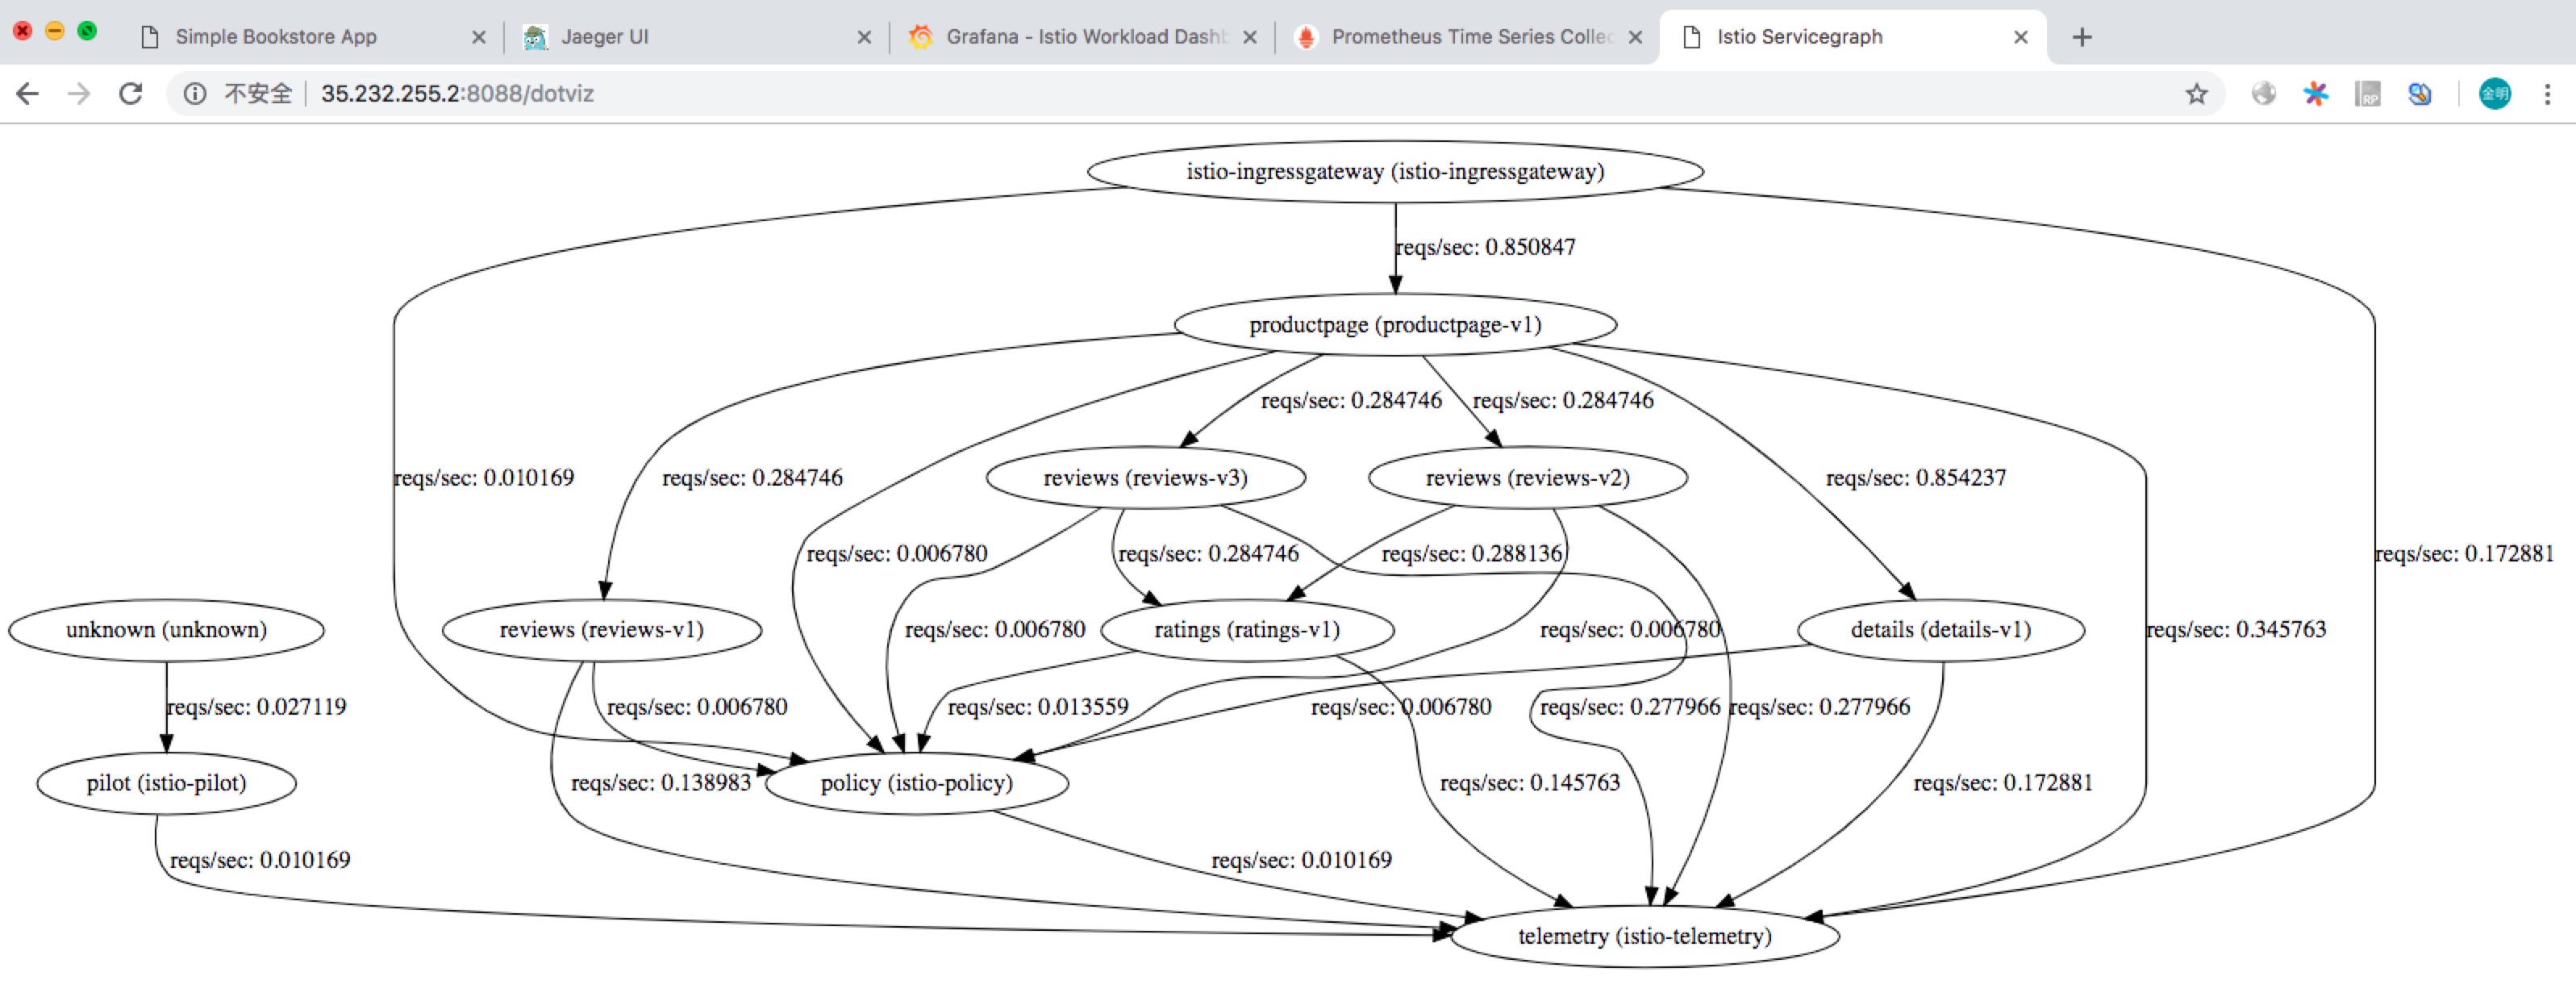
访问 http://35.232.255.2:8088/dotviz 查看 Bookinfo 的服务拓扑结构,如下图所示:
Tracing
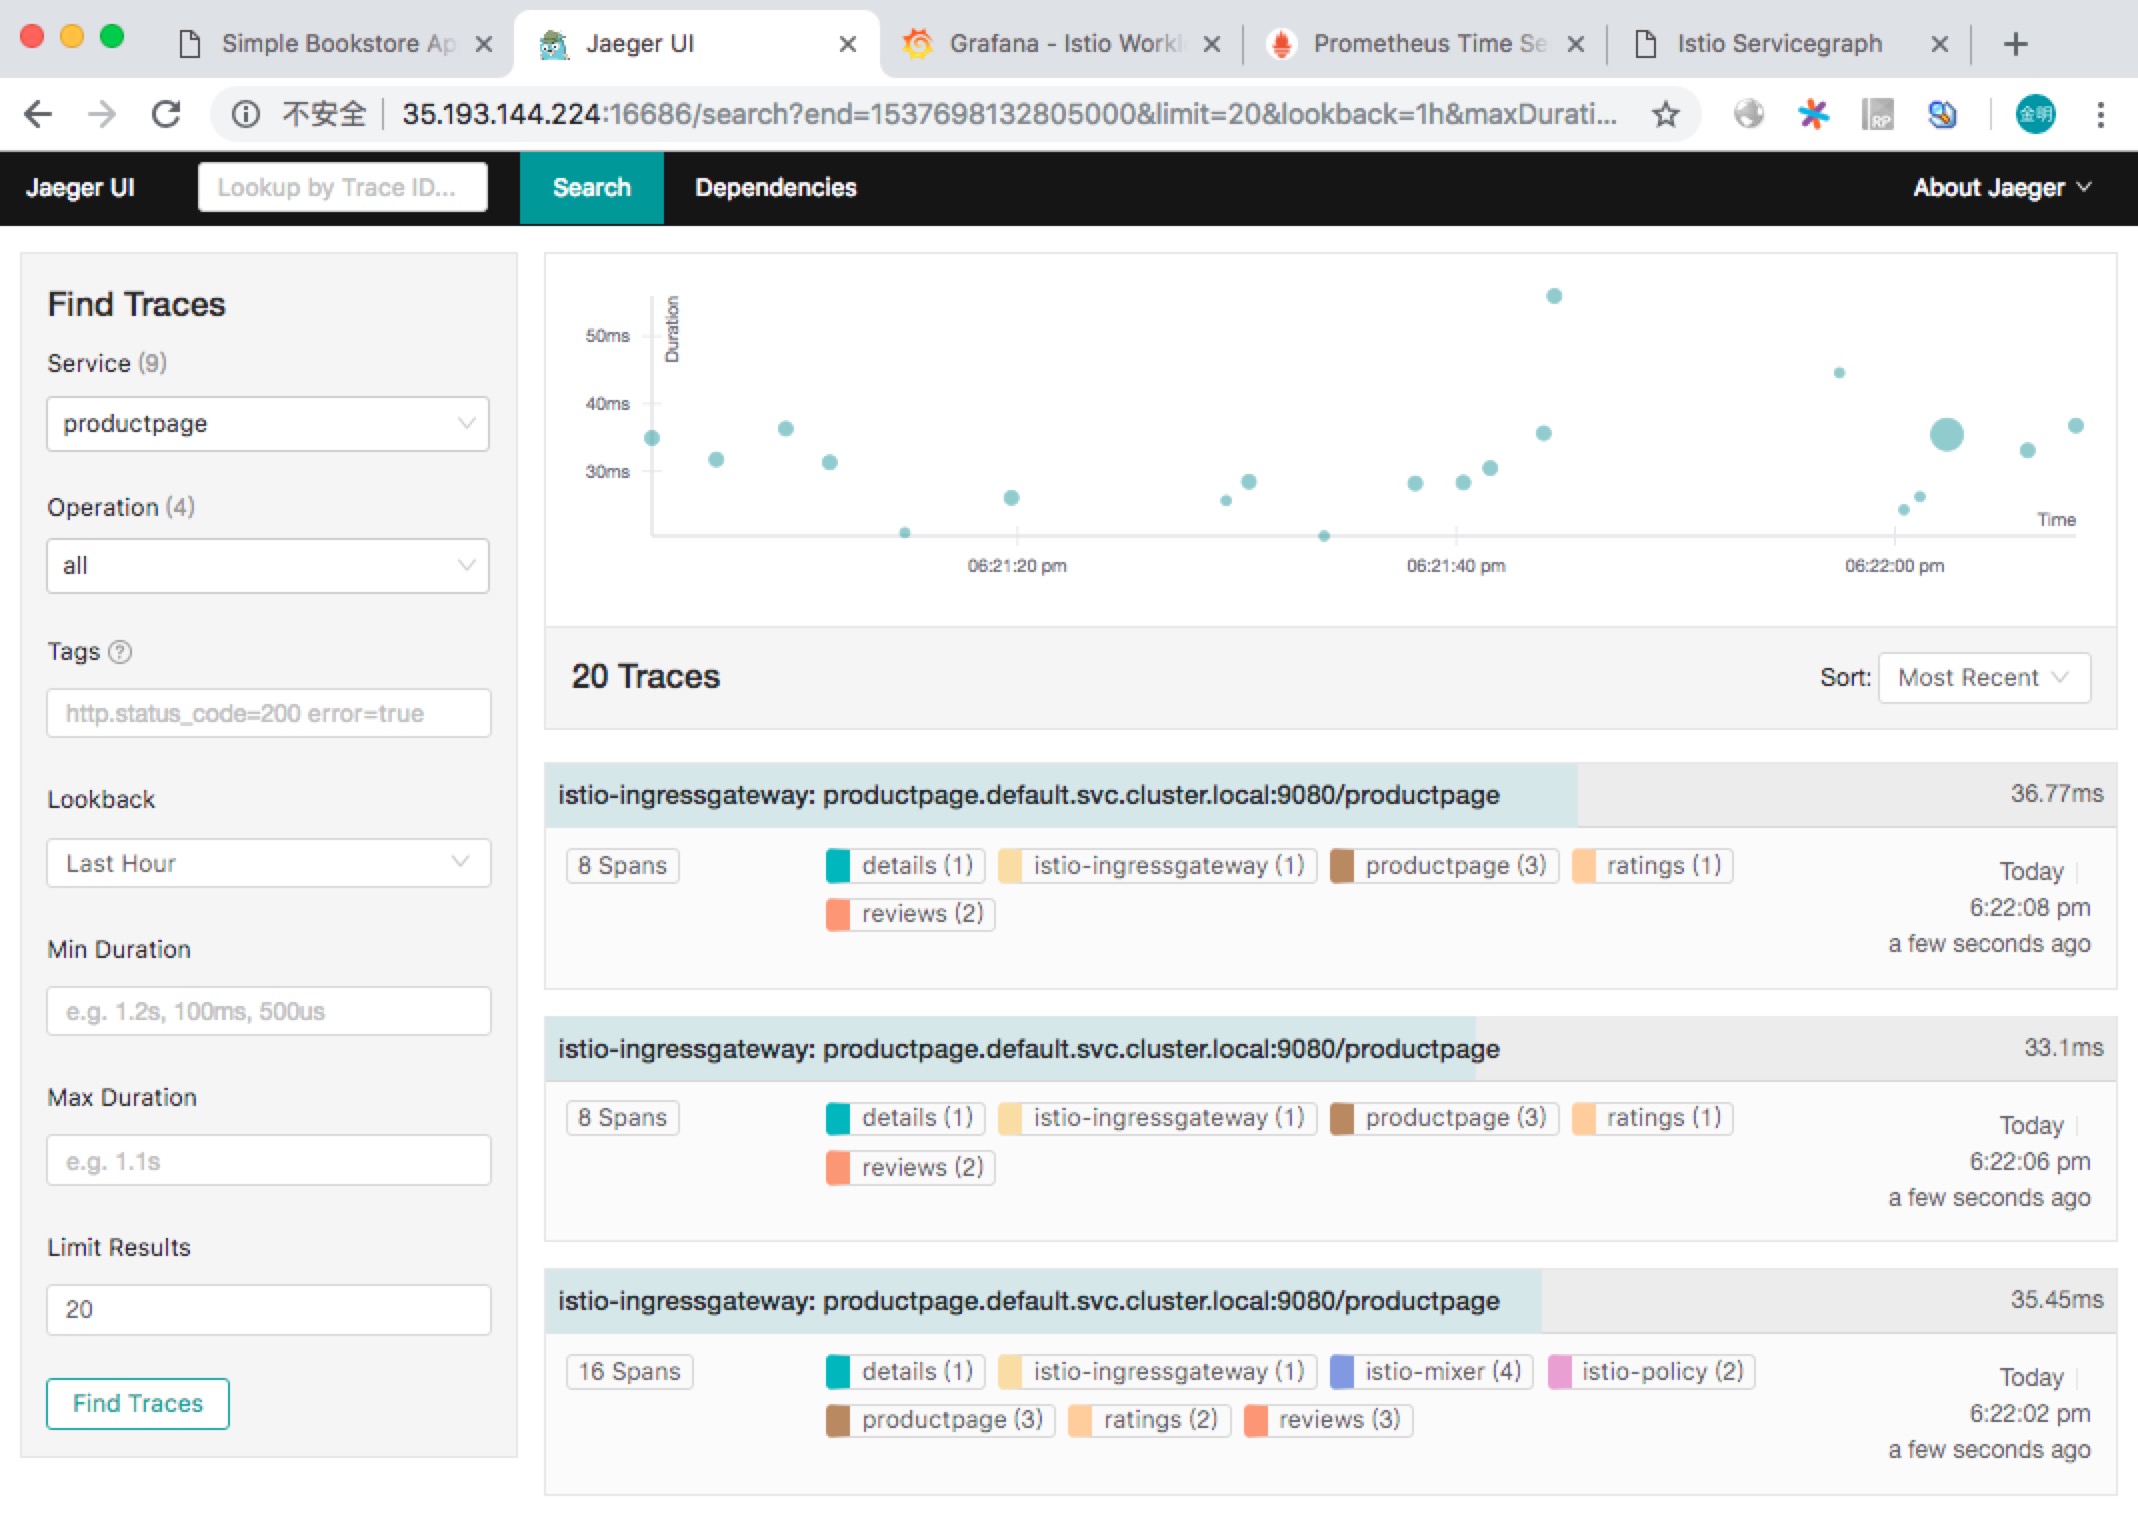
访问 http://35.193.144.224:16686 查看调用链追踪信息,如下图所示:
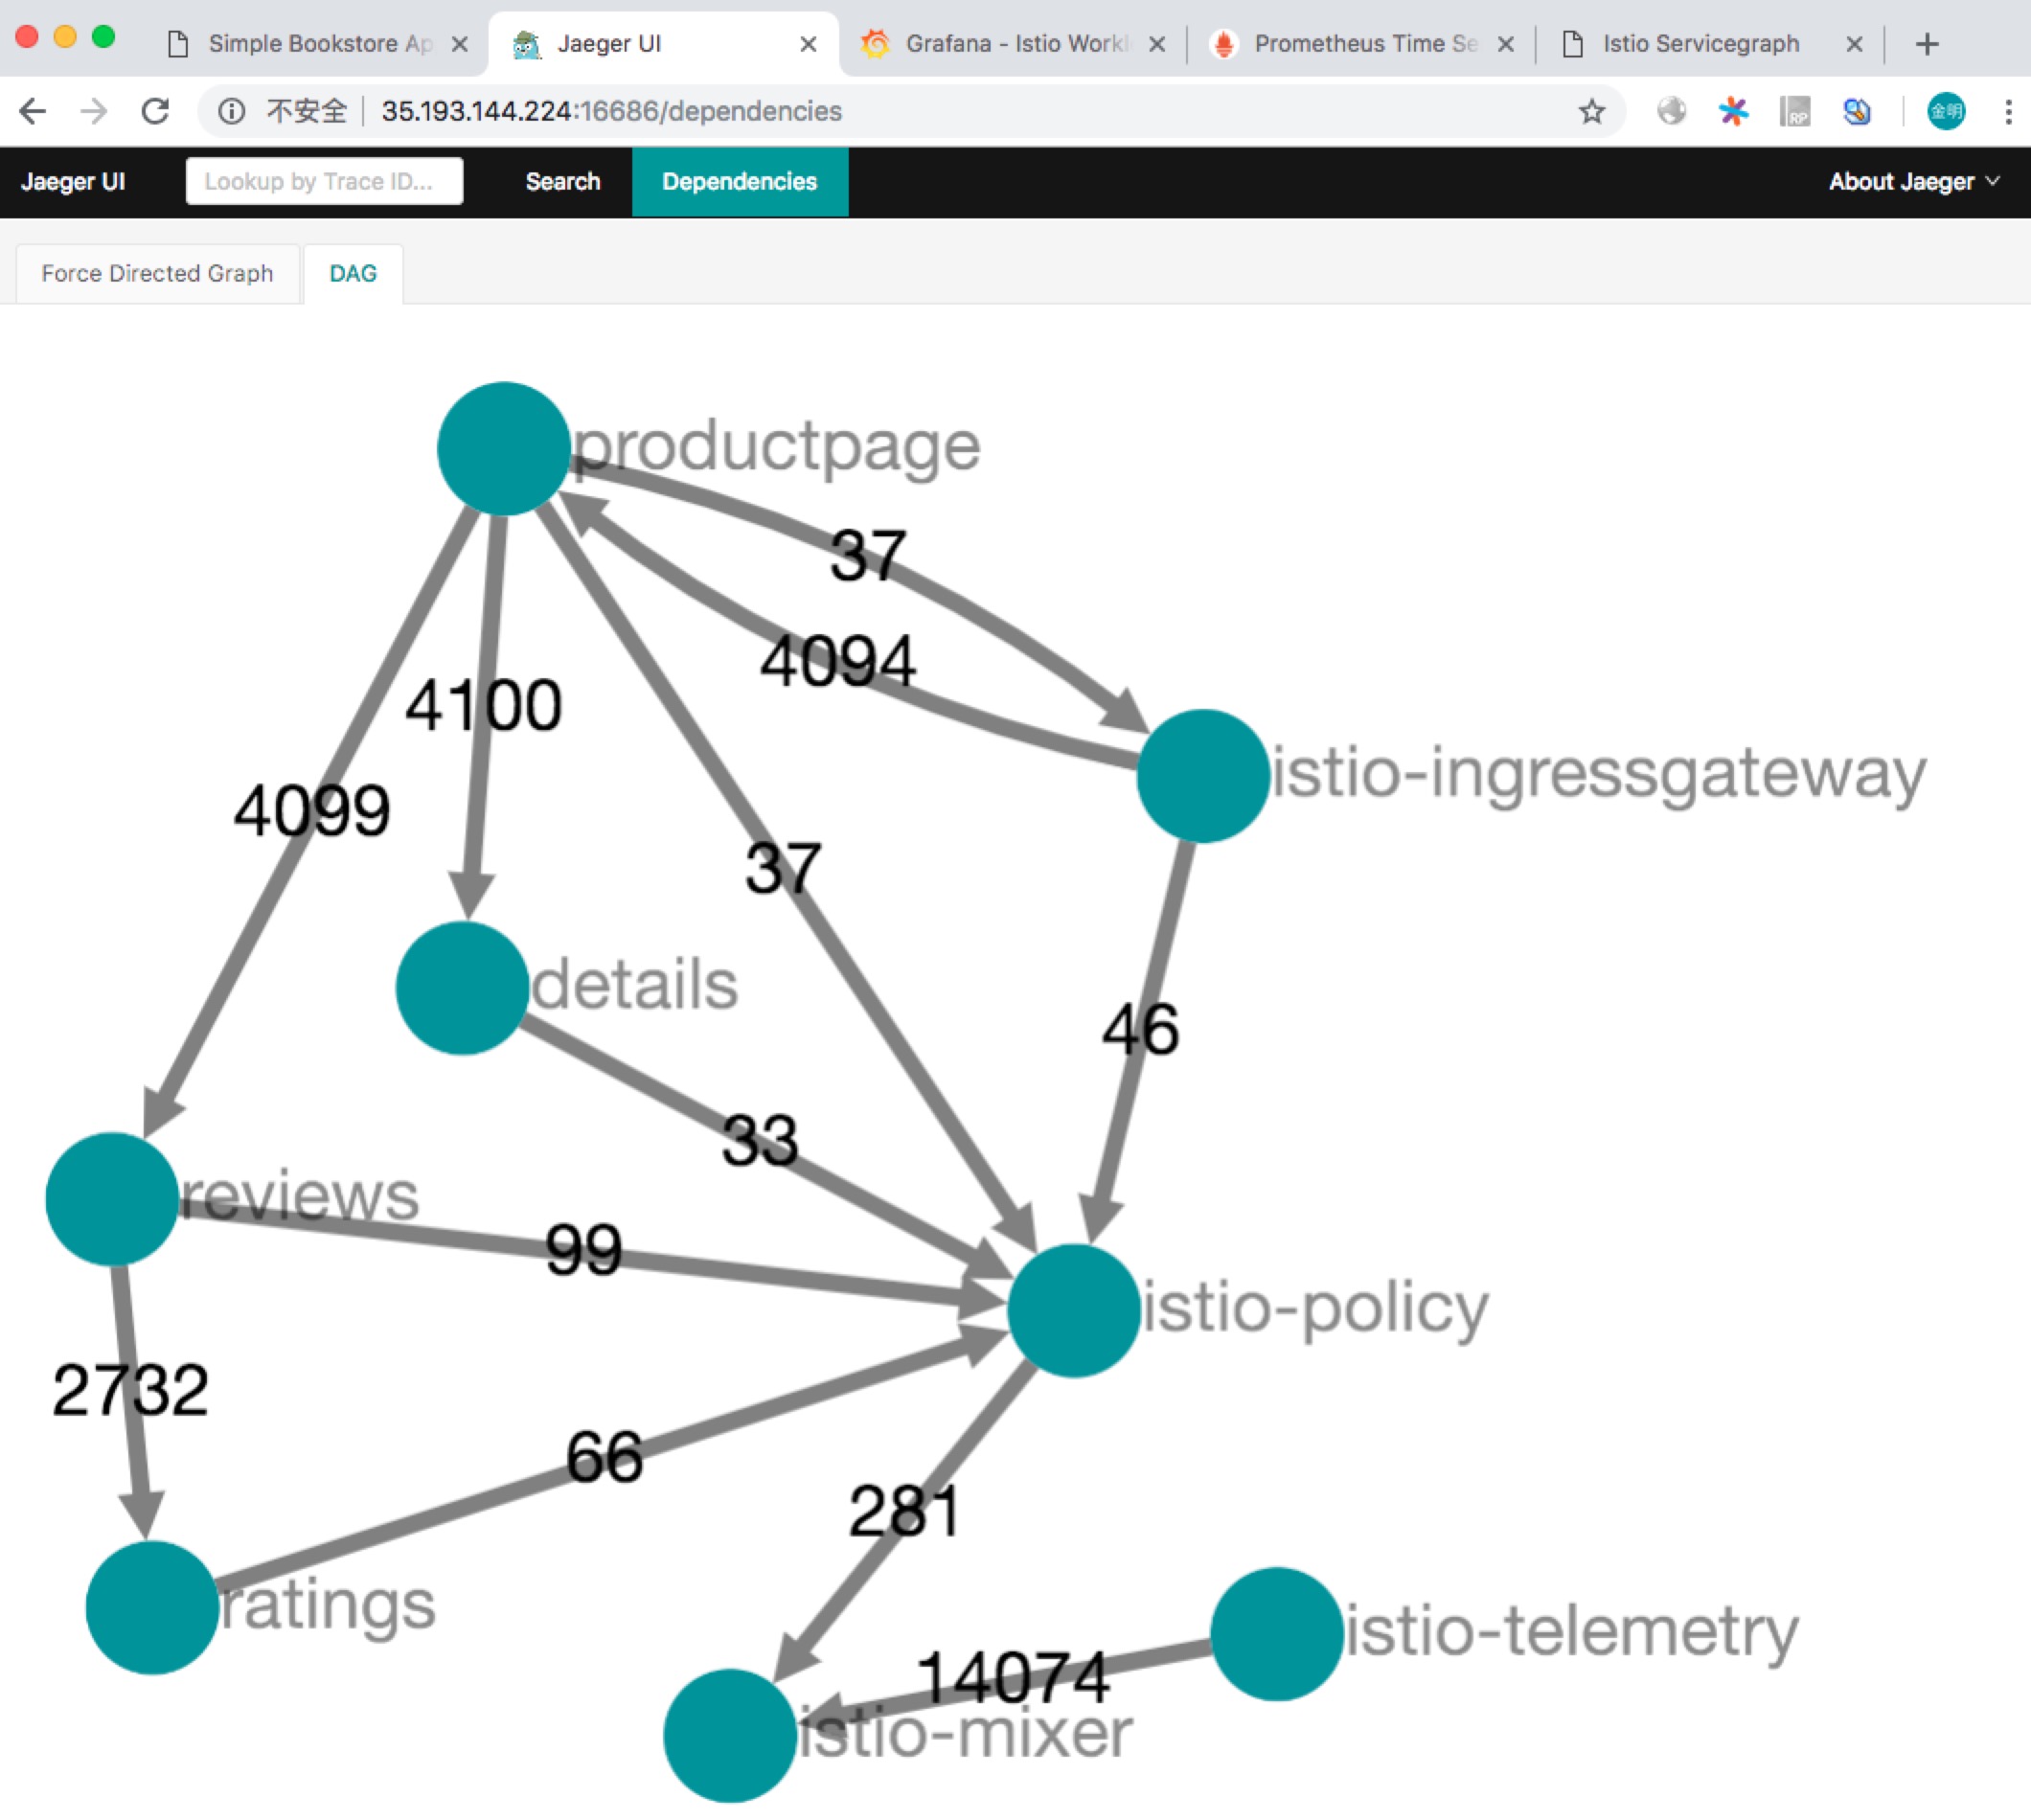
同时也可以常看服务拓扑结构,如下图所示:
Cleanup
清理 Bookinfo:
$ samples/bookinfo/kube/cleanup.sh
清理 Istio:
$ kubectl delete -f install/kubernetes/istio-demo.yaml
Reference
Recommend
About Joyk
Aggregate valuable and interesting links.
Joyk means Joy of geeK