

详细设计一个文章页目录插件
source link: https://bubuzou.com/2020/10/14/article-catalog/
Go to the source link to view the article. You can view the picture content, updated content and better typesetting reading experience. If the link is broken, please click the button below to view the snapshot at that time.
详细设计一个文章页目录插件
在说这个插件之前,可以先去 https://bubuzou.com/ 这个网站体验下这个插件的效果,好有个大概的印象。
通过阅读这篇文章,你可以收获什么?
- 用
JS直接操作DOM - 浏览器
BOM相关知识 - 性能优化思考
- 插件设计思考
平时我们在用 Markdown 写的文章,如果放到自己的博客或者投稿到掘金等平台,其内容会被浏览器解析成 HTML。而 Markdown 里面的一级(#)、二级(##)、三级标题(###)分别对应于页面的文章标题、一级目录、二级目录。基于此,就可以很好的利用该生成的页面实现一个目录,便于更直观方便的的浏览文章内容,而这就是最初我想为博客里的文章页实现一个目录功能的理由。
这个插件是基于
Hexo生成的网页来实现的,且目前只支持一级和二级目录,因为作为一篇文章来说有两个层级已经可以很好的将一块内容划分细说得很清楚了。
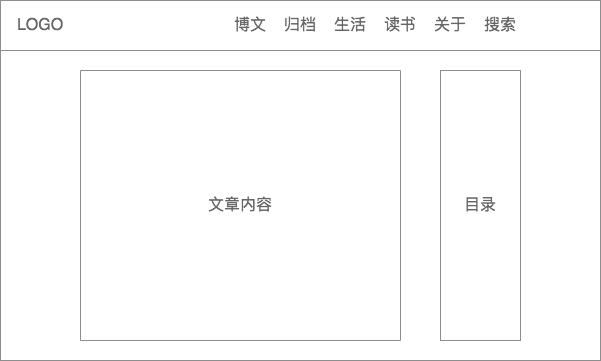
首先我打算将文章的目录放置在文章内容的右侧,且是悬浮固定在那里不随浏览器的滚动而滚动。因为我们都习惯从上到下从左到右的去浏览文章,所以我希望首先映入眼帘的是文章内容而不是文章目录;另外因为我的博客的首页和文章列表页都是左侧是浏览区域而右侧是操作区域,所以把目录放到右侧能保持整站的布局统一以及操作的便利性。
需要做什么
- 首先需要根据文章内容的二级和三级标题生成目录;
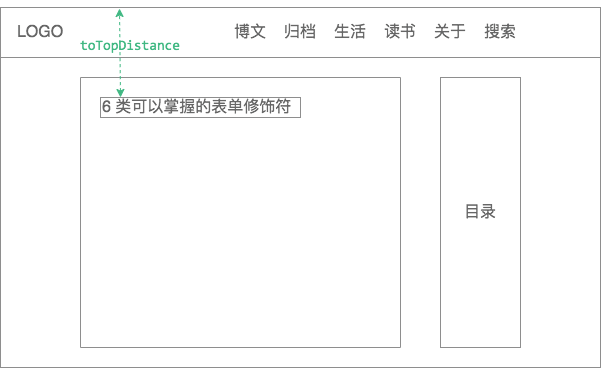
- 然后,页面从上到下滚动过程中,需要在右侧目录里高亮当前的标题,而高亮的原则是当前标题所在的位置到浏览器可视区域顶部的距离需要小于或等于一个固定值,如上图所示;
- 在合适的时候滚动目录列表,使得当前高亮的子目录会出现在滚动区域内部,且尽量处于滚动区域的中间区域;
- 当点击某个子目录的时候需要高亮当前点击的目录,且文章内容滚动到对应目录的位置,使得点击目录对应的文章标题所在的位置距离可视区域顶部的距离刚好等于一个固定值。
滚动目录的机制是怎样的
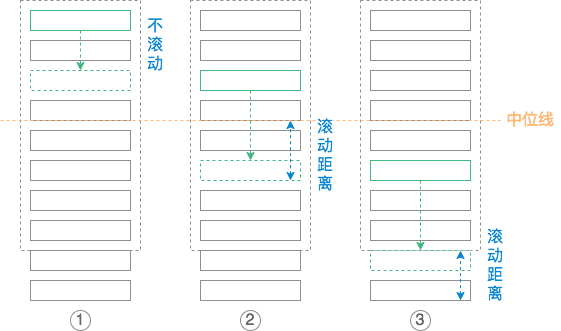
对于的第三点提到在合适的时候滚动目录,那什么时候才算合适呢?目录能不能滚动,以及怎么滚动总共分为以下 5 种情况:
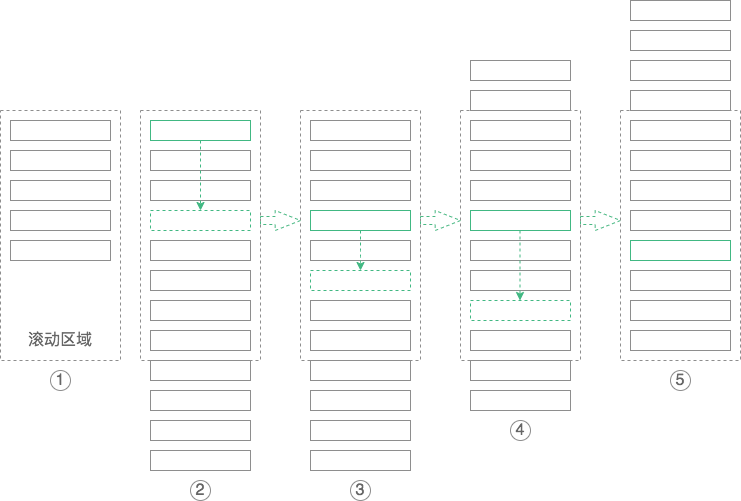
- 当目录能在滚动区域完全显示的时候,即滚动区域高度大于所有目录子项高度总和的时候,不进行目录滚动,如上面的图 ① ;
- 当目录不能在滚动区域完全显示的时候,目录需要滚动。所以需要做的就是在一个划定的区域内滚动目录,超出该区域的目录子项将会自动隐藏。通过滚动目录,我们可以实现目录列表的头尾两个目录子项都能很好的在划定区域里显示出来。随着页面的滚动,目录将从头滚到尾,那么滚动的范围是从第一个子目录贴着滚动区域的顶部到最后一个子目录贴着滚动区域的底部为止;
- 当页面在最顶部的时候,当前高亮的子目录肯定是第一个,随着页面的向下滚动,高亮的位置也在不断下移,当高亮位置移动到在目录滚动区域的上半部分之前,这段不进行目录滚动,如上面的图 ② 到 图 ③ 的变化过程;
- 当第一个子目录贴着滚动区域的顶部,且高亮位置在中位往下继续滚动的时候,需要进行目录滚动,滚动的距离是当前高亮目录所在位置距离滚动区域中间位置的高度差,如上面的图 ③ 到图 ④ 的变化过程;
- 如果这个高度差过于大,使得滚动后最后一个子元素不能贴着滚动区域底部的时候,则不按照这个高度差进行滚动,而真实需要滚动的距离是最后一个子目录到滚动区域底部的距离,如上面的图 ④ 到图 ⑤ 的变化过程。
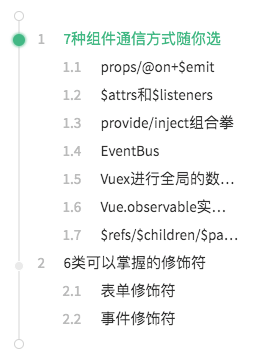
由于文章页是由 Hexo 基于 Markdown 生成而来的,所以它有自己特定的 HTML 格式,它的格式大概是如下这样:
<h2 id="7种组件通信方式随你选">
    <a href="" class="headerlink" title="7种组件通信方式随你选"></a>
    7种组件通信方式随你选
</h2>
<!-- 这里是部分文章内容 -->
<h3 id="props-on-emit">
    <a href="" class="headerlink" title="props/@on+$emit"></a>
    props/@on+$emit
</h3>
<!-- 这里是部分文章内容 -->
<h3 id="$attrs和$listeners">
    <a href="" class="headerlink" title="$attrs和$listeners"></a>
    $attrs和$listeners
</h3>
<!-- 这里是部分文章内容 -->
可以看到所有的二级标题(H2)和三级标题(H3)都是在同一个父元素下面,且每个标题下面都包含了一个带有 headerlink 类名的链接,另外还有标题属性。
这个时候我们就能很容易的获取到所有的标题:
let arContentAnchor = document.querySelectorAll('.headerlink')
上面这串代码的结果会返回一个 NodeList,有了它我们就可以去生成目录了。
生成目录无非就是产生一串 HTML,除此之外还有哪些要做的呢?
首先要确定下,目录都包含了哪些部分,如上图所示这里大概是包含了 3 部分:目录条、序号和标题。那么就可以先确定好 HTML 结构:
<div class="arCatalog">
    <div class="arCatalog-line"></div>
    <div class="arCatalog-body">
        <dl>
            <dd class="arCatalog-tack1 on">
                <span class="arCatalog-index">1</span>
                    <a href="#">7种组件通信方式随你选</a>
                    <span class="arCatalog-dot"></span>
            </dd>
        </dl>
    </div>
</div>
其中,arCatalog-line 表示目录条,arCatalog-body 是滚动区域,dl 是滚动列表,dd 是目录子项,arCatalog-index 是目录序号,链接里放的是子目录标题。有了 HTML ,接下来要做的就是把目录的样式写好,写完后样式比较多,所以就不在这里贴出来了。
生成目录到这里就完事了吗?并没有,由于浏览器可视区域是不固定的,所以我们需要计算出目录所在滚动区域的高度。
滚动高度 = n个目录子项 * 子项的实际高度
先说子项的实际高度,对于目录子项的样式上,我这里没有用内间距和外边距,而是通过 line-height 来控制他们之间的间隙,那么:
子项的实际高度 = 子项的行高
再说 n 个目录子项,那到底 n 是多少呢?在目录的 Y 轴方向上,除了有目录,还有顶部的菜单,以及为了美观还需要适当的留白,所以:

n = (视口高度 - (顶部菜单高度 + 留白高度))/ 子项行高
所以,最终我们可以计算出滚动高度:
let DEFAULT = {
    lineHeight: 28,           // 每个菜单的行高是 28
    moreHeight: 10,           // 菜单左侧的线比菜单多出的高度
    surplusHeight: 180,       // 除了菜单高度+留白高度
    delay: 200,               // 防抖的延迟时间
    duration: 200,            // 滚动的动画持续时间
    toTopDistance: 80,        // 距离视口顶部多少高度之内时候触发高亮
    selector: '.headerlink',  // 文章内容中标题标签的 selector
}

// maxCatalogCount 就是上面提到的 n 个目录子项中的 n
let maxCatalogCount = Math.floor((window.innerHeight - DEFAULT.surplusHeight) / DEFAULT.lineHeight)

// 滚动区域高度
let catalogHeight = arContentAnchor.length > maxCatalogCount ? maxCatalogCount * DEFAULT.lineHeight : arContentAnchor.length * DEFAULT.lineHeight;
完整的生成目录的函数代码如下:
// 生成目录
function generateCatalog(){
    let catalogHeight = arContentAnchor.length > maxCatalogCount ? maxCatalogCount * DEFAULT.lineHeight : arContentAnchor.length * DEFAULT.lineHeight;
    let retStr = `
        <div class="arCatalog">
        <div class="arCatalog-line"
        style="height: ${catalogHeight + DEFAULT.moreHeight}px"></div>
        <div class="arCatalog-body"
        style="max-height: ${catalogHeight}px; height: ${catalogHeight}px">
        <dl style="margin-top: ${marginTop}px">`;

let h2Index = 0,
        h3Index = 1,
        acIndex = '',
        tagName = '',
        index = 0;

for (let currNode of arContentAnchor) {
        tagName = currNode.parentElement.tagName
        if ( tagName === 'H3' ) {
            acIndex = `${h2Index}.${h3Index++}`
            className = 'arCatalog-tack2'
        } else {
            acIndex = ++h2Index
            h3Index = 1
            className = 'arCatalog-tack1'
        }
        retStr += `
            <dd class="${className} ${index++ === lastOnIndex ? 'on' : ''}">
            <span class="arCatalog-index">${acIndex}</span>
            <a href="#">${currNode.title}</a>
            <span class="arCatalog-dot"></span>
            </dd>`
    };
    retStr += `</dl></div></div>`

document.getElementById('arAnchorBar').innerHTML = retStr
}
设置滚动监听事件
给 window 加上滚动事件,用于监听当滚动的时候去做一些操作,这里的操作就是设置高亮和滚动目录。
window.addEventListener('scroll', function() {
    setHighlight()
}, false)

// 只有目录总数超过滚动区域可容纳最大目录数的时候,目录才需要滚动
if (catalogLength > maxCatalogCount) {
    window.addEventListener('scroll', function() {
        scrollCatalog()
    }, false)
}
如上这样就能监听浏览器滚动事件,从而做一些事情啦。但是这样会导致函数被频繁调用,从而存在性能问题,其实我们更希望当滚动开始到滚动结束的时候,只执行一次函数即可,那这个直接上防抖即可:
// 防抖:触发高频事件 n 秒后只会执行一次,如果 n 秒内事件再次触发,则会重新计时。
function debounce(fn, delay = 200) {
    return function(args) {
        const _this = this
        clearTimeout(fn.id)
        fn.id = setTimeout(function() {
            fn.apply(_this, args)
        }, delay)
    }
}
然后我们只需要把 scroll 监听回调里的函数对应换成如下的即可:
window.addEventListener('scroll', function() {
    debounce(setHighlight, DEFAULT.delay)()
    debounce(resetStatus, DEFAULT.delay)()
}, false)

if (catalogLength > maxCatalogCount) {
    window.addEventListener('scroll', function() {
        debounce(scrollCatalog, DEFAULT.delay)()
    }, false)
}
高亮当前目录
这部分内容开始前,我们先来复习一个 API,该方法会返回元素的大小及其相对于视口的位置:
Element.getBoundingClientRect()
需求分析的时候有提到,高亮的原则是当前标题所在的位置到浏览器可视区域顶部的距离需要小于或等于一个固定值:
arContentAnchor[index].getBoundingClientRect().top <= DEFAULT.toTopDistance
所以当遍历 arContentAnchor 这个列表,某项的位置小于固定值,且差值最小的时候,该项对应的目录就应该被设置为高亮:
let curr = document.querySelector('.arCatalog .on')
curr.classList.remove('on')

let nextOnIndex = 0,
    currNode;

while (nextOnIndex < arContentAnchor.length) {
    currNode = arContentAnchor[nextOnIndex]
    if (currNode.getBoundingClientRect().top <= DEFAULT.toTopDistance) {
        nextOnIndex++
    } else {
        break
    }
}
nextOnIndex = nextOnIndex === arContentAnchor.length ? nextOnIndex - 1 : nextOnIndex;
let catalogDd = document.querySelectorAll('.arCatalog dd')
catalogDd[nextOnIndex].classList.add('on')
到此一切都看起来很美好,但是上面这段代码存在性能问题,只要页面一滚动就会从第一个目录到最后一个目录之间进行查找,知道找到那个符合要求的为止,这样的话遍历次数太多了。
我们知道页面滚动无非就是在当前这个位置的前提下,往上滚动或者向下滚动,如果我们把 nextOnIndex 记为滚动前的索引,在根据滚动方向进行加加减减不就可以很好的减少遍历次数嘛?想法貌似不错,来试一下。
首先我们要判断当前滚动是向上还是向下滚动,可以根据两次滚动前后的偏移量来判断:
向上滚动 = 滚动后偏移量 < 滚动前偏移量
let lastSH = window.pageYOffset

// 获取最近一次页面的滚动方向
function getScrollDirection() {
    let sh = window.pageYOffset, ret = 'bottom'
    if (sh < lastSH) {
        ret = 'top'
    }
    lastSH = sh
    return ret
}
知道了滚动方向,我们就可以很好的写出设置高亮的优化代码:
let curr = document.querySelector('.arCatalog .on')
let nextOnIndex = onIndex;
if (defaultDirec === 'bottom') {
    while (nextOnIndex < catalogLength) {
        let currTop = arContentAnchor[nextOnIndex].getBoundingClientRect().top
        if ( currTop > DEFAULT.toTopDistance && nextOnIndex > 0){
            nextOnIndex--
            break
        }
        nextOnIndex++
    }
} else {
    while (nextOnIndex >= 0) {
        let currTop = arContentAnchor[nextOnIndex].getBoundingClientRect().top
        if ( currTop <= DEFAULT.toTopDistance){
               break
        }
        nextOnIndex--
    }
}
nextOnIndex = nextOnIndex === arContentAnchor.length ? nextOnIndex - 1 : nextOnIndex < 0 ? 0 : nextOnIndex
catalogDd[nextOnIndex].classList.add('on')
优化后的遍历次数明显减少,而且遍历次数基本上是小于或等于滚动前后目录索引的差值。
虽然经过优化后,已经明显的减少了遍历次数,但是我还想再优化一下。纳尼?
很多文章页很长,所以有回到顶部这种功能,试想一下,如果当前页面已经滚动到最底部,这个时候来一下回到顶部,那刚刚写的优化代码会遍历几次?答案是:遍历次数将会是目录子项的总数。文章最开始提到的那个体验地址的那篇文章 34条我能告诉你的Vue之实操篇 有 43 个子目录,所以需要遍历 43 次,真的不能接受结果,所以再来优化一次。
二次优化主要是处理边际问题,即滚动到头尾部的时候加上判断,最终二次优化后的高亮当前目录函数如下:
// 高亮当前目录
function setHighlight(){
    defaultDirec = getScrollDirection()

if (hasStopSetHighlight) {
        return
    }
    let {
        scrollTop,
    } = document.scrollingElement;

let curr = document.querySelector('.arCatalog .on')

let onIndex = [].indexOf.call(catalogDd, curr),  // 当前高亮索引
        nextOnIndex = onIndex;  // 滚动后高亮索引

curr.classList.remove('on')

let scrollHeight = document.documentElement.scrollHeight || document.body.scrollHeight
    if (arContentAnchor[catalogLength - 1].getBoundingClientRect().top <= DEFAULT.toTopDistance ||
        window.innerHeight + window.pageYOffset === scrollHeight) {  // 尾部
        lastOnIndex = catalogLength - 1
        catalogDd[lastOnIndex].classList.add('on')
    } else if (scrollTop <= firstDdTop) {  // 顶部
        catalogDd[0].classList.add('on')
        lastOnIndex = 0
    } else {  // 中间:使用缓存,直接从上一次索引(onIndex)位置开始查找
        if (defaultDirec === 'bottom') {
            while (nextOnIndex < catalogLength) {
                let currTop = arContentAnchor[nextOnIndex].getBoundingClientRect().top
                if ( currTop > DEFAULT.toTopDistance && nextOnIndex > 0){
                    nextOnIndex--
                    break
                }
                nextOnIndex++
                }
        } else {
            while (nextOnIndex >= 0) {
                let currTop = arContentAnchor[nextOnIndex].getBoundingClientRect().top
                if ( currTop <= DEFAULT.toTopDistance){
                    break
                }
                nextOnIndex--
            }
        }
        nextOnIndex = nextOnIndex === catalogLength ? nextOnIndex - 1 : nextOnIndex < 0 ? 0 : nextOnIndex
        lastOnIndex = nextOnIndex
        catalogDd[nextOnIndex].classList.add('on')
    }
}
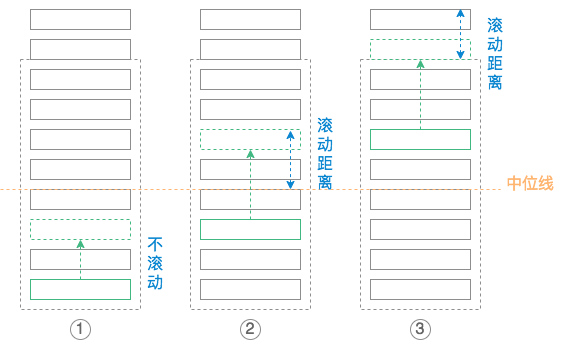
根据之前需求分析里的说明,我们可以知道当浏览器向下滚动的时候,会分成 3 种情况:
- 滚动后的高亮子目录处于于滚动区域上半部分,即中位线以上,此时目录不进行滚动,如上图 ①;
- 滚动后的高亮子目录处于滚动区域的下半部分,即中位线以下,此时目录的滚动距离将是滚动后高亮子目录的底部位置到中位线的高度差,如上图 ②;
- 滚动后的高亮目录处于中位线以下且最后一个子目录需要贴着滚动区域底部,此时目录的滚动距离将是滚动列表底部到滚动区域底部的高度差,如上图 ③。
let catalogBody = document.querySelector('.arCatalog-body'),
    initBodyTop = catalogBody..getBoundingClientRect().top,
    bodyMidBottom = initBodyTop + Math.ceil((maxCatalogCount / 2 )) * DEFAULT.lineHeight;  // 中位线位置

if (curr.bottom + (maxCatalogCount / 2) * DEFAULT.lineHeight <= bodyBCR.bottom) {  // 上半部分
    // 不滚动
} else if (curr.bottom - bodyMidBottom < list.bottom - bodyBCR.bottom) {  // 中位以下
    marginTop += -Math.floor((curr.bottom - bodyMidBottom ) / DEFAULT.lineHeight) * DEFAULT.lineHeight
} else if (bodyBCR.bottom <= list.bottom) {  // 当剩余滚动距离
    marginTop = bodyBCR.bottom - initDlBottom
}
同理,当浏览器向上滚动的时候,也能很好的得出其滚动逻辑:
if (bodyBCR.top + (maxCatalogCount / 2) * DEFAULT.lineHeight <= curr.top) {
    // 不滚动
} else if (bodyMidBottom - curr.top < bodyBCR.top - list.top) {
    marginTop += Math.floor((bodyMidBottom - curr.top) / DEFAULT.lineHeight) * DEFAULT.lineHeight
} else if (list.top <= bodyBCR.top) {
    marginTop = 0
}
最终的滚动目录函数完整代码:
// 自动滚动目录树,使得当前高亮目录在可视范围内
function scrollCatalog() {
    let currentCatalog = document.querySelector('.arCatalog .on');

let curr = currentCatalog.getBoundingClientRect(),
        list = catalogDl.getBoundingClientRect();

if (defaultDirec === 'bottom') {  // 向下滚动
        if (curr.bottom + (maxCatalogCount / 2) * DEFAULT.lineHeight <= bodyBCR.bottom) {  // 上半部分
            // 不滚动
        } else if (curr.bottom - bodyMidBottom < list.bottom - bodyBCR.bottom){  // 中位以下
            marginTop += -Math.floor((curr.bottom - bodyMidBottom ) / DEFAULT.lineHeight) * DEFAULT.lineHeight
        } else if (bodyBCR.bottom <= list.bottom) {  // 当剩余滚动距离
            marginTop = bodyBCR.bottom - initDlBottom
        }
    } else {  // 向上滚动
        if (bodyBCR.top + (maxCatalogCount / 2) * DEFAULT.lineHeight <= curr.top) {
            // 不滚动
        } else if (bodyMidBottom - curr.top < bodyBCR.top - list.top) {
            marginTop += Math.floor((bodyMidBottom - curr.top) / DEFAULT.lineHeight) * DEFAULT.lineHeight
        } else if (list.top <= bodyBCR.top) {
            marginTop = 0
        }
    }
    catalogDl.style.marginTop = marginTop + 'px'
}
子目录点击事件
当点击子目录的时候需要做 2 件事情,第一是滚动页面到对应的目录位置,然后是高亮当前点击的目录;
滚动页面到对应的目录位置:
// 给目录子项绑定事件
let catalogDd = document.querySelectorAll('.arCatalog dd');

catalogDd.forEach((curr, index) => {
    curr.addEventListener('click', function(e) {
        e.preventDefault()
        let currTop = arContentAnchor[index].getBoundingClientRect().top
        document.documentElement.scrollTop = document.body.scrollTop = currTop + window.pageYOffset - DEFAULT.toTopDistance
    }, false)
});
这样实现页面的滚动是没什么问题,就是体验不太好,突然从一个位置滚动到另外一个位置,显得突兀,能不能来点动画效果?类似 jQuery 的 animate() ?没问题,我们来尝试着实现一下。
用 JS 实现动画效果,一定离不开定时器,诸如 setTimeout、setInterval 之类,但是这次我不打算用他们,而是用 HTML5 中增加的 requestAnimationFrame,这是一个专门为浏览器实现动画而提供的 API。它虽然也是个定时器,但是相比于另外两个,他不需要传递时间,因为传递的回调函数里自带了参数 DOMHighResTimeStamp,这个参数表示回调函数被触发的时间。
除此之外,requestAnimationFrame 中的回调函数执行次数通常是每秒60次,即大概每 16.6 毫秒执行一次回调函数,但在大多数遵循 W3C 建议的浏览器中,回调函数执行次数通常与浏览器屏幕刷新次数相匹配。好了,对于 requestAnimationFrame 的介绍就到这里,下面我们直接来说下动画实现滚动的核心原理:
每次滚动距离 = ( 滚动距离 / 动画持续时间 ) * 每次动画执行时间距离第一次执行时间的差值 + 当前滚动距离
直接来看完整的动画实现滚动的函数:
// 滚动到目标位置
function scrollToDest(destScrollTop) {
    let startTime;
    let currScrollTop = window.pageYOffset;
    let duration = 200;

function step(timestamp) {
        if (!startTime) {
            startTime = timestamp
        }
        const elapsed = Math.round(timestamp - startTime)
        const distance = elapsed * ((Math.floor(destScrollTop) - currScrollTop) / duration) + currScrollTop

document.documentElement.scrollTop = document.body.scrollTop = distance

if (elapsed < duration) {
            window.requestAnimationFrame(step)
        }
    }
    window.requestAnimationFrame(step)
}
好了,现在有了动画函数,我们需要改写下子目录的点击事件,给滚动加上过渡效果,让人体验起来更加舒服:
let catalogDd = document.querySelectorAll('.arCatalog dd');

catalogDd.forEach((curr, index) => {
    curr.addEventListener('click', function(e) {
        e.preventDefault()
        let currTop = arContentAnchor[index].getBoundingClientRect().top
        scrollToDest(currTop + window.pageYOffset - DEFAULT.toTopDistance)
    }, false)
});
第一件事已经做好,接下来做第二件事,高亮当前点击某个子目录:
// 给目录子项绑定事件
let catalogDd = document.querySelectorAll('.arCatalog dd');

catalogDd.forEach((curr, index) => {
    curr.addEventListener('click', function(e) {
        e.preventDefault()
        hasStopSetHighlight = true
        document.querySelector('.arCatalog .on').classList.remove('on')
        catalogDd[index].classList.add('on')
        lastOnIndex = index
        let currTop = arContentAnchor[index].getBoundingClientRect().top
        scrollToDest(currTop + window.pageYOffset - DEFAULT.toTopDistance)
    }, false)
});
如上即可,但是由于点击了某个子目录,页面会进行滚动,而页面滚动又会触发 setHighlight 函数对目录进行高亮,所以我这里的做法是用了一个全局变量 hasStopSetHighlight 用来控制当点击子目录的时候,不进行 setHighlight 设置高亮操作。
浏览器视口高度变了怎么办
因为我们的滚动高度是根据浏览器视口高度计算出来的,如果浏览器视口高度变化了,那这个时候再去滚动页面,那肯定会出问题的。所以需要做的就是把和视口高度有关的逻辑抽离出来,统一放到一个函数里,当监听到视口高度变化的时候,再去执行这个函数。
先来写监听函数,同样用上了防抖函数处理:
window.addEventListener('resize', function(e) {
    debounce(initCatalog, DEFAULT.delay)()
}, false)
然后去把相关逻辑抽离出来:
// 初始化
function initCatalog() {
    let tempHeight = window.innerHeight

if (viewPortHeight !== tempHeight) {
        viewPortHeight = tempHeight
        maxCatalogCount = Math.floor((viewPortHeight - DEFAULT.surplusHeight) / DEFAULT.lineHeight)

generateCatalog()

catalogLength = arContentAnchor.length
        lastSH = window.pageYOffset
        catalogBody = document.querySelector('.arCatalog-body')
        catalogDl = document.querySelector('.arCatalog dl')
        catalogDd = document.querySelectorAll('.arCatalog dd')
        bodyBCR = catalogBody.getBoundingClientRect()
        initBodyTop = bodyBCR.top
        initDlBottom = initDlBottom || catalogDl.getBoundingClientRect().bottom
        firstDdTop = firstDdTop || catalogDd[0].getBoundingClientRect().top,
        bodyMidBottom = initBodyTop + Math.ceil((maxCatalogCount / 2 )) * DEFAULT.lineHeight;

// 给目录子项绑定事件
        catalogDd.forEach((curr, index) => {
            curr.addEventListener('click', function(e) {
                e.preventDefault()
                hasStopSetHighlight = true
                document.querySelector('.arCatalog .on').classList.remove('on')
                catalogDd[index].classList.add('on')
                lastOnIndex = index
                let currTop = arContentAnchor[index].getBoundingClientRect().top
                scrollToDest(currTop + window.pageYOffset - DEFAULT.toTopDistance)
            }, false)
        });
    }
}
浏览器视口高度变化后,这里有个细节需要提一下,那就是滚动目录的 margin-top 以及高亮位置是希望变化的,所以我们需要使用全局变量进行提前保存起来,分别用到的全局变量是 marginTop 和 lastOnIndex。
上面的代码都是把不同的功能点提取到函数里进行操作,看起来比较散乱,所以我们需要看看一个完整的目录插件应该是什么样子?
/*
 * articleCatalog v2.0
 * Copyright(c) 2016 by bulandent
 * Date: 2017-5-27 16:10:41
 * Updated: 2020-10-10 17:40:04
**/

let articleCatalog = (function() {
    if ( document.querySelectorAll('.headerlink').length === 0 || window.innerWidth < 900 ) {
        return function(){};
    }
    let DEFAULT = {
        lineHeight: 28,           // 每个菜单的行高是 28
        moreHeight: 10,           // 菜单左侧的线比菜单多出的高度
        surplusHeight: 180,       // 除了菜单高度+留白高度
        delay: 200,               // 防抖的延迟时间
        duration: 200,            // 滚动的动画持续时间
        toTopDistance: 80,        // 距离视口顶部多少高度之内时候触发高亮
        selector: '.headerlink',  // 文章内容中标题标签的 selector
    }
    return function(args) {
        DEFAULT = Object.assign(DEFAULT, args)

let arContentAnchor = document.querySelectorAll(DEFAULT.selector),
            catalogLength = arContentAnchor.length,
            maxCatalogCount = 0,          // 视口内能容纳的最大目录个数
            viewPortHeight = 0,           // 当前视口的高度
            marginTop = 0,                // 菜单的初始滚动距离
            defaultDirec = 'bottom',      // 默认滚动方向
            lastSH = 0,                   // 获取页面初始滚动距离
            lastOnIndex = 0,              // 上次高亮的目录索引
            catalogBody = [],             // .arCatalog-body
            catalogDl = null,             // .arCatalog-body dl
            catalogDd = [],                 // .arCatalog-body dd
            initBodyTop = 0,              // 目录可视区域的 top
            initDlBottom = 0,             // 目录 dl 的 bottom
            firstDdTop = 0,               // 第一个 dd 的 top
            bodyMidBottom = 0,            // 目录可视区域的中间位置的 dd 的 bottom
            bodyBCR = null,                  // 目录可视区域的边界值
            hasStopSetHighlight = false;  // 在点击目录子项的时候直接高亮当前目录,而不通过 scroll 事件触发 setHighlight 函数

initCatalog()

window.addEventListener('scroll', function() {
            debounce(setHighlight, DEFAULT.delay)()
        }, false)

if (catalogLength > maxCatalogCount) {
            window.addEventListener('scroll', function() {
                debounce(scrollCatalog, DEFAULT.delay)()
            }, false)
        }

window.addEventListener('resize', function(e) {
            debounce(initCatalog, DEFAULT.delay)()
        }, false)

// 此处声明初始化函数 initCatalog
        // 此处声明生成目录函数 generateCatalog
        // 此处声明设置高亮函数 setHighlight
        // 此处声明滚动目录函数 scrollCatalog
        // 此处声明动画实现滚动函数 scrollToDest
        // 此处声明防抖函数 debounce
        // 此处声明获取滚动方向函数 getScrollDirection
        function resetStatus() {
            if (hasStopSetHighlight) {
                hasStopSetHighlight = false
            }
        }
    }
}());
然后在实际页面里使用的时候,只需要引入 articleCatalog.js,然后直接用调用函数即可:
articleCatalog()
当然调用的时候也支持传入一些参数,参数说明如下:
articleCatalog({
    lineHeight: 28,           // 每个菜单的行高是 28
    moreHeight: 10,           // 菜单左侧的线比菜单多出的高度
    surplusHeight: 180,       // 除了菜单高度+留白高度
    delay: 200,               // 防抖的延迟时间
    duration: 200,            // 滚动的动画持续时间
    toTopDistance: 80,        // 距离视口顶部多少高度之内时候触发高亮
    selector: '.headerlink',  // 文章内容中标题标签的 selector
})
注意传入参数也是瞎传的,需要配合该插件的样式,否则容易程问题。比如明明页面中子目录的真实行高是 28px,你却传入 lineHeight: 24,那肯定是不行的。
使用这个插件是有前提的,那就是其文章页的 HTML 结构必须满足上面提到的那种结构才行,且只支持两级子目录。

Recommend
About Joyk
Aggregate valuable and interesting links.
Joyk means Joy of geeK