

ESP8266 and Plantower Particle Sensor
source link: http://tenderlovemaking.com/2019/09/03/esp8266-and-plantower-particle-sensor.html
Go to the source link to view the article. You can view the picture content, updated content and better typesetting reading experience. If the link is broken, please click the button below to view the snapshot at that time.
ESP8266 and Plantower Particle Sensor
2019-09-03 @ 08:20Since forest fires have started to become a normal thing in the PNW, I’ve gotten interested in monitoring the air quality in and around my house. I found some sensors that will measure PM2.5 which is a standard for measuring air quality. The sensor I’m using is a PMS5003, and you can see the data sheet for it here. I like this sensor because it supports UART, so I was able to hook it to an FTDI and read data directly from my computer. I wanted to log the data, so I hooked it up to a Raspberry PI. However, I decided I’d like to measure the air quality in my office, a second room in the house, and also outside. Buying a Raspberry Pi for every sensor I purchase seems a little unreasonable, so I investigated a different solution. I settled on the ESP8266 E-01. This part can connect to wifi, knows how to speak UART, and is powerful enough to program directly. My plan was to read data from the sensor, then broadcast the data via UDP and have a central Raspberry Pi collect the data and report on it. Unfortunately, this plan has taken me many months to execute, so I’m going to write here the stuff I wish I had known when getting started.
Parts
Here are the parts I used:
Wiring
Basically I just hooked the TX / RX pins to the Plantower sensor and set the CHPD and RST pins to high.
Challenges with the ESP8266
Now I’m basically going to complain about this chip, and then I’ll post the code I used.
The first issue I ran in to is that I’m not sure what to call this thing, so searching the internet became a challenge. It seems that “ESP8266” refers to the chip, but E-01 refers to the package? I’m still not actually sure. It seems there are several boards that have an ESP8266 mounted on them, but searching for ESP8266 with E01 seemed to work.
The second issue is programming the chip. I prefer to use C when developing for embedded systems, but no matter how hard I tried, I could not get the native toolchain running on MacOS. Finally I gave up and just used the Arduino toolchain. Somehow, you can write programs for the ESP8266 in Arduino, but doing it in C seems impossible (on Mac anyway).
Building a circuit to program the chip seems impossible. I found some schematics online for building a programmer, but I couldn’t get anything to work. Instead, I ended up buying a dedicated programmer, and it seems to work well.
Power requirements are extremely finicky. The chip wants 3.3v and at times 400mA. If either of these criteria aren’t met, the chip won’t work. Sometimes the chip wouldn’t do anything. Sometimes it would start, but when it tried to do wifi it would just restart. I ended up connecting a dedicated power supply to get the right power requirements.
The ESP8266 E-01 is not breadboard friendly. I ended up buying some breadboard adapters so I could prototype.
CHPD and RST need to be pulled HIGH for the chip to boot. This got me for a long time. I was able to program the chip with the programmer, but as soon as I moved it to the breadboard, nothing worked. In order to get the chip to actually boot, both CHPD and RST need to be pulled high.
The air quality sensor is 5v. This isn’t too much of a problem, just kind of annoying that I really really have to use two different voltages for this task.
Picture
Here is a picture of the breadboard setup I have now:
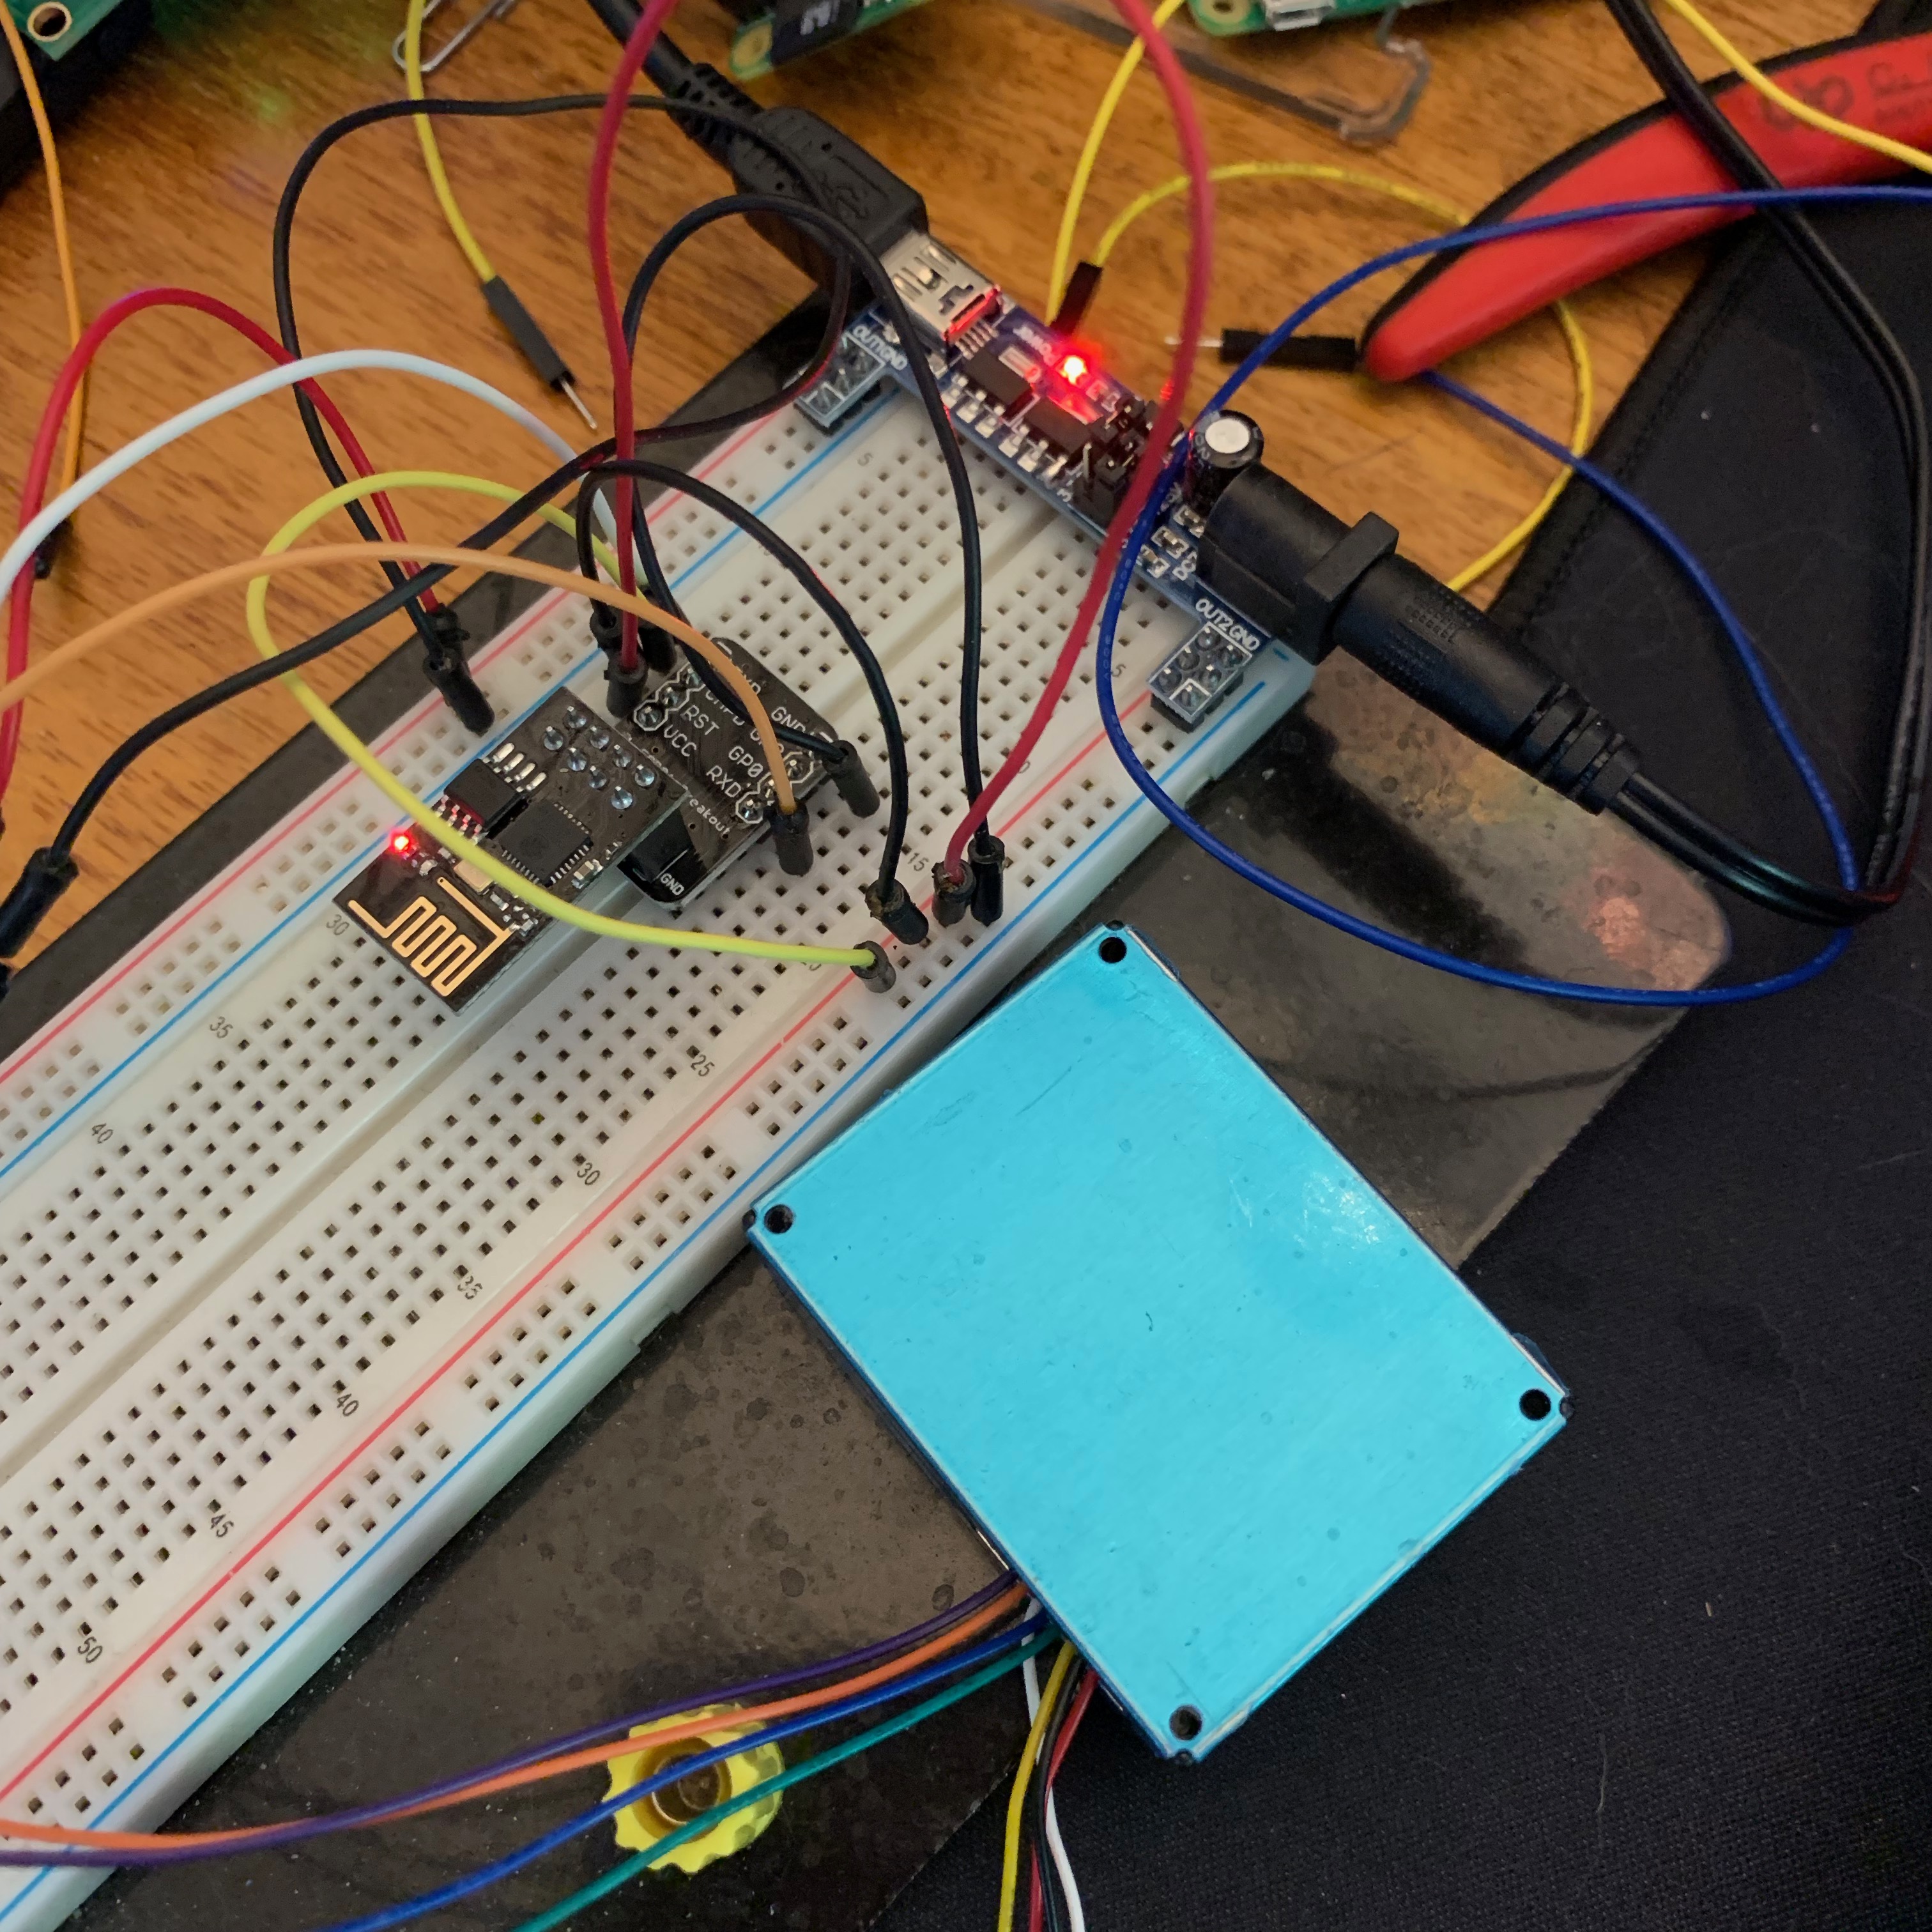
The blue box on the right is the air quality sensor, in the middle on the breadboard is the ESP8266, and up top is the power supply.
Here is the Arduino code I used:
#include <ESP8266WiFi.h>
#include <WiFiUdp.h>
#include <ESP8266WiFiMulti.h>
#include <base64.h>

#ifndef STASSID
#define STASSID "WifiAPName"
#define STAPSK  "WifiPassword"
#endif

const char* ssid     = STASSID;
const char* password = STAPSK;

ESP8266WiFiMulti WiFiMulti;
WiFiUDP udp;
IPAddress broadcastIp(224, 0, 0, 1);

byte inputString[32];
int i = 0;
int recordId = 0;

void setup() {
  Serial.begin(9600);

  WiFi.mode(WIFI_STA);
  WiFiMulti.addAP(ssid, password);

  while (WiFiMulti.run() != WL_CONNECTED) {
    delay(500);
  }

  delay(500);
}

void loop() {
  while (Serial.available()) {
    inputString[i] = Serial.read();
    i++;
    if (i == 2) { // Check for start of packet
      if (!(inputString[0] == 0x42 && inputString[1] == 0x4d)) {
        i = 0;
      }
    }
    if (i == 32) {
      i = 0;
      String encoded = base64::encode(inputString, 32);
      udp.beginPacketMulticast(broadcastIp, 9000, WiFi.localIP());
      udp.print("[\"aq\",{\"mac\":\"");
      udp.print(WiFi.macAddress());
      udp.print("\",\"record_id\":");
      udp.print(recordId);
      udp.print(",\"record\":\"");
      udp.print(encoded);
      udp.print("\"}]");
      udp.endPacket();
      recordId++;
    }
  }
}
I haven’t added CRC checking in this code, but it seems to work fine. Basically it reads data from the AQ sensor, Base64 encodes the data, then broadcasts the info as JSON over UDP on my network.
Here is the client code:
require "socket"
require "ipaddr"
require "json"

MULTICAST_ADDR = "224.0.0.1"
BIND_ADDR = "0.0.0.0"
PORT = 9000

if_addr = Socket.getifaddrs.find { |s| s.addr.ipv4? && !s.addr.ipv4_loopback? }
p if_addr.addr.ip_address

socket = UDPSocket.new
membership = IPAddr.new(MULTICAST_ADDR).hton + IPAddr.new(BIND_ADDR).hton

socket.setsockopt(:IPPROTO_IP, :IP_ADD_MEMBERSHIP, membership)
socket.setsockopt(:IPPROTO_IP, :IP_MULTICAST_TTL, 1)
socket.setsockopt(:SOL_SOCKET, :SO_REUSEPORT, 1)

socket.bind(BIND_ADDR, PORT)

class Sample < Struct.new(:time,
                          :pm1_0_standard, :pm2_5_standard, :pm10_standard,
                          :pm1_0_env,      :pm2_5_env,
                          :concentration_unit,

                          # These fields are "number of particles beyond N um
                          # per 0.1L of air". These numbers are multiplied by
                          # 10, so 03um == "number of particles beyond 0.3um
                          # in 0.1L of air"
                          :particle_03um,   :particle_05um,   :particle_10um,
                          :particle_25um,   :particle_50um,   :particle_100um)
end

loop do
  m, _ = socket.recvfrom(2000)
  record = JSON.load(m)[1]

  data = record["record"].unpack("m0").first
  unpack = data.unpack('CCnn14')
  crc = 0x42 + 0x4d + 28 + data.bytes.drop(4).first(26).inject(:+)
  unless crc != unpack.last
    p Sample.new(Time.now.utc, *unpack.drop(3).first(12))
  end
end
This code just listens for incoming data and prints it out.
I’ve posted the code here.
Conclusion
This is what I did over the long weekend! Since the AQ sensor only uses the RX and TX pins on the ESP8266, it means I’ve got at least two more GPIO pins left. Next I’ll add temperature and humidity sensor, then make something a bit more permanent.
Recommend
About Joyk
Aggregate valuable and interesting links.
Joyk means Joy of geeK