

MVC .NET Core Dynamic Role Based Authorization
source link: https://www.codeproject.com/Articles/5165567/MVC-NET-Core-Dynamic-Role-Based-Authorization
Go to the source link to view the article. You can view the picture content, updated content and better typesetting reading experience. If the link is broken, please click the button below to view the snapshot at that time.

Table of Contents
Goal
Usually for small organisations, there are no predefined fixed roles/users. They learn processes while they grow and prosper over time. In such situations, we usually get requirements to create role and assign permissions dynamically without compromising security because mostly, those people giving requirements also not sure about the roles or policies. So here, we'll try to learn dynamic Role based Authorization.
Introduction
In this article, we'll try to learn how to create dynamic roles and assign permissions dynamically to those roles. It's a continuation of a previous article, MVC 6 Dynamic Navigation Menu from Database.
Previously, we learnt how to generate the menu dynamically from database. Now according to that menu, we need to validate permissions for user roles. We'll learn to:
- create a new role
- assign/remove role permissions dynamically
- assign/remove new role to User
Components Used
Here are the components that you'll need to build and test the demo code provided.
We'll be using .NET Core Framework version 3.1 with C# & MVC project template, so let's start.
From the previous article, I've added some extra fields like ExternalUrl& DisplayOrderto give an option to add external links in the menu and set the order of menu items as per user's choice.
Create New Project
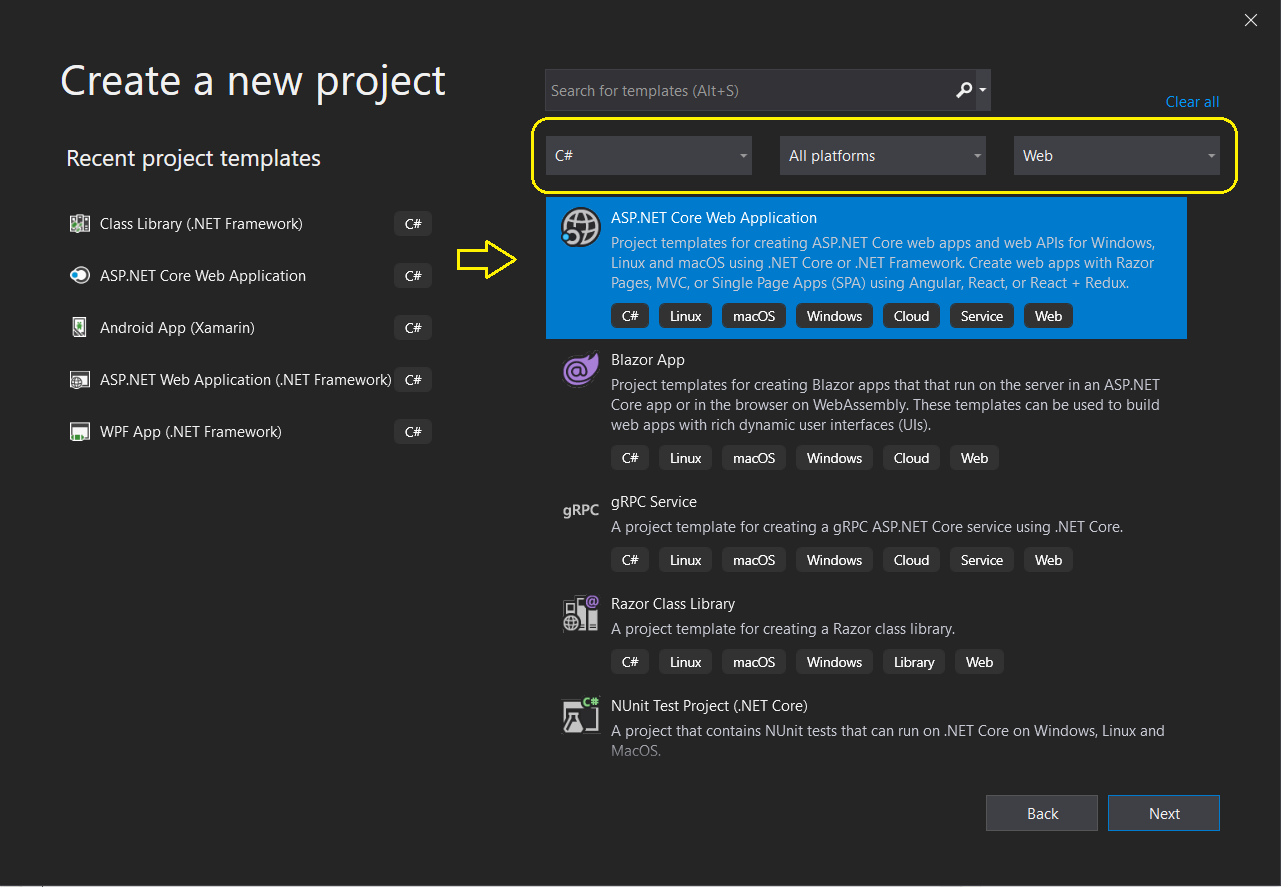
Open Visual Studio 2019 and click on Create a new project to start with a new project.

It'll show you the below screen for more selections, so select C#, All platforms, Web and then ASP.NET Core Web Application and click Next.
Here, we need to provide the project name and click on Create.

Select .NET Core, ASP.NET Core 3.1, Model-View-Controller as the template and Individual User Accounts as Authentication, then click on Create, Visual Studio will create a new project with all these settings for you.

After setting up the project, let's create database based on our model, make sure to setup the connection string in appsettings.json file. I'll be using the localhost as my server with Windows authentication, following is my connection string.
"DefaultConnection": "Server=localhost;Database=DynamicPermissions;
Trusted_Connection=True;MultipleActiveResultSets=true"
I've created NavigationMenu to store menu names & RoleMenuPermission entity to store role permissions.
[Table(name: "AspNetNavigationMenu")]
public class NavigationMenu
{
    [Key]
    [DatabaseGenerated(DatabaseGeneratedOption.Identity)]
    public Guid Id { get; set; }

    public string Name { get; set; }

    [ForeignKey("ParentNavigationMenu")]
    public Guid? ParentMenuId { get; set; }

    public virtual NavigationMenu ParentNavigationMenu { get; set; }

    public string Area { get; set; }

    public string ControllerName { get; set; }

    public string ActionName { get; set; }

    public bool IsExternal { get; set; }

    public string ExternalUrl { get; set; }

    public int DisplayOrder { get; set; }

    [NotMapped]
    public bool Permitted { get; set; }

    public bool Visible { get; set; }
}

[Table(name: "AspNetRoleMenuPermission")]
public class RoleMenuPermission
{
    public string RoleId { get; set; }

    public Guid NavigationMenuId { get; set; }

    public NavigationMenu NavigationMenu { get; set; }
}
Here is my Db Context, we're overriding OnModelCreating to define RoleId & NavigationMenuId as keys because we don't need an identity key for this table.
public class ApplicationDbContext : IdentityDbContext
{
      public ApplicationDbContext(DbContextOptions<ApplicationDbContext> options)
      : base(options)
      {

      }

      public DbSet<RoleMenuPermission> RoleMenuPermission { get; set; }

      public DbSet<NavigationMenu> NavigationMenu { get; set; }

      protected override void OnModelCreating(ModelBuilder builder)
      {
           builder.Entity<RoleMenuPermission>()
           .HasKey(c => new { c.RoleId, c.NavigationMenuId});


           base.OnModelCreating(builder);
      }
}
Migrations
Now we need to run the migrations and then update the database, Enable-Migrations command has been obsolete, so we need to delete everything from Migrations folder and then run add migration command.
add-migration InitialVersion
Here are my database tables like shown below:

For more details on Seeding data, you can check out the following article:
New version of EF .NET Core has HasData on ModelBuilderobject in OnModelCreatingfunction but for now, we'll stick to the above approach for this demonstration.
Modification in DbInitializer, added new Permissions and allocated to Admin Role, we need these to be available in the database so we can allocate and validate for User roles later.
For our limited scope we'll add data through seed there's no CRUD screen as part of this scope but I hope you talented folks can do it in no time.
new NavigationMenu()
{
    Id = new Guid("F704BDFD-D3EA-4A6F-9463-DA47ED3657AB"),
    Name = "External Google Link",
    ControllerName = "",
    ActionName = "",
    IsExternal = true,
    ExternalUrl = "https://www.google.com/",
    ParentMenuId = new Guid("13e2f21a-4283-4ff8-bb7a-096e7b89e0f0"),
    DisplayOrder=2,
    Visible = true,
},
new NavigationMenu()
{
    Id = new Guid("913BF559-DB46-4072-BD01-F73F3C92E5D5"),
    Name = "Create Role",
    ControllerName = "Admin",
    ActionName = "CreateRole",
    ParentMenuId = new Guid("13e2f21a-4283-4ff8-bb7a-096e7b89e0f0"),
    DisplayOrder=3,
    Visible = true,
},
new NavigationMenu()
{
    Id = new Guid("3C1702C5-C34F-4468-B807-3A1D5545F734"),
    Name = "Edit User",
    ControllerName = "Admin",
    ActionName = "EditUser",
    ParentMenuId = new Guid("13e2f21a-4283-4ff8-bb7a-096e7b89e0f0"),
    DisplayOrder=3,
    Visible = false,
},
new NavigationMenu()
{
    Id = new Guid("94C22F11-6DD2-4B9C-95F7-9DD4EA1002E6"),
    Name = "Edit Role Permission",
    ControllerName = "Admin",
    ActionName = "EditRolePermission",
    ParentMenuId = new Guid("13e2f21a-4283-4ff8-bb7a-096e7b89e0f0"),
    DisplayOrder=3,
    Visible = false,
},
I have added two new functions in the data service from our previous implementation.
We'll get all defined permissions from NavigationMenu joining with allocated to role having Permitted = true so based on that, we can render the checkboxes Checked/Unchecked.
public async Task<List<NavigationMenuViewModel>> GetPermissionsByRoleIdAsync(string id)
{
    var items = await (from m in _context.NavigationMenu
                      join rm in _context.RoleMenuPermission
                      on new { X1 = m.Id, X2 = id } equals
                         new { X1 = rm.NavigationMenuId, X2 = rm.RoleId }
                      into rmp
                      from rm in rmp.DefaultIfEmpty()
                      select new NavigationMenuViewModel()
                      {
                          Id = m.Id,
                          Name = m.Name,
                          Area = m.Area,
                          ActionName = m.ActionName,
                          ControllerName = m.ControllerName,
                          IsExternal = m.IsExternal,
                          ExternalUrl = m.ExternalUrl,
                          DisplayOrder = m.DisplayOrder,
                          ParentMenuId = m.ParentMenuId,
                          Visible = m.Visible,
                          Permitted = rm.RoleId == id
                       })
                         .AsNoTracking()
                         .ToListAsync();

   return items;
}

//Remove old permissions for that role id and assign changed permissions

public async Task<bool> SetPermissionsByRoleIdAsync(string id, IEnumerable<Guid> permissionIds)
{
    var existing = await _context.RoleMenuPermission.Where(x => x.RoleId == id).ToListAsync();
     _context.RemoveRange(existing);

     foreach (var item in permissionIds)
     {
        await _context.RoleMenuPermission.AddAsync(new RoleMenuPermission()
        {
            RoleId = id,
            NavigationMenuId = item,
        });
     }

     var result = await _context.SaveChangesAsync();

     // Remove existing permissions to roles from Cache so it can re evaluate and take effect
     _cache.Remove("RolePermissions");

     return result > 0;
}
Here is my Admin Controller, for detailed implementation for actions, we can see code in the zip. Simple implementation, no magic code :). We just need to put [Authorize("Authorization")] on any Action we want to tell the application to validate authorization or it can be used on Controller level if all the actions are protected under same policy.
[Authorize]
public class AdminController : Controller
{
    private readonly UserManager<IdentityUser> _userManager;
    private readonly RoleManager<IdentityRole> _roleManager;
    private readonly IDataAccessService _dataAccessService;
    private readonly ILogger<AdminController> _logger;

    public AdminController(
        UserManager<IdentityUser> userManager,
        RoleManager<IdentityRole> roleManager,
        IDataAccessService dataAccessService,
        ILogger<AdminController> logger)
    {
        _userManager = userManager;
        _roleManager = roleManager;
        _dataAccessService = dataAccessService;
        _logger = logger;
    }

    [Authorize("Authorization")]
    public async Task<IActionResult> Roles() {}

    [HttpPost]
    [Authorize("Roles")]
    public async Task<IActionResult> CreateRole(RoleViewModel viewModel) {}

    [Authorize("Authorization")]
    public async Task<IActionResult> Users() {}

    [Authorize("Users")]
    public async Task<IActionResult> EditUser(string id){}

    [HttpPost]
    [Authorize("Users")]
    public async Task<IActionResult> EditUser(UserViewModel viewModel){}

    [Authorize("Authorization")]
    public async Task<IActionResult> EditRolePermission(string id){}

    [HttpPost]
    [Authorize("Authorization")]
    public async Task<IActionResult> EditRolePermission
                     (string id, List<NavigationMenuViewModel> viewModel){}
}
Here is how we render the checkboxes list.
<form asp-action="EditRolePermission">
    <div class="form-group">
        <ul style="list-style-type: none;">
            @for (var i = 0; i < Model.Count; i++)
            {
                <li>
                    <input type="checkbox" asp-for="@Model[i].Permitted" />
                    <label style="margin-left:10px;"
                    asp-for="@Model[i].Permitted">@Model[i].Name</label>
                    <input type="hidden" asp-for="@Model[i].Id" />
                    <input type="hidden" asp-for="@Model[i].Name" />
                </li>
            }
        </ul>
    </div>
    <div class="form-group">
        <input type="submit" value="Save" class="btn btn-primary" />
        <a asp-action="Roles">Back to List</a>
    </div>
</form>
So now we can run & test the system with Admin User by logging in with:
- Username: [email protected]
- Password: P@ssw0rd
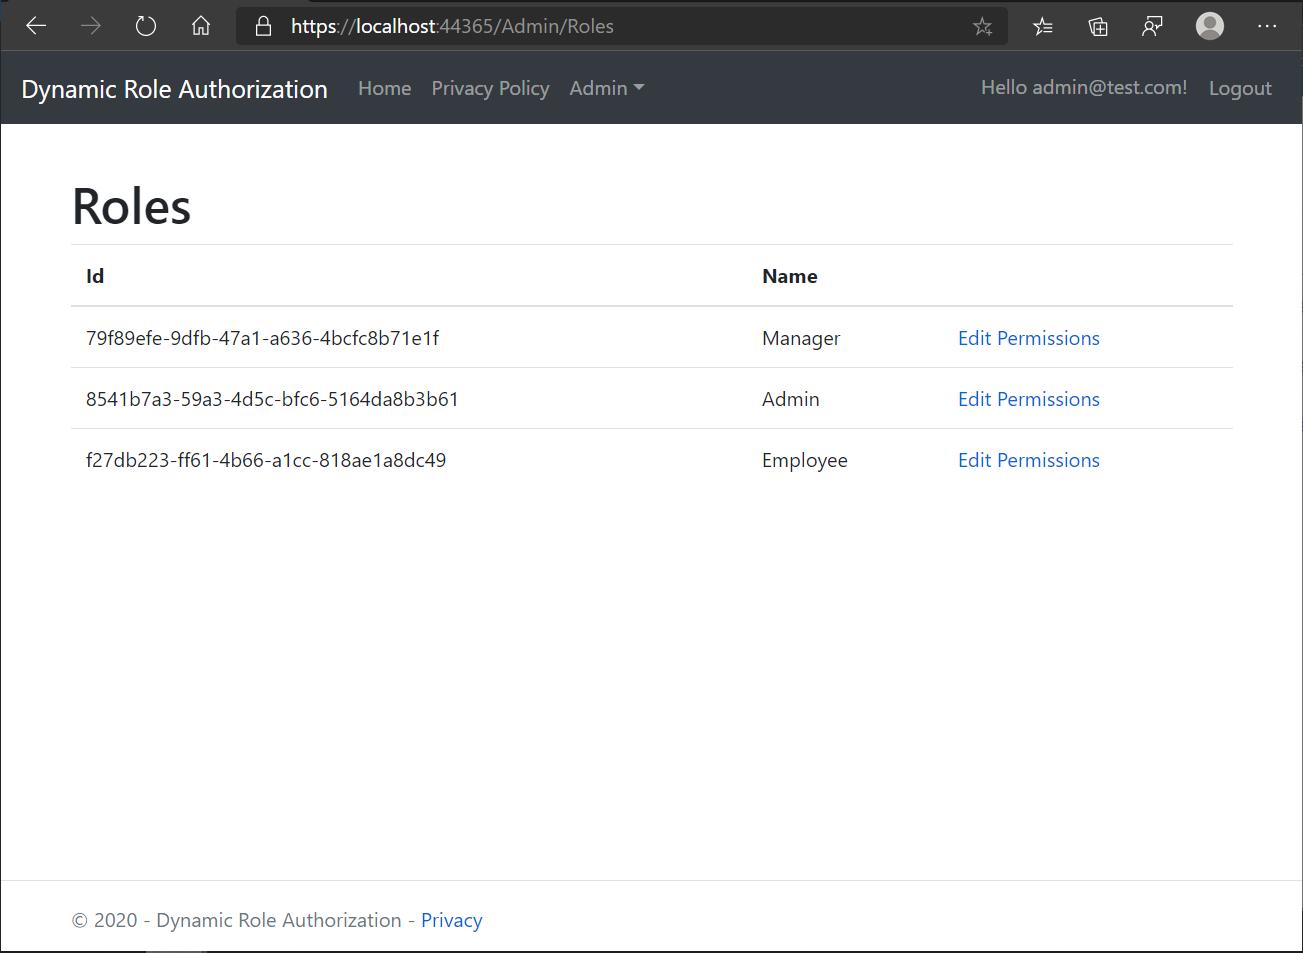
Roles, Create Role
Here is the list of roles which were created as part of migrations:
From Create Role screen, a new role can be added in the system.

Assign Role Permissions
In Roles Listing, if we click on Edit Permissions button, it'll take us to Permissions screen listing all permissions with allocated permissions checked.

Now we can change these permissions and save to make it effective for users under that role. So let's try to change it.
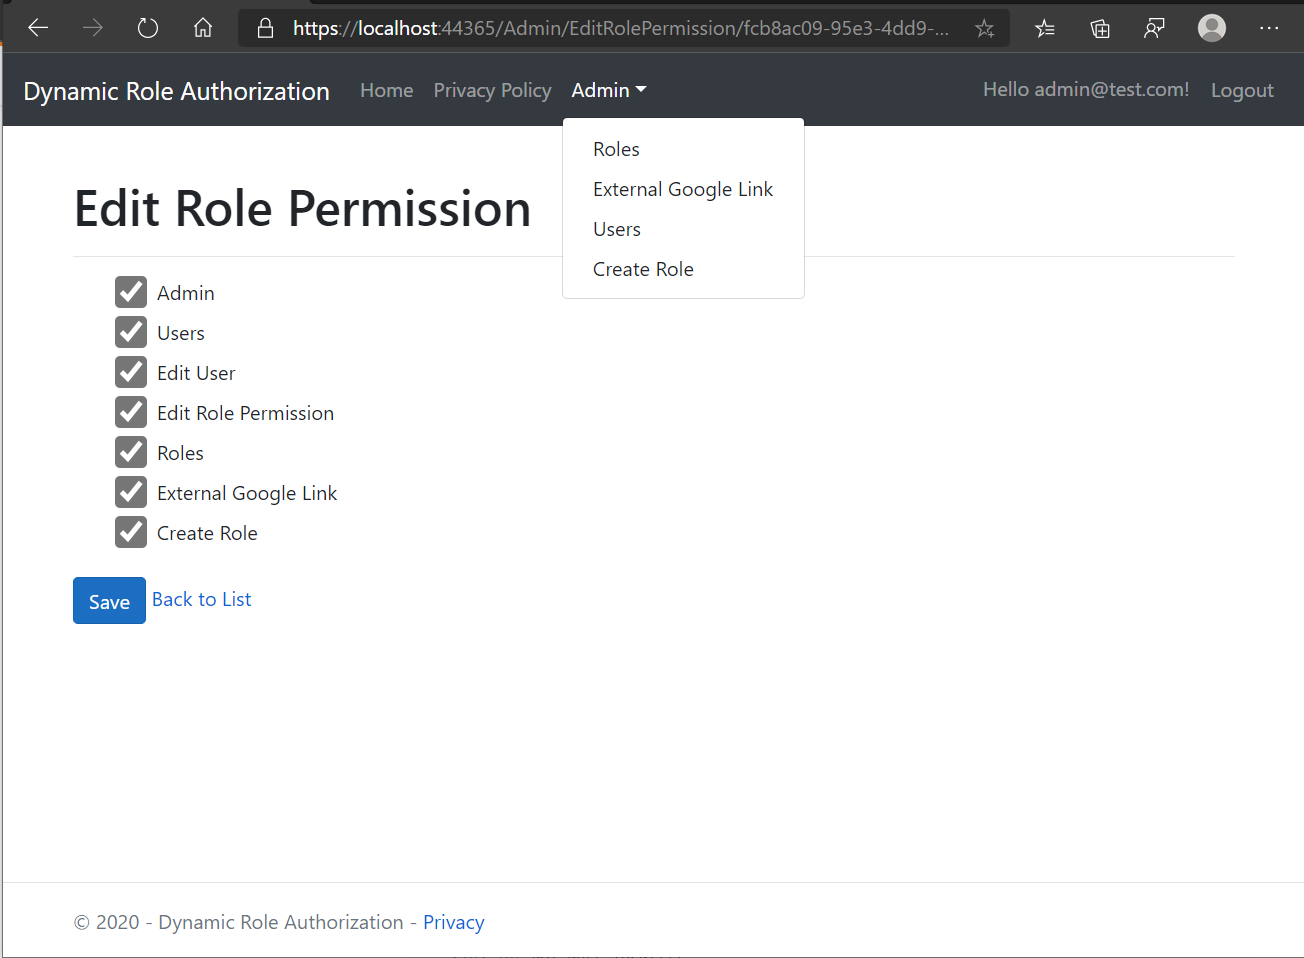
We'll uncheck External Google Link & Create Role.
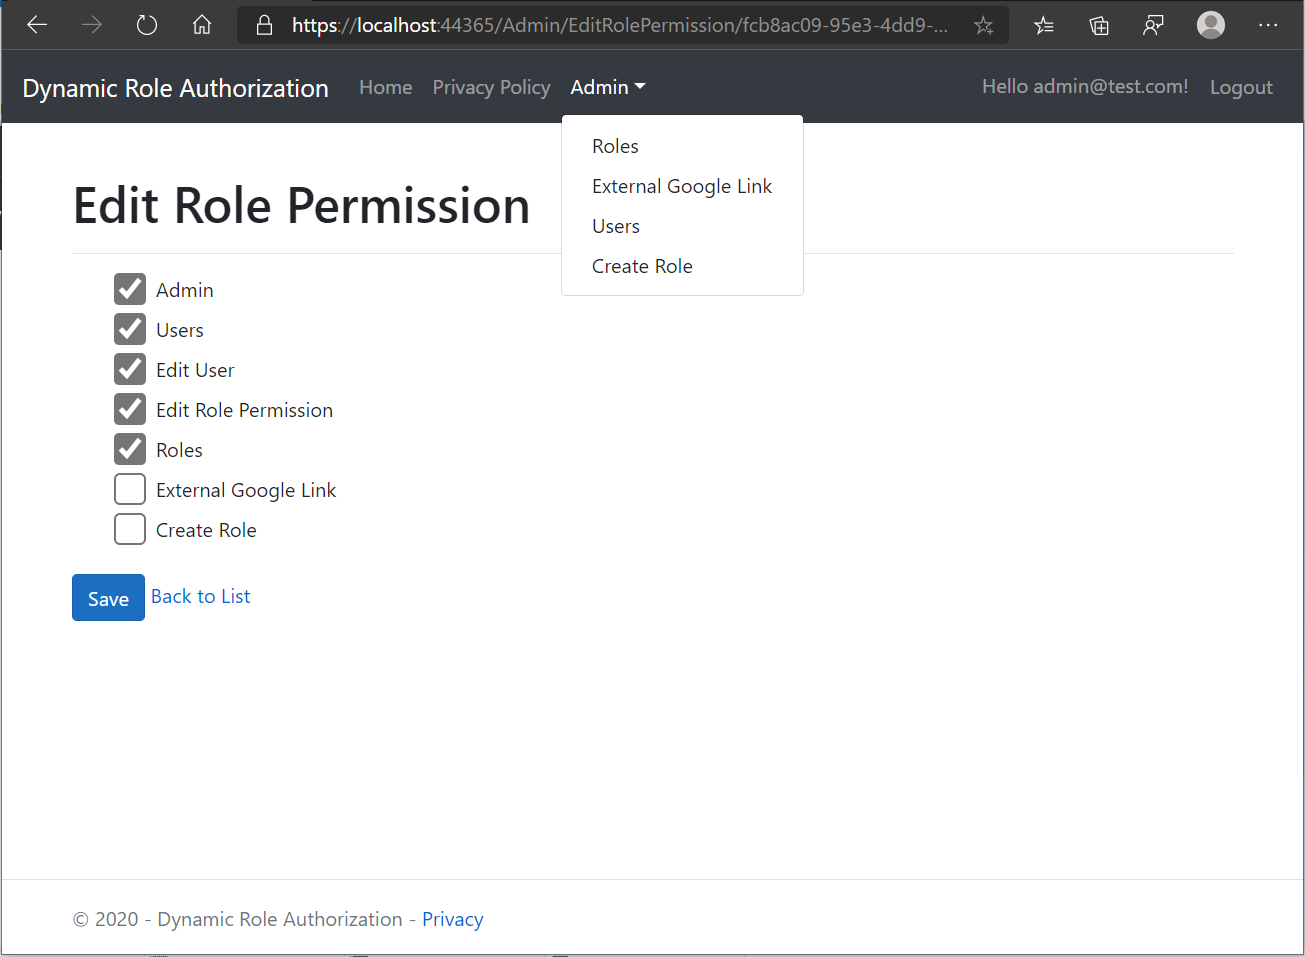
Now when I'll save these changes and after that again Edit permissions for that same role.
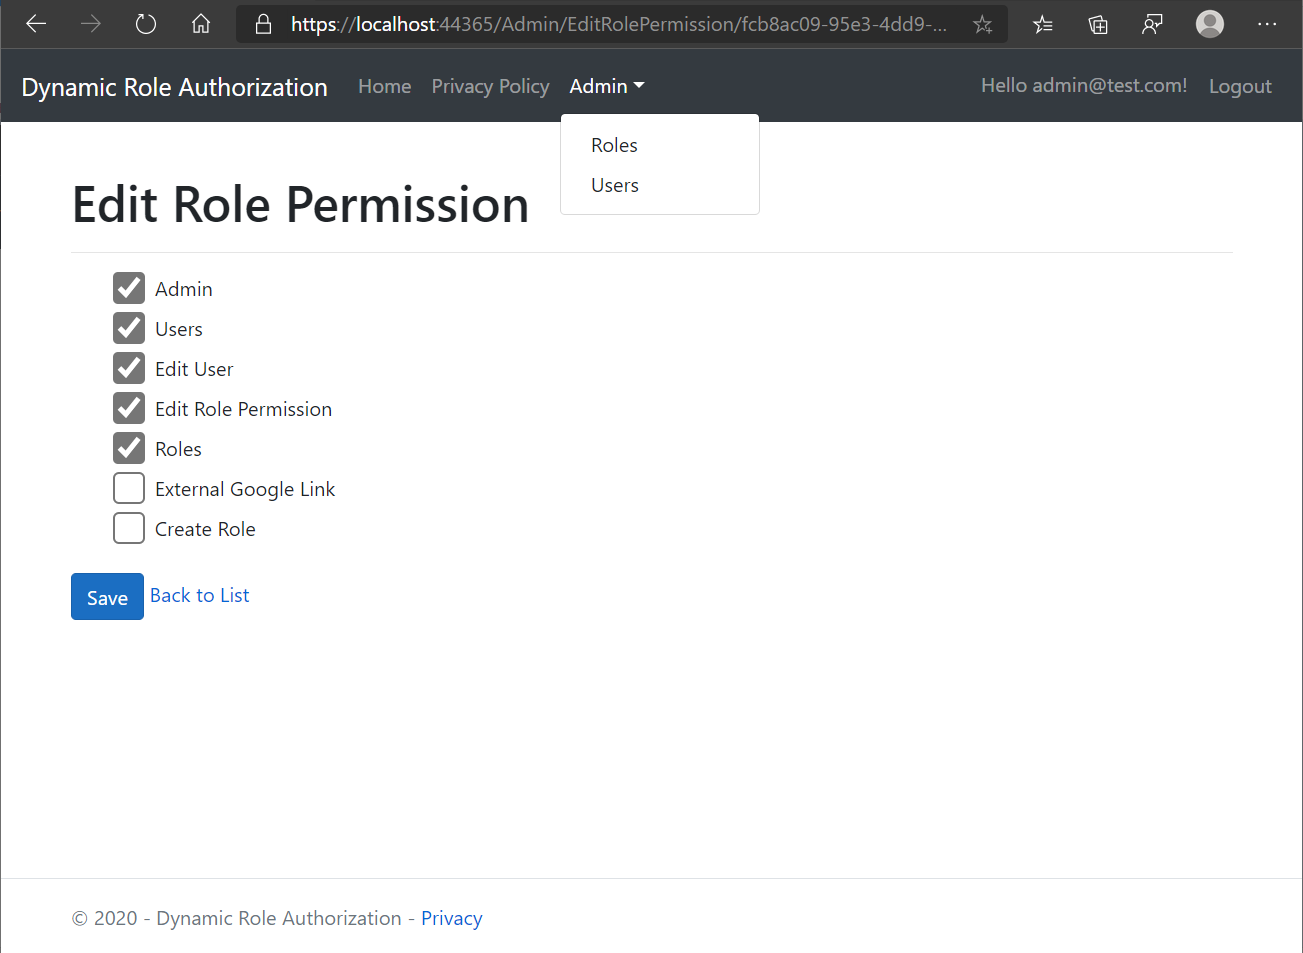
As you can see, now those two permissions are unchecked and not present in the menu as well.
Now I can try to access Create Role page by pasting the URL, so it should validate me according to my updated permissions and throw me an Access Denied.
Same can be verified if we copy URL for some page with user having access, then login with some other user without access to that page and paste the copied URL, it should give the same error.

Assign Role to User
We can see the user listing with Edit button.
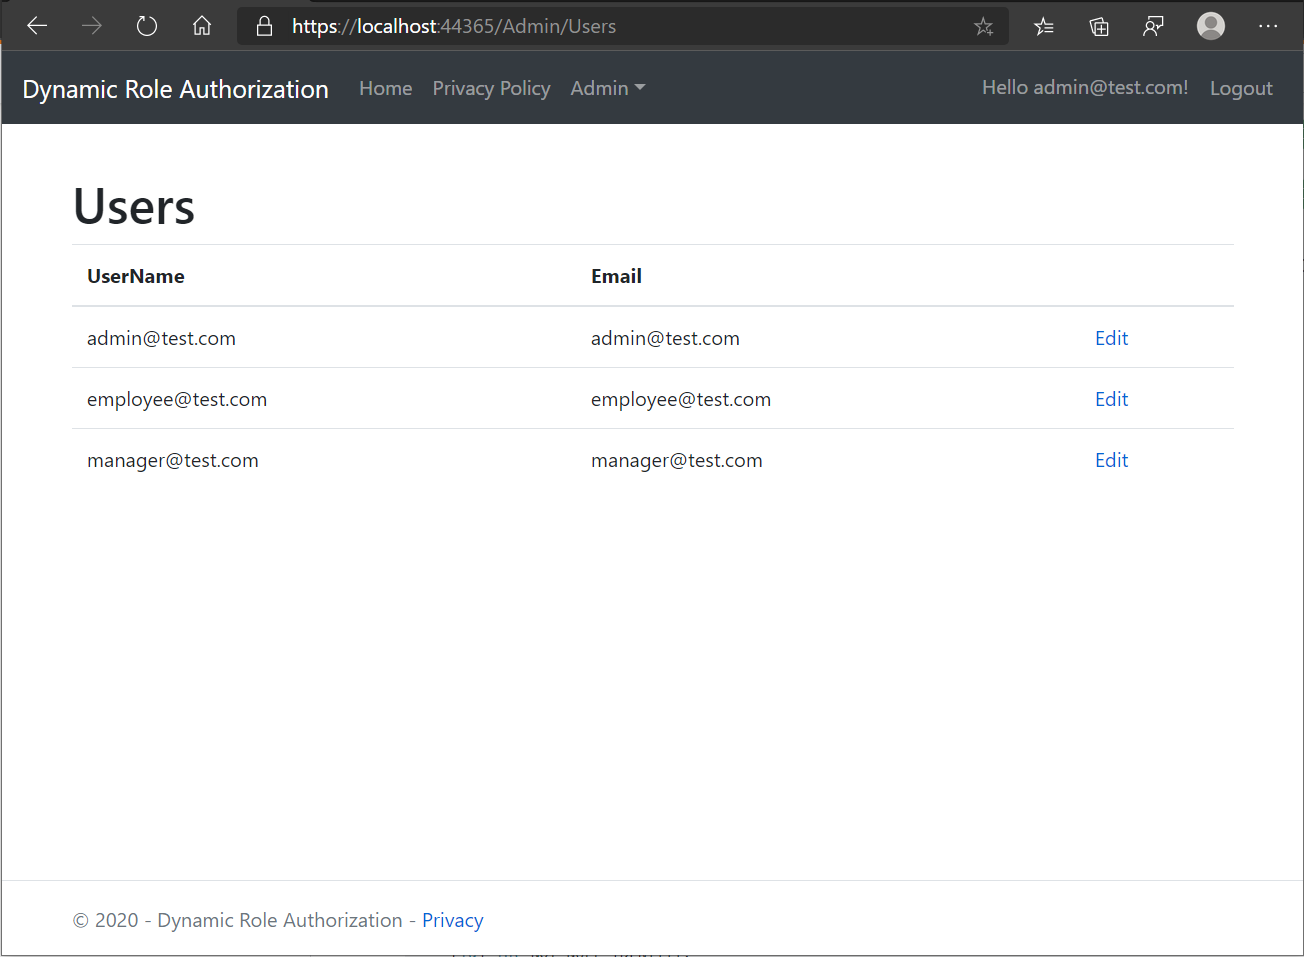
By Editing, we'll be able to assign/remove roles to User, after we click on Edit button, we can see the below screen with list of all roles as check box list available in the system.

So now we have screens to Create new role, Roles listing, Edit User, Edit permissions for role, based on these interfaces, we need to validate the authorization.
Access Restriction with Cache
We'll use Authorization handler for that purpose but instead of many policies or roles already defined at the time of development, in real world systems, roles can be changed and reassigned to different users or one user can have multiple roles for some specific period of time, etc. Keeping that in mind, we'll give the liberty to the end user to give permissions to their defined roles so their customer/employees with those roles could perform their duties according to their roles and permissions.
We'll generalize AuthorizationHandler to make it work dynamically with permissions from the database. We need to Create an Authorization requirement and inherit from IAuthorizationRequirement interface. Now we can create an AuthorizationHandler and pass our requirement using generics, then we can override the HandleRequirementAsync function. To get Controller and Action from end point and check for permission from database. With this approach, Authorization will be coupled to MVC but that's ok because that handler has been written for this particular purpose & use.
We can provide a parent action name as well when we have lots of ajax child actions that we want to protect as well e.g. I have an Action Role Listing so I say if a Role has access to Role Listing it should be allowed to create new role as well. So in this case we are protecting two actions based on one Permission.
public class AuthorizationRequirement : IAuthorizationRequirement
{
    public AuthorizationRequirement(string permissionName)
    {
        PermissionName = permissionName;
    }

    public string PermissionName { get; }
}

public class PermissionHandler : AuthorizationHandler<AuthorizationRequirement>
{
    private readonly IDataAccessService _dataAccessService;

    public PermissionHandler(IDataAccessService dataAccessService)
    {
        _dataAccessService = dataAccessService;
    }

    protected async override Task HandleRequirementAsync(AuthorizationHandlerContext context, AuthorizationRequirement requirement)
    {
        if (context.Resource is RouteEndpoint endpoint)
        {
            endpoint.RoutePattern.RequiredValues.TryGetValue("controller", out var _controller);
            endpoint.RoutePattern.RequiredValues.TryGetValue("action", out var _action);

            endpoint.RoutePattern.RequiredValues.TryGetValue("page", out var _page);
            endpoint.RoutePattern.RequiredValues.TryGetValue("area", out var _area);

            // Check if a parent action is permitted then it'll allow child without checking for child permissions
            if (!string.IsNullOrWhiteSpace(requirement?.PermissionName) && !requirement.PermissionName.Equals("Authorization"))
            {
                _action = requirement.PermissionName;
            }

            if (context.User.Identity.IsAuthenticated && _controller != null && _action != null &&
                   await _dataAccessService.GetMenuItemsAsync(context.User, _controller.ToString(), _action.ToString()))
            {
                context.Succeed(requirement);
            }
         }

         await Task.CompletedTask;
     }
}
We can use Cache to hold permissions to reduce database calls for authorization checks on each resource access. Role Permissions can be added to user claims and permissions in Cache to give it a performance boost.
So in the Data Service we are going to make some changes, we'll use MemoryCache, injecting through DI then use GetOrCreateAsync function.
public class DataAccessService : IDataAccessService
{
    private readonly IMemoryCache _cache;
    private readonly ApplicationDbContext _context;

    public DataAccessService(ApplicationDbContext context, IMemoryCache cache)
    {
        _cache = cache;
        _context = context;
    }

    public async Task<List<NavigationMenuViewModel>> GetMenuItemsAsync(ClaimsPrincipal principal)
    {
        var isAuthenticated = principal.Identity.IsAuthenticated;
        if (!isAuthenticated)
        {
            return new List<NavigationMenuViewModel>();
        }

        var roleIds = await GetUserRoleIds(principal);

        var permissions = await _cache.GetOrCreateAsync("Permissions",
             async x => await (from menu in _context.NavigationMenu select menu).ToListAsync());

        var rolePermissions = await _cache.GetOrCreateAsync("RolePermissions",
             async x => await (from menu in _context.RoleMenuPermission select menu).Include(x => x.NavigationMenu).ToListAsync());

        var data = (from menu in rolePermissions
                    join p in permissions on menu.NavigationMenuId equals p.Id
                    where roleIds.Contains(menu.RoleId)
                    select p)
                           .Select(m => new NavigationMenuViewModel()
                           {
                              Id = m.Id,
                              Name = m.Name,
                              Area = m.Area,
                              Visible = m.Visible,
                              IsExternal = m.IsExternal,
                              ActionName = m.ActionName,
                              ExternalUrl = m.ExternalUrl,
                              DisplayOrder = m.DisplayOrder,
                              ParentMenuId = m.ParentMenuId,
                              ControllerName = m.ControllerName,
                          }).Distinct().ToList();

        return data;
    }

}
Custom Authorization Policy
Usually when we have large number of policies or dynamic polices so in such cases we can't add each individual policy with AuthorizationOptions.AddPolicy. Same can be used if we are reading these policies from database or external data source some api etc. Creating policies at runtime based on information make sense.
Using policy-based authorization, policies are registered by calling AuthorizationOptions. AddPolicy as part of authorization service configuration. We can use a custom IAuthorizationPolicyProvider to control how authorization policies are supplied. So here's our implementation class and some changes in Startup.cs are required as well
public class AuthorizationPolicyProvider : DefaultAuthorizationPolicyProvider
{
    private readonly AuthorizationOptions _options;

    public AuthorizationPolicyProvider(IOptions<AuthorizationOptions> options) : base(options)
    {
        _options = options.Value;
    }

    public override async Task<AuthorizationPolicy> GetPolicyAsync(string policyName)
    {
        return await base.GetPolicyAsync(policyName)
                 ?? new AuthorizationPolicyBuilder()
                     .AddRequirements(new AuthorizationRequirement(policyName))
                     .Build();
    }
}
in Startup.cs need to register it with the handler.
services.AddScoped<IAuthorizationHandler, PermissionHandler>();
services.AddSingleton<IAuthorizationPolicyProvider, AuthorizationPolicyProvider>();
Now we don't need to use the single policy registration in the startup class which was like
services.AddAuthorization(options =>
{
     options.AddPolicy("Authorization", policyCorrectUser =>
     {
          policyCorrectUser.Requirements.Add(new AuthorizationRequirement());
     });
});
Conclusion
We have created our database through migrations and started our project under Development environment. Logged in User can see Menu Items and pages according to dynamically defined role permissions. The source code is attached. I encourage you to download the sample code, run and see. All of you are most welcome to post comments if you have any questions/suggestions.
Thanks for reading...
Interesting Reads
Between developer community and .NET Core security team, some discussions are still going on.
History
- 5th March, 2020: Initial version
- 16th April, 2022 Upgraded source code to .Net6 https://github.com/dnxit/Mvc-Dynamic-Role-Permission-Authorization
Recommend
-
30
The website of Ximedes
-
24
Angular Role-Based Authorization with ASP.NET Core Identity Posted by Marinko Spasojevic | Updated Date Dec 17, 2020 |
-
15
C# with CSharpFritz - S2 Ep 3: ASP.NET Core MVC, Part 2704 views•Jan 5, 2021292ShareSave
-
8
Arrays in ASP.NET MVC Core route parameters Posted on: 30-04-2021
-
11
Migrate to ASP.NET Core MVC from ASP.NET Framework MVC 16 minute read .NET has been around for a while and has had many versions. We...
-
5
.NET Core 2.1 MVC 实现 PagedList .NET Core 2.1 NuGet 包管理器 开源分页包 Sakura.AspNetCore.Mvc.PageList 和 Sakura.AspNetCore.PagedList
-
4
.NETRole-Based Authorization for ASP.NET Web APIsWhat is the best way to apply Role-Based Access Control (RBAC) to your ASP.NET Web API? Let's find out together.November 02, 2021Role-Bas...
-
8
Posting AJAX Requests to ASP.NET Core MVC Introduction In the past, I’ve had trouble doing something that is apparently simple: invoking a simple action method in a controller using AJAX. Although it is...
-
5
Role-based Authorization Strategy
-
13
Role-Based Authorization with JWT Using NestJS 16 Jul 2022 Authentication and Authorization can be implemented in different ways using NestJS. The framework has great...
About Joyk
Aggregate valuable and interesting links.
Joyk means Joy of geeK