

在Vue3项目中使用pinia代替Vuex进行数据存储
source link: https://www.cnblogs.com/wuhuacong/p/16117968.html
Go to the source link to view the article. You can view the picture content, updated content and better typesetting reading experience. If the link is broken, please click the button below to view the snapshot at that time.
在Vue3项目中使用pinia代替Vuex进行数据存储
pinia是一个vue的状态存储库,你可以使用它来存储、共享一些跨组件或者页面的数据,使用起来和vuex非常类似。pina相对Vuex来说,更好的ts支持和代码自动补全功能。本篇随笔介绍pinia的基础用法以及持久化存储的一些用法,供参考学习。
Pinia 是 Vuex4 的升级版,也就是 Vuex5; Pinia 极大的简化了Vuex的使用,是 Vue3的新的状态管理工具;Pinia 对 ts的支持更好,性能更优, 体积更小,无 mutations,可用于 Vue2 和 Vue3;Pinia支持Vue Devtools、 模块热更新和服务端渲染。
1、pinia的安装和使用
安装pinia(https://pinia.vuejs.org/)
npm install pinia
在main.j或者main.ts中引入使用
import { createPinia } from 'pinia'

app.use(createPinia())
下面就是使用pinia的一个例子。这样你就创建了一个状态存储。
// stores/counter.js
import { defineStore } from 'pinia'

export const useCounterStore = defineStore('counter', {
  state: () => {
    return { count: 0 }
  },
  // 也可以这样定义状态
  // state: () => ({ count: 0 })
  actions: {
    increment() {
      this.count++
    },
  },
})
在组件中使用:
import { useCounterStore } from '@/stores/counter'

export default {
  setup() {
    const counter = useCounterStore()

    counter.count++
    // 编辑器会有代码提示
    counter.$patch({ count: counter.count + 1 })
    // 也可以使用action来代替
    counter.increment()
  },
}
const useCounterStore = defineStore('counter', {
  state: () => ({ count: 0 }),
  getters: {
    double: (state) => state.count * 2,
  },
  actions: {
    increment() {
      this.count++
    }
  }
})

const useUserStore = defineStore('user', {
  // ...
})

export default {
  computed: {
    // 其他计算属性
    // ...
    // 可以使用 this.counterStore 和 this.userStore获取
    ...mapStores(useCounterStore, useUserStore)
    // 可以使用 this.count 和this.double获取
    ...mapState(useCounterStore, ['count', 'double']),
  },
  methods: {
    // 可以使用 this.increment()调用
    ...mapActions(useCounterStore, ['increment']),
  },
}
与vue4之前的版本相比,pinia的API是有很多不同的,即:
- 去掉了mutation。因为好多人认为mutation是多余的。以前它方便devtools集成,现在这不是个问题了。
- 不用在写复杂的ts类型包装,所有的都是有类型的,API设计的都是尽量符合ts的类型推断
- 不再使用一个莫名其妙的字符串了,只需要导入一个函数,调用他们就行了,同时还有代码自动补全
- 不需要动态添加store了,因为它们现在本来就是动态。如果你想,你随时可以手动去写一个store。
- 没有复杂的嵌套模块了。你仍然可以在一个store中导入其他的store来实现嵌套模块,但是pinia还是推荐使用一个扁平的结构。但是即使你使用循环依赖也没关系。
- 不再需要命名空间了。因为现在store本来就是扁平结构了。你也可以理解为所有的store本来就有命名空间了。
import { defineStore } from 'pinia'

export const useStore = defineStore('main', {
  // other options...
})
上面只是定义了store,在setup函数中调用了useStore()时,才会创建store:
import { useStore } from '@/stores/counter'

export default {
  setup() {
    const store = useStore()

    return {
      // 你可以返回store这个对象,然后就可以在template中使用了
      store,
    }
  },
}
在store实例化以后,你就可以调用到store中定义的state、getters和actions了。为了让解构的值还保持响应式,你需要用到storeToRefs()方法。它会给响应式的数据创建ref。
import { storeToRefs } from 'pinia'

export default defineComponent({
  setup() {
    const store = useStore()
    // `name` 和 `doubleCount` 是响应式的
    // 插件增加的属性也会创建ref
    // 但是会自动跳过action或者不是响应性的属性
    const { name, doubleCount } = storeToRefs(store)

    return {
      name,
      doubleCount
    }
  },
})
默认情况下,你可以在store实例上直接获取或者修改state:
const store = useStore()
store.counter++
也可以调用$reset()方法来把state恢复为初始值:
const store = useStore()
store.$reset()
除了直接修改store里的值store.counter++,你也可以是用$patch方法。你可以同时修改多个值:
store.$patch({
  counter: store.counter + 1,
  name: 'Abalam',
})
或者$patch接收一个函数作为参数,来简化改变数组的写法:
store.$patch((state) => {
  state.items.push({ name: 'shoes', quantity: 1 })
  state.hasChanged = true
})
2、pinia的持久化存储处理
localStorage和sessionStorage差别
localStorage和sessionStorage一样都是用来存储客户端临时信息的对象。
他们均只能存储字符串类型的对象(虽然规范中可以存储其他原生类型的对象,但是目前为止没有浏览器对其进行实现)。
localStorage生命周期是永久,这意味着除非用户显示在浏览器提供的UI上清除localStorage信息,否则这些信息将永远存在。
sessionStorage生命周期为当前窗口或标签页,一旦窗口或标签页被永久关闭了,那么所有通过sessionStorage存储的数据也就被清空了。
不同浏览器无法共享localStorage或sessionStorage中的信息。相同浏览器的不同页面间可以共享相同的 localStorage(页面属于相同域名和端口),但是不同页面或标签页间无法共享sessionStorage的信息。这里需要注意的是,页面及标 签页仅指顶级窗口,如果一个标签页包含多个iframe标签且他们属于同源页面,那么他们之间是可以共享sessionStorage的。
JSON对象提供的parse和stringify将其他数据类型转化成字符串,再存储到storage中就可以了,操作的方式:
存:
var obj = {"name":"xiaoming","age":"16"}
localStorage.setItem("userInfo",JSON.stringify(obj));
取:
var user = JSON.parse(localStorage.getItem("userInfo"))
删除:
localStorage.remove("userInfo);
清空:
localStorage.clear();
pnia 使用订阅机制subscribe来实现数据的持久化存储的代码如下所示。
const instance = useMainStore();
// 订阅数据变化,变化时存储 instance.$id 这是storeId
instance.$subscribe((mutation, state) => {
  localStorage.setItem(instance.$id, JSON.stringify(state));
});

//init 初始的时候获取
const val = localStorage.getItem(instance.$id);
if (val) {
  instance.$state = JSON.parse(val);
}
也可以通过watch实现
watch(
  pinia.state,
  (state) => {
    // persist the whole state to the local storage whenever it changes
    localStorage.setItem('piniaState', JSON.stringify(state))
  },
  { deep: true }
)
但是需要注意,这种方式持久化会提示pinia未安装挂载,所以需要在pinia挂载后再调用,这里可以将它封装成方法导出,在挂载后调用
xport const initStore = () => {
  const instance = useMainStore();
  // 订阅数据变化,变化时存储 instance.$id 这是storeId
  instance.$subscribe((mutation, state) => {
    localStorage.setItem(instance.$id, JSON.stringify(state));
  });

  //init 初始的时候获取
  const val = localStorage.getItem(instance.$id);
  if (val) {
    instance.$state = JSON.parse(val);
  }

}
export default {
  setup() {
    const someStore = useSomeStore()

    // 组件卸载后,侦听也会有
    someStore.$subscribe(callback, true)

    // ...
  },
}
或者watch状态的变化
watch(
  pinia.state,
  (state) => {
    // 在state改变时,保存在localStorage中
    localStorage.setItem('piniaState', JSON.stringify(state))
  },
  { deep: true }
)
3、使用pinia插件持久化存储
pinia plugin persist官方网站:pinia-plugin-persist
持久化存储也可以通过安装插件的方式,安装 pinia-plugin-persist 来实现。
npm i pinia-plugin-persist --save
使用main.js
import { createPinia } from 'pinia'
import piniaPluginPersist from 'pinia-plugin-persist'
const store = createPinia()
store.use(piniaPluginPersist)
createApp(App).use(store).mount('#app')
在对应的store中开启,数据默认存在 sessionStorage 里,并且会以 storeId 作为 key
import { defineStore } from 'pinia'
// 'main' 是storeId
export const useMainStore = defineStore('main', {
  state: () => ({
    counter: 2,
    name: 'Eduardo',
    isAdmin: true
  }),
  // ……
  // 开启数据缓存
  persist: {
    enabled: true
  }
})
如果需要自定义key和存储位置,则修改参数即可。
  persist: {
    enabled: true,
    strategies: [ //使用插件自定义存储
      {
        key: 'settings', // key可以自己定义,不填的话默认就是这个store的ID
        storage: localStorage,
      }
    ]
  },
4、在实际项目中使用pinia
一般项目开发,实际上存储的内容会比较多,可能根据不同的键值模块进行区分,因此把它们放在一个store/modules里面,方便的使用引用它来存取设置数据即可。
我们这里简单以一个settings的配置信息进行介绍,其中index.ts是一个统一的创建pinia的对象并挂接到全局App上的。
其中index.ts的代码如下所示。
import type { App } from "vue";
import { createPinia } from "pinia";
import piniaPluginPersist from 'pinia-plugin-persist';//使用插件持久化

const store = createPinia();
store.use(piniaPluginPersist) //使用插件持久化

export function setupStore(app: App<Element>) {
  app.use(store);
}

export { store };
因此在main.js里面引入并挂接pinia即可。
import { createApp } from 'vue'

import ElementPlus from 'element-plus'
import 'element-plus/dist/index.css'
import 'normalize.css' // css初始化

import App from './App.vue'
import { setupStore } from "/@/store";

const app = createApp(App)
setupStore(app)
app.use(ElementPlus)
app.mount('#app')
这样我们就可以再次定义一个模块化的配置信息,以便于管理存储各种不同类型的内容。
如下面我们定义一个程序配置信息setttings.ts
import { defineStore } from "pinia";
import { store } from "/@/store";

export type settingType = {
    title: string;
    fixedHeader: boolean;
    hiddenSideBar: boolean;
  };

export const useSettingStore = defineStore({
  id: "settings",
  state: (): settingType => ({
    title: "Vue3 + TypeScript + Element",
    fixedHeader: false,
    hiddenSideBar: false
  }),
  persist: {
    enabled: true,
    strategies: [ //使用插件自定义存储
      {
        key: 'settings', // key可以自己定义,不填的话默认就是这个store的ID
        storage: localStorage,
      }
    ]
  },

  getters: {
    getTitle() {
      return this.title;
    },
    getFixedHeader() {
      return this.fixedHeader;
    },
    getHiddenSideBar() {
      return this.HiddenSideBar;
    }
  },
  actions: {
    CHANGE_SETTING({ key, value }) {
      // eslint-disable-next-line no-prototype-builtins
      if (this.hasOwnProperty(key)) {
        this[key] = value;
      }
    },
    changeSetting(data) {
      this.CHANGE_SETTING(data);
    }
  }
});

export function useSettingStoreHook() {
  return useSettingStore(store);
}
然后在组件视图vue或者app.vue中使用即可
<script lang="ts">
import { defineComponent } from "vue";

import { useSettingStoreHook } from "/@/store/modules/settings";
import { storeToRefs } from "pinia";

export default defineComponent({
  name: "app",
  components: {
  },
  setup() {
    const store = useSettingStoreHook();

    const { fixedHeader, title } = storeToRefs(store);
    return {
      fixedHeader,
      title,
    };
  },
  methods: {
    setTitle() {
      this.title = "Vue3 + TypeScript + Element + Edit";
      console.log(this.title);
    },
  },
});
</script>
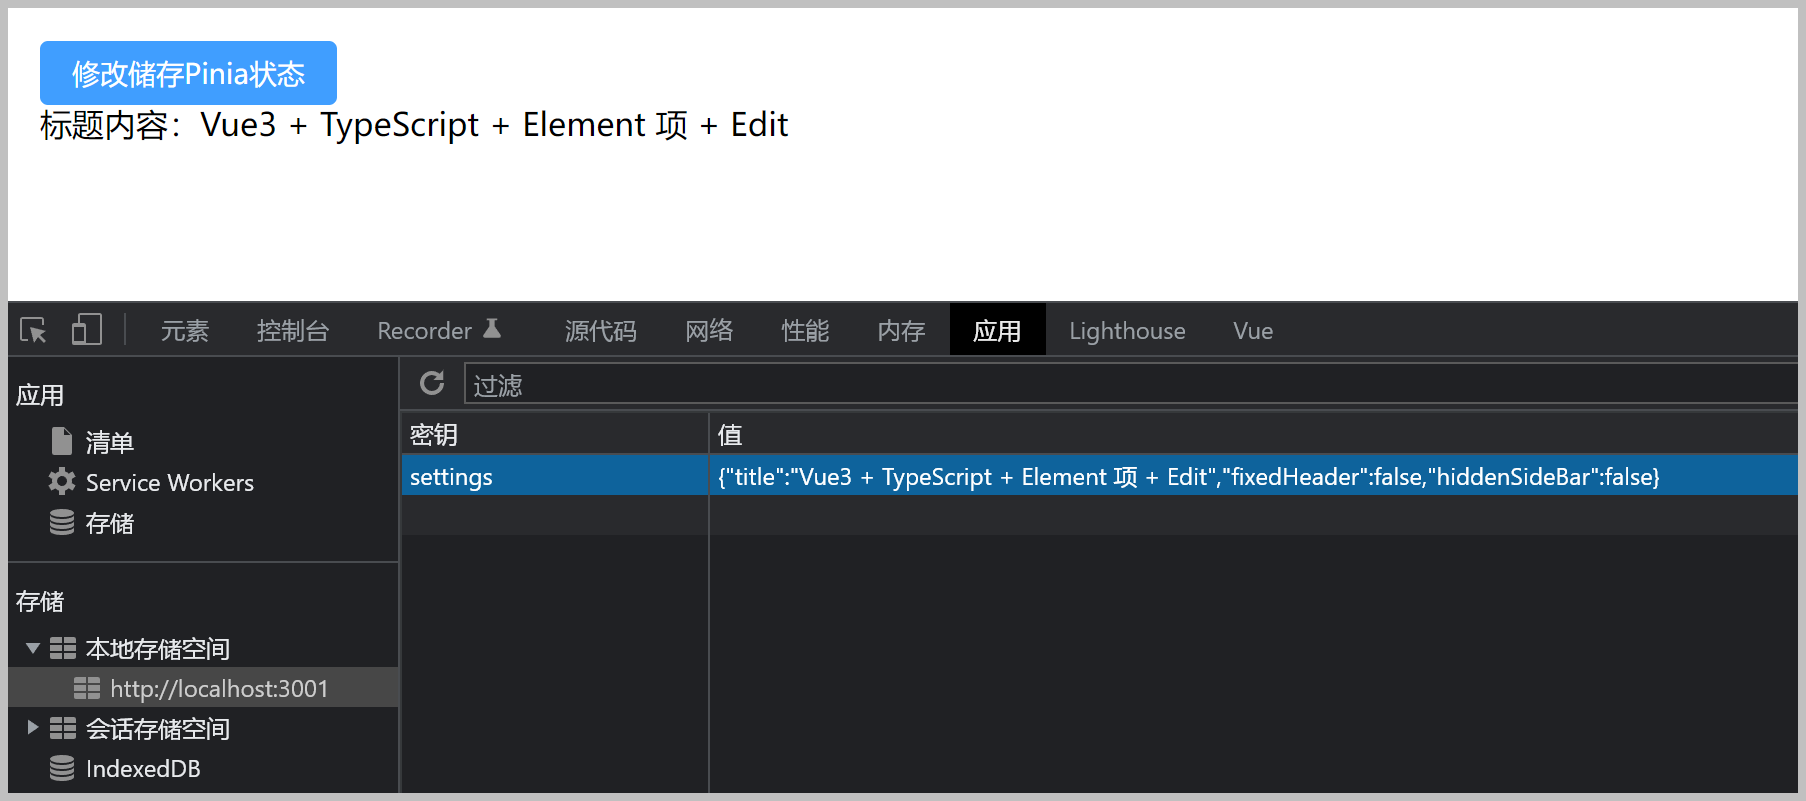
查看数据修改后,存储在本地存储空间中的内容,如下所示。
专注于Winform开发框架/混合式开发框架、Web开发框架、Bootstrap开发框架、微信门户开发框架的研究及应用。
转载请注明出处:
撰写人:伍华聪 http://www.iqidi.com
Recommend
About Joyk
Aggregate valuable and interesting links.
Joyk means Joy of geeK