

Telerik UI for Blazor
source link: https://www.telerik.com/blogs/manage-forms-data-telerik-ui-blazor-ef-core
Go to the source link to view the article. You can view the picture content, updated content and better typesetting reading experience. If the link is broken, please click the button below to view the snapshot at that time.

Manage Forms Data with Telerik UI for Blazor and EF Core
See how to quickly build a Blazor app that performs Data Grid CRUD operations with Telerik UI for Blazor Form and Grid UI components, and EF Core.
Managing data can become a very simple task if we use the right tools. In our two-part blog series, we will see how quickly you can implement .NET web applications with Telerik UI components and EF Core. In the current article, we will focus on building a Blazor application and easily persist data with Telerik UI for Blazor components together with EF Core. In the blog post to follow, we will recreate the same scenario in ASP.NET Core.
Building new functionality always takes time. Even for a simple registration form, we need to implement data modeling, CRUD functions and screen frontends under the hood. But the good news is there are sensational tools that make things easier, without the need to reinvent the wheel.
In this article, we will learn how to create a registration system with Telerik UI for Blazor and EF Core. We’ll see how simple and fast everything can be with the help of these tools.
About the Project
As an example project, we will create a server app for Blazor in .NET 6. We will create an app that will allow us to:
- Register products
- Read records
- Create records
- Alter records
- Delete records
For the database, I will use SQLite due to its easy configuration, but you can use any relational database, like MySQL or SQL SERVER, just changing the connection string and the configuration of the “ApplicationDbContext” class.
The database schema will be modeled according to the Model classes and created/updated by EF Core commands.
For the frontend, we will use Telerik UI for Blazor library, which has all the resources we will need such as registration forms, Blazor Data Grid with pagination, Form, Buttons for functions and much more.
You can access the complete source code of the final project at this link: Source Code.
Implementing the Project
In this article, I will use Visual Studio 2022. To create the project in Visual Studio, follow the steps below:
Create a new project -> Blazor Server App -> .NET 6.0 -> Create
You can name the project “ProductCatalog.”
Project Dependencies
Add the project dependencies by editing the project file “ProductCatalog.csproj,” or install them via the NuGet Package Manager.
  <ItemGroup>
    <PackageReference Include="Microsoft.EntityFrameworkCore" Version="6.0.3" />
    <PackageReference Include="Microsoft.EntityFrameworkCore.Design" Version="6.0.3">
      <PrivateAssets>all</PrivateAssets>
      <IncludeAssets>runtime; build; native; contentfiles; analyzers; buildtransitive</IncludeAssets>
    </PackageReference>
    <PackageReference Include="Microsoft.EntityFrameworkCore.Sqlite" Version="6.0.3" />
    <PackageReference Include="Microsoft.EntityFrameworkCore.Tools" Version="6.0.3">
      <PrivateAssets>all</PrivateAssets>
      <IncludeAssets>runtime; build; native; contentfiles; analyzers; buildtransitive</IncludeAssets>
    </PackageReference>
    <PackageReference Include="Telerik.UI.for.Blazor" Version="3.1.0" />
  </ItemGroup>
Model Classes
In the “Data” folder, create the classes below. These classes will model the database when we run the Entity Framework commands.
- Brand
using System;

namespace ProductCatalog.Data
{
    public class Brand
    {
        public Guid Id { get; set; }
        public string Name { get; set; }
    }
}
- Category
using System;

namespace ProductCatalog.Data
{
    public class Category
    {
        public Guid Id { get; set; }
        public string Name { get; set; }
        public Guid ProductId { get; set; }
    }
}
- ProductPrice
using System;

namespace ProductCatalog.Data
{
    public class ProductPrice
    {
        public Guid Id { get; set; }
        public Guid ProductId { get; set; }
        public double Price { get; set; }
    }
}
- Product
using System;

namespace ProductCatalog.Data
{
    public class Product
    {
        public Guid Id { get; set; }
        public string Displayname { get; set; } = string.Empty;
        public DateTime CreationDate { get; set; }
        public DateTime LastUpdateDate { get; set; }
        public bool Active { get; set; }
        public Brand Brand { get; set; }
        public ProductPrice Price { get; set; }
        public Category Category { get; set; }
        public Guid BrandId { get; set; }
    }
}
- ProductDto
using System;
using System.ComponentModel.DataAnnotations;

namespace ProductCatalog.Data
{
    public class ProductDto
    {
        public Guid Id { get; set; }

        [Display(Name = "Displayname*:")]
        [Required(ErrorMessage = "You must specify the Displayname.")]
        public string Displayname { get; set; }

        public DateTime CreationDate { get; set; }

        public DateTime LastUpdateDate { get; set; }

        public bool Active { get; set; }

        [Display(Name = "Brand*:")]
        [Required(ErrorMessage = "You must specify the Brand.")]
        public string Brand { get; set; }

        [Display(Name = "Price*:")]
        [Required(ErrorMessage = "You must specify the Price.")]
        public double Price { get; set; }

        [Display(Name = "Category*:")]
        [Required(ErrorMessage = "You must specify the Category.")]
        public string Category { get; set; }
    }
}
Creating the DBContext
Next, we will create the class which contains the database entities and configurations. Inside the “Data” folder, create a new folder called “Context,” and inside it create a new class “ApplicationDbContext”:
- ApplicationDbContext
using Microsoft.EntityFrameworkCore;

namespace ProductCatalog.Data.Context
{
    public class ApplicationDbContext : DbContext
    {
        public ApplicationDbContext(DbContextOptions options) : base(options)
        {
        }

        protected override void OnConfiguring(DbContextOptionsBuilder options)
            => options.UseSqlite("DataSource = productCatalog; Cache=Shared");

        public DbSet<Product> Products { get; set; }
        public DbSet<ProductPrice> ProductPrices { get; set; }
        public DbSet<Category> Categories { get; set; }
        public DbSet<Brand> Brands { get; set; }
    }
}
In the “Program” class, add the code below:
builder.Services.AddDbContext<ApplicationDbContext>();
Running EF Core Commands
Our data modeling is ready and represented by the Model classes. The database will reflect these classes through some commands that are available in the EF Core library.
To execute the commands, you can open the Visual Studio console by right-clicking on the project and choosing “Open in Terminal.” You can also execute the commands through the terminal of your machine at the root of the project.
So you can first run the command below:
dotnet ef migrations add InitialModel
The “dotnet ef migrations add” command creates the EF Core model from the domain (entity) classes. Migrations will create or update the database schema based on the EF Core model.
Introducing Telerik REPL for Blazor
A new web-based tool for the Blazor community makes it quick and easy to write, run, save and share code snippets.
In simple terms, EF Core will create a new folder called “Migrations.” This folder will contain the files responsible for applying the creations and changes regarding the database with all the relationships between the entities, based on the Model classes we created in the project.
Then we will execute the command that applies the script created with the previous command.
So, run the command below:
dotnet ef database update
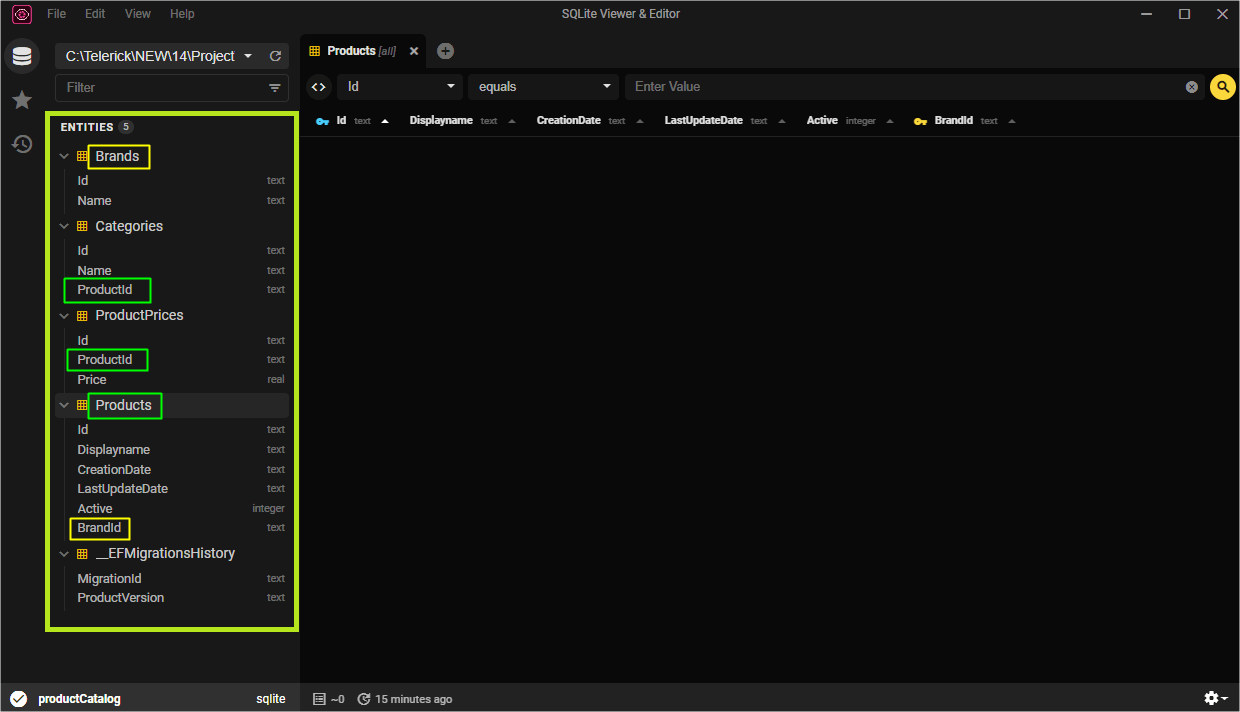
Note that the first command created some files inside the “Migrations” folder with the SQL code needed to create the tables and their relationships, and the second executed the code from these files and created a database in the project root. As we are using SQLite, the extension is .db. In this article, we will use the SQLite View Editor available for free on the Microsoft Store if you use Windows, but you can use any other.
The SQL Viewer Editor image below shows the structure of the tables generated by the EF Core commands. Note the relationships created between the tables:
Creating the Service Class
The service class will be responsible for performing CRUD operations on the database. It will refer to the “ApplicationDbContext” class, which has all the methods we need thanks to its inheritance from the “DbContext” class.
Create a new folder called “Services” and inside it create a new class “ProductService”:
using ProductCatalog.Data;
using ProductCatalog.Data.Context;
using System;
using System.Collections.Generic;
using System.Linq;

namespace ProductCatalog.Services
{
    public class ProductService
    {
        private readonly ApplicationDbContext _dbContext;

        public ProductService(ApplicationDbContext dbContext)
        {
            _dbContext = dbContext;
        }

        public List<ProductDto> GetProducts()
        {
            var products = _dbContext.Products.ToList();
            var categories = _dbContext.Categories.ToList();
            var brands = _dbContext.Brands.ToList();
            var prices = _dbContext.ProductPrices.ToList();
            var productsDto = new List<ProductDto>();

            foreach (var product in products)
            {
                var productCategory = categories.Where(p => p.ProductId == product.Id).FirstOrDefault().Name;
                var productBrand = brands.FirstOrDefault(b => b.Id == product.BrandId).Name;
                var productPrice = prices.FirstOrDefault(x => x.ProductId == product.Id).Price;

                var productDto = new ProductDto()
                {
                    Id = product.Id,
                    Displayname = product.Displayname,
                    CreationDate = product.CreationDate,
                    LastUpdateDate = product.LastUpdateDate,
                    Price = productPrice,
                    Active = product.Active,
                    Brand = productBrand,
                    Category = productCategory
                };

                productsDto.Add(productDto);
            }
            return productsDto;
        }

        public ProductDto GetProductById(string id)
        {
            Guid guidId = Guid.Parse(id);

            var product = _dbContext.Products.FirstOrDefault(p => p.Id == guidId);

            if (product is null)
                return null;

            var productCategory = _dbContext.Categories.Where(p => p.ProductId == guidId).FirstOrDefault().Name;
            var productBrand = _dbContext.Brands.FirstOrDefault(b => b.Id == product.BrandId).Name;
            var productPrice = _dbContext.ProductPrices.FirstOrDefault(x => x.ProductId == guidId).Price;

            return new ProductDto()
            {
                Id = product.Id,
                Active = product.Active,
                Brand = productBrand,
                Category = productCategory,
                CreationDate = product.CreationDate,
                Displayname = product.Displayname,
                LastUpdateDate = product.LastUpdateDate,
                Price = productPrice
            };
        }

        public string CreateProduct(ProductDto productDto)
        {
            Guid id = Guid.NewGuid();

            var product = new Product()
            {
                Id = id,
                Displayname = productDto.Displayname,
                Active = true,
                Price = new ProductPrice() { Id = Guid.NewGuid(), Price = productDto.Price, ProductId = id },
                CreationDate = DateTime.UtcNow,
                LastUpdateDate = DateTime.UtcNow,
                Brand = new Brand() { Id = Guid.NewGuid(), Name = productDto.Brand },
                Category =  new Category() { Id = Guid.NewGuid(), Name = productDto.Category }
            };

            _dbContext.Products.Add(product);
            _dbContext.SaveChanges();

            return "Create successfully";
        }

        public string UpdateProduct(ProductDto productDto)
        {
            var product = _dbContext.Products.FirstOrDefault(p => p.Id == productDto.Id);
            var brand = _dbContext.Brands.FirstOrDefault(b => b.Id == product.BrandId);
            var category = _dbContext.Categories.FirstOrDefault(c => c.ProductId == productDto.Id);
            var price = _dbContext.ProductPrices.FirstOrDefault(x => x.ProductId == productDto.Id);

            try
            {
                var updateBrand = new Brand() { Id = product.BrandId, Name = productDto.Brand };
                var updateCategory = new Category() { Id = category.Id, Name = productDto.Category, ProductId = productDto.Id };
                var updatePrice = new ProductPrice() { Id = price.Id, Price = productDto.Price, ProductId = productDto.Id };

                _dbContext.Entry(product).CurrentValues.SetValues(productDto);
                _dbContext.Entry(brand).CurrentValues.SetValues(updateBrand);
                _dbContext.Entry(category).CurrentValues.SetValues(updateCategory);
                _dbContext.Entry(price).CurrentValues.SetValues(updatePrice);
                _dbContext.SaveChanges();

                return "Update successfully";
            }
            catch (Exception ex)
            {
                throw;
            }
        }

        public string DeleteProduct(ProductDto productDto)
        {
            var product = _dbContext.Products.FirstOrDefault(p => p.Id == productDto.Id);
            if (product is null)
                return "Product not found";

            _dbContext.Products.Remove(product);
            _dbContext.SaveChanges();
            return "Delete successfully";
        }
    }
}
Add the code below to Program.cs:
services.AddScoped<ProductService>();
Adding Telerik UI for Blazor
To add Telerik UI for Blazor to the project, you can choose one of two ways. The first one is via the Telerik Visual Studio extension to convert the existing project to the Telerik Blazor project. In the guide “Convert to Telerik Application” you will find step-by-step instructions to download, install and apply it to the project.
The second way is to manually import Telerik UI for Blazor. For that, you can follow this guide: “Blazor UI Getting Started.” Under “Step 2 - Add the Telerik Blazor Components to an Existing Project,” follow the instructions from “3. Add the JavaScript File” to “8. Configure the Main Layout.”
Creating the Frontend with Telerik UI for Blazor
Thanks to Telerik UI for Blazor, forms are very easy and fast to implement. That’s because the “Telerik.UI.for.Blazor” library has all the components with built-in functionality we need, such as data grid, forms, buttons, etc. If we didn’t use Telerik UI, we would have to create a page for each CRUD function.
So, we will create a page to display the data that will contain the functions of adding, editing and deleting data, and a page for creating a single item.
Inside the “Pages” folder, create the following Razor Components:
- CreateProduct
@page "/CreateProduct"
@using ProductCatalog.Data
@using ProductCatalog.Services
@using Telerik.Blazor
@using Telerik.Blazor.Components
@inject ProductService productService
@inject NavigationManager NavigationManager

<div class="form-section">
    @if (ValidSubmit)
    {
        <div class="success-alert">
            The form was submitted successfully.
        </div>
    }
    else
    {
        <TelerikForm Model="@ProductEntity"
                 OnValidSubmit="@HandleValidSubmit"
                 OnInvalidSubmit="@HandleInvalidSubmit">
            <FormValidation>
                <DataAnnotationsValidator></DataAnnotationsValidator>
            </FormValidation>
            <FormItems>
                <FormItem Field="@nameof(ProductDto.Displayname)"></FormItem>
                <FormItem Field="@nameof(ProductDto.Brand)"></FormItem>
                <FormItem Field="@nameof(ProductDto.Price)"></FormItem>
                <FormItem Field="@nameof(ProductDto.Category)"></FormItem>
            </FormItems>
        </TelerikForm>
    }
</div>

@code {
    public bool ValidSubmit { get; set; } = false;
    public ProductDto ProductEntity = new ProductDto();

    protected async void HandleValidSubmit()
    {
        ValidSubmit = true;

        productService.CreateProduct(ProductEntity);
        await Task.Delay(2000);

        ValidSubmit = false;

        StateHasChanged();
    }

    void HandleInvalidSubmit()
    {
        ValidSubmit = false;
    }
}

<style>
    .form-section {
        margin: 0 auto;
        padding: 3em;
        border: 1px solid rgba(20,53,80,0.14);
        box-shadow: 0 1px 2px 1px rgb(0 0 0 / 8%), 0 3px 6px rgb(0 0 0 / 8%);
    }
    .success-alert {
      padding: 20px;
      background-color: green;
      color: white;
      margin-bottom: 15px;
    }
</style>
- ProductIndex
@page "/product"
@using ProductCatalog.Data
@using ProductCatalog.Services
@using System.Data
@using Telerik.Blazor
@using Telerik.Blazor.Components
@using Telerik.DataSource
@using Telerik.DataSource.Extensions
@inject ProductService ProductService

<TelerikGrid Data=@Products
             OnUpdate="@UpdateHandler"
             OnDelete="@DeleteHandler"
             OnCreate="@CreateHandler"
             ConfirmDelete="true"
             Pageable="true"
             Groupable="true"
             Sortable="true"
             FilterMode="GridFilterMode.FilterMenu"
             Resizable="true"
             Reorderable="true"
             EditMode="GridEditMode.Popup"
             SelectionMode="GridSelectionMode.Multiple"
             OnStateInit="@((GridStateEventArgs<ProductDto> args) => OnStateInit(args))"
             PageSize="10"
             Navigable="true">
    <GridColumns>
        <GridCheckboxColumn></GridCheckboxColumn>
        <GridColumn Field="@nameof(ProductDto.Displayname)" Title="Displayname" Width="195px" />
        <GridColumn Field="@nameof(ProductDto.CreationDate)" Title="CreationDate" Width="200px" />
        <GridColumn Field="@nameof(ProductDto.LastUpdateDate)" Title="Last Update Date" Width="200px" />
        <GridColumn Field="@nameof(ProductDto.Active)" Title="Active" Width="200px" />
        <GridColumn Field="@nameof(ProductDto.Brand)" Title="Brand" Width="200px" />
        <GridColumn Field="@nameof(ProductDto.Price)" Width="120px" Title="Price" TextAlign="@ColumnTextAlign.Right">
        </GridColumn>
        <GridColumn Field="@nameof(ProductDto.Category)" Title="Category" Width="200px" />
        <GridCommandColumn Width="190px">
            <GridCommandButton Command="Save" Icon="save" ShowInEdit="true">Update</GridCommandButton>
            <GridCommandButton Command="Edit" Icon="edit">Edit</GridCommandButton>
            <GridCommandButton Command="Delete" Icon="delete">Delete</GridCommandButton>
            <GridCommandButton Command="Cancel" Icon="cancel" ShowInEdit="true">Cancel</GridCommandButton>
        </GridCommandColumn>
    </GridColumns>
    <GridToolBar>
        <GridCommandButton Command="Add" Icon="add">Add Product</GridCommandButton>
    </GridToolBar>
</TelerikGrid>

@code {

    List<ProductDto> Products;

    protected override void OnInitialized() => LoadProducts();

    private void LoadProducts() =>
        Products = ProductService.GetProducts().ToList();

    private void OnStateInit(GridStateEventArgs<ProductDto> args)
    {
        args.GridState.GroupDescriptors = new List<GroupDescriptor>()
        {
            new GroupDescriptor()
            {
                Member = nameof(ProductDto.Category),
                MemberType = typeof(string)
            }
        };
    }

    public void CreateHandler(GridCommandEventArgs args)
    {
        var product = (ProductDto)args.Item;
        ProductService.CreateProduct(product);
        LoadProducts();
    }

    public void UpdateHandler(GridCommandEventArgs args)
    {
        var product = (ProductDto)args.Item;
        ProductService.UpdateProduct(product);
        LoadProducts();
    }

    public void DeleteHandler(GridCommandEventArgs args)
    {
        var product = (ProductDto)args.Item;
        ProductService.DeleteProduct(product);
        LoadProducts();
    }

    public List<int?> GetFilterValues(CompositeFilterDescriptor filterDescriptor) =>
         filterDescriptor.FilterDescriptors.Select(f => (int?)(f as FilterDescriptor).Value).ToList();

    public void ColumnValueChanged(bool value, int categoryId, CompositeFilterDescriptor filterDescriptor)
    {
        var filter = filterDescriptor.FilterDescriptors.FirstOrDefault(f => categoryId.Equals((f as FilterDescriptor).Value));

        filterDescriptor.LogicalOperator = FilterCompositionLogicalOperator.Or;

        if (value && filter == null)
        {
            filterDescriptor.FilterDescriptors.Add(new FilterDescriptor(nameof(ProductDto.Id), FilterOperator.IsEqualTo, categoryId));
        }
        else if (!value && filter != null)
        {
            filterDescriptor.FilterDescriptors.Remove(filter);
        }
    }
}
Replace the code in ~/Shared/NavMenu.razor with:
<div class="top-row ps-3 navbar navbar-dark">
    <div class="container-fluid">
        <a class="navbar-brand" href="">Product Catalog</a>
        <button class="navbar-toggler" @onclick="ToggleNavMenu">
            <span class="navbar-toggler-icon"></span>
        </button>
    </div>
</div>

<div class="@NavMenuCssClass" @onclick="ToggleNavMenu">
    <nav class="flex-column">
        <div class="nav-item px-3">
            <NavLink class="nav-link" href="" Match="NavLinkMatch.All">
                <span class="oi oi-home" aria-hidden="true"></span> Home
            </NavLink>
        </div>
        <div class="nav-item px-3">
            <NavLink class="nav-link" href="product">
                <span class="oi oi-list-rich" aria-hidden="true"></span> Products
            </NavLink>
        </div>
        <div class="nav-item px-3">
            <NavLink class="nav-link" href="CreateProduct">
                <span class="oi oi-plus" aria-hidden="true"></span> Add Product
            </NavLink>
        </div>
    </nav>
</div>

@code {
    private bool collapseNavMenu = true;

    private string? NavMenuCssClass => collapseNavMenu ? "collapse" : null;

    private void ToggleNavMenu()
    {
        collapseNavMenu = !collapseNavMenu;
    }
}
Inserting Data via Frontend
If you followed all the previous steps, the application should display the result below.
The Products menu item will display an empty table, so we will add new data to perform the change and delete operations.
Then, click on the menu, “Add Product,” fill in the data and click on “Save.” You will be redirected to the products display page, as in the GIF below:
Editing and Deleting Data
As said before, thanks to Telerik UI for Blazor, we don’t need to create pages for editing and deleting actions, as Telerik components already have everything inside the same form, even the create function. In the GIF below, you can see the three functions being executed via the front end.
Conclusion
In this article, we created a Blazor project and made the relationship between the tables with a few simple commands using Entity Framework Core. Then we developed all the functions of adding, editing and deleting data easily with the help of the built-in features provided by Telerik UI for Blazor components.
There are several other possibilities available in the Telerik Blazor library—feel free to explore them. You can see all available components through this link: Telerik Blazor UI Demos.
Recommend
About Joyk
Aggregate valuable and interesting links.
Joyk means Joy of geeK