

都什么时候了,你还不会框架SSM整合
source link: https://blog.51cto.com/u_13902521/5166004
Go to the source link to view the article. You can view the picture content, updated content and better typesetting reading experience. If the link is broken, please click the button below to view the snapshot at that time.
都什么时候了,你还不会整合SSM🤦♂️🤦♂️🤦♂️
👵👵👵需求:
🐱🚀🐱🚀🐱🚀使用ssm框架完成对 account 表的增删改查操作。
💖💖💖最后,框架搭建完后阿红,手写了一个完整的CRUD的demo,请看第9章节···
步骤分析👀👀👀
- 准备数据库和表记录
- 创建web项目
- 编写mybatis在ssm环境中可以单独使用
- 编写spring在ssm环境中可以单独使用
- spring整合mybatis
- 编写springMVC在ssm环境中可以单独使用
- spring整合springMVC
1. 准备数据库和表记录
CREATE TABLE `account` (
`id` int(11) NOT NULL AUTO_INCREMENT,
`name` varchar(32) DEFAULT NULL,
`money` double DEFAULT NULL,
PRIMARY KEY (`id`)
) ENGINE=InnoDB AUTO_INCREMENT=3 DEFAULT CHARSET=utf8;
insert  into `account`(`id`,`name`,`money`) values (1,'tom',1000),
(2,'jerry',1000);
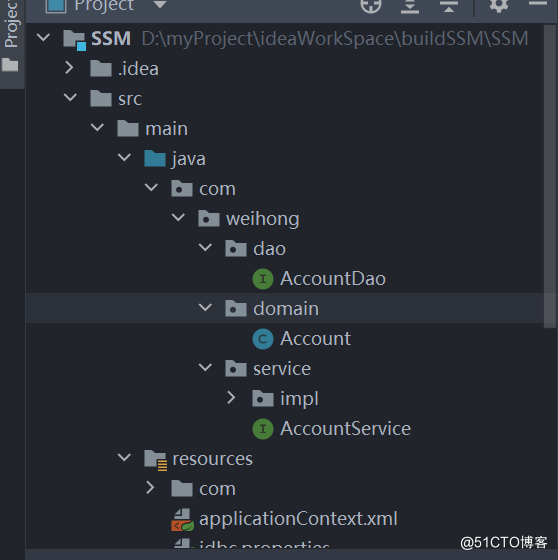
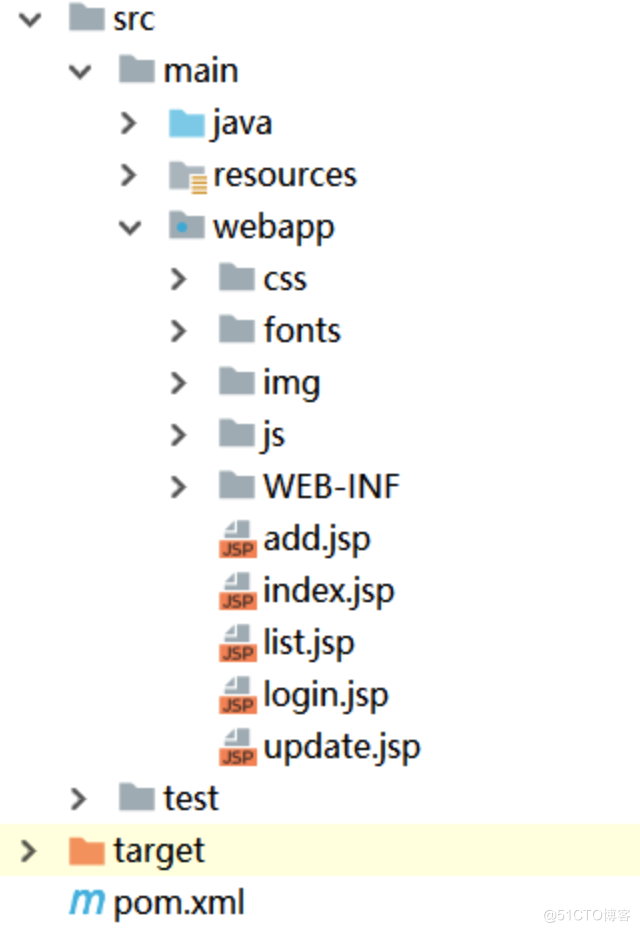
2. 创建web项目
3.编写mybatis在ssm环境中可以单独使用
3.1 导入相关依赖
   <packaging>war</packaging>
    <dependencies>
        <!--    数据库连接驱动-->
        <dependency>
            <groupId>mysql</groupId>
            <artifactId>mysql-connector-java</artifactId>
            <version>5.1.47</version>
        </dependency>
<!--        配置数据库连接池-->
        <dependency>
            <groupId>com.alibaba</groupId>
            <artifactId>druid</artifactId>
            <version>1.1.15</version>
        </dependency>
<!--        mybatis依赖-->
        <dependency>
            <groupId>org.mybatis</groupId>
            <artifactId>mybatis</artifactId>
            <version>3.5.4</version>
        </dependency>
<!--        junit依赖-->
        <dependency>
            <groupId>junit</groupId>
            <artifactId>junit</artifactId>
            <version>4.12</version>
            <scope>test</scope>
        </dependency>
3.2 创建Account实体
public class Account {
    private Integer id;
    private String name;
    private String money;
 //省略get和set方法
}
3.3 创建AccountDao接口
    /**
     * 查询所有信息
     * @return
     */
     List<Account> findAll();
3.4 创建AccountDao.xml映射文件
<?xml version="1.0" encoding="UTF-8" ?>
<!DOCTYPE mapper PUBLIC "-//mybatis.org//DTD Mapper 3.0//EN" "http://mybatis.org/dtd/mybatis-3-mapper.dtd" >
<mapper namespace="com.weihong.dao.AccountDao">
    <select id="findAll" resultType="Account">
        select * from account
    </select>
</mapper>
3.5 创建mybatis核心配置文件
jdbc.properties文件:
jdbc.driver=com.mysql.jdbc.Driver
jdbc.url=jdbc:mysql://127.0.0.1:3306/smd
jdbc.username=root
jdbc.password=root
SqlMapConfig.xml文件:
<?xml version="1.0" encoding="UTF-8" ?>
<!DOCTYPE configuration
        PUBLIC "-//mybatis.org//DTD Config 3.0//EN" "http://mybatis.org/dtd/mybatis-3-config.dtd">
<configuration>
<!--    加载配置文件-->
    <properties resource="jdbc.properties" />
<!--    给实体重命名,方便在sql.xml配置简单-->
    <typeAliases>
        <package name="com.weihong.domain"/>
    </typeAliases>
<!--    配置数据量连接信息-->
    <environments default="dev">
        <environment id="dev">
            <transactionManager type="JDBC"></transactionManager>
            <dataSource type="POOLED">
                <property name="driver" value="${jdbc.driver}"/>
                <property name="url" value="${jdbc.url}"/>
                <property name="username" value="${jdbc.username}"/>
                <property name="password" value="${jdbc.password}"/>
            </dataSource>
        </environment>
    </environments>

<!--    加载映射文件-->
    <mappers>
        <package name="com.weihong.dao"/>
    </mappers>
</configuration>
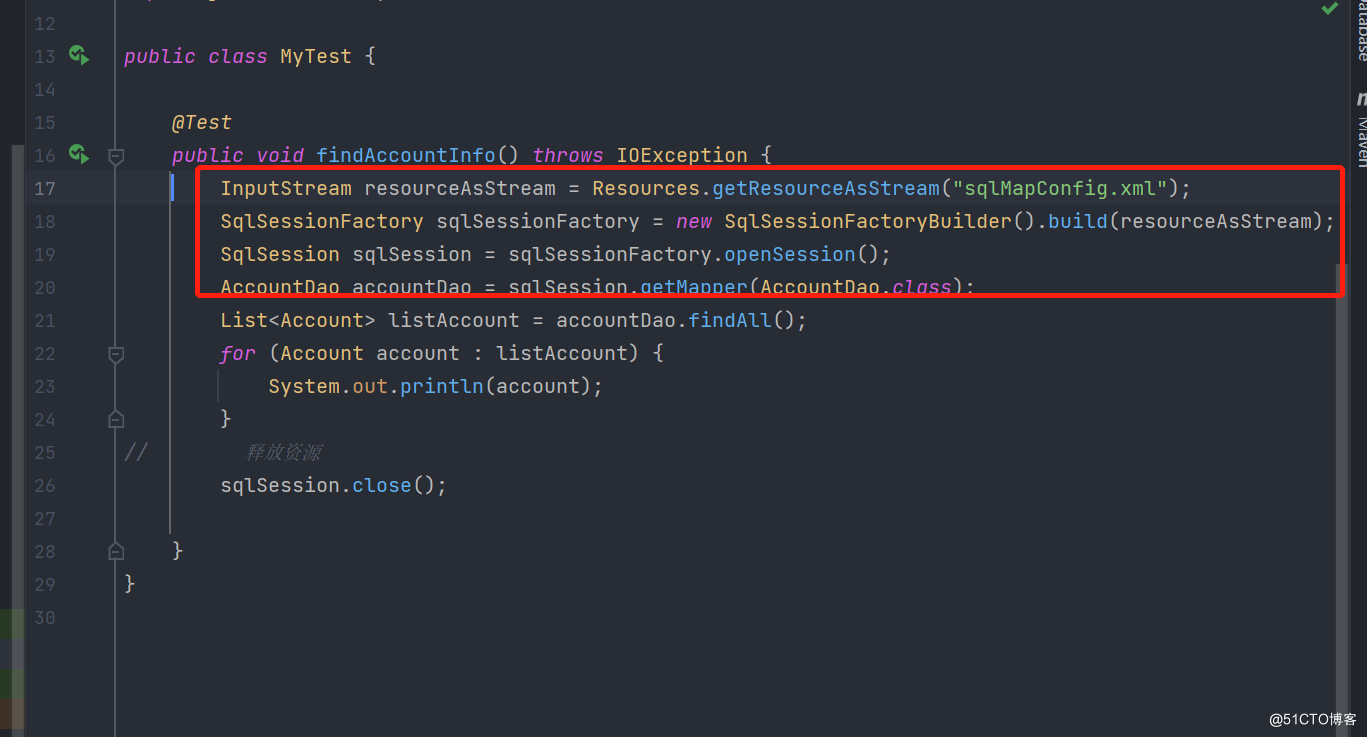
3.6 测试代码
public class MyTest {

    @Test
    public void findAccountInfo() throws IOException {
        InputStream resourceAsStream = Resources.getResourceAsStream("sqlMapConfig.xml");
        SqlSessionFactory sqlSessionFactory = new SqlSessionFactoryBuilder().build(resourceAsStream);
        SqlSession sqlSession = sqlSessionFactory.openSession();
        AccountDao accountDao = sqlSession.getMapper(AccountDao.class);
        List<Account> listAccount = accountDao.findAll();
        for (Account account : listAccount) {
            System.out.println(account);
        }
//        释放资源
        sqlSession.close();

    }
}
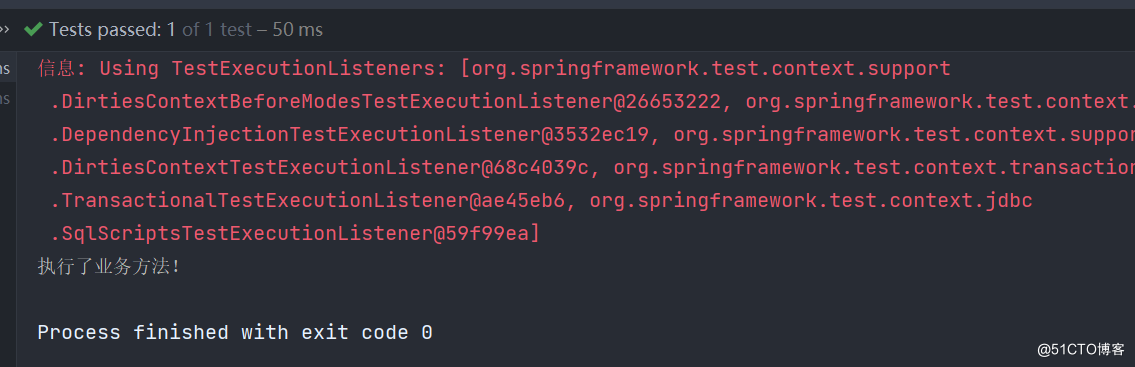
3.7 测试结果

4. 编写spring在ssm环境中可以单独使用
4.1相关坐标
<!--        Spring依赖 start-->
<!--        spring版本-->
        <dependency>
            <groupId>org.springframework</groupId>
            <artifactId>spring-context</artifactId>
            <version>5.2.15.RELEASE</version>
        </dependency>
<!--        spring切面-->
        <dependency>
            <groupId>org.aspectj</groupId>
            <artifactId>aspectjweaver</artifactId>
            <version>1.8.13</version>
        </dependency>
<!--        spring-jdbc对jdbc进行封装 -->
        <dependency>
            <groupId>org.springframework</groupId>
            <artifactId>spring-jdbc</artifactId>
            <version>5.0.6.RELEASE</version>
        </dependency>
<!--        spring-tx:提供事务的支持-->
        <dependency>
            <groupId>org.springframework</groupId>
            <artifactId>spring-tx</artifactId>
            <version>5.2.15.RELEASE</version>
        </dependency>
<!--        spring测试-->
        <dependency>
            <groupId>org.springframework</groupId>
            <artifactId>spring-test</artifactId>
            <version>5.1.5.RELEASE</version>
        </dependency>
<!--        spring依赖结束 end-->
4.2 创建AccountService接口
public interface AccountService {

     List<Account> findAccount();

}
4.3 创建AccountServiceImpl实现
@Service
public class AccountServiceImpl implements AccountService {
    @Override
    public List<Account> findAccount() {
        System.out.println("执行了业务方法!");
        return null;
    }
}
4.4 创建spring核心配置文件
applicationContext.xml:
<?xml version="1.0" encoding="UTF-8"?>
<beans xmlns="http://www.springframework.org/schema/beans"
       xmlns:xsi="http://www.w3.org/2001/XMLSchema-instance"
       xmlns:context="http://www.springframework.org/schema/context"
       xmlns:tx="http://www.springframework.org/schema/tx"
       xmlns:aop="http://www.springframework.org/schema/aop"
       xsi:schemaLocation="
       	http://www.springframework.org/schema/beans
		http://www.springframework.org/schema/beans/spring-beans.xsd
       	http://www.springframework.org/schema/context
		http://www.springframework.org/schema/context/spring-context.xsd
		http://www.springframework.org/schema/tx
		http://www.springframework.org/schema/tx/spring-tx.xsd
		http://www.springframework.org/schema/aop
		http://www.springframework.org/schema/aop/spring-aop.xsd">

    <!--注解组件扫描-->
    <context:component-scan base-package="com.weihong" />

</beans>
4.5 测试代码
@RunWith(SpringJUnit4ClassRunner.class)
@ContextConfiguration("classpath:applicationContext.xml")
public class SpringTest {

    @Autowired
    private AccountService accountService;

    @Test
    public void test1(){
        accountService.findAccount();
    }
}
4.6 测试结果
5. spring整合mybatis
5.1 整合思想:
将mybatis接口代理对象的创建权交给spring管理,我们就可以把dao的代理对象注入到service中,此时也就完成了spring与mybatis的整合了。
也就是摒弃这几行代码,通过代理对象注入到service中。
5.2 导入整合包
     <!--spring整合mybatis        -->
        <dependency>
            <groupId>org.mybatis</groupId>
            <artifactId>mybatis-spring</artifactId>
            <version>1.3.1</version>
        </dependency>
5.3 spring配置文件管理mybatis
注意:此时可以将mybatis主配置文件删除。
<?xml version="1.0" encoding="UTF-8"?>
<beans xmlns="http://www.springframework.org/schema/beans"
       xmlns:xsi="http://www.w3.org/2001/XMLSchema-instance"
       xmlns:context="http://www.springframework.org/schema/context"
       xmlns:tx="http://www.springframework.org/schema/tx"
       xmlns:aop="http://www.springframework.org/schema/aop"
       xsi:schemaLocation="
       	http://www.springframework.org/schema/beans
		http://www.springframework.org/schema/beans/spring-beans.xsd
       	http://www.springframework.org/schema/context
		http://www.springframework.org/schema/context/spring-context.xsd
		http://www.springframework.org/schema/tx
		http://www.springframework.org/schema/tx/spring-tx.xsd
		http://www.springframework.org/schema/aop
		http://www.springframework.org/schema/aop/spring-aop.xsd">

    <!--注解组件扫描-->
    <context:component-scan base-package="com.weihong" />

<!--    spring整合mybatis start___ -->
<!--    加载配置文件 -->
    <context:property-placeholder location="classpath:jdbc.properties" />
<!--利用阿里巴巴德鲁伊druid连接数据库-->
    <bean id="dataSource" class="com.alibaba.druid.pool.DruidDataSource" >
        <property name="driverClassName" value="${jdbc.driver}" />
        <property name="url" value="${jdbc.url}" />
        <property name="username" value="${jdbc.username}" />
        <property name="password" value="${jdbc.password}" />
    </bean>
<!--    SqlSessionFactory创建交给spring的IOC容器-->
    <bean id="sessionFactoryBean" class="org.mybatis.spring.SqlSessionFactoryBean">
<!--    数据库环境配置-->
        <property name="dataSource" ref="dataSource" />
<!--    类型别名配置-->
        <property name="typeAliasesPackage" value="com.weihong.domain" />
<!--如果要引入mybatis主配置文件,可以通过如下配置 -->
        <!-- <property name="configLocation" value="classpath:SqlMapConfig.xml"/> -->
    </bean>

<!--    映射接口扫描配置,由spring创建代理对象,交给IOC容器 -->
    <bean  class="org.mybatis.spring.mapper.MapperScannerConfigurer">
        <property name="basePackage" value="com.weihong.dao" />
    </bean>

</beans>
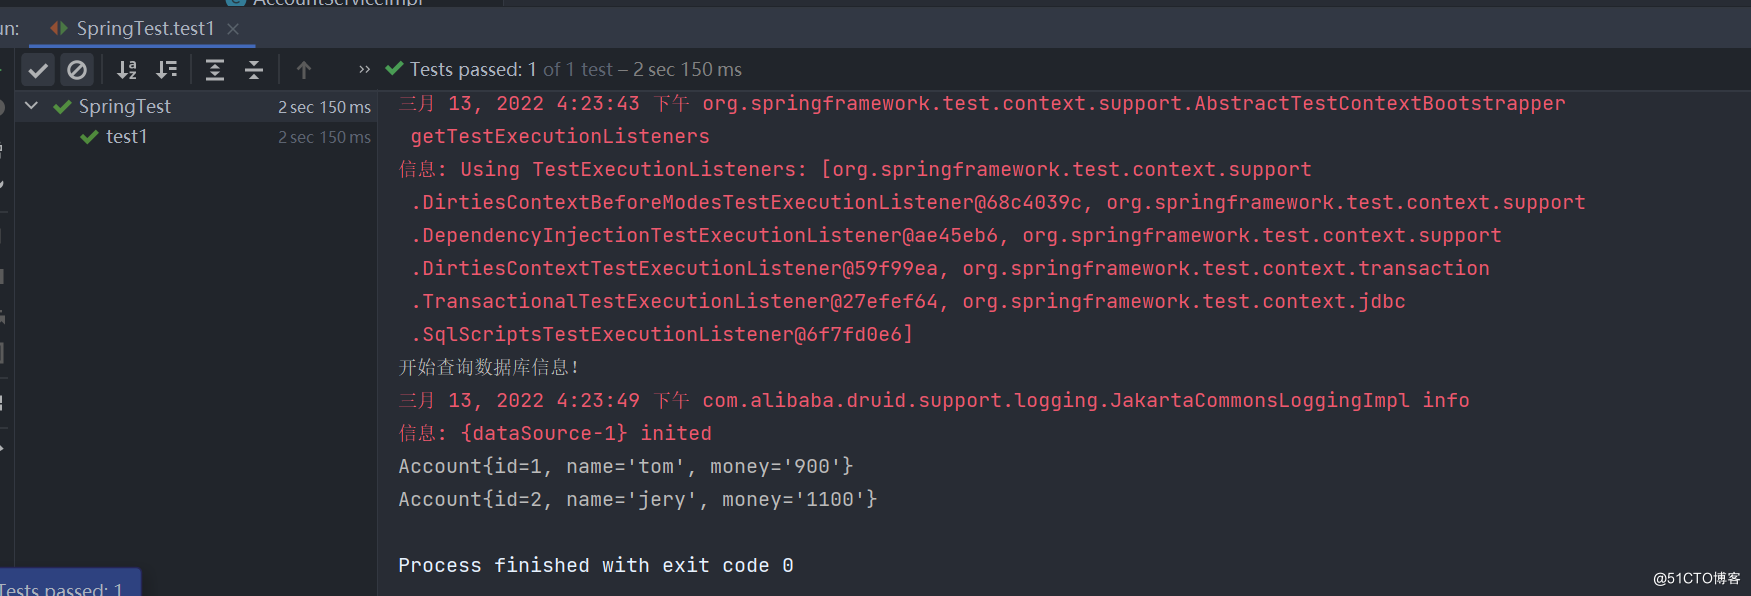
5.4 修改AccountServiceImpl
@Service
public class AccountServiceImpl implements AccountService {
    @Autowired
    private AccountDao accountDao;
    @Override
    public List<Account> findAccount() {
        System.out.println("开始查询数据库信息!");
        List<Account> list = accountDao.findAll();
        return list;
    }

}
5.5 运行结果
6. 配置springMVC在ssm环境中可以单独使用
访问到controller里面的方法查询所有账户,并跳转到list.jsp页面进行列表展示
6.1 导入相关依赖
        <!--    spring mvc 依赖 start-->
<!--        引入spring MVC -->
        <dependency>
            <groupId>org.springframework</groupId>
            <artifactId>spring-webmvc</artifactId>
            <version>5.1.5.RELEASE</version>
        </dependency>
<!--        引入jsp依赖-->
        <dependency>
            <groupId>javax.servlet</groupId>
            <artifactId>javax.servlet-api</artifactId>
            <version>3.1.0</version>
        </dependency>
        <dependency>
            <groupId>javax.servlet.jsp</groupId>
            <artifactId>jsp-api</artifactId>
            <version>2.2</version>
        </dependency>
<!--        引入spring的el表达式-->
        <dependency>
            <groupId>jstl</groupId>
            <artifactId>jstl</artifactId>
            <version>1.2</version>
        </dependency>
6.2 导入页面资源
6.3 配置前端控制器DispathcerServlet
<?xml version="1.0" encoding="UTF-8"?>
<web-app xmlns="http://xmlns.jcp.org/xml/ns/javaee"
         xmlns:xsi="http://www.w3.org/2001/XMLSchema-instance"
         xsi:schemaLocation="http://xmlns.jcp.org/xml/ns/javaee http://xmlns.jcp.org/xml/ns/javaee/web-app_4_0.xsd"
         version="4.0">


    <!--前端控制器-->
    <servlet>
        <servlet-name>DispatcherServlet</servlet-name>
        <servlet-class>org.springframework.web.servlet.DispatcherServlet</servlet-class>
<!--        web项目启动,让其去加载spring-mvc的配置文件 -->
        <init-param>
            <param-name>contextConfigLocation</param-name>
            <param-value>classpath:spring-mvc.xml</param-value>
        </init-param>
<!--        加载顺序-->
        <load-on-startup>2</load-on-startup>
    </servlet>
    <!--/会匹配到所有的访问路径,但是不会匹配到像*.jsp这样的方法url  /login  /add /update  /a.jsp(带后缀名的拦截不到)-->
    <!--/和/*的区别-->
    <servlet-mapping>
        <servlet-name>DispatcherServlet</servlet-name>
        <url-pattern>/</url-pattern>
    </servlet-mapping>

<!--    post中文处理-->
    <filter>
        <filter-name>CharacterEncodingFilter</filter-name>
        <filter-class>org.springframework.web.filter.CharacterEncodingFilter</filter-class>
        <init-param>
            <param-name>encoding</param-name>
            <param-value>utf-8</param-value>
        </init-param>
    </filter>
    <filter-mapping>
        <filter-name>CharacterEncodingFilter</filter-name>
        <url-pattern>/*</url-pattern>
    </filter-mapping>

    <!--    web异常处理机制-->
    <error-page>
        <error-code>404</error-code>
        <location>/404.jsp</location>
    </error-page>
    <error-page>
        <error-code>500</error-code>
        <location>/500.jsp</location>
    </error-page>

    <!--    spring 与 web容器整合-->
    <listener>
        <listener-class>org.springframework.web.context.ContextLoaderListener</listener-class>
    </listener>
    <context-param>
        <param-name>contextConfigLocation</param-name>
        <param-value>classpath:applicationContext.xml</param-value>
    </context-param>

</web-app>
6.4 AccountController和 list.jsp
@Controller
public class AccountController {

    @RequestMapping("/findAll")
    public String findAll(Model model){
        Account account = new Account();
        List<Account> list = new ArrayList<>();
        account.setId(1);
        account.setName("张三");
        account.setMoney("1000");
        list.add(account);
        model.addAttribute("list",list);
        return "list";
    }
}
              <c:forEach items="${list}" var="account">

              <tr>
                  <td>
                      <input type="checkbox" name="ids" value="${account.id}">
                  </td>
                  <td>${account.id}</td>
                  <td>${account.name}</td>
                  <td>${account.money}</td>
                  <td><a rel="nofollow" class="btn btn-default btn-sm" href="${pageContext.request.contextPath}/account/findById?id=${account.id}">修改</a> <a rel="nofollow" class="btn btn-default btn-sm" href="">删除</a></td>
              </tr>
              </c:forEach>
6.5 配置springMVC核心配置文件
<?xml version="1.0" encoding="UTF-8"?>
<beans xmlns="http://www.springframework.org/schema/beans"
       xmlns:mvc="http://www.springframework.org/schema/mvc"
       xmlns:context="http://www.springframework.org/schema/context"
       xmlns:xsi="http://www.w3.org/2001/XMLSchema-instance"
       xsi:schemaLocation="http://www.springframework.org/schema/beans
    http://www.springframework.org/schema/beans/spring-beans.xsd
    http://www.springframework.org/schema/mvc
    http://www.springframework.org/schema/mvc/spring-mvc.xsd
    http://www.springframework.org/schema/context
    http://www.springframework.org/schema/context/spring-context.xsd">

<!--   1. 注解扫描-->
    <context:component-scan base-package="com.weihong.controller" />

<!--    2. mvc注解增强 -->
    <mvc:annotation-driven  />

<!--    3.视图解析 -->
    <bean class="org.springframework.web.servlet.view.InternalResourceViewResolver">
        <property name="prefix" value="/" />
        <property name="suffix" value=".jsp" />
    </bean>

<!--    4.实现静态资源映射-->
<!--    方式一:所有静态资源全解开-->
        <mvc:default-servlet-handler />
<!--    方式二:指定资源-->
<!--    <mvc:resources mapping="/js/**" location="/js/" />-->

</beans>
7. spring整合springMVC
7.1 整合思想
spring和springMVC其实根本就不用整合,本来就是一家。
但是我们需要做到spring和web容器整合,让web容器启动的时候自动加载spring配置文件,web容器销毁的时候spring的ioc容器也销毁。
7.2 spring和web容器整合
ContextLoaderListener加载【掌握】
可以使用spring-web包中的ContextLoaderListener监听器,可以监听servletContext容器的创建和销毁,来同时创建或销毁IOC容器。
<!--    spring 与 web容器整合-->
    <listener>
        <listener-class>org.springframework.web.context.ContextLoaderListener</listener-class>
    </listener>
    <context-param>
        <param-name>contextConfigLocation</param-name>
        <param-value>classpath:applicationContext.xml</param-value>
    </context-param>
7.3 修改AccountController
@Controller
public class AccountController {

    @Autowired
    private AccountService accountService;

    @RequestMapping("/findAll")
    public String findAll(Model model){
        List<Account> account = accountService.findAccount();
        model.addAttribute("list",account);
        return "list";
    }
}
8. spring配置声明式事务
<!--    spring的声明式事务-->
<!--    1.事务管理器-->
    <bean id="dataSourceTransactionManager" class="org.springframework.jdbc.datasource.DataSourceTransactionManager" >
        <property name="dataSource" ref="dataSource" />
    </bean>

    <!--2.开始事务注解的支持-->
    <tx:annotation-driven/>
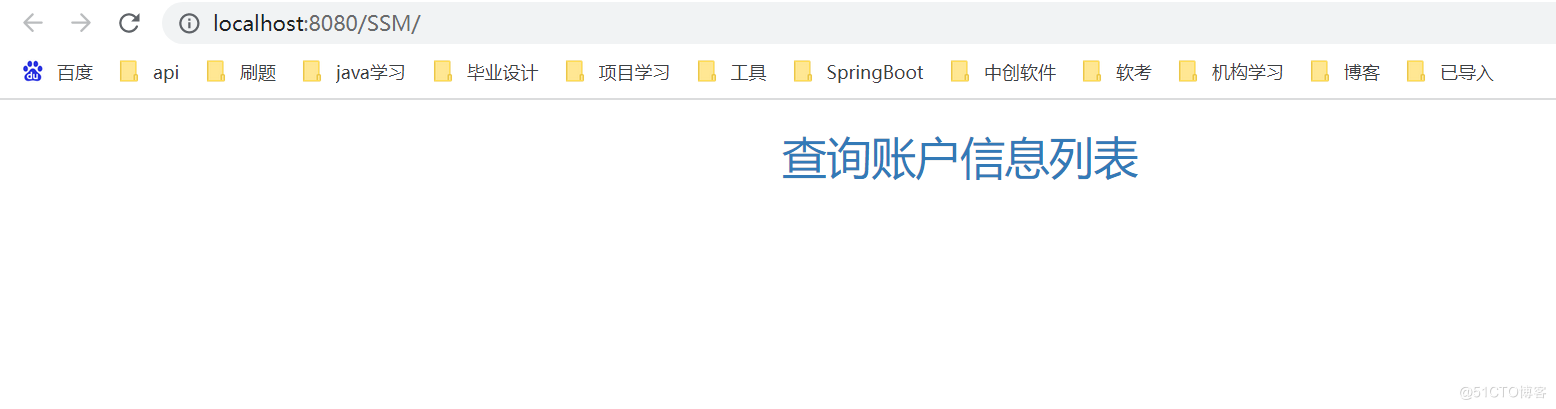
9. 框架演示
💖💖最后为了,框架的完整性,阿红特地写了一个demo
✨✨框架适用于毕业设计、或者大作业,需要的私信博主,或者直接下载也行
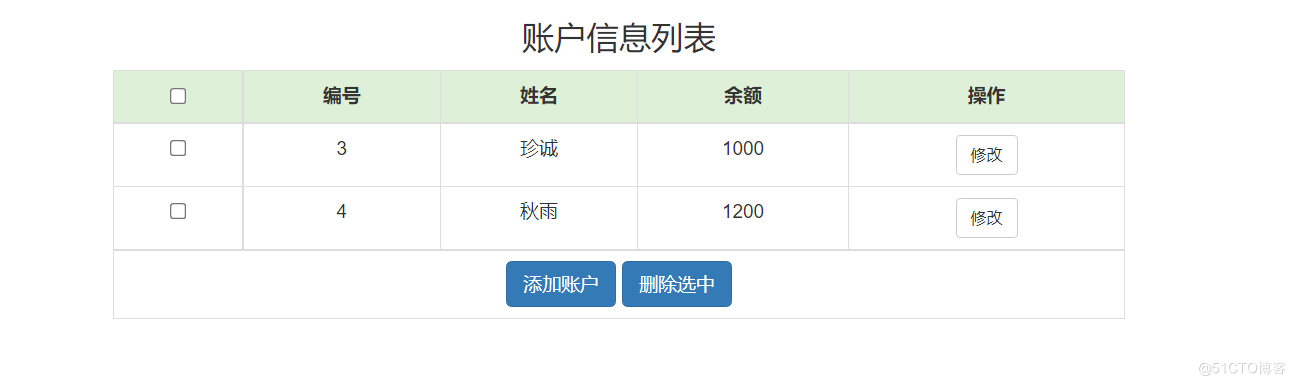
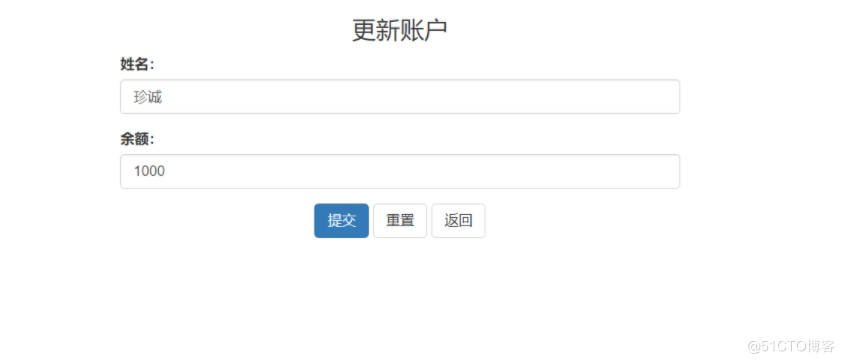
🎃项目功能有:
- 查询账户所有基本信息
- 实现账户信息的修改
- 实现单条或多条信息的删除
🥠运行后项目主页:
🍿查询所有账户信息页面:
🥞修改对应账户信息页面
- 跳转页面,并查询出对应的数据进行回显
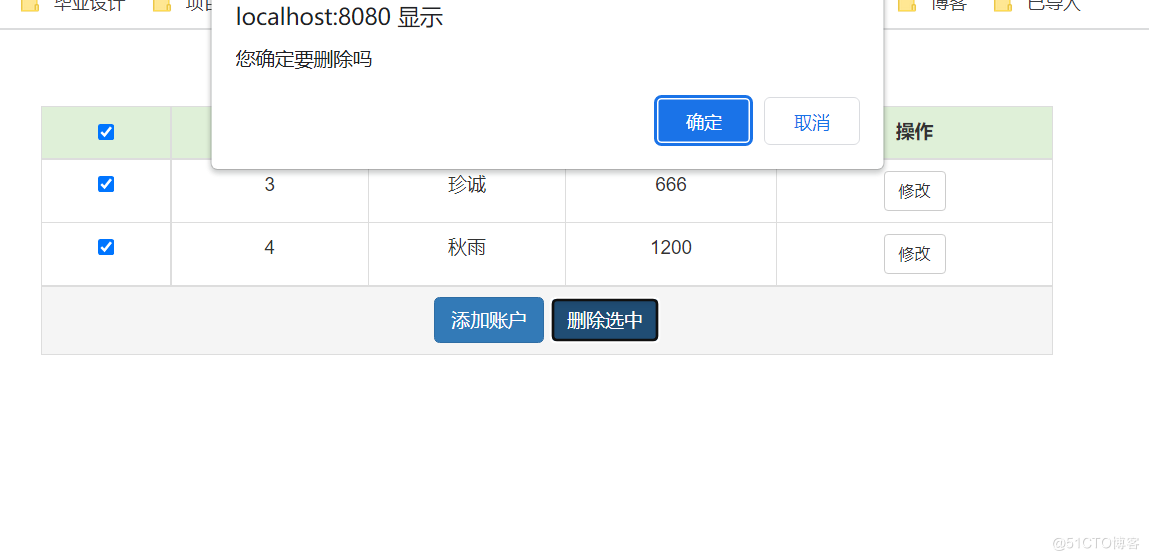
🏎可多选或单选删除对应账户信息
💖💖💖都看到这了,动动小手点个关注吧💖💖💖
💖💖💖都看到这了,动动小手点个关注吧💖💖💖
💖💖💖都看到这了,动动小手点个关注吧💖💖💖
以上均为所有SSM的配置整合,整理不易,喜欢的请关注关注阿红。最后附上整合好的框架源码:

Recommend
About Joyk
Aggregate valuable and interesting links.
Joyk means Joy of geeK