

七天接手react项目 系列 —— 生命周期&受控和非受控组件&Dom 元素&Diffing...
source link: https://www.cnblogs.com/pengjiali/p/16021635.html
Go to the source link to view the article. You can view the picture content, updated content and better typesetting reading experience. If the link is broken, please click the button below to view the snapshot at that time.
生命周期&受控和非受控组件&Dom 元素&Diffing 算法
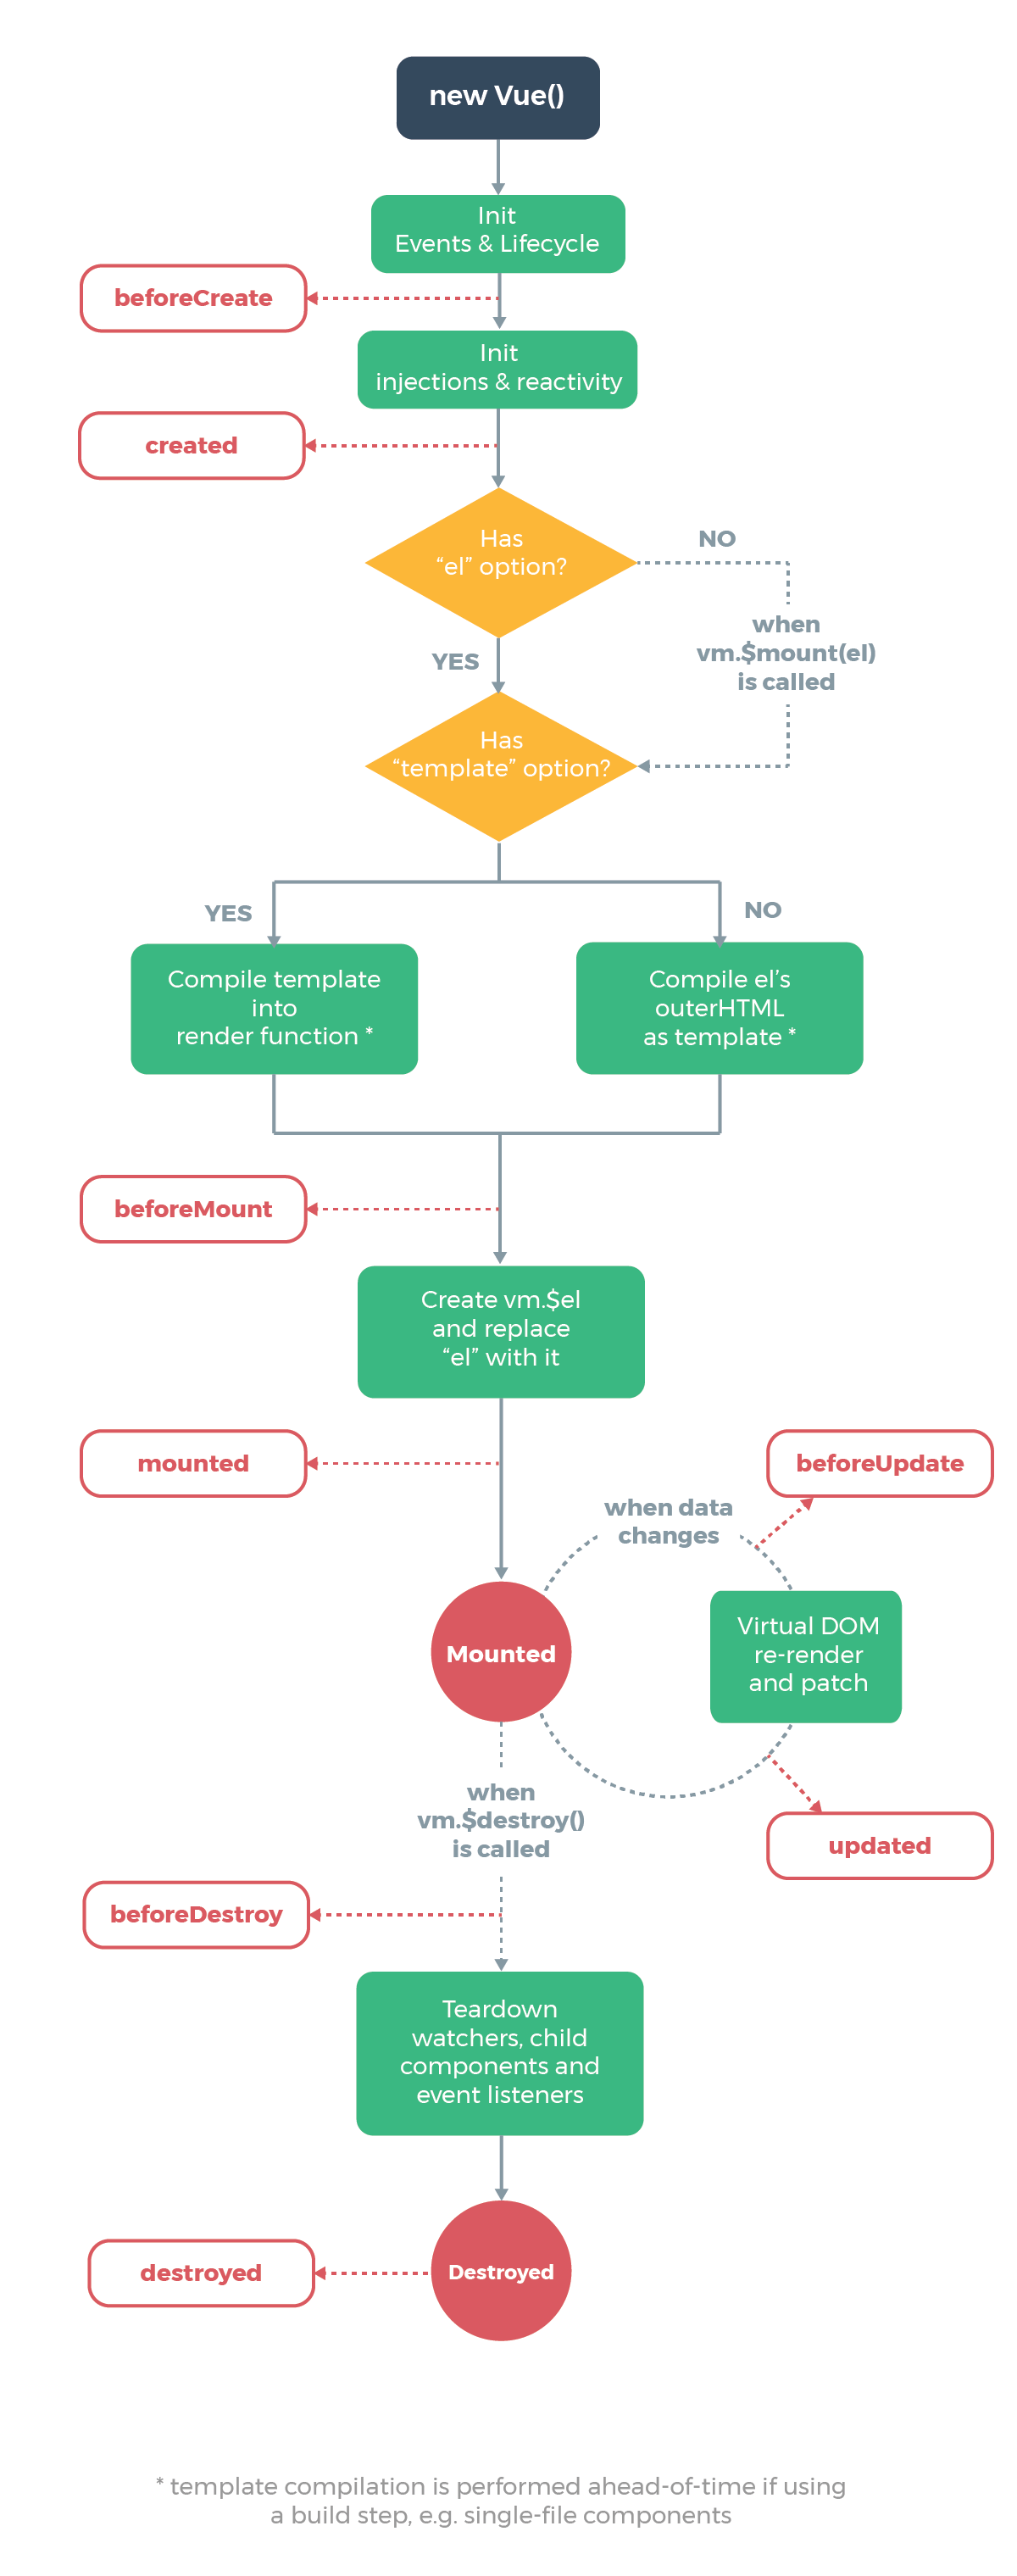
首先回忆一下 vue 中的生命周期:
vue 对外提供了生命周期的钩子函数,允许我们在 vue 的各个阶段插入一些我们的逻辑,比如:created、mounted、beforeDestroy等。
react 中的生命周期是否也类似?请接着看:
每个组件都包含 “生命周期方法”,你可以重写这些方法,以便于在运行过程中特定的阶段执行这些方法 —— react 官网-组件的生命周期
请看一张 react 的生命周期图谱:
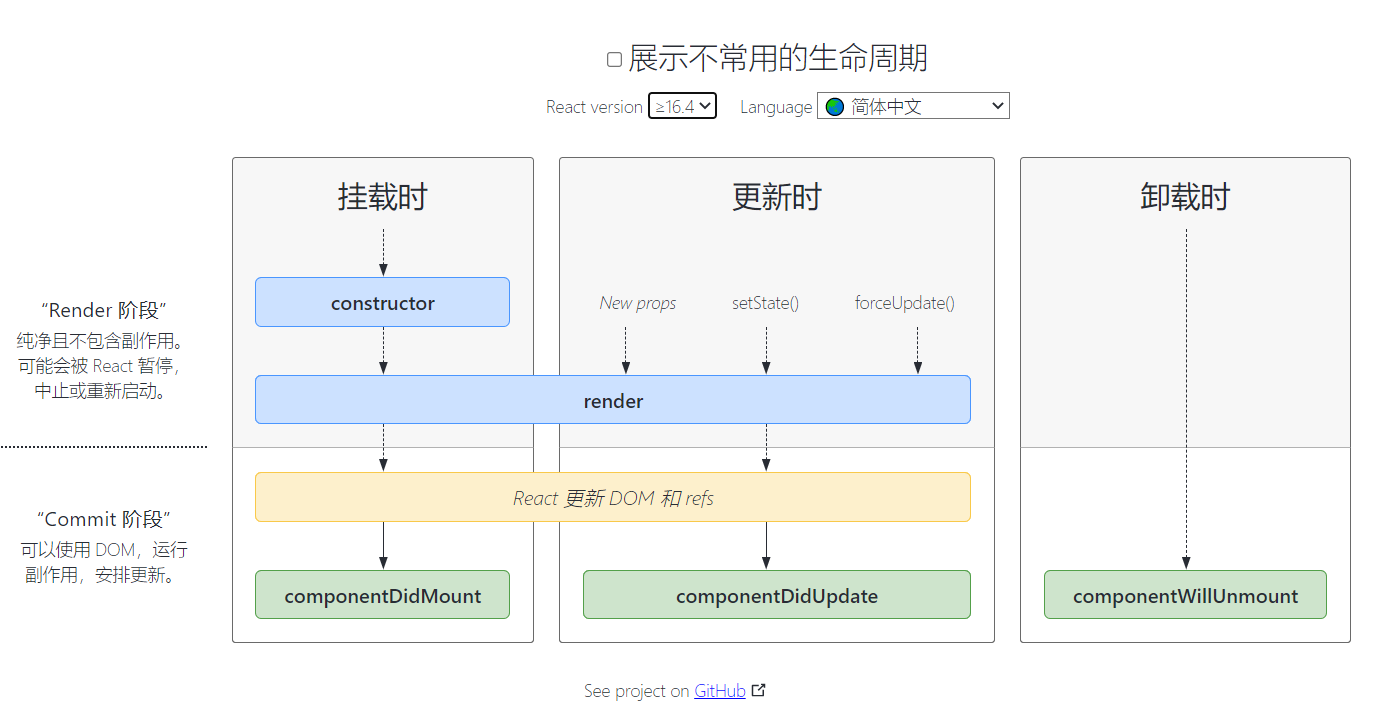
从这张图我们知道:
- 既然没有勾选”展示不常用的生命周期“,这里显示的 5 个方法就是常用的生命周期方法。
- 组件的生命周期可以分三个阶段:挂载、更新、卸载
- 挂载时的顺序是:
constructor()、render()、componentDidMount()
Tip:
- componentDidMount() 会在组件挂载后(插入 DOM 树中)立即调用。常做定时器、网络请求
componentDidUpdate()会在更新后会被立即调用。首次渲染不会执行此方法componentWillUnmount()会在组件卸载及销毁之前直接调用。在此方法中执行必要的清理操作,例如,清除 timer,取消网络请求或清除在componentDidMount()中创建的订阅等
挂载和卸载
以 Clock 组件为例:
当 Clock 组件第一次被渲染到 DOM 中的时候,就为其设置一个计时器。这在 React 中被称为“挂载(mount)”。
同时,当 DOM 中 Clock 组件被删除的时候,应该清除计时器。这在 React 中被称为“卸载(unmount)”。
请看实现:
class Clock extends React.Component {
    state = { date: new Date() }
    componentDidMount() {
        this.timerID = setInterval(
            () => this.tick(),
            1000
        )
    }
    // 组件卸载前会被调用
    componentWillUnmount() {
        clearInterval(this.timerID) // {1}
    }
    tick() {
        this.setState({
            date: new Date()
        });
    }
    handleUnmount = () => {
        // 从 DOM 中卸载组件
        ReactDOM.unmountComponentAtNode(document.getElementById('root'))
    }
    render() {
        return (
            <div>
                <h1>Hello, world!</h1>
                <h2>It is {this.state.date.toLocaleTimeString()}.</h2>
                <button onClick={this.handleUnmount}>卸载</button>
            </div>
        );
    }
}
页面显示:
Hello, world!
It is 11:34:16.

卸载
时间每秒都会更新,点击按钮”卸载“,页面将不再有任何信息,对应的 html 为 <div id="root"></div>
Tip:unmountComponentAtNode() 从 DOM 中卸载组件,会将其事件处理器(event handlers)和 state 一并清除。
注:倘若将 clearInterval(this.timerID)(行{1})注释,点击”卸载“将报错如下:
Warning: Can't perform a React state update on an unmounted component. This is a no-op, but it indicates a memory leak in your application. To fix, cancel all subscriptions and asynchronous tasks in the componentWillUnmount method.

警告:无法对卸载的组件执行 React 状态更新。 这是一个空操作,但它表明您的应用程序中存在内存泄漏。 要修复,请取消 componentWillUnmount 方法中的所有订阅和异步任务。
不要将定时器放入 render()
倘若将上面例子中的定时器放在 render() 中。就像这样:
render() {
    console.log(1)
    // 定时器
    this.timerID = setInterval(
        () => this.tick(),
        1000
    )
    return (
        // ...不变
    );
}
之前 render() 每秒执行一次,现在很快就会执行过万,因为每次执行都会生成一个定时器。
过时的生命周期方法
以下生命周期方法标记为“过时”。这些方法仍然有效,但不建议在新代码中使用它们 —— 官网-过时的生命周期方法
-
componentWillMount,现在改名为UNSAFE_componentWillMount(),在挂载之前被调用 -
componentWillReceiveProps,现在改名为UNSAFE_componentWillReceiveProps(),在已挂载的组件接收新的 props 之前被调用。第一次传的不算,以后传的才算,有人说应该叫componentWillReceiveNewProps -
componentWillUpdate,现在改名为UNSAFE_componentWillUpdate(),当组件收到新的 props 或 state 时,会在渲染之前调用。
倘若用了重命名之前的方法,控制台会有详细的警告信息。请看示例:
class Clock extends React.Component {
    componentWillMount() {

    }
    UNSAFE_componentWillReceiveProps() {

    }
}
控制台输出:
Warning: componentWillMount has been renamed, and is not recommended for use. See https://reactjs.org/link/unsafe-component-lifecycles for details.

* Move code with side effects to componentDidMount, and set initial state in the constructor.
* Rename componentWillMount to UNSAFE_componentWillMount to suppress this warning in non-strict mode. In React 18.x, only the UNSAFE_ name will work. To rename all deprecated lifecycles to their new names, you can run `npx react-codemod rename-unsafe-lifecycles` in your project source folder.

Please update the following components: Clock
Tip:既然这几个方法不建议使用,所以不打算深入研究
UNSAFE_ 不是指安全性
这里的 “unsafe” 不是指安全性,而是表示使用这些生命周期的代码在 React 的未来版本中更有可能出现 bug,尤其是在启用异步渲染之后 —— 官网-异步渲染之更新
shouldComponentUpdate
shouldComponentUpdate() 默认返回 true。用法如下:
class Clock extends React.Component {
    state = { date: new Date() }
    componentDidMount() {
        this.timerID = setInterval(
            () => this.tick(),
            1000
        )
    }
    tick() {
        this.setState({
            date: new Date()
        });
    }
    render() {
        return (
            <div>
                <h1>Hello, world!</h1>
                <h2>It is {this.state.date.toLocaleTimeString()}.</h2>
            </div>
        );
    }
    // 返回 false
    shouldComponentUpdate() {
        return false
    }
}
Clock 的时间不会再变化。render() 方法也不会再执行。请看下图:
调用 setState(),如果 shouldComponentUpdate() 返回 false 则中断,不再执行 render()。
Tip:此方法仅作为性能优化的方式而存在。不要企图依靠此方法来“阻止”渲染,因为这可能会产生 bug —— 官网-shouldComponentUpdate()
forceUpdate
根据上图说明,调用 forceUpdate() 将致使组件调用 render() 方法,此操作会跳过该组件的 shouldComponentUpdate()。
通常应该避免使用 forceUpdate()
新增生命周期方法
相对旧的生命周期,新增如下两个方法,但都属于不常见的情形,所以不做详细研究。
getDerivedStateFromProps
getDerivedStateFromProps() 会在调用 render 方法之前调用,并且在初始挂载及后续更新时都会被调用。它应返回一个对象来更新 state,如果返回 null 则不更新任何内容。
此方法适用于罕见的用例,即 state 的值在任何时候都取决于 props。
getDerivedStateFromProps 的存在只有一个目的:让组件在 props 变化时更新 state —— 官网-什么时候使用派生 state
getSnapshotBeforeUpdate
getSnapshotBeforeUpdate() 在最近一次渲染输出(提交到 DOM 节点)之前调用。它使得组件能在发生更改之前从 DOM 中捕获一些信息(例如,滚动位置)。
此用法并不常见,但它可能出现在 UI 处理中,如需要以特殊方式处理滚动位置的聊天线程等。
在函数组件中使用生命周期
我们可以在函数组件中使用 useEffect 来模拟常见的生命周期钩子:componentDidMount()、componentDidUpdate()、componentWillUnmount()。
体验 useEffect
首先我们运行一个例子:
function MyButton() {
    const [count, setCount] = React.useState(0)

    const add = () => {
        setCount(count + 1)
    }

    const unMount = () => {
        ReactDOM.unmountComponentAtNode(document.getElementById('root'))
    }

    // React.useEffect() 将写在此处 {1}

    return (
        <div>
            <button onClick={add}>{count}</button> <button onClick={unMount}>卸载</button>
        </div>
    );
}
ReactDOM.render(
    <MyButton />,
    document.getElementById('root')
)
页面显示两个按钮:
0 卸载
第一个按钮显示一个数字,每点击一次就会自增 1,点击第二个按钮,此组件就会被卸载。
我们接下来在行{1}处添加 React.useEffect() 相关代码。请看示例:
// 相当于 componentDidMount()、componentDidUpdate()
React.useEffect(() => {
    console.log('a')
})
页面渲染后就会输出 a,之后每点击第一个按钮都会输出 a,点击卸载没有输出。
可以给 useEffect 传递第二个参数,它是 effect 所依赖的值数组 —— 官网-effect 的条件执行
倘若给 useEffect 第二个参数传递一个空数组,表明没有依赖值:
// 相当于 componentDidMount()
React.useEffect(() => {
    console.log('a')
}, [])
页面渲染后就会输出 a,但点击第一个按钮就不会再有输出。
通常,组件卸载时需要清除 effect 创建的诸如订阅或计时器 ID 等资源。要实现这一点,useEffect 函数需返回一个清除函数 —— 官网-清除 effect
倘若给 useEffect 函数返回一个函数。请看示例:
 React.useEffect(() => {
    console.log('a')
    return () => {
        console.log('b')
    }
}, [])
页面渲染后就会输出 a,但点击第一个按钮就不会再有输出,点击卸载输出 b。
优化函数组件 Clock 中的定时器
在函数组件中使用 state中我们写过这么一个例子:
function Clock() {
    const [name] = React.useState('pjl')
    const [date, setDate] = React.useState(new Date())

    setInterval(() => {
        console.log('setInterval')
        setDate(new Date())
    }, 1000)

    return (
        <div>
            <h1>Hello, world! {name}</h1>
            <h2>It is {date.toLocaleTimeString()}.</h2>
        </div>
    );
}
十秒就会输出一千多次 setInterval。定时器应该只执行一次,放在 componentDidMount 生命钩子中比较合适。以下是优化后的增强版:
function Clock() {
    // console.log('Clock')
    const [name] = React.useState('pjl')
    const [date, setDate] = React.useState(new Date())

    React.useEffect(() => {
        console.log('useEffect')
        const timerId = setInterval(() => {
            // console.log('setInterval')
            setDate(new Date())
        }, 1000)

        return () => {
            clearInterval(timerId)
        }
    }, [name])

    const unMount = () => {
        ReactDOM.unmountComponentAtNode(document.getElementById('root'))
    }

    return (
        <div>
            <h1>Hello, world! {name}</h1>
            <h2>It is {date.toLocaleTimeString()}.</h2>
            <button onClick={unMount}>卸载</button>
        </div>
    );
}
受控组件和非受控组件
在大多数情况下,我们推荐使用 受控组件 来处理表单数据。在一个受控组件中,表单数据是由 React 组件来管理的。另一种替代方案是使用非受控组件,这时表单数据将交由 DOM 节点来处理 —— 官网-非受控组件
这里我们能接收两个信息:
- 推荐使用受控组件
- 受控组件和非受控组件的区别在于:表单数据由谁来处理 —— 是 react 组件管理,还是 dom 来处理。
将表单写为受控组件:
class NameForm extends React.Component {
    state = { value: '' }
    // 值若改变,则将其更新到 state 中
    handleChange = event => {
        this.setState({ value: event.target.value });
    }

    // 提交表单
    handleSubmit = event => {
        console.log('提交的名字: ' + this.state.value);
        event.preventDefault();
    }

    render() {
        return (
            <form onSubmit={this.handleSubmit}>
                <label>
                    名字:
                    <input type="text" value={this.state.value} onChange={this.handleChange} />
                </label>
                <input type="submit" value="提交" />
            </form>
        );
    }
}
ReactDOM.render(
    <NameForm />,
    document.getElementById('root')
);
名字:[ 输入框 ] 提交
在输入框中输入”123“,点击”提交“按钮,控制台将输出 ”提交的名字: 123“。
非受控组件
重写 NameForm 组件,改为功能相同的非受控组件:
class NameForm extends React.Component {
    input = React.createRef()
    handleSubmit = event => {
        console.log('提交的名字: ' + this.input.current.value);
        event.preventDefault();
    }

    render() {
        return (
            <form onSubmit={this.handleSubmit}>
                <label>
                    名字:
                    <input type="text" ref={this.input} />
                </label>
                <input type="submit" value="提交" />
            </form>
        );
    }
}
勿过度使用 Refs —— 官网
Tip:倘若发生事件的元素,是你要操作的元素时,可以通过 event.target 取得 dom。
高阶函数和函数柯里化优化受控组件
按照受控组件中的写法,如果我们定义多个 input,我们就得写多个 handleXxxx 处理方法。就像这样:
class NameForm extends React.Component {
    state = { name: '', age: '' }

    // 2 个 input 对应 2 个处理方法
    handleName = event => {
        this.setState({ name: event.target.value });
    }
    handleAge = event => {
        this.setState({ age: event.target.value });
    }

    handleSubmit = event => {
        console.log({ name: this.state.name, age: this.state.age });
        event.preventDefault();
    }

    render() {
        return (
            <form onSubmit={this.handleSubmit}>
                <label>
                    名字:
                    <input type="text" value={this.state.name} onChange={this.handleName} />
                </label>
                <label>
                    年龄:
                    <input type="text" value={this.state.age} onChange={this.handleAge} />
                </label>
                <input type="submit" value="提交" />
            </form>
        );
    }
}
如果我们有10个,岂不是要写10个处理方法!我们可以用高阶函数和函数柯里化来对其优化。请看实现:
class NameForm extends React.Component {
    state = { name: '', age: '' }

    // saveFormField 既是`高阶函数`,也使用了`函数柯里化`
    saveFormField = (stateName) => {
        return (event) => {
            this.setState({ [stateName]: event.target.value }) // {1}
        }
    }

    handleSubmit = event => {
        console.log({ name: this.state.name, age: this.state.age });
        event.preventDefault();
    }

    render() {
        return (
            <form onSubmit={this.handleSubmit}>
                <label>
                    名字:
                    <input type="text" value={this.state.name} onChange={this.saveFormField('name')} />
                </label>
                <label>
                    年龄:
                    <input type="text" value={this.state.age} onChange={this.saveFormField('age')} />
                </label>
                <input type="submit" value="提交" />
            </form>
        );
    }
}
Tip:this.setState({ [stateName]: event.target.value }) 使用的语法是 可计算属性名。
高阶函数是处理函数的函数,只要满足其中一个条件即可:
- 参数是函数
js 内置的高阶函数有:Array.forEach、setInterval、Promise等。
函数柯里化
通过函数调用继续返回函数,实现多次接收参数最后统一处理的函数编码形式。
最二的一个示例是将:
function sum(a,b,c){
    return a + b + c
}
改成 sum(1)(2)(3) 的形式。就像这样:
const sum = (a) => {
    return (b) => {
        return (c) => {
            return a + b + c
        }
    }
}

// 6
console.log(sum(1)(2)(3))
DOM 元素
React 实现了一套独立于浏览器的 DOM 系统,兼顾了性能和跨浏览器的兼容性。我们借此机会完善了浏览器 DOM 实现的一些特殊情况 ——官网-DOM 元素。
在 React 中,所有的 DOM 特性和属性(包括事件处理)都应该是小驼峰命名的方式。例如,与 HTML 中的 tabindex 属性对应的 React 的属性是 tabIndex。
注:例外的情况是 aria-* 以及 data-* 属性,一律使用小写字母命名。比如, 你依然可以用 aria-label 作为 aria-label。
React 与 HTML 之间有很多属性存在差异,下面以 onChange 为例。
Tip:比如 react 中用 htmlFor 代替 for,其他更多介绍请看 DOM 元素。
onChange
onChange 事件与预期行为一致:每当表单字段变化时,该事件都会被触发。我们故意没有使用浏览器已有的默认行为,是因为 onChange 在浏览器中的行为和名称不对应,并且 React 依靠了该事件实时处理用户输入 —— 官网-onChange
change 事件并不是每次元素的 value 改变时都会触发 —— mdn-change 事件
原生 html 中 change 事件是这样的:
<body>
    名字:<input name="name" />

    <script>
        document.querySelector('input').
            addEventListener('change', e => console.log(e.target.value))
    </script>
</body>
在输入框中输入 123,点击他处让 input 失去焦点,控制台输出 123。
在上面受控组件 NameForm 中增加一行:
class NameForm extends React.Component {
    state = { value: '' }
    handleChange = event => {
      + console.log(event.target.value)
        this.setState({ value: event.target.value });
    }
}
在输入框中输入 123,控制台依次输出:
每当表单字段变化时,该事件都会被触发。事件名和行为相对应。
Diffing 算法
当对比两棵树时,React 首先比较两棵树的根节点 —— 官网-Diffing 算法
对比不同类型的元素
当根节点为不同类型的元素时,React 会拆卸原有的树并且建立起新的树
举个例子,当一个元素从 <a> 变成 <img>,从 <Article> 变成 <Comment>,或从 <Button> 变成 <div> 都会触发一个完整的重建流程
当卸载一棵树时,对应的 DOM 节点也会被销毁。组件实例将执行 componentWillUnmount() 方法。
在根节点以下的组件也会被卸载,它们的状态会被销毁。比如,当比对以下更变时:
<div>
  <Counter />
</div>

<span>
  <Counter />
</span>
React 会销毁 Counter 组件并且重新装载一个新的组件。
对比同类型的元素
当对比两个相同类型的 React 元素时,React 会保留 DOM 节点,仅比对及更新有改变的属性
<div className="before" title="stuff" />

<div className="after" title="stuff" />
通过对比这两个元素,React 知道只需要修改 DOM 元素上的 className 属性。
在处理完当前节点之后,React 继续对子节点进行递归。
对比同类型的组件元素
当一个组件更新时,组件实例会保持不变,因此可以在不同的渲染时保持 state 一致。React 将更新该组件实例的 props 以保证与最新的元素保持一致,并且调用该实例的 componentDidUpdate() 方法。
下一步,调用 render() 方法,diff 算法将在之前的结果以及新的结果中进行递归
对子节点进行递归
默认情况下,当递归 DOM 节点的子元素时,React 会同时遍历两个子元素的列表
在子元素列表末尾新增元素时,更新开销比较小。比如:
<ul>
  <li>first</li>
  <li>second</li>
</ul>

<ul>
  <li>first</li>
  <li>second</li>
  <li>third</li>
</ul>
React 会先匹配两个 <li>first</li> 对应的树,然后匹配第二个元素 <li>second</li> 对应的树,最后插入第三个元素的 <li>third</li> 树。
如果只是简单的将新增元素插入到表头,那么更新开销会比较大。比如:
<ul>
  <li>Duke</li>
  <li>Villanova</li>
</ul>

<ul>
  <li>Connecticut</li>
  <li>Duke</li>
  <li>Villanova</li>
</ul>
React 并不会意识到应该保留 <li>Duke</li> 和 <li>Villanova</li>,而是会重建每一个子元素。这种情况会带来性能问题。
为了解决上述问题(新增元素插入表头开销大),React 引入了 key 属性。以下示例在新增 key 之后,使得树的转换效率得以提高:
<ul>
  <li key="2015">Duke</li>
  <li key="2016">Villanova</li>
</ul>

<ul>
  <li key="2014">Connecticut</li>
  <li key="2015">Duke</li>
  <li key="2016">Villanova</li>
</ul>
现在 React 知道只有带着 '2014' key 的元素是新元素,带着 '2015' 以及 '2016' key 的元素仅仅移动了。
正确使用 key
倘若用元素在数组中的下标作为 key,有时不仅会造成上面所说的性能问题,有时还会造成程序的错误。请看示例:
function Demo() {
    const [todos, setTodos] = React.useState(['a', 'b'])

    const unshift = () => {
        setTodos([++seed, ...todos])
    }
    return (
        <div>
            <ul>
                {
                    todos.map((item, index) => {
                        return <li key={index} data-index={index}> {item} <input type="text" /></li>
                    })
                }
            </ul>
            <button onClick={unshift}>头部插入</button>
        </div>
    )
}
页面显示:
a [   /* input 输入框 */   ]
b [   /* input 输入框 */   ]
头部插入
在第一个输入框中输入 a,在第二个输入框中输入 b,然后点击按钮“头部插入”,界面错乱如下:
1 [a                       ]
a [b                       ]
b [                        ]
头部插入
倘若将 key 改成唯一值,使用相同的操作,界面就正常:
{
    todos.map((item, index) => {
        return <li key={item} data-index={index}> {item} <input type="text" /></li>
    })
}
1 [                        ]
a [a                       ]
b [b                       ]
头部插入
在 Codepen 有两个例子,分别为 展示使用下标作为 key 时导致的问题,以及不使用下标作为 key 的例子的版本,修复了重新排列,排序,以及在列表头插入的问题 —— 官网-Keys
Tip:如果仅做简单展示,用元素在数组中的下标作为 key 也是可以的。
Recommend
About Joyk
Aggregate valuable and interesting links.
Joyk means Joy of geeK