

Building containers by hand using namespaces: The net namespace
source link: https://www.redhat.com/sysadmin/net-namespaces
Go to the source link to view the article. You can view the picture content, updated content and better typesetting reading experience. If the link is broken, please click the button below to view the snapshot at that time.
Building containers by hand using namespaces: The net namespace
Posted: March 9, 2022 | by Steve Ovens (Red Hat, Sudoer)
Over the last year, I've been writing articles for Enable Sysadmin about some of the most-used Linux namespaces. Throughout the series, I have looked at some really useful functions built right into the Linux kernel:
-
With the UTS namespace, you can change the hostname or the Network Information Service (NIS) domain that a process reports. This feature is mainly useful in the container context and not extremely useful on its own.
- The PID namespace is quite useful for isolating processes from each other. This is valuable if you have a complicated environment where you use the Linux kernel's freeze functionality, which allows you to pause a process and resume it on a different host. It also allows running multiple versions of an application that relies on isolated process trees.
- The mount namespace has many uses for constructing namespaces that do not have full access to the host's filesystem. Not only is this useful for creating and managing processes on a host, but it is also beneficial when creating Linux containers.
- The user namespace allows processes to run as specific users. Among other things, this is useful for creating a namespace as an unprivileged user that can still be root in the namespace. There are obvious limitations regarding the tasks these namespaces can accommodate, as they do not have root on the host. The user namespace is most often used in combination with the other namespaces to provide a greater level of isolation than would otherwise be possible.
This article looks at the namespace I get asked about the most: the net namespace. As the name implies, you can use this namespace to manage the network stack inside of a namespace. I will look at the following use cases for why you might want to do something like this:
- Configure a point-to-point net namespace demonstrating that one namespace can talk to a Python webserver in another namespace.
- Configure DHCP inside of a namespace to show that namespaces can isolate broadcast traffic, even from the host.
- Combine the net namespace and Open vSwitch to isolate two or more processes that use the network to communicate without permitting the outside (or even the host) to access those processes.
Initial setup
I'm using a CentOS Stream virtual machine (VM) for this tutorial. You need to install a few packages to follow along with it. Normally, I recommend installing everything from your package manager:
$ sudo dnf install centos-release-nfv-openvswitch
$ sudo dnf install openvswitch-selinux-extra-policy \
openvswitch2.15 \
dnsmasq \
dhcp-client \
net-tools
However, I'm using CentOS Stream 9 and at the time of writing, the Network Functions Virtualization (NFV) repo is populated but not a part of the default repositories. If you try to install the meta package that usually provides these repos, you may receive an error.
If that happens to you, download the packages directly from the repository. While you're at it, install the DHCP packages for later:
wget http://mirror.stream.centos.org/SIGs/9-stream/nfv/x86_64/openvswitch-2/Packages/o/openvswitch-selinux-extra-policy-1.0-30.el9s.noarch.rpm
wget http://mirror.stream.centos.org/SIGs/9-stream/nfv/x86_64/openvswitch-2/Packages/o/openvswitch2.15-2.15.0-51.el9s.x86_64.rpm
dnf install -y dnsmasq dhcp-client net-tools
dnf install openvswitch-selinux-extra-policy-1.0-30.el9s.noarch.rpm openvswitch2.15-2.15.0-51.el9s.x86_64.rpm
Example 1: Configure point-to-point net namespaces
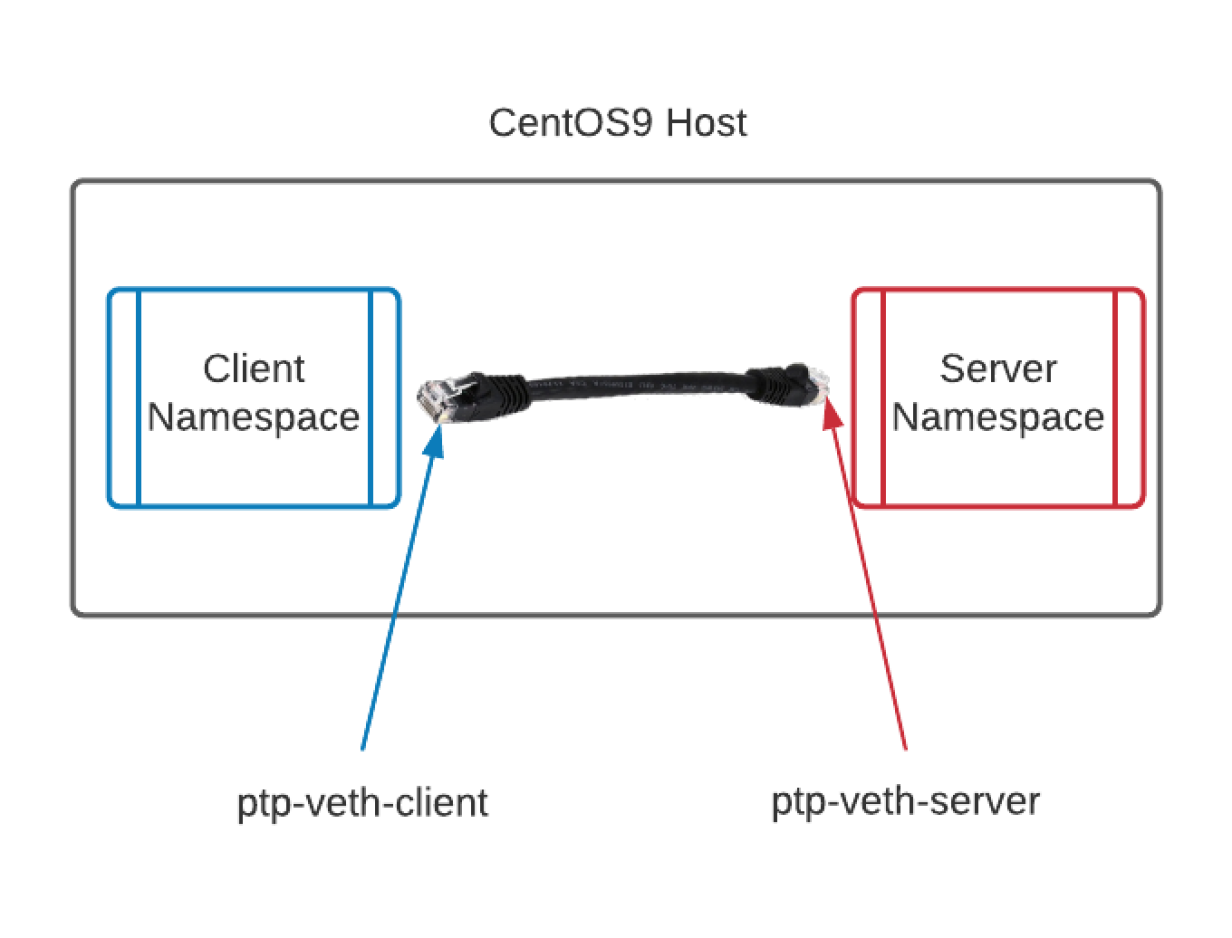
The first example is creating two net namespaces that communicate with each other. This configuration is similar to using a crossover cable when connecting two network interface controllers.
In the diagram below, each end of the "cable" is labeled. I recommend using obvious names, although the naming convention you choose is entirely arbitrary.
To accomplish this, set up some environment variables to make life easier and the code more repeatable. You can create several variables all at once by placing what you need in a plain-text file, and then using the source command (or a single dot) to import them into your shell:
$ cat << EOF >> vars
namespace1=client
namespace2=server
command='python3 -m http.server'
ip_address1="10.10.10.10/24"
ip_address2='10.10.10.20/24'
interface1=veth-client
interface2=veth-server
EOF
$ . vars
For this example, the server is running a basic Python 3 web server. You just need to verify the connection works.
The first thing to do is to create the namespaces. Unlike other commands, you can access the net namespace directly from the ip command. Create the namespaces:
sudo ip netns add $namespace1
sudo ip netns add $namespace2
Verify that the namespaces exist:
$ ip netns list
server
client
Great, you have some namespaces. This in and of itself is not very useful yet. If you run a command in one of the new namespaces, you see that there is only the loopback address, and it is marked as DOWN:
$ sudo ip netns exec $namespace2 ip ad
1: lo: <LOOPBACK> mtu 65536 qdisc noop state
DOWN group default qlen 1000
link/loopback 00:00:00:00:00:00 brd 00:00:00:00:00:00
The next step is to create the virtual "Ethernet cable" by creating a link between the two namespaces, like this:
$ sudo ip link add \
       ptp-$interface1 \
       type veth \
       peer name ptp-$interface2
If you run the ip link command on the host, you'll see two additional links created by this command:
$ ip link
1: lo: <LOOPBACK,UP,LOWER_UP> mtu 65536 [...]
    link/loopback 00:00:00:00:00:00 brd 00:00:00:00:00:00
2: enp1s0: <BROADCAST,MULTICAST,UP,LOWER_UP> [...]
    link/ether 52:54:00:57:53:77 brd ff:ff:ff:ff:ff:ff
3: ptp-veth-server@ptp-veth-client: <BROADCAST,MULTICAST,M-DOWN> [...]
    link/ether d6:d9:74:95:64:6f brd ff:ff:ff:ff:ff:ff
4: ptp-veth-client@ptp-veth-server: <BROADCAST,MULTICAST,M-DOWN> [...]
    link/ether f6:4a:a4:70:86:67 brd ff:ff:ff:ff:ff:ff
The output may look rather odd. Even though you typed one command, because you specified peer in the link command, it created a link with the following convention: <link name>@<peer link name>. This is why I recommend picking descriptive names for your links. Once you have a few links, it can be difficult to keep track of their purpose.
At this point, you have created the links but have not assigned them anywhere. Go ahead and assign the interfaces to their respective namespaces:
sudo ip link set ptp-$interface1 netns $namespace1
sudo ip link set ptp-$interface2 netns $namespace2
After running this command, the host no longer has access to these links because they are assigned to a different net namespace. If you rerun the ip netns exec command, you can see that your new namespaces have devices, but they are still marked as DOWN and do not have IP addresses to communicate with:
$ sudo ip netns exec $namespace2 ip ad
1: lo: <LOOPBACK> mtu 65536 qdisc noop state DOWN group default qlen 1000
    link/loopback 00:00:00:00:00:00 brd 00:00:00:00:00:00
3: ptp-veth-server@if4: <BROADCAST,MULTICAST> mtu 1500 qdisc noop state [...]
    link/ether d6:d9:74:95:64:6f brd ff:ff:ff:ff:ff:ff link-netns client
Next, assign the IPs and bring the interfaces up:
sudo ip netns exec $namespace1 ip addr \
     add $ip_address1 dev ptp-$interface1
sudo ip netns exec $namespace2 ip addr \
     add $ip_address2 dev ptp-$interface2
sudo ip netns exec $namespace1 ip link set \
     dev ptp-$interface1 up
sudo ip netns exec $namespace2 ip link set \
     dev ptp-$interface2 up
Finally, start the Python 3 web server in $namespace2 and test it:
sudo ip netns exec $namespace2 $command &Because you have the subnet CIDR in the $ip_addres2, you have options. You can do some Bash trickery to remove it:
sudo ip netns exec $namespace1 curl `echo $ip_address2 |awk -F '/' '{print $1}'`:8000Or you can simply type the IP address into the command:
sudo ip netns exec $namespace1 curl 10.10.10.20:8000You receive a directory listing for whichever directory was active during the instantiation of the Python web server. Because the original host does not have an Ethernet device on the 10.x.x.x network, it cannot reach the new namespaces:
$ curl --connect-timeout 3 10.10.10.20:8000
curl: (28) Connection timed out after 3001 milliseconds
Even if it did have a properly configured interface for that subnet, because you used a point-to-point "cable," only the namespaces connected to that interface peering can communicate with each other.
[ Learn what it takes to develop cloud-native applications using modern tools such as microservices. Download the eBook Kubernetes-native microservices with Quarkus and MicroProfile. ]
Add DHCP services
Building on the examples above, create a few more variables to assist with the DHCP example:
ip_range_start='10.10.10.100'
ip_range_end='10.10.10.150'
netmask='255.255.255.0'
For DHCP to function properly, you need to bring up the loopback device in the server namespace:
sudo ip netns exec $namespace2 ip addr add 127.0.0.1/8 dev lo
sudo ip netns exec $namespace2 ip link set lo up
Next, start the dnsmasq process in the new namespace:
sudo ip netns exec $namespace2 \
     dnsmasq --interface=ptp-$interface2 \
     --dhcp-range=$ip_range_start,$ip_range_end,$netmask
Finally, delete the IP address attached to $namespace1 and then start dhclient to ensure you can establish a connection with the DHCP server:
sudo ip netns exec $namespace1 ip addr\
     del $ip_address1 dev ptp-$interface1
You now see a different IP on the interface inside $namespace1:
$ sudo ip netns exec $namespace1 ip ad

1: lo: <LOOPBACK> mtu 65536 qdisc noop state DOWN group default qlen 1000
    link/loopback 00:00:00:00:00:00 brd 00:00:00:00:00:00
4: ptp-veth-client@if3: <BROADCAST,MULTICAST,UP,LOWER_UP> mtu 1500 [...]
    link/ether 9a:61:93:29:73:d5 brd ff:ff:ff:ff:ff:ff link-netns server
    inet 10.10.10.124/24 brd 10.10.10.255 scope global dynamic ptp-veth-client
       valid_lft 3468sec preferred_lft 3468sec
    inet6 fe80::9861:93ff:fe29:73d5/64 scope link
       valid_lft forever preferred_lft forever
But wait! You may have noticed that the host is behaving strangely when making DNS queries. That's because you have done nothing to stop the network namespace from overwriting /etc/resolv.conf. There are a few ways you can solve this. You could create a new mount namespace using the skills you learned in my previous articles. In fact, this is probably the most "container-like" method of achieving the correct results.
However, there's another way that may be more useful if you plan to use net namespaces on your desktop or laptop.
The ip-netns(8) man page says:
For applications that are aware of network namespaces, the convention is to look for global network configuration files first in /etc/netns/NAME/ then in /etc/. For example, if you want a different version of /etc/resolv.conf for a network namespace used to isolate your VPN, name it /etc/netns/myvpn/resolv.conf.
Since DHCP overwrites /etc/resolv.conf, you only need to touch the file in the appropriate directory. For completeness, you can create a directory for both namespaces, but this is not necessary. The server namespace will not receive DHCP and thus does not need to adjust the /etc/resolv.conf file.
Create the directories on the host filesystem:
sudo mkdir -p /etc/netns/{$namespace1,$namespace2}You can now touch resolv.conf for the client namespace:
sudo touch /etc/netns/$namespace{1,2}/resolv.confWith this file in place, the original net namespace will use /etc/resolv.conf while the rest of the net namespaces will reference the resolv.conf file in each namespace's subdirectory.
Example 2: Configure multiple net namespaces with Open vSwitch
While it is good to be able to have services running locally that talk only to each other, most containerized workloads involve multiple services working together to achieve a goal. Just like with physical computers, to eloquently connect multiple namespaces to the same network, you need to deploy a switch.
Numerous virtual switches can be used for this purpose. For this demonstration, I'll deploy Open vSwitch. Before proceeding, I recommend removing all the namespaces you have created previously, or you can simply reboot your host (as namespaces do not survive a reboot by default). You could use the DHCP tactic discussed above, but it is slightly easier to set static IPs again.
Here are the variable declarations:
namespace1=east
namespace2=west
namespace3=central
command='python3 -m http.server'
ip_address1="10.10.10.10/24"
ip_address2='10.10.10.20/24'
ip_address3='10.10.10.30/24'
interface1=east
interface2=west
interface3=central
Create the namespaces like you did before:
sudo ip netns add $namespace1
sudo ip netns add $namespace2
sudo ip netns add $namespace3
Start Open vSwitch and create a bridge for networking:
sudo systemctl start openvswitch
sudo ovs-vsctl add-br NAMESPACE-DEMO
Just as before, create some veth peer interfaces, but this time specify one side of the "cable" because you will add the other end to the virtual switch. It looks something like this when you're done:
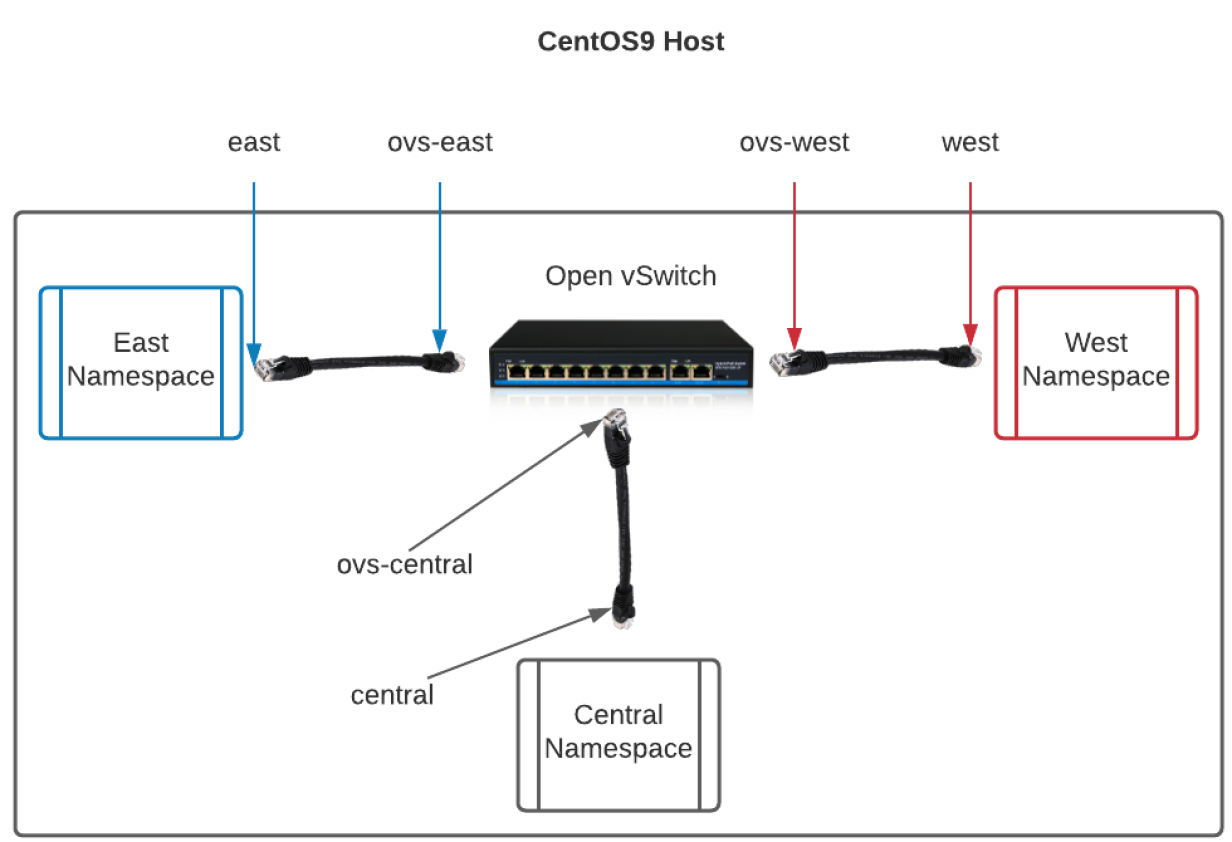
Adding the interfaces should look very familiar by now:
sudo ip link add $interface1 type veth peer name ovs-$interface1
sudo ip link set $interface1 netns $namespace1
sudo ip link add $interface2 type veth peer name ovs-$interface2
sudo ip link set $interface2 netns $namespace2
sudo ip link add $interface3 type veth peer name ovs-$interface3
sudo ip link set $interface3 netns $namespace3
You can verify that the commands worked as expected by taking a look inside of one of the namespaces:
$ sudo ip netns exec $namespace1 ip link

1: lo: <LOOPBACK> mtu 65536 qdisc noop state DOWN mode DEFAULT group default qlen 1000
    link/loopback 00:00:00:00:00:00 brd 00:00:00:00:00:00
6: east@if5: <BROADCAST,MULTICAST> mtu 1500 qdisc noop state DOWN mode DEFAULT group default qlen 1000
    link/ether 32:5f:80:91:34:40 brd ff:ff:ff:ff:ff:ff link-netnsid 0
Next, add the ports to the switch:
sudo ovs-vsctl add-port NAMESPACE-DEMO ovs-$interface1
sudo ovs-vsctl add-port NAMESPACE-DEMO ovs-$interface2
sudo ovs-vsctl add-port NAMESPACE-DEMO ovs-$interface3
You can also view the ports that your Open vSwitch uses:
$ sudo ovs-vsctl list-ports NAMESPACE-DEMO
ovs-central
ovs-east
ovs-west
As you have seen from the outputs, the interfaces exist and are attached to their respective components. However, they have neither an IP address nor are they currently up.
Bring the devices up:
sudo ip link set dev ovs-$interface1 up
sudo ip link set dev ovs-$interface2 up
sudo ip link set dev ovs-$interface3 up
And then configure:
sudo ip netns exec $namespace1 ip addr add $ip_address1 dev $interface1
sudo ip netns exec $namespace2 ip addr add $ip_address2 dev $interface2
sudo ip netns exec $namespace3 ip addr add $ip_address3 dev $interface3
sudo ip netns exec $namespace1 ip link set dev $interface1 up
sudo ip netns exec $namespace2 ip link set dev $interface2 up
sudo ip netns exec $namespace3 ip link set dev $interface3 up
Next, do some quick ping tests to verify that the namespaces are functioning as expected:
$ sudo ip netns exec $namespace3 ping -c 2 10.10.10.20
$ sudo ip netns exec $namespace1 ping -c 2 10.10.10.20
Finally, view the Address Resolution Protocol (ARP) table of each namespace:
$ sudo ip netns exec $namespace1 arp
Address                  HWtype  HWaddress           Flags Mask            Iface
10.10.10.20              ether   ce:29:53:b3:b1:bd   C                     east

$ sudo ip netns exec $namespace2 arp
Address                  HWtype  HWaddress           Flags Mask            Iface
10.10.10.10              ether   32:5f:80:91:34:40   C                     west
10.10.10.30              ether   72:4c:7b:f3:87:fe   C                     west

$ sudo ip netns exec $namespace3 arp
Address                  HWtype  HWaddress           Flags Mask            Iface
10.10.10.20              ether   ce:29:53:b3:b1:bd   C                     central
Each namespace pinged the west namespace, so it has entries in its ARP table for both of the other IPs, whereas both east and central have a single entry in their ARP tables.
Great! So you have a bunch of namespaces that can communicate with each other via Open vSwitch. If you want to enable host-to-namespace communication as well, follow a similar pattern:
- Create the
veth peer. - Add an IP to the host end of the "cable."
- Set the host
vethinterface toUP. - Connect the other end of the "cable" to Open vSwitch.
- Set the Open vSwitch port to
UP.
The following commands will do these:
sudo ip link add host-if type veth peer name ovs-host-if
sudo ip addr add 10.10.10.40/24 dev ovs-host-if
sudo ip link set dev ovs-host-if up
sudo ovs-vsctl add-port NAMESPACE-DEMO ovs-host-if
sudo ip link set dev ovs-host-if up
You are now able to communicate with the processes inside all the namespaces connected to Open vSwitch:
ping -c 2 10.10.10.20Manual namespaces
This is a big topic and I covered a lot in this article:
- Having two isolated net namespaces communicate directly with each other
- Standing up DHCP instead of static IPs
- Creating multiple net namespaces and using Open vSwitch to connect them all
I've demonstrated several techniques for creating and interacting with the net namespace and combined this with previous knowledge of the user and mnt namespaces to isolate processes further. You can combine these namespaces (pid, user, mnt, and net) to make a very powerful isolation layer on any Linux system. While Linux containers provide this functionality in a more user-friendly way, it is always important to grasp the fundamental building blocks.
Whereas containers are supposed to only have a single process by design (although it is certainly possible to have more), creating your own namespaces allows you the flexibility to customize your environment to your specific needs, all without downloading or running binaries you didn't intentionally install. Namespaces provide a very customizable interface for tasks such as isolating application traffic.
In my next article, I'll use everything you've learned in this one to run a VPN in a dedicated namespace that you craft by hand.
Recommend
About Joyk
Aggregate valuable and interesting links.
Joyk means Joy of geeK