

An introduction to ASP.NET Core MVC through an example (Part 1)
source link: https://www.codeproject.com/Articles/5327033/An-introduction-to-ASP-NET-Core-MVC-through-an-exa
Go to the source link to view the article. You can view the picture content, updated content and better typesetting reading experience. If the link is broken, please click the button below to view the snapshot at that time.
Introduction
To get the most from these articles, you should be familiar with the basics of web development, understand how HTML, CSS and JavaScript work, have a working knowledge of C#, what MVC model is, and you also should know a bit of the basics of .NET Core, ASP.NET Core and Entity Framework Core. If you haven’t done any these, you can get started with them from W3schools or Microsoft docs.
In these articles, through a project called BooksStore, I want to show you a realistic development process from inception to deployment. I used Windows 10, Visual Studio 2019 and SQL Server LocalDB.
Background
In my apllication, called BooksStore, I will create an online book catalog that customers can browse by genre and page, a shopping cart where users can add and remove books, and a checkout where customers can enter their shipping details. I will also create an administration area that includes create, read, update, and delete (CRUD) facilities for managing the catalog, and I will protect it so that only logged-in administrators can make changes.
Using the code
Creating the Project
From the Visual Studio, select Create a new project, select ASP.NET Core Web Application and Next

Name the project BooksStore and select Create
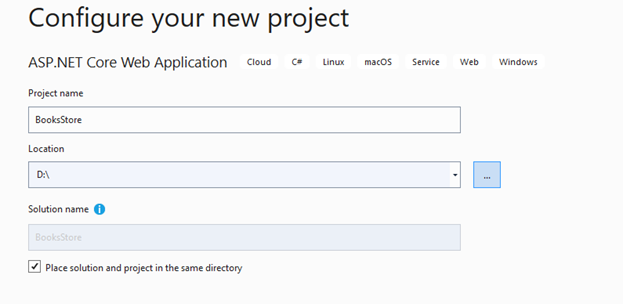
Select Web Application (Model-View-Controller), then select Create
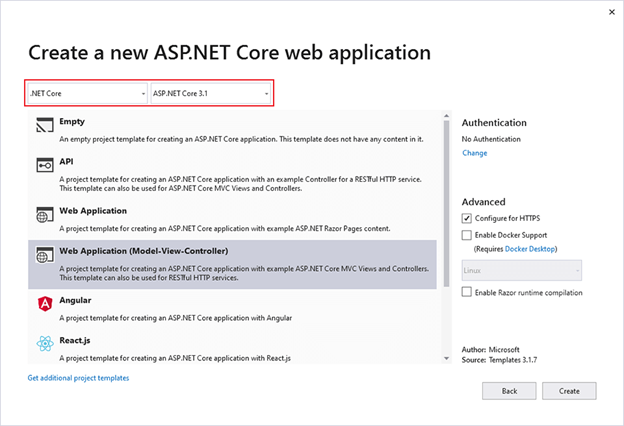
Notice that, I selected ASP.NET Core 3.1 – the Long-Term support in Visual Studio 2019.
Changing the Razor Views
The Razor view engine is responsible for processing view files, which have the .cshtml extension, to generate HTML responses. Replace the content of the Views/Shared/_Layout.cshtml file with the following markup:
<!DOCTYPE html>
<html>
<head>
    <meta name="viewport" content="width=device-width" />
    <title>BooksStore</title>
</head>
<body>
    <div>
        @RenderBody()
    </div>
</body>
</html>
And also replace the content of the Views/Home /Index.cshtml file with the following markup:
<h3>Welcome to BooksStore</h3>
Adding a Data Model
Since this is an e-commerce application, the most obvious model I need is for a book. Add a class file named Book.cs to the Models folder and replace the default content of this file with the following code:
using System.ComponentModel.DataAnnotations.Schema;

namespace BooksStore.Models {

    public class Book {
        public long BookID { get; set; }
        public string Title { get; set; }
        public string Description { get; set; }
        [Column(TypeName = "decimal(8, 2)")]
        public decimal Price { get; set; }
        public string Genre { get; set; }
    }
}
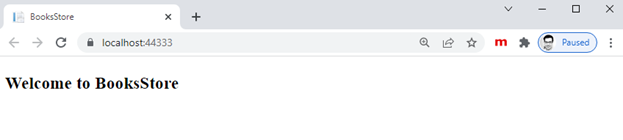
And now, before going any further, we can run the application to make sure it builts and runs as expected:
Adding data to the application
Installing the Entity Framework Core Packages
The BooksStore application will store its data in a SQL Server LocalDB database, which is accessed using Entity Framework Core (EF Core). So first step is to add EF Core to the project by selecting the Tools menu, select NuGet Package Manager > Package Manager Console (PMC). In the PMC, run the following command:
Install-Package Microsoft.EntityFrameworkCore.SqlServer -Version 3.1.1
Defining the Connection String
Configuration settings, such as database connection strings, are stored in JSON configuration files. Add a connection string to the appsettings.json file:
{
  "Logging": {
    "LogLevel": {
      "Default": "Information",
      "Microsoft": "Warning",
      "Microsoft.Hosting.Lifetime": "Information"
    }
  },
  "AllowedHosts": "*",
  "ConnectionStrings": {
    "BooksStoreConnection": "Server=(localdb)\\MSSQLLocalDB;Database=BooksStore;MultipleActiveResultSets=true"
  }
}
This configuration string specifies a LocalDB database called BooksStore and enables the multiple active result set feature (MARS), which is required for some of the database queries that will be made by the BooksStore application using Entity Framework Core.
Creating the Database Context Class
Entity Framework Core provides access to the database through a context class. Add a class file named BooksStoreDbContext.cs to the Models folder and use it to define the class with the follwing code:
using Microsoft.EntityFrameworkCore;

namespace BooksStore.Models {

    public class BooksStoreDbContext: DbContext {
        public BooksStoreDbContext (DbContextOptions< BooksStoreDbContext > options)
            : base(options) { }
        public DbSet<Book> Books { get; set; }
    }
}
The DbContext base class provides access to the Entity Framework Core’s underlying functionality, and the Books property will provide access to the Book objects in the database. The BooksStoreDbContext class is derived from DbContext and adds the properties that will be used to read and write the application’s data.
Configuring Entity Framework Core
Entity Framework Core must be configured so that it knows the type of database to which it will connect, which connection string describes that connection, and which context class will present the data in the database. To do this, we change something to the Startup.cs file:
using BooksStore.Models;
using Microsoft.AspNetCore.Builder;
using Microsoft.AspNetCore.Hosting;
using Microsoft.EntityFrameworkCore;
using Microsoft.Extensions.Configuration;
using Microsoft.Extensions.DependencyInjection;
using Microsoft.Extensions.Hosting;
...
public void ConfigureServices(IServiceCollection services)
        {
            services.AddControllersWithViews();
            services.AddDbContext<BooksStoreDbContext>(opts => {
                opts.UseSqlServer(
                   Configuration["ConnectionStrings:BooksStoreConnection"]);
            });
        }
...
Entity Framework Core is configured with the AddDbContext method, which registers the database context class and configures the relationship with the database.
The UseSQLServer method declares that SQL Server is being used and the connection string is read via the IConfiguration object.
Creating a Repository
The next step is to create a repository interface and implementation class. The repository pattern is one of the most widely used, and it provides a consistent way to access the features presented by the database context class.
Add a class file named IBooksStoreRepository.cs to the Models folder and use it to define the interface with the following code:
using System.Linq;

namespace BooksStore.Models {

    public interface IBooksStoreRepository {
        IQueryable<Book> Books { get; }
    }
}
This interface uses IQueryable<T> to allow a caller to obtain a sequence of Book objects.
To create an implementation of the repository interface, add a class file named EFBooksStoreRepository.cs in the Models folder and use it to define the class with the follwing code:
using System.Linq;

namespace BooksStore.Models {

    public class EFBooksStoreRepository : IBooksStoreRepository {
        private BooksStoreDbContext context;
        public EFBooksStoreRepository (BooksStoreDbContext ctx) {
           context = ctx;
        }
        public IQueryable<Book> Books => context.Books;
    }
}
Now, we’re going to add the statement below to the Startup class to create a service for the IBooksStoreRepository interface that uses EFBooksStoreRepository as the implementation class:
public void ConfigureServices(IServiceCollection services)
        {
            services.AddControllersWithViews();
            services.AddDbContext<BooksStoreDbContext>(opts => {
                opts.UseSqlServer(
                   Configuration["ConnectionStrings:BooksStoreConnection"]);
            });
            services.AddScoped<IBooksStoreRepository, EFBooksStoreRepository>();
        }
The AddScoped method creates a service where each HTTP request gets its own repository object, which is the way that Entity Framework Core is typically used.
Creating the Database Migration
Entity Framework Core is able to generate the schema for the database using the data model classes through a feature called migrations. From the Tools menu, select NuGet Package Manager > Package Manager Console (PMC). In the PMC, enter the following commands:
Install-Package Microsoft.EntityFrameworkCore.Tools -Version 3.1.1
Add-Migration InitialCreate
Update-Database
We used the Add-Migration command to create a database migration and to using the Update-Database command to apply it to a database. We also installed Microsoft.EntityFrameworkCore.Tools package from nuget to use these commands.
Creating Seed Data
To populate the database and provide some sample data, I added a class file called SeedData.cs to the Models folder and defined the class with the following code:
using System.Linq;
using Microsoft.AspNetCore.Builder;
using Microsoft.Extensions.DependencyInjection;
using Microsoft.EntityFrameworkCore;

namespace BooksStore.Models
{
    public static class SeedData
    {
        public static void EnsurePopulated(IApplicationBuilder app)
        {
            BooksStoreDbContext context = app.ApplicationServices.CreateScope().ServiceProvider.GetRequiredService<BooksStoreDBContext>();
            if (context.Database.GetPendingMigrations().Any())
            {
                context.Database.Migrate();
            }
            if (!context.Books.Any())
            {
                context.Books.AddRange(
                    new Book
                    {
                        Title = "Atomic Habits",
                        Description = "An Easy & Proven Way to Build Good Habits & Break Bad Ones",
                        Genre = "Self-Help",
                        Price = 11.98m
                    },
                   new Book
                    {
                        Title = "How to Win Friends & Influence People",
                        Description = "You can go after the job you want...and get it! You can take the job you have...and improve it!",
                        Genre = "Self-Help",
                        Price = 17.46m
                    },
                    new Book
                    {
                        Title = "Rich Dad Poor Dad",
                        Description = "What the Rich Teach Their Kids About Money That the Poor and Middle Class Do Not!",
                        Genre = "Personal Finance",
                        Price = 13.41m
                    },
                    new Book
                    {
                        Title = "The Psychology of Money",
                        Description = "Doing well with money isn’t necessarily about what you know. It’s about how you behave. And behavior is hard to teach, even to really smart people.",
                        Genre = "Money Management",
                        Price = 18.69m
                    },
                    new Book
                    {
                        Title = "48 Laws of Power",
                        Description = "Amoral, cunning, ruthless, and instructive, this piercing work distills 3,000 years of the history of power into 48 well-explicated laws.",
                        Genre = "Political Science",
                        Price = 31.26m
                    }
                );
                context.SaveChanges();
            }
        }
    }
}
The final change is to seed the database when the application starts, which we have done by adding a call to the EnsurePopulated method from the Startup class with the following code:
public void Configure(IApplicationBuilder app, IWebHostEnvironment env)
  {
            ...
            app.UseEndpoints(endpoints =>
            {
                endpoints.MapControllerRoute(
                    name: "default",
                    pattern: "{controller=Home}/{action=Index}/{id?}");
            });
            SeedData.EnsurePopulated(app);
  }
Displaying a List of Books
Preparing the Controller
Preparing the Controller in the HomeController.cs File in the BooksStore/Controllers Folder by replacing the default content with the following code:
using Microsoft.AspNetCore.Mvc;
using BooksStore.Models;

namespace BooksStore.Controllers
{
    public class HomeController : Controller
    {
        private IBooksStoreRepository repository;
        public HomeController(IBooksStoreRepository repo)
        {
            repository = repo;
        }
        public IActionResult Index() => View(repository.Books);
    }
}
This is known as dependency injection, and its approach allows the HomeController object to access the application’s repository through the IStoreRepository interface without knowing which implementation class has been configured.
Updating the View
Updating the content of the Index.cshtml File in the SportsStore/Views/Home Folder with the following markup:
@model IQueryable<Book>

@foreach (var p in Model)
{
    <div>
        <h3>@p.Title</h3>
        @p.Description
        @p.Genre
        <h4>@p.Price.ToString("c")</h4>
    </div>
}
Running the application

Points of Interest
You can see from Figure above that the Index.cshtml view displays the books in the database on a single page. In next article, I will add support for pagination so that the view displays a smaller number of products on a page, and the user can move from page to page to view the overall catalog.
Recommend
About Joyk
Aggregate valuable and interesting links.
Joyk means Joy of geeK