

Streaming at Scale with Azure Event Hubs for Kafka Developers Part 1: Getting St...
source link: https://www.codeproject.com/Articles/5326318/Streaming-at-Scale-with-Azure-Event-Hubs-for-Kafka
Go to the source link to view the article. You can view the picture content, updated content and better typesetting reading experience. If the link is broken, please click the button below to view the snapshot at that time.
Streaming at Scale with Azure Event Hubs for Kafka Developers Part 1: Getting Streaming Data into Azure
This article is a sponsored article. Articles such as these are intended to provide you with information on products and services that we consider useful and of value to developers
A growing amount of data is generated every day, requiring systems that can process data streams at scale. Apache Kafka has been a stable system for stream-processing and implementing the publish–subscribe pattern at scale.
Azure Event Hubs is a fully managed publish–subscribe service that allows streams of millions of events each second without managing servers and clusters. Event Hubs also provides an endpoint compatible with Apache Kafka, which enables using Event Hubs with existing applications.
This series explores how developers can use Event Hubs, Python, and a Cosmos DB to create an end-to-end streaming solution without the need to create or manage infrastructure. It also connects Power BI to generate dashboards based on the data sent to the Cosmos DB. This article works with the example of a web application that allows users to book flights by sending the details to the Event Hub. To mimic this application, the article uses a fake Kafka producer using the Faker library to generate the data.
Before starting, be sure to set up an Azure account.
Setting Up Azure Event Hubs
Before setting up a producer to send messages, developers must set up an Event Hub to receive and send messages to consumers.
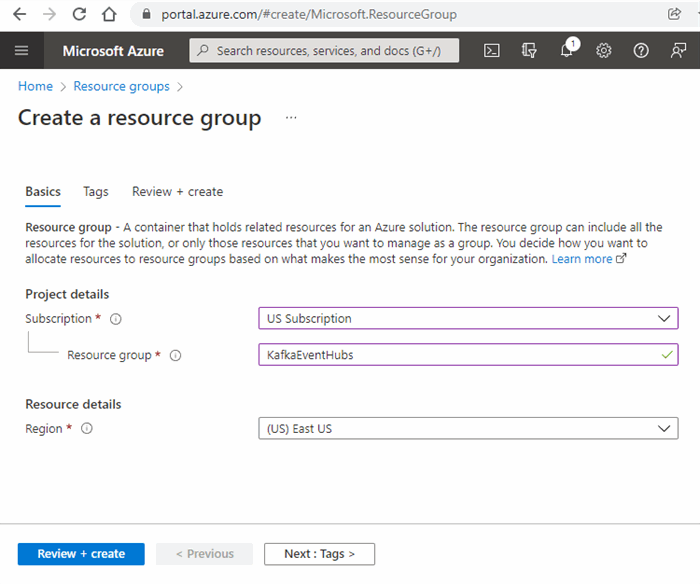
Open the Azure portal, click the Create a resource icon, and create a new resource group to hold all the application components.
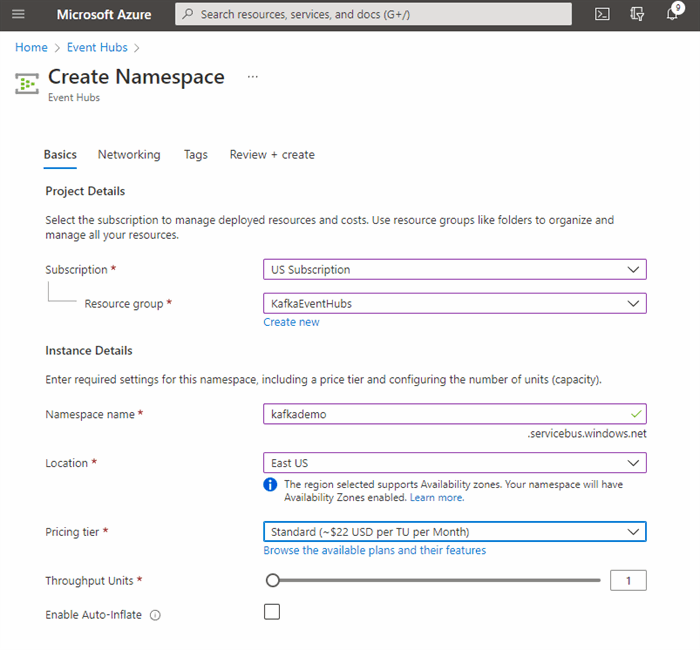
Now that we have a resource group to hold all our components, we can create a new Event Hub namespace similar to a Kafka cluster, but with no need to manage the infrastructure.
Click the Create a resource icon again and find Event Hubs. Select the resource group we created and specify a name for the namespace. Also, make sure that you select at least the standard tier to ensure the Kafka service is enabled. Once done, click Review and create to complete the new namespace.
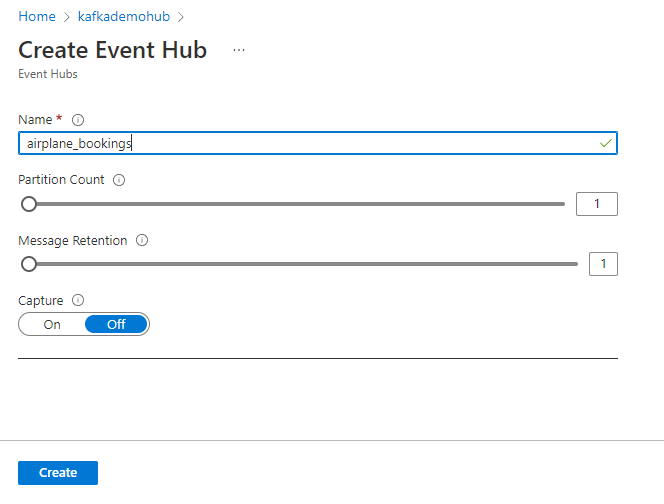
Once the Event Hub namespace is ready, open it and select the Event Hubs option from the menu list on the left. We will create a new Event Hub called airplane_bookings to act as our Kafka topic for messages. You can increase the partition count and message retention if you run large production loads on this service, but we use the defaults for this tutorial.
To gain access to this Event Hub from our Kafka client, we must pass the connection string through a method using secure authentication and security layer (SASL).
To do this, open the new topic and scroll down to the Shared access policies section. Add a new shared access policy for our web application, give it a name, and select Send permission as our application must send messages to the pipeline. When finished, open the new policy and copy the primary connection string, which we need to configure our data producer.
Data Producers
By leveraging the Kafka API for Event Hubs, we can connect our existing applications or devices without reworking any end-user devices. We configure a fake data producer that sends airplane bookings as a production web application would. To do this, we create a Linux virtual machine (VM) with Ubuntu and modify the sample Python client to use the Faker Python Library.
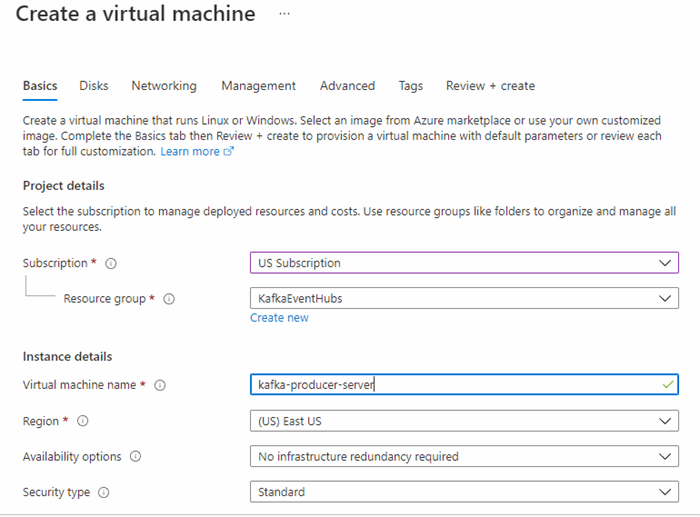
Create a VM by clicking create a resource in our resource folder and selecting the Ubuntu Server 20.04 option. Give the server a name and size, and configure the administrator account with an SSH key. Open a port so that you can log in remotely, then click Create. Make sure to download the key, and when the server has finished building, use a terminal like Putty to log into the remote server.
Now, we are going to configure a simple Python Kafka client with Faker installed by running the following commands:
sudo pip install confluent-kafka faker faker_airtravel
This installs the Confluent Kafka client, the Faker library, and the air travel community add-on. After installing these Python libraries, we create a Python file named producer.py using the code in this GitHub repository. Paste the code into a new file called producer.py or download the GitHub repository using the command git clone.
If we look at the code, we see that we pass the following five arguments:
- The Event Hub namespace
- The connection string for our Event Hub
- A topic name
- The number of messages we want to send
- The maximum number of milliseconds between messages
This configures our script to deliver random messages to our event hub as required.
Because we are using the standard Confluent Kafka client, we can see how to configure this for a real-world example by viewing the conf setting on line 20. In this configuration, we set the following:
- Kafka bootstrap server to
<your_namespace>.servicebus.windows.net:9093 - Protocol to
SASL_SSL - Certificate location to Ubuntu’s default (/usr/lib/ssl/certs/ca-certificates.crt)
- SASL mechanism to
Plain - Username to the variable
$ConnectionString - Password to the primary connection string from the SAS policy
- Set the client id to
Kafka-example-producer
After establishing this configuration, the rest of our script iterates the number of times we specify, with a random wait time between 0 and the Max wait time. Faker’s generated JSON payload includes a UID, customer name, phone number, city, country, and flight details.
We can now run our script to produce messages with the command: python3 producer.py. --namespace '<your_namespace>' --connection '<your_connection_string>' --topic '<your_topic>' --messages '<message_amount>' --time '<wait_time>'.
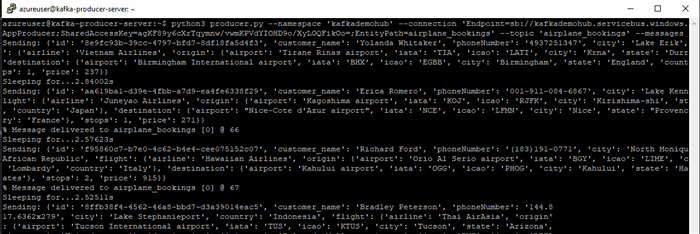
We can see the resulting JSON structure of the messages composed and sent to our Event Hub. If we open our Event Hub and look at the overview screen, we should see a spike of messages in the requests and messages graphs.
This shows that we are now pushing messages to Event Hubs using a standard Kafka application. In our Event Hub, we don’t currently have any way to retrieve messages from the pipeline or process them in any way. One potential method is to use the capture feature on the left menu, enabling us to save and view the messages on a storage account. Instead, we create several consumer applications to process the messages in a production scenario.
Next Steps
While this application only creates and sends contrived data, it demonstrates the ease of changing almost any application that uses the Kafka protocol. Typically, it is as simple as changing the configuration file to use SASL and pointing to the Event Hubs instance.
Currently, although our application sends messages into the pipeline, we don’t consume them. In the following article, we develop several Azure Functions in Python to process the payload we receive and save the data to a Cosmos DB instance.
If you'd like learn more about, or share what you know about Azure Cosmos DB, check out the Azure Cosmos DB Conf; a free online virtual developer event organized in collaboration with the Azure Cosmos DB community.
To learn how to accelerate foundational app development, check out The Developer’s 7-Step Guide to Low-Code App Development.
Recommend
About Joyk
Aggregate valuable and interesting links.
Joyk means Joy of geeK