

Using Travis CI for Deploying Mulesoft Applications to Cloudhub
source link: https://dzone.com/articles/using-travis-ci-for-deploying-mulesoft-application
Go to the source link to view the article. You can view the picture content, updated content and better typesetting reading experience. If the link is broken, please click the button below to view the snapshot at that time.

What Is Travis CI?
- Travis CI is a hosted continuous integration service used to build and test software projects hosted at GitHub and Bitbucket. Travis CI provides various paid plans for private projects and a free plan for open source.
- Travis CI is available at https://travis-ci.org/.
- https://travis-ci.org/ supports only public repositories. To support GitHub private repositories, you can use https://travis-ci.com/.
Prerequisites
To start using Travis CI, make sure you have:
- A GitHub or Bitbucket or GitLab account.
- Owner permissions for a project hosted on GitHub or Bitbucket or GitLab.
To get started with Travis CI using GitHub, follow these steps:
- Go to Travis-ci.com and Sign up with GitHub.
- Accept the Authorization of Travis CI. You’ll be redirected to GitHub.
- Click on your profile picture in the top right of your Travis Dashboard, click Settings and then on the Left-hand side, Sync Account button. This will sync all your repositories in the GitHub with Travis CI.
- Add a .travis.yml file to the root of your repository to tell Travis CI what to do. Below is the example of a travis.yml file that I used to build the integration:
language: java
jdk:
- openjdk8
cache:
directories:
- "$HOME/.m2"
before_install:
- cp .travis.settings.xml $HOME/.m2/settings.xml
jobs:
- stage: Start
name: "Application is ready"
script:
- echo "$applicationName is ready to be deployed"
- stage: Test
name: "Run Tests"
script:
- mvn clean package
- stage: Deploy #stage type
name: "Deploy stage" #stage name
script:
- mvn deploy -DmuleDeploy -Danypoint.username=$username -Danypoint.password=$password -Danypoint.environment=$environment -Danypoint.workerType=$workerType -Danypoint.businessGroup=$businessGroup -Danypoint.workers=$workers -Danypoint.appName=$applicationName -Danypoint.objectStore=$objectStore
notifications:
email:
recipients:
- [email protected]
on_success: always
on_failure: always
Add .travis.setting.xml to the root of your repository. This will have the url to all the repositories from where all the dependencies will get downloaded to build the project. Below is the example of the file used in the integration :
<settings>
<servers>
<server>
<id>anypoint-exchange-v2</id>
<username>${username}</username>
<password>${password}</password>
</server>
</servers>
<pluginGroups>
<pluginGroup>org.mule.tools</pluginGroup>
</pluginGroups>
<profiles>
<profile>
<id>mule-extra-repos</id>
<activation>
<activeByDefault>true</activeByDefault>
</activation>
<repositories>
<repository>
<id>mule-public</id>
<url>https://repository.mulesoft.org/nexus/content/repositories/public</url>
</repository>
</repositories>
<pluginRepositories>
<pluginRepository>
<id>mule-public</id>
<url>https://repository.mulesoft.org/nexus/content/repositories/public</url>
</pluginRepository>
</pluginRepositories>
</profile>
<profile>
<id>Mule</id>
<activation>
<activeByDefault>true</activeByDefault>
</activation>
<repositories>
<repository>
<id>MuleRepository</id>
<name>MuleRepository</name>
<url>https://repository.mulesoft.org/nexus-ee/content/repositories/releases-ee/</url>
<layout>default</layout>
<releases>
<enabled>true</enabled>
</releases>
<snapshots>
<enabled>true</enabled>
</snapshots>
</repository>
</repositories>
</profile>
</profiles>
</settings>
Now, for deploying Mulesoft application to Cloudhub, you need to configure mule maven plugin in POM.xml:
<cloudHubDeployment>
<uri>https://anypoint.mulesoft.com</uri>
<muleVersion>${app.runtime}</muleVersion>
<username>${anypoint.username}</username>
<password>${anypoint.password}</password>
<environment>${anypoint.environment}</environment>
<applicationName>${anypoint.appName}</applicationName>
<workerType>${anypoint.workerType}</workerType>
<workers>${anypoint.workers}</workers>
<businessGroup>${anypoint.businessGroup}</businessGroup>
<objectStoreV2>${anypoint.objectStore}</objectStoreV2>
<properties>
<key>value</key>
</properties>
</cloudHubDeployment>
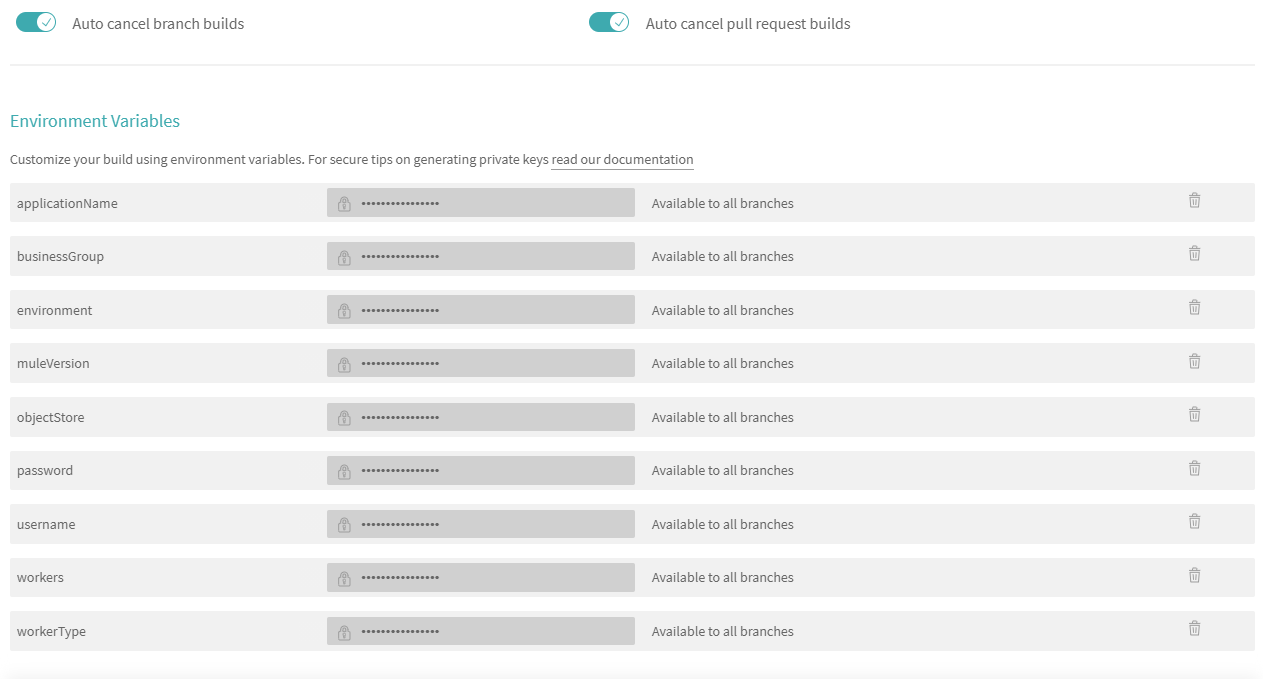
Declaring Environment Variables at Travis CI
For declaring the variable, you can activate the repository and click on settings. It will navigate to the build screen. Now click on More Options ⇒ Settings. Scroll down and it will show you the Environment Variables tab to declare your variables.
For the above code, all environment variables have been declared — required by Mule maven plugin like workers, workerType, Application Name, etc. and username and password required by .travis.settings.xml
Once all the changes are pushed to the git, and Travis CI is activated for that repository, the Continuous Integration, and Continuous Deployment process will take place. You can check the logs for further details.
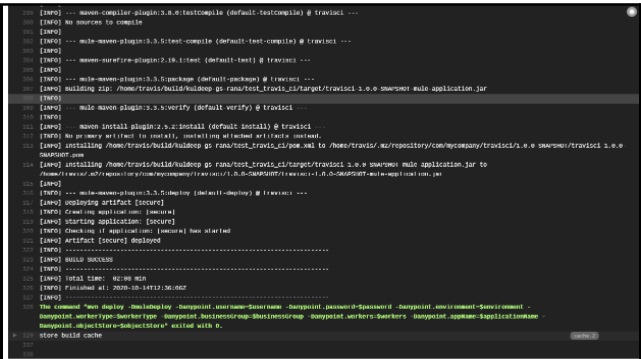
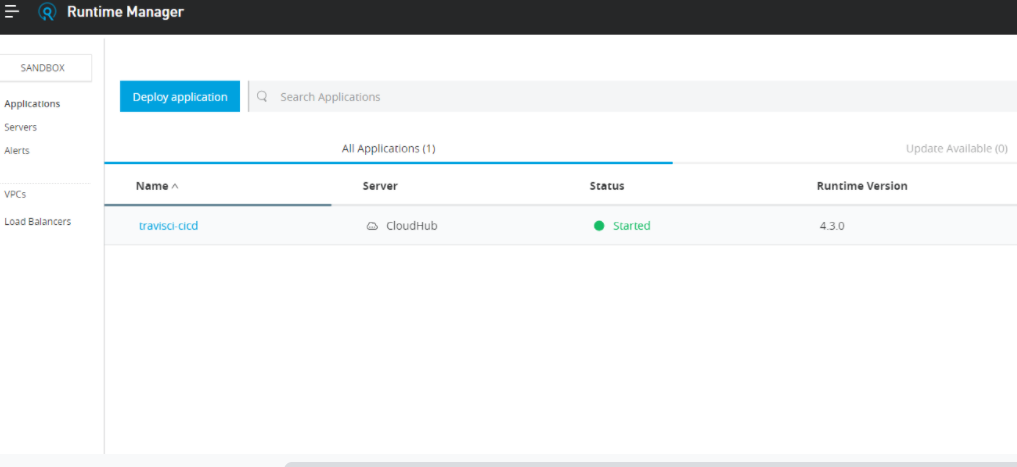
The application is successfully deployed to Cloudhub.
Reference Links
Recommend
-
38
Amazon MQ is a managed message broker service for Apache ActiveMQ, and as a result, connectivity with Amazon MQ and MuleSoft has been there since day one. Amazon MQ makes it easy to set up and operate message brokers in the cloud...
-
35
Here you are — you spent days and nights trying to create your website which is awesome and solves the problems of the future....
-
43
Today we are going to use Travis CI (free for an open-source repository) to deploy continuously a Scala.js app on Github pages. All your commit on the master branch put your static files on a gh-pages branch...
-
2
Apr 24, 2018 - 7 minute read - Comments - Not Security ...
-
8
Tutorial: Deploying and Using WebAssembly Under Deno on the Server Side Using Travis CI Jan 4, 2021 | Montana Mendy | n...
-
10
In Part 1 of this series, we looked at two features of Mule CloudHub Connector. In total, there are 5 features provided by this connector as listed below: G...
-
7
CI/CD for SpringBoot applications using Travis-CISkip to contentShare this:In this article we...
-
4
Using available MuleSoft connectors, there are three approaches that we can use to operate on the Snowflake platform: Using MuleSoft Snowflake...
-
3
In late July, I was asked to do a Proof-Of-Concept (POC) for one of our customers regarding Intune and deployment of large applications. Basically, they wanted to know how well Intune would work with application sizes in the 5 – 20 GB range. Obvio...
-
5
Design an API Specification Using MuleSoft’s Visual API Designer...
About Joyk
Aggregate valuable and interesting links.
Joyk means Joy of geeK