

How to Implement a Tag Archive Page in Jekyll
source link: https://alxddh.github.io/2019/11/12/how-to-implement-a-tag-archive-page-in-jekyll.html
Go to the source link to view the article. You can view the picture content, updated content and better typesetting reading experience. If the link is broken, please click the button below to view the snapshot at that time.

How to Implement a Tag Archive Page in Jekyll
Jekyll uses Liquid, which was created by Shopify and written in Ruby, as its template language. For making a tag archive page, we have to do a little bit of dirty work because of the lack of power of Liquid. But first, let me describe what a tag page we want to make here.
On the top of the tag archive page, there is a list of labels, for example,
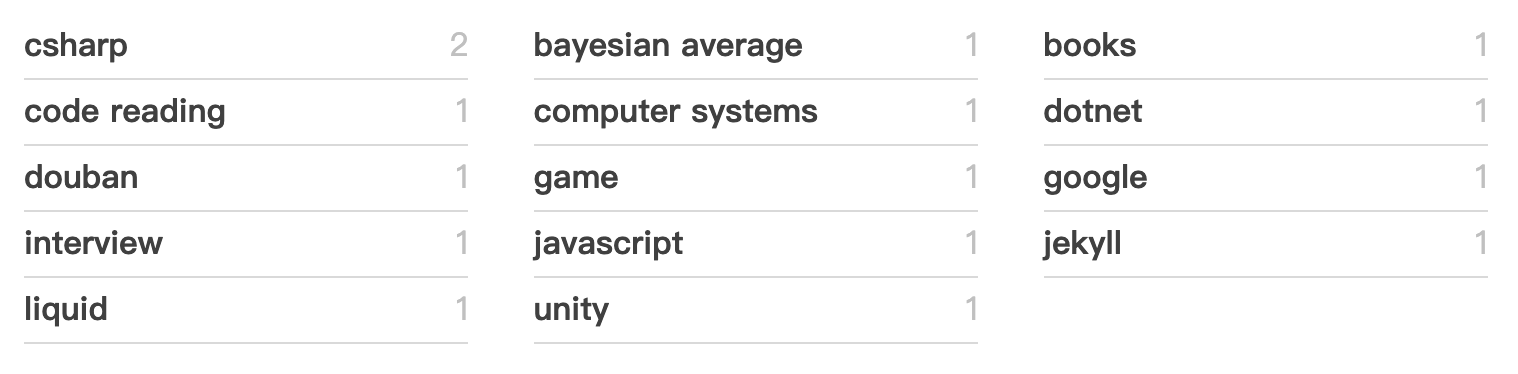
Ignoring the style, we can see that each label has a tag name and the count of tags. Besides, each label has a link to the section of the related posts list. These labels are first sorted by the counts and then by the alphabetic.
Talk is cheap. Show me the code.
OK, I show you the code now:
{% assign tags_max = 0 %}
{% for tag in site.tags %}
  {% if tag[1].size > tags_max %}
    {% assign tags_max = tag[1].size %}
  {% endif %}
{% endfor %}

{% assign tag_names_array = "" %}
{% assign tag_counts = "" %}
{% assign first_array_element = true %}
{% for i in (1..tags_max) reversed %}
  {% assign tag_names = "" %}
  {% assign first_tag = true %}

  {% for tag in site.tags %}
    {% if tag[1].size == i %}
      {% if first_tag %}
        {% assign first_tag = false %}
      {% else %}
        {% assign tag_names = tag_names | append: "," %}
      {% endif %}
      {% assign tag_names = tag_names | append: tag[0] %}
    {% endif %}
  {% endfor %}

  {% if tag_names != "" %}
    {% assign tag_names = tag_names | split: "," | sort | join: "," %}

    {% if first_array_element %}
      {% assign first_array_element = false %}
    {% else %}
      {% assign tag_names_array = tag_names_array | append: "|" %}
      {% assign tag_counts = tag_counts | append: "|" %}
    {% endif %}
    {% assign tag_names_array = tag_names_array | append: tag_names %}
    {% assign tag_counts = tag_counts | append: i %}
  {% endif %}
{% endfor %}

{% assign tag_names_array = tag_names_array | split: "|" %}
{% assign tag_counts = tag_counts | split: "|" %}


<ul class="taxonomy-index">
  {% for tag_names in tag_names_array %}
    {% assign tag_names_list = tag_names | split: "," %}
    {% assign tag_count = tag_counts[forloop.index0] %}
    {% for tag_name in tag_names_list %}
      <li>
        <a href="#{{ tag_name | slugify }}">
          <strong>{{ tag_name }}</strong> <span class="taxonomy-count">{{ tag_count }}</span>
        </a>
      </li>
    {% endfor %}
  {% endfor %}
</ul>
It looks dirty, so let us walk through the code for better understanding.
{% assign tags_max = 0 %}
{% for tag in site.tags %}
  {% if tag[1].size > tags_max %}
    {% assign tags_max = tag[1].size %}
  {% endif %}
{% endfor %}
This segment is for calculating the maximum counts of tags. {% site.tags %} is a hash of posts indexed by the tag, for example,
{
    'tech' => [<Post A>, <Post B>],
    'ruby' => [<Post B>]
}
Then we define two strings tag_names_array and tag_counts. What we want to have are two arrays, but by the lack of syntax for directly creating arrays in Liquid, we play a trick here. We use a long string to collect tag names; each element is delimited by a vertical line |, and each tag name in each element is delimited by a comma ,. For example,
"tech,ruby|jekyll|html,css,javascript"
Similarly, we also use a string to collect tag counts; each count is delimited by a vertical line |.
Next, we define an auxiliary Boolean value first_array_element. If the first element is appended to the array, it will be set to false. It is used to check whether a delimiter | should be appended to the array.
Next, we iterate from tags_max to 1, and inside this loop, we define two variables tag_names and first_tag. Their roles are similar with tag_names_array and tag_counts. Then we create an inner loop to find all tags whose count is matched with i:
{% for tag in site.tags %}
  {% if tag[1].size == i %}
    {% if first_tag %}
      {% assign first_tag = false %}
    {% else %}
      {% assign tag_names = tag_names | append: "," %}
    {% endif %}
    {% assign tag_names = tag_names | append: tag[0] %}
  {% endif %}
{% endfor %}
After escaping this loop, if tag_names is not an empty string, that means we have collected tags whose counts are equal to i. So we append tag_names to tag_names_array, and at the same time, append i to tag_counts.
{% if tag_names != "" %}
  {% assign tag_names = tag_names | split: "," | sort | join: "," %}
  {% if first_array_element %}
    {% assign first_array_element = false %}
  {% else %}
    {% assign tag_names_array = tag_names_array | append: "|" %}
    {% assign tag_counts = tag_counts | append: "|" %}
  {% endif %}
  {% assign tag_names_array = tag_names_array | append: tag_names %}
  {% assign tag_counts = tag_counts | append: i %}
{% endif %}
Now we can make two real arrays by calling split:
{% assign tag_names_array = tag_names_array | split: "|" %}
{% assign tag_counts = tag_counts | split: "|" %}
Until now, all the things we do are prepare works. Let’s do a real job: showing the list of labels.
<ul class="taxonomy-index">
  {% for tag_names in tag_names_array %}
    {% assign tag_names_list = tag_names | split: "," %}
    {% assign tag_count = tag_counts[forloop.index0] %}
    {% for tag_name in tag_names_list %}
      <li>
        <a href="#{{ tag_name | slugify }}">
          <strong>{{ tag_name }}</strong> <span class="taxonomy-count">{{ tag_count }}</span>
        </a>
      </li>
    {% endfor %}
  {% endfor %}
</ul>
At last, we need to show the post entries for each tag:
{% for tag_names in tag_names_array %}
  {% assign tag_names_list = tag_names | split: "," %}
  {% for tag_name in tag_names_list %}
    <section id="{{ tag_name | slugify | downcase }}" class="taxonomy-section">
      <h2 class="taxonomy-title">{{ tag_name }}</h2>
      {% for tag in site.tags %}
        {% if tag[0] == tag_name %}
          <div>
            {% for entry in tag.last %}
              {% comment %} Show the entry of each post in the style you like. {% endcomment %}
            {% endfor %}
          </div>
        {% endif %}
      {% endfor %}
    </section>
  {% endfor %}
{% endfor %}
Since we have finished a tag archive page, I think a category archive page is also easy to make by little modifications.
Recommend
-
59
June 24, 2018 · 5 minutes to read · 920 words I recently migrated my personal website (the source code is on GitHub ) from
-
12
Jekyll : Handling Github page build failure and Jekyll plugins on Github Jul 6, 2013 Updated 18-Nov-2013 : publish.sh script updated to publish a specific commit...
-
18
Tag Posts Excerpt Display with Archive.php Our Series Twenty Seventeen continues with an example of setting Tag Post display to excerpts using the...
-
8
Using Jekyll to archive a wordpress based blog Wednesday, December 25, 2013 I recently completed migrating my blog from Wordpress to Jekyll (complete pos...
-
8
Feb 14, 2016 - 3 minute read - Comments - Migration to Hugo
-
10
Github page Jekyll静态博客迁移到vps Github page Jekyll静态博客迁移到vps 在网上搜如何将静态博客迁移到vps 上,没找到太多详细的资料,有的文章也只是了了几句,仿佛这是一件简单到无需多言的事。开始让人摸不着头脑,无从下手。事实上并不...
-
5
Add Multiple Post Type to Category Archive Page We use cookies for commenting and analytics. For more details, please visit our privacy page.
-
6
Archive Page // Yuantops' Blog© 2012-2021 @yuantops Proudly powered by Hugo with theme Minos
-
10
Creating a Jekyll-style blog post year archive in Astro While not included in their default blog template, it is straightforward to create a year-based archive for your posts in Astro. ...
-
9
This app is available only on the App Store for iPhone, iPad, and Mac. ...
About Joyk
Aggregate valuable and interesting links.
Joyk means Joy of geeK