

Wemos D1入门
source link: https://www.cnblogs.com/bymeet/p/15138653.html
Go to the source link to view the article. You can view the picture content, updated content and better typesetting reading experience. If the link is broken, please click the button below to view the snapshot at that time.

Wemos D1入门
ESP8266特点介绍
- 802.11 b/g/n
- 内置Tensilica L106 超低功耗 32 位微型 MCU,主频支持 80 MHz 和160 MHz,支持 RTOS
- 内置10 bit高精度ADC
- 内置TCP/IP协议栈
- 内置TR 开关、balun、LNA、功率放大器和匹配网络
- 内置PLL、稳压器和电源管理组件,802.11b 模式下+20 dBm的输出功率
- A-MPDU 、 A-MSDU 的聚合和 0.4 s的保护间隔
- WiFi @ 2.4 GHz,支持 WPA/WPA2 安全模式
- 支持AT远程升级及云端OTA升级
- 支持 STA/AP/STA+AP 工作模式
- 支持 Smart Config 功能(包括 Android 和 iOS 设备)
- HSPI 、UART、I2C、I2S、IR Remote Control、PWM、GPIO
- 深度睡眠保持电流为 10 uA,关断电流小于 5 uA
- 2 ms 之内唤醒、连接并传递数据包
- 待机状态消耗功率小于1.0 mW (DTIM3)
- 工作温度范围:-40℃- 125℃
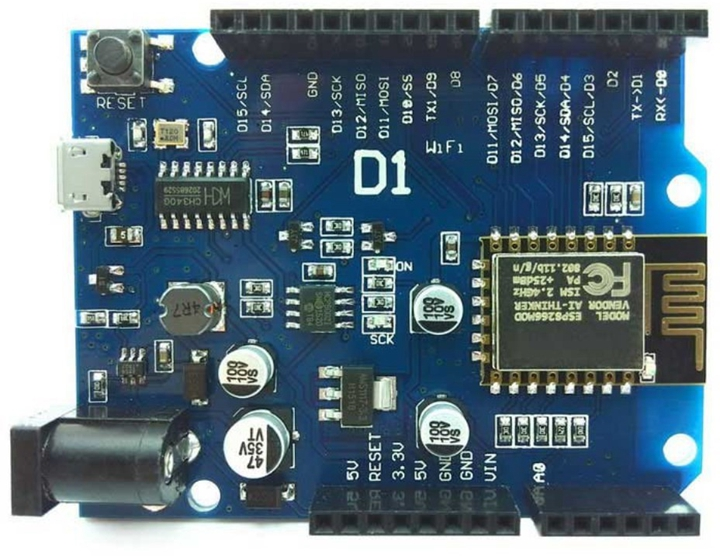
WeMos D1开发板
全称是WeMos D1 WiFI UNO R3开发板,基于ESP-8266,兼容Arduino。
有了这款物联网开发板,我们就可以愉快的使用arduino方式开发ESP8266,玩转物联网项目。
引脚
WeMos D1包含:
数字IO引脚11个。除了D0引脚外,其余引脚均支持pwm、I2C、中断、单总线。
模拟输入引脚1个(最大支持3.3v输入)。
模拟引脚仅有1个。数字引脚(包括RX,TX)共有11个
需要注意的一点是:WeMos D1上数字引脚的一侧引脚数量远大于11个,
这是因为该板上D3与D15、D4与D14、D5与D13、D6与D12、D7与D11、D9与板载LED 它们两两之间是互通的。
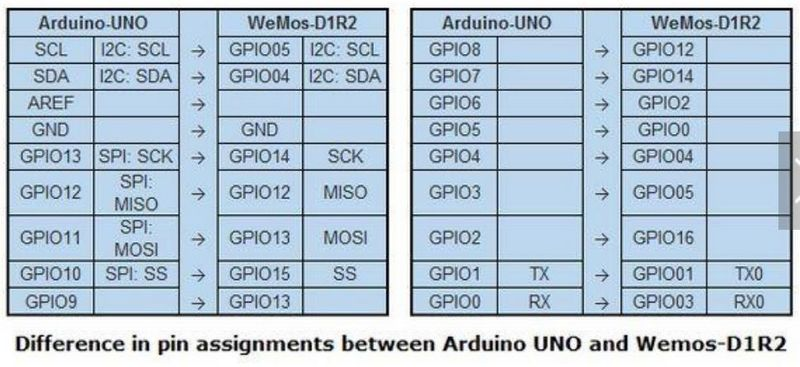
具体引脚的定义可以参考我整理的引脚定义库。
1.Arduino IDE下载
链接:https://pan.baidu.com/s/1ig6psM6GvWJk0CwqaIqs7A
提取码:uyy4
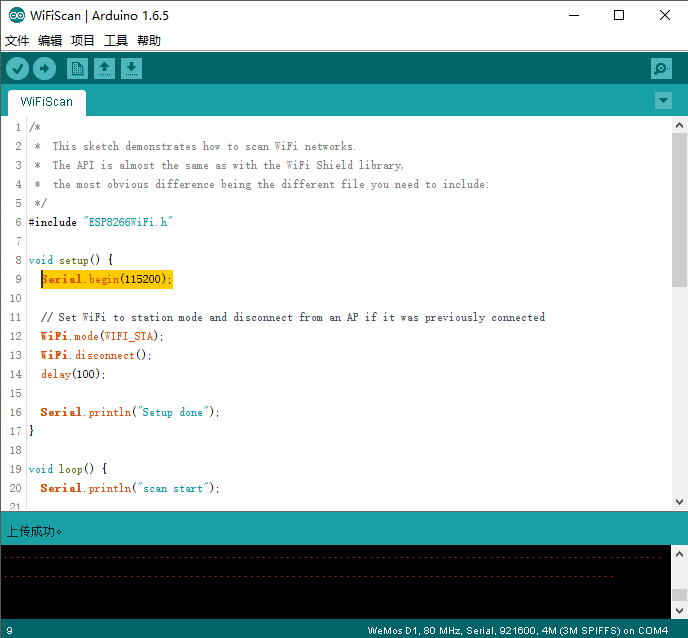
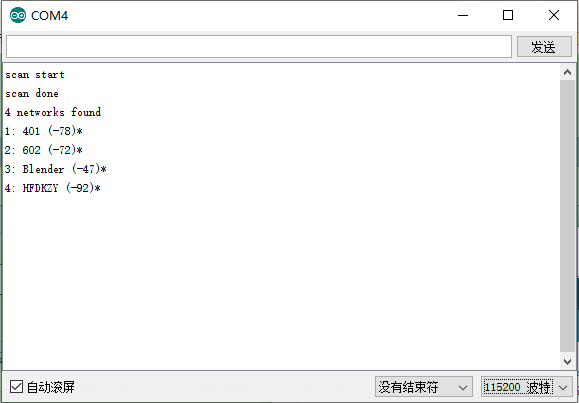
2.示例(搜索WIFI)

 1 /*
 2  *  This sketch demonstrates how to scan WiFi networks.
 3  *  The API is almost the same as with the WiFi Shield library,
 4  *  the most obvious difference being the different file you need to include:
 5  */
 6 #include "ESP8266WiFi.h"
 7
 8 void setup() {
 9   Serial.begin(115200);
10
11   // Set WiFi to station mode and disconnect from an AP if it was previously connected
12   WiFi.mode(WIFI_STA);
13   WiFi.disconnect();
14   delay(100);
15
16   Serial.println("Setup done");
17 }
18
19 void loop() {
20   Serial.println("scan start");
21
22   // WiFi.scanNetworks will return the number of networks found
23   int n = WiFi.scanNetworks();
24   Serial.println("scan done");
25   if (n == 0)
26     Serial.println("no networks found");
27   else
28   {
29     Serial.print(n);
30     Serial.println(" networks found");
31     for (int i = 0; i < n; ++i)
32     {
33       // Print SSID and RSSI for each network found
34       Serial.print(i + 1);
35       Serial.print(": ");
36       Serial.print(WiFi.SSID(i));
37       Serial.print(" (");
38       Serial.print(WiFi.RSSI(i));
39       Serial.print(")");
40       Serial.println((WiFi.encryptionType(i) == ENC_TYPE_NONE)?" ":"*");
41       delay(10);
42     }
43   }
44   Serial.println("");
45
46   // Wait a bit before scanning again
47   delay(5000);
48 }
3.WIFI搜索
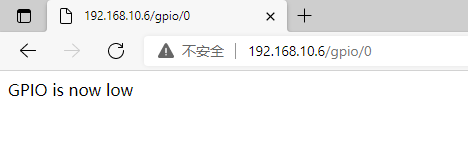
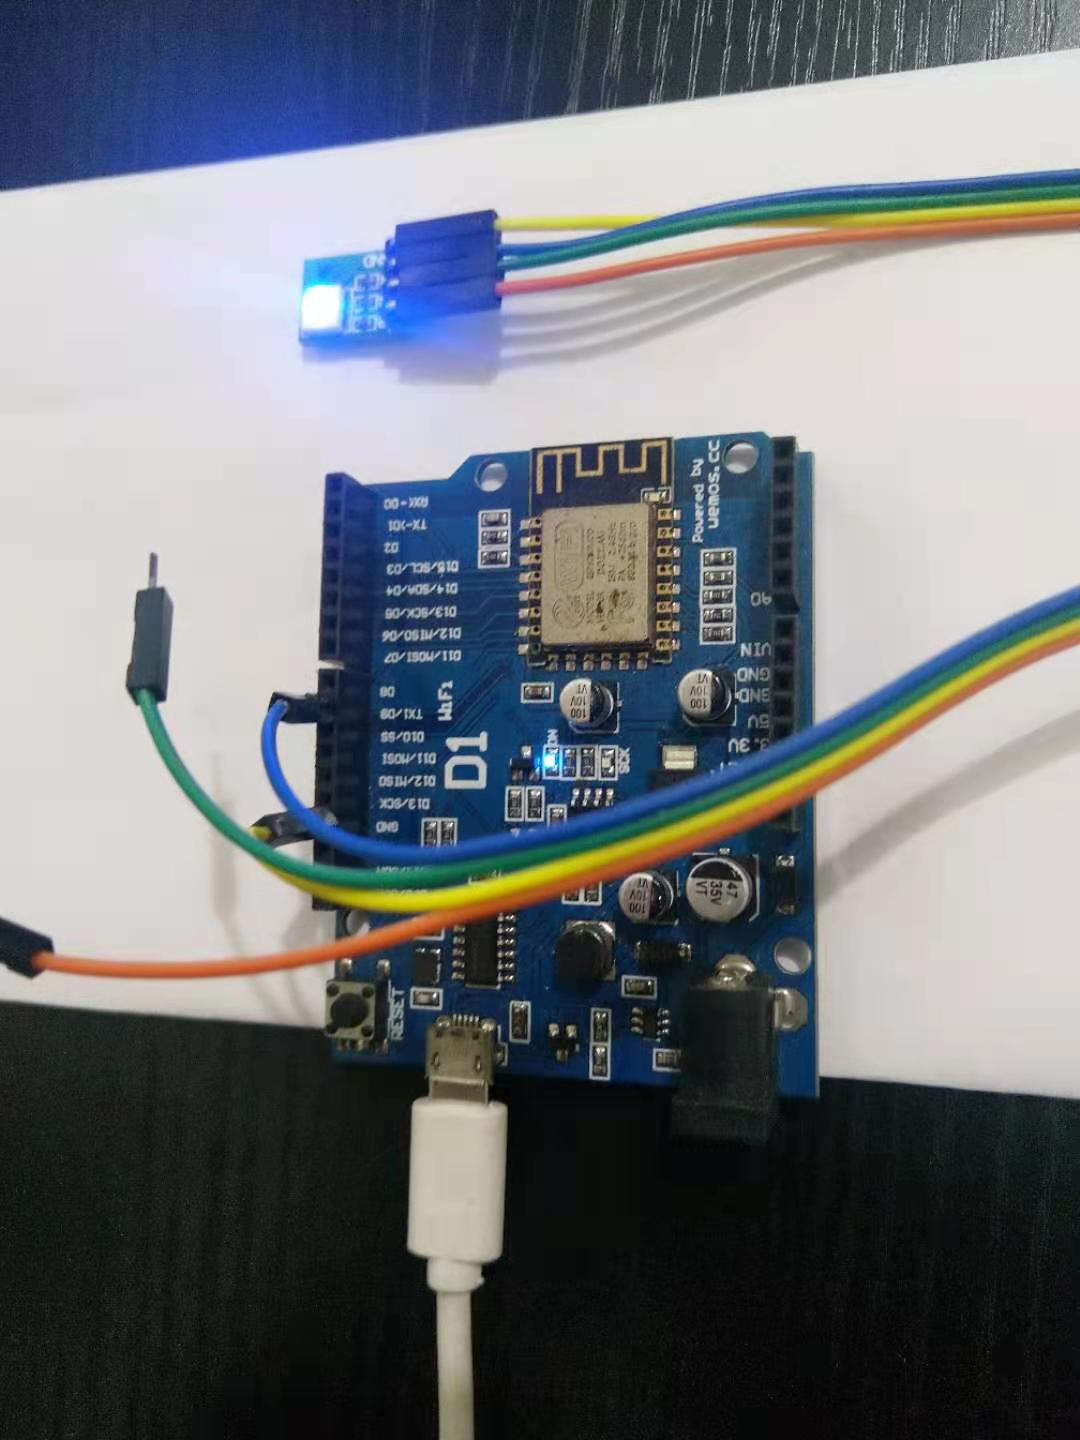
4.点灯控制
/*
 *  This sketch demonstrates how to set up a simple HTTP-like server.
 *  The server will set a GPIO pin depending on the request
 *    http://server_ip/gpio/0 will set the GPIO2 low,
 *    http://server_ip/gpio/1 will set the GPIO2 high
 *  server_ip is the IP address of the ESP8266 module, will be
 *  printed to Serial when the module is connected.
 */

#include <ESP8266WiFi.h>

const char* ssid = "your-ssid";
const char* password = "your-password";

// Create an instance of the server
// specify the port to listen on as an argument
WiFiServer server(80);

void setup() {
  Serial.begin(115200);
  delay(10);

  // prepare GPIO2
  pinMode(2, OUTPUT);
  digitalWrite(2, 0);

  // Connect to WiFi network
  Serial.println();
  Serial.println();
  Serial.print("Connecting to ");
  Serial.println(ssid);

  WiFi.begin(ssid, password);

  while (WiFi.status() != WL_CONNECTED) {
    delay(500);
    Serial.print(".");
  }
  Serial.println("");
  Serial.println("WiFi connected");

  // Start the server
  server.begin();
  Serial.println("Server started");

  // Print the IP address
  Serial.println(WiFi.localIP());
}

void loop() {
  // Check if a client has connected
  WiFiClient client = server.available();
  if (!client) {
    return;
  }

  // Wait until the client sends some data
  Serial.println("new client");
  while(!client.available()){
    delay(1);
  }

  // Read the first line of the request
  String req = client.readStringUntil('\r');
  Serial.println(req);
  client.flush();

  // Match the request
  int val;
  if (req.indexOf("/gpio/0") != -1)
    val = 0;
  else if (req.indexOf("/gpio/1") != -1)
    val = 1;
  else {
    Serial.println("invalid request");
    client.stop();
    return;
  }

  // Set GPIO2 according to the request
  digitalWrite(2, val);

  client.flush();

  // Prepare the response
  String s = "HTTP/1.1 200 OK\r\nContent-Type: text/html\r\n\r\n<!DOCTYPE HTML>\r\n<html>\r\nGPIO is now ";
  s += (val)?"high":"low";
  s += "</html>\n";

  // Send the response to the client
  client.print(s);
  delay(1);
  Serial.println("Client disonnected");

  // The client will actually be disconnected
  // when the function returns and 'client' object is detroyed
}

-------------------------------------------
个性签名:独学而无友,则孤陋而寡闻。做一个灵魂有趣的人!
万水千山总是情,打赏一分行不行,所以如果你心情还比较高兴,也是可以扫码打赏博主,哈哈哈(っ•̀ω•́)っ✎⁾⁾!


Recommend
-
136
不知道大家是否有这样的经历,有些工具的安装就能让你怀疑人生。可是我们学习的热情怎么能在开始就被浇灭呢?要给大家安利一个神奇的工具:docker。于是我们就能愉快的使用其他人封装好的软件啦。这是整理出来的入门框架做..
-
143
2017-10-16 16:37从入门到放弃,女主播过山车般的一年“感谢XX哥送上的礼物”,“谢谢亲哦么么哒”……这是一名刚刚毕业的大学女生阿宣,在一年前几乎每晚都要对着手机重复无数次的话。如今大学毕业后的阿宣已经找到了一份...
-
98
当年,那个领我入门的技术老大...(文末有彩蛋)-51CTO.COM 当年,那个领我入门的技术老大...(文末有彩蛋) 作者:佚名 2017-08-10 09:56:39
-
108
从入门到后期,这些 App 让你的照片美到飞起来少数派 · 2017-10-23这是一篇层层递进学习摄影的文章,从摄影的原理到后期,你将通过本文学到拍好照片的核心要...
-
111
最近开始尝试在项目中使用Typescript, 简单来说,Typescript是一个JavaScript的超集(即支持JavaScript的全部语法,完全兼容),TS在JavaScript的基础上增加了静态类型检查和面向对象的特性。 Typescript可以在编译阶段“降级”为ES5或ES3,以在浏览器中运行,因此Ty...
-
126
从入门到倒闭,共享汽车算是快黄了别往多了说,不到半年前,大伙儿听到“共享”二字还都感觉这是个互联网新风口,未来新方向。但这词儿搁最近,几乎已经成为了“高运营成本,低回报,骗钱”的代名词。共享单车倒得倒,黄得黄...
-
4
#IT明星不是梦#wemos D1 arduino物联网开发板应用笔记9-HTTP Client编程 前言 本节,我们开始学习wemos D1的HTTP Client编程,并实现通过HTTP GET方式获取天气信息的功能。 一、基础知...
-
10
The ProblemRecently I bought a Wemos Lolin ESP32 module. This prototyping board consists...
-
13
Wemos WEMOS LOLIN32 Lite 1 review Regular price $12.95...
-
3
fellowgeek/wemos-d1-mini-dev-board: Generic Dev Board for Wemos D1 mini Skip to content...
About Joyk
Aggregate valuable and interesting links.
Joyk means Joy of geeK