

An Example of Pushdown Using SingleStore and Spark
source link: https://dzone.com/articles/an-example-of-pushdown-using-singlestore-and-spark
Go to the source link to view the article. You can view the picture content, updated content and better typesetting reading experience. If the link is broken, please click the button below to view the snapshot at that time.

Abstract
In this article series, we’ll look at an example of query Pushdown when using the SingleStore Spark Connector. This first article will load some weather data into SingleStore using Databricks Community Edition (CE).
The notebook files used in this article series are available on GitHub in DBC, HTML, and iPython formats.
Introduction
The SingleStore Spark Connector supports the rewriting of Spark query execution plans, for both SQL and Dataframe operations, into SingleStore queries. Computation is pushed into the SingleStore system automatically. By default, query rewrites are enabled, but can be disabled using the disablePushdown option as follows:
# Pushdown enabled
spark.conf.set("spark.datasource.singlestore.disablePushdown", "false")
# Pushdown disabled
spark.conf.set("spark.datasource.singlestore.disablePushdown", "true")SingleStore also supports partial Pushdown. This enables some parts of a query to be evaluated by SingleStore and other parts to be evaluated by Spark. We’ll look at an example of this shortly. We’ll develop everything in the Cloud using the SingleStore Managed Service and Databricks CE for ease of use.
To begin with, we need to create a free Managed Service account on the SingleStore website, and a free Community Edition (CE) account on the Databricks website. At the time of writing, the Managed Service account from SingleStore comes with $500 of Credits. This is more than adequate for the case study described in this article. For Databricks CE, we need to sign-up for the free account rather than the trial version.
This is a two-part article series, and it is structured as follows:
- Load the Weather data into SingleStore.
- Demonstrate a Pushdown example.
This first article covers Part 1: Load the Weather data into SingleStore.
In our SingleStore Managed Service account, let’s use the SQL Editor to create a new database. Call this weather, as follows:
CREATE DATABASE IF NOT EXISTS weather;
We’ll run the command and check that it is completed.
We need some data for our use case. We can find actual weather data from the CORGIS Dataset Project on GitHub. The weather.csv file contains weather data for cities across the United States for 2016.
Configure Databricks CE
A previous article provides detailed instructions on how to Configure Databricks CE for use with SingleStore. We can use those exact instructions for this use case.
Upload CSV File
To use the CSV file, we need to upload it into the Databricks CE environment. A previous article provides detailed instructions on how to upload a CSV file. We can use those exact instructions for this use case.
Fill Out the Notebook
Let’s now create a new notebook. We’ll call it Data Loader for Pushdown. We’ll attach our new notebook to our Spark cluster.
In a new code cell, let’s add the following code:
from pyspark.sql.types import *
schema = StructType([
StructField("Precipitation", FloatType(), True), StructField("Date", StringType(), True), StructField("Month", IntegerType(), True), StructField("Week", IntegerType(), True), StructField("Year", IntegerType(), True), StructField("City", StringType(), True), StructField("Code", StringType(), True), StructField("Location", StringType(), True), StructField("State", StringType(), True), StructField("Avg", IntegerType(), True), StructField("Max", IntegerType(), True), StructField("Min", IntegerType(), True), StructField("Wind_Direction", IntegerType(), True), StructField("Wind_Speed", FloatType(), True)])
This schema shortens some of the original column names in the CSV file.
We’ll create a new Dataframe in the next code cell, as follows:
df = spark.read.csv("/FileStore/weather.csv",header = True,
schema = schema)
This reads the CSV file and creates a Dataframe called df. We also tell Spark that there is a header row and ask it to use the previously defined schema.
In the next code cell, let’s get the number of rows:
df.count()
Executing this, we obtain the value 16743.
In the next code cell, we’ll take a look at the structure of the Dataframe:
display(df)
Next, let’s plot the maximum and minimum temperatures for San Francisco using the following query:
display(df.select("Date", "Max", "Min").filter("City == 'San Francisco'"))The Databricks environment allows us to create simple charts. If we select a Line Chart and use Date as the Key along the x-axis and select Max and Min as the Values along the y-axis, it gives us the following plot, shown in Figure 1.
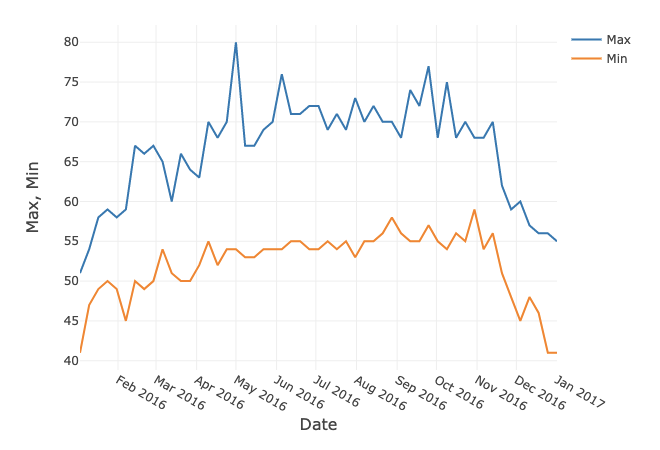
Figure 1. Max and Min in Fahrenheit for San Francisco.
We are now ready to write the Dataframe to SingleStore. In the next code cell, we can add the following:
%run ./Setup
In the Setup notebook, we need to ensure that the server address and password are added for our SingleStore Managed Service cluster.
In the next code cell, we’ll set some parameters for the SingleStore Spark Connector as follows:
spark.conf.set("spark.datasource.singlestore.ddlEndpoint", cluster)spark.conf.set("spark.datasource.singlestore.user", "admin")spark.conf.set("spark.datasource.singlestore.password", password)spark.conf.set("spark.datasource.singlestore.disablePushdown", "false")Finally, we are ready to write the Dataframe to SingleStore using the Spark Connector:
(df.write
.format("singlestore") .mode("overwrite") .save("weather.temperatures_all"))This will write the Dataframe to a table called temperatures_all in the weather database. We can check that this table was successfully created from SingleStore.
Summary
In this first article in this Pushdown series, we have successfully loaded our weather data into a Spark Dataframe, checked the number of rows, and then written the Dataframe to SingleStore using the SingleStore Spark Connector. In the next article, we'll see an example of Pushdown using our weather database.
Recommend
-
37
README.md Owl is a pars...
-
43
Introduction In SQL Server 2012, grouped (vector) aggregation was able to use parallel batch-mode execution, but only for the partial (per-thread) aggregate. The associated global aggregate always ran in row m...
-
7
RAGANWALD.COM A Brutal Look at Balanced Parentheses, Computing Machines, and Pushdown Automata As discussed in
-
14
Abstract In this final part of our Fraud Detection series, we’ll use Spark to build a Logistic Regression model from data stored in SingleStore. The notebook files used in this article series are available on
-
10
Abstract In the first part of this Pushdown series, we successfully loaded our weather data into a Spark Dataframe, checked the number of row...
-
25
Deterministic Pushdown Automata for L = a^nb^n The python code I wrote and ran for the program. It does what I want it to do for the project, but I reall...
-
7
Abstract This article is the third and final part of our Pipelines series. We'll look at replacing the Consumer part of our Producer-Consumer application by using a compelling feature of SingleStore, called Pipelines. The SQL...
-
9
IntroductionBesides being remarkably stable, performant and reliable, PostgreSQL offers a plethora of more or less known attractive features, has a
-
8
Feb 9, 2022 · By Marko GrujićREADING TIME: 9 minPostgreSQL FDW aggregation pushdown part II: Snowflake speedupWe demonstr...
-
7
Abstract SingleStore is a multi-model database system. In addition to relational data, it supports key-value, JSON, full-text search, geospatial, and time series. A
About Joyk
Aggregate valuable and interesting links.
Joyk means Joy of geeK