

Linux Fu: The Ultimate Dual Boot Laptop?
source link: https://hackaday.com/2021/11/30/linux-fu-the-ultimate-dual-boot-laptop/
Go to the source link to view the article. You can view the picture content, updated content and better typesetting reading experience. If the link is broken, please click the button below to view the snapshot at that time.
Linux Fu: The Ultimate Dual Boot Laptop?
I must confess, that I try not to run Windows any more than absolutely necessary. But for many reasons, it is occasionally necessary. In particular, I have had several laptops that are finicky with Linux. I still usually dual boot them, but I often leave Windows on them for one reason or another. I recently bought a new Dell Inspiron and the process of dual booting it turned out to be unusually effective but did bring up a few challenges.
If you ever wanted a proper dual-booting laptop, you’ll be interested in how this setup works. Sure, you can always repartition the drive, but the laptop has a relatively small drive and is set up very specifically to work with the BIOS diagnostics and recovery so it is always a pain to redo the drive without upsetting the factory tools.
Since the laptop came with a 512 GB NVMe drive, I wanted to upgrade the drive anyway. So one option would have been to put a bigger drive in and then go the normal route. That was actually my intention, but I wound up going a different way.
Bad News, Good News
Oddly enough, this all worked out because I damaged the backlight on the first Dell that I bought. I had the extended warranty, and after each “fix” it was returned in even worse shape. I escalated the support case and they offered to just give me a new computer. The catch was that they didn’t have the exact model I had, so they offered me an upgrade to an Inspiron 5510 — a bigger screen than the old one and, along with that, a fancier keyboard and bigger battery. But there was one other key feature.
That feature? Dual NVMe slots. I didn’t realize this machine had dual slots until I cracked the case open. There is a secondary short slot (2230) and a primary slot that can accommodate a 2280 (long) device or a 2230. The stock drive was a short unit in the primary slot. You’d think you could just put in another short device or flip them around. You can, but it isn’t just that easy.
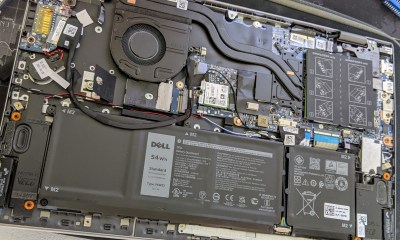 One M.2 slot is under the fan and there is another short slot to the right of the battery.
I wanted to put in a 2 TB drive of the longer form factor, so I elected to relocate the short drive to the short slot. That was easy, and the machine did boot up with no issues. I opened the BIOS to see what settings might apply to having two drives and found something interesting. The default BIOS setup was for RAID. I suppose Dell figured if you have one drive you don’t care and if you have two drives, you would probably like them to show up as a single larger drive.
Of course, a different brand laptop might not be setup this way, but it is worth checking. I was nervous that changing the mode would render the hard drive unusable. A quick search showed that some people had changed it and were not able to boot Windows again. However, there was also a fix.
RAID No More (and Bitlocker Woes)
The trick is to first boot into Windows in RAID mode and use MSCONFIG to select that the next boot should be in safe mode. Then reboot, enter the BIOS and select the normal disk configuration. Reboot into Windows safe mode. Windows will notice the disk system changed and put in the right drivers with little or no comment. Then run MSCONFIG again to turn off safe mode. The system then booted nicely.
The other thing that made me nervous was that the drive had Bitlocker encryption turned on. I’m not sure if Dell shipped it that way or if Windows 11 decided to encrypt the drive. Again, you don’t really get told about it unless you know where to look, and it is hard to opt out of it.
If your drive is encrypted, make sure you know how to get your keys now. The easiest way is to log into your Microsoft account and, in theory, all machines connected to your account should be there along with recovery keys. As I would find out, though, this isn’t always the case, so good idea to save a copy on paper or a USB drive, too.
Installation
Bracket instructions from the service manual.The next job was to install the new 2 TB drive. Again, you may have a different set of problems, but in my case, there is a little threaded bracket that installs the motherboard to accept the drive screw and it was in the position for a short NVMe drive. Removing it took a bit of effort, and then I had to push it back into another bracket to fit a long drive. The service manual explains it all. The bracket uses spring tension so it took a little force, but not too much.
I found a nice guide for upgrading exactly this computer on YouTube. If you are working on a different laptop, it might pay to search for something similar.
With the drive installed and the back loosely attached, I was happy to see the BIOS recognized the drive with no problems.
Send in the Clones
There are many ways to clone a Windows drive. I used Macrium Reflect which has a free tier that is all you need for this task. Honestly, you should really back things up before doing surgery like this, but I will confess that I didn’t. As a practical matter, I didn’t have anything on there that I couldn’t stand to lose.
Reflect is able to automatically expand the Windows partition as it clones and it also takes off encryption on the copy. Sort of. The copy went fine, but it turns out Windows 11 automatically encrypts a drive when it notes that is possible — at least, by default. Luckily, I figured this out and printed out the new encryption key. However, this will turn out to not be as smart as it sounds.
Boot to the Head
Of course, modern UEFI booting isn’t as simple as the old-fashioned kind, so a reboot after the clone still put me on the old drive and forcing a boot with the BIOS did get me prompted for the decryption key one time. Feeling pleased with myself, I threw away the printout of the decryption key but before I did, I tore it up. After all, now that Windows booted, it would be in my account, right?
You can guess this was a bad assumption on my part. Here’s what I should have done: I should have disabled the old drive in the BIOS and tested rebooting without it. That’s what you should do. That’s not what I did. Turns out, the BIOS was still booting from the UEFI partition on the old drive and redirecting to the new drive. So formatting the old drive made the computer fail to boot with the usual mystery non-specific error code and meaningless log file entries. I could boot Linux from a USB drive but with everything encrypted, it wasn’t easy to figure out what to do.
Booting a Windows repair disk was fine, but it needed the decryption key that was in pieces at the bottom of the trash. My Microsoft account still showed the old key for the original hard drive. Luckily, even though it was trash day, the garbage truck hadn’t made it to me yet, so I went dumpster diving for the pieces of my key. With the key, the startup repair still couldn’t fix everything. But at least I could boot to a command prompt and run the usual commands. Finally, I had a bootable system.
No Account
Unfortunately, the Microsoft account issue persisted. There seemed to be no way to force the key to save. The Internet claims there is an option to save the key to the account, but in Windows 11 home edition with the automatic encryption, that doesn’t seem to be the case. The answer was to remove the Microsoft accounts from the machine and then re-enroll the accounts. I suspect this might not have been a problem if I had not had multiple accounts associated, but who knows?
In all fairness, this wasn’t a critical problem as long as you keep your keys backed up anyway (which I don’t). But it was odd that it just silently encrypted the drive and then failed to store the keys for you.
After that, installing Linux to the original drive went fine. GRUB, of course, can easily boot the machine in whatever configuration you like, and is easy to change. You have to do all the usual dual boot stuff like set your Linux clock to local time so you don’t get the time confused on each reboot.
If you prefer a short summary:
- Some laptops have two drive slots so you can use one for Linux. Look for that option if you’re interested.
- Your laptop may have RAID configured by default
- Booting a cloned copy of Windows has some challenges
- Windows 11 may encrypt your drive without telling you and not save the recovery key to your Microsoft account
In the end, though, it all worked out and now I have my choice of operating environments. Linux found the audio, network, and camera with no problems. It helps, too, that the 5510 is pretty vanilla and doesn’t have things like detachable screens and rotation sensors that often confuse Linux on other laptops.
Of course, you could just wipe everything and install Linux or do a traditional dual boot setup. Or build your own laptop and do what you want. You can even do that with a Raspberry Pi.
Recommend
About Joyk
Aggregate valuable and interesting links.
Joyk means Joy of geeK