

在Kubernetes上使用Bitfusion进行TensorFlow深度学习
source link: https://my.oschina.net/u/4238514/blog/4411002
Go to the source link to view the article. You can view the picture content, updated content and better typesetting reading experience. If the link is broken, please click the button below to view the snapshot at that time.

在Kubernetes上使用Bitfusion进行TensorFlow深度学习 - VMware中国研发中心的个人空间 - OSCHINA - 中文开源技术交流社区
*本文作者系VMware研发工程师 尹皓正
背景介绍
随着 AI 技术的快速发展,越来越多的企业开始将 AI 技术应用到自身业务之中。目前,云端 AI 算力主要由三类 AI 加速器来提供:GPU,FPGA 和 AI ASIC 芯片。这些加速器的优点是性能非常高,缺点是 成本高昂,缺少异构加速管理和调度。大部分企业因无法构建高效的加速器资源池,而不得不独占式地使用这些昂贵的加速器资源,导致 资源利用率低,成本高。
以 GPU 为例,通过创新的 Bitfusion GPU 虚拟化技术,能够帮助用户无需任务修改就能透明地共享和使用数据中心内任何服务器之上的 AI 加速器,不但能够帮助用户提高资源利用率,而且可以 极大便利 AI 应用的部署,构建数据中心级的 AI 加速器资源池。
Bitfusion通过提供远程GPU池来帮助解决这些问题。Bitfusion使GPU成为头等公民,可以像传统的计算资源一样抽象、分区、自动化和共享。另一方面,Kubernetes已经成为部署和管理机器学习负载的平台。
本文通过介绍使用最新开发的Bitfusion Device Plugin,如何快捷在Kubernetes上使用Bitfusion提供的GPU资源池进TensorFlow行流行的TensorFlow深度学习开发。
概念理解
先来简要介绍一下kubernetes这两个模块:
Extended Resource: 一种自定义资源扩展的方式,将资源的名称和总数量上报给API server,而Scheduler则根据使用该资源pod的创建和删除,做资源可用量的加减法,进而在调度时刻判断是否有满足资源条件的节点。目前这里的Extended Resource的增加和减少单元必须是整数,比如你可以分配1个GPU,但是不能分配0.5个GPU。该功能由于只是替代了Opaque integer resources,做了些更名的工作,所以在1.8已经是稳定的状态了。
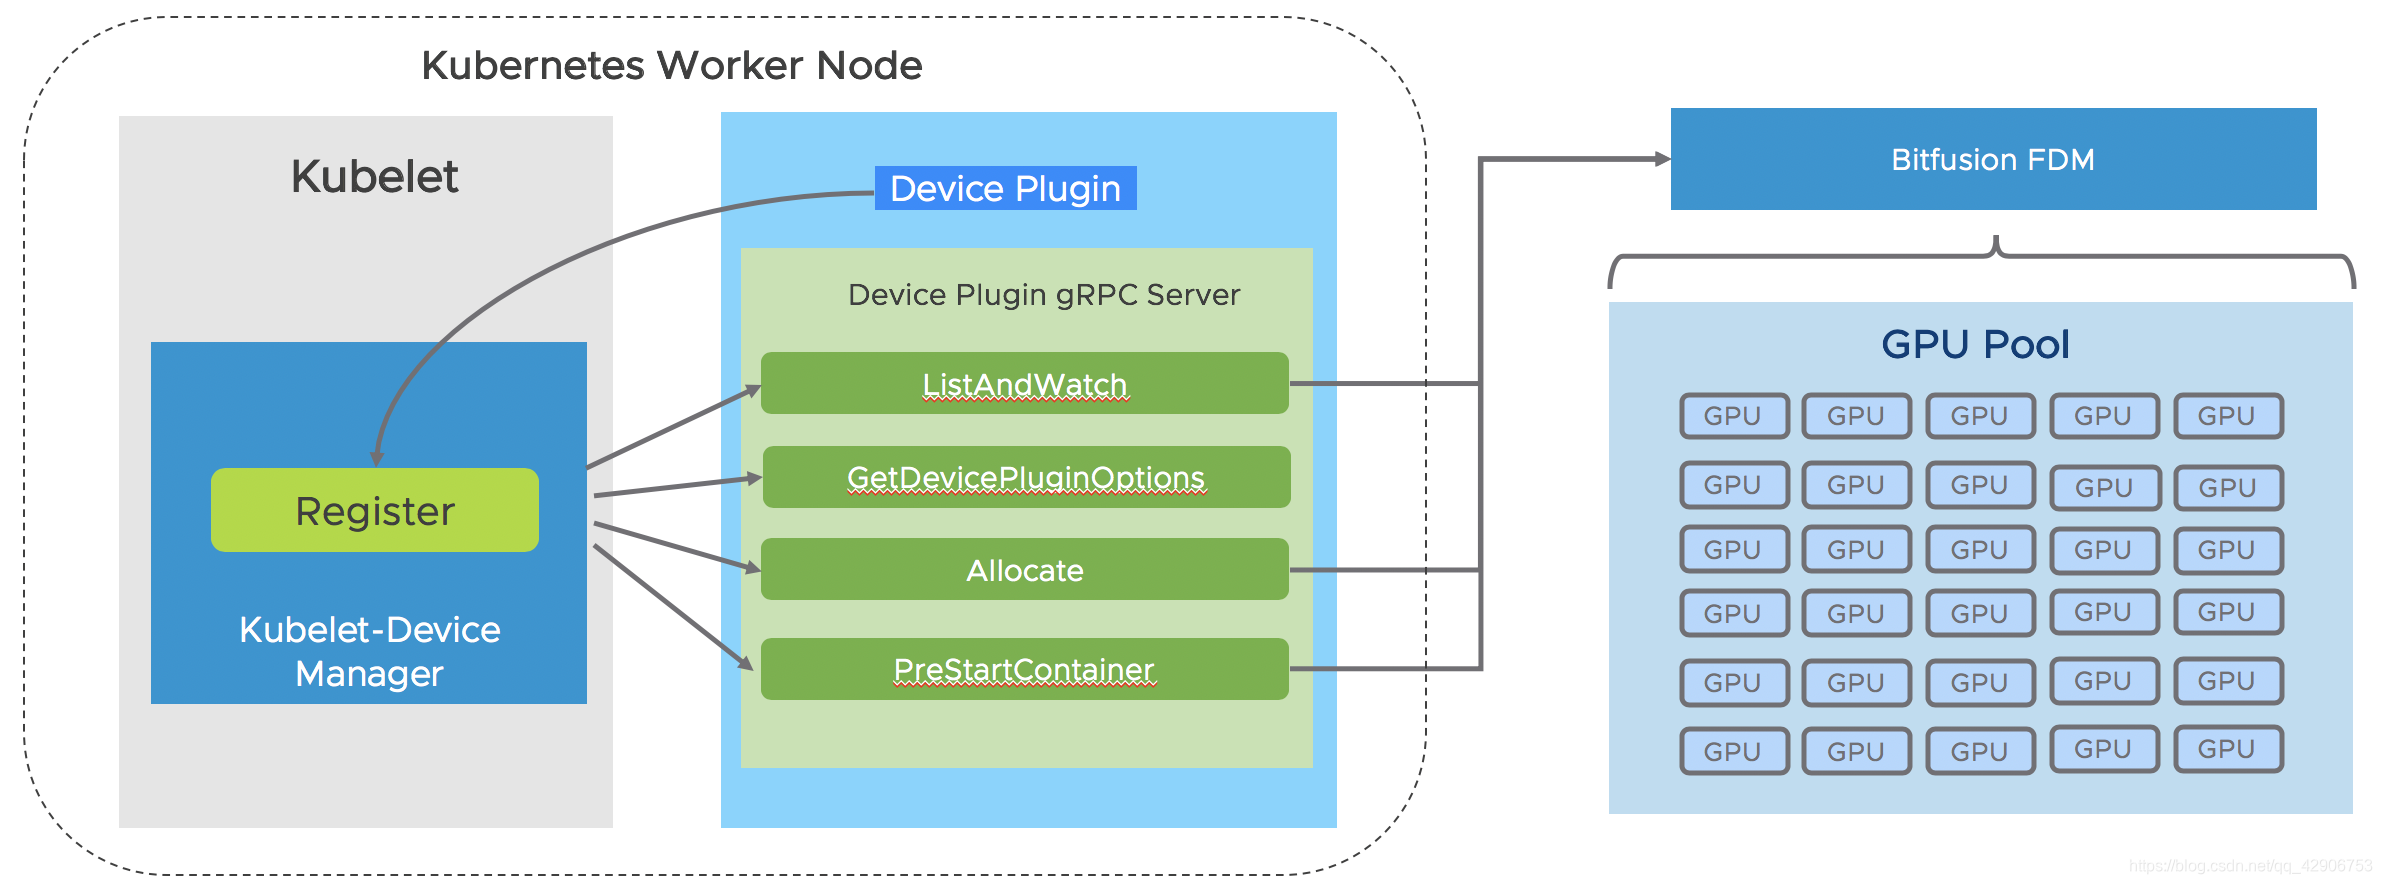
Device Plugin:通过提供通用设备插件机制和标准的设备API接口。这样设备厂商只需要实现相应的API接口,无需修改Kubelet主干代码,就可以实现支持GPU、FPGA、高性能 NIC、InfiniBand 等各种设备的扩展。该能力在Kubernetes 1.8和1.9版本处于Alpha版本,在1.10会进入Beta版本。需要通过feature gate打开, 即配置 --feature-gates=DevicePlugins=true
如图所示,目前我们的处理层在通过device plugin控制单反方面做pod的资源控制,然后由pod内的Bitfusion Client 和 Bitfusion Server 在CUDA driver级别进行交互,在BitfusionClient的软件堆栈中有一个CUDA driver的代理,通过它截获Client上的所有CUDA服务访问,通过网络将数据和服务请求发送给BitfusionServer进行处理。
Bitfusion Device Plugin安装及使用步骤
以下例子以Kubernetes v1.17.5和Ubuntu 18.04作为安装环境,阐述Bitfusion Device Plugin搭建TensorFlow环境进行Benchmarks测试。目前项目及容器镜像托管在研发内部服务器。如无法访问,可通过VMware客户代表联系我们。
首先我们下载Bitfusion Device Plugin项目
目前项目的代码以及bitfusion-base暂时未公开,可通过联系我们或者客户代表获得。获得后,可继续执行下面操作。
我们需要先构建 Device Plugin 的docker image 由于想知道该平台的一个整体性能,所以想要跑些Benchmarks,可以从我们提供的 Dockerfile 中构建Docker image:

然后配置Bitfusion Device Plugin的yaml文件
Bitfusion Device Plugin 是符合 Kubernetes device plugin 接口规范的设备扩展插件。可以无缝地在一个 Kubernetes 集群里添加 bitfusion.io/gpu 资源,从而在部署应用的时候,在容器中使用 bitfusion。
修改如下,更新 device_plugin.yml 文件中的 image ,Device Plugin 将以 DaemonSet 安装在Kubernetes 节点上。
apiVersion: apps/v1
kind: DaemonSet
metadata:
 name: bitfusion-cli-device-plugin
 namespace: kube-system
 labels:
 tier: node
spec:
 hostNetwork: true
 containers:
 - name: device-plugin-ctr
 image: bitfusion_device_plugin/bitfusion-device:v0.1
 securityContext:
 privileged: true
 command: ["./start.sh"]
 env:
 - name: REG_EXP_SFC
 valueFrom:
 configMapKeyRef:
 name: configmap
 key: reg-exp
 - name: SOCKET_NAME
 valueFrom:
 configMapKeyRef:
 name: configmap
 key: socket-name
 - name: RESOURCE_NAME
 valueFrom:
 configMapKeyRef:
 name: configmap
 key: resource-name
 volumeMounts:
 - mountPath: "/root/.bitfusion"
 name: bitfusion-cli
 - mountPath: /gopath/run
 name: docker
 - mountPath: /gopath/proc
 name: proc
 - mountPath: "/root/.ssh/id_rsa"
 name: ssh-key
 - mountPath: "/var/lib/kubelet"
 name: kubelet-socket
 - mountPath: "/etc/kubernetes/pki"
 name: pki
 volumes:
 - name: bitfusion-cli
 hostPath:
 path: "/root/.bitfusion"
 - name: docker
 hostPath:
 path: /var/run
 - name: proc
 hostPath:
 path: /proc
 - hostPath:
 path: "/root/.ssh/id_rsa"
 name: ssh-key
 - hostPath:
 path: "/var/lib/kubelet"
 name: kubelet-socket
 - hostPath:
 path: "/etc/kubernetes/pki"
 name: pki
然后使用以下命令进行部署
kubeclt apply -f bitfusion-device-plugin/device_plugin.yml
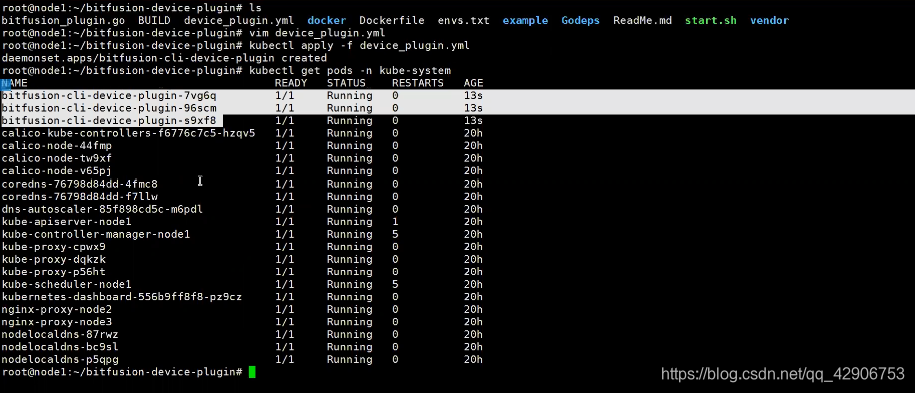
执行完成后,等待一段时间,如果成功部署,可以看到Bitfusion Device Plugin 的状态为Running,日志打印出当前device-plugin的状态

构建TensorFlow image进行Benchmarks测试
我们已经提供了bitfusion-base镜像,以及构建好的bitfusion-tfl-cli镜像,可以直接拉取使用,或者按照需求自行构建。
docker build -f bitfusion-device-plugin/docker/bitfusion-tfl-cli/Dockerfile -t bitfusion-tfl-cli:v0.1
FROM bitfusion-base:v0.1
RUN conda install tensorflow-gpu==1.13.1
在 pod.yaml 中添加标签,并且参考如下修改 参数:
- resource limit:可以设置应用能使用的 bitfusion.io/gpu 的数目;
配置 pod bitfusion-device-plugin/example/pod/pod.yaml
---
apiVersion: v1
kind: ConfigMap
metadata:
 name: bfs-pod-configmap
---

apiVersion: v1
kind: Pod
metadata:
 name: bfs-demo
 labels:
 purpose: device-demo
spec:
 hostNetwork: true
 containers:
 - name: demo
 image: bitfusion-tfl-cli:v0.1
 imagePullPolicy: Always
 workingDir: /root
 securityContext:
 privileged: true
 command: ["/bin/bash", "-c", "--"]
 args: ["python /benchmarks/scripts/tf_cnn_benchmarks/tf_cnn_benchmarks.py
 --local_parameter_device=gpu
 --batch_size=32
 --model=inception3 "]
 volumeMounts:
 - mountPath: "/root/.bitfusion"
 name: config-volume
 resources:
 limits:
 bitfusion.io/gpu: 1
 volumes:
 - name: config-volume
 hostPath:
 path: "/root/.bitfusion"
Kubernetes上跑TensorFlow的benchmark进行测试
TensorFlow有自己的官方Benchmarks:tensorflow/benchmarks,里面的tf_cnn_benchmarks包含了resnet50, resnet152, inception3, vgg16, googlenet, alexnet等模型,只需要简单地提供一些参数,便可开始测试。
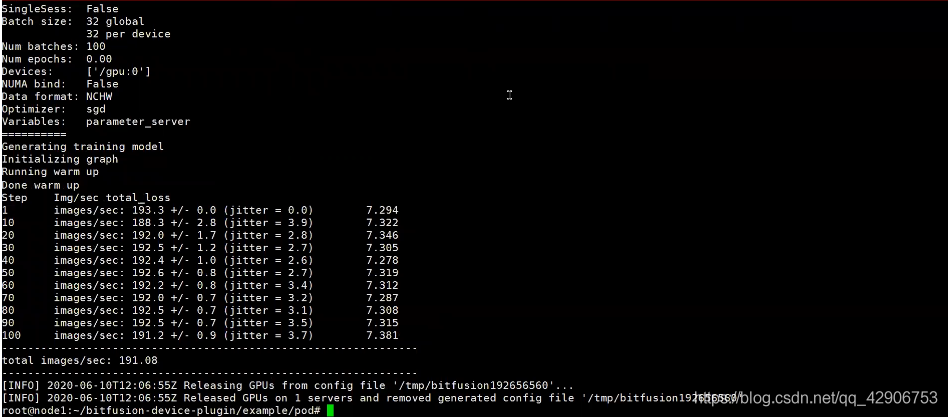
这里我们选择inception3模型来做基准测试,观察pod内的bitfusion client 是否成功和bitfusion server打通
kubeclt apply -f bitfusion-device-plugin/example/pod/pod.yaml
执行完之后,等待一段时间,default 项目中可以看到 bfs-demo 的 Pod。
如果部署成功, Pod的log显示:
Recommend
About Joyk
Aggregate valuable and interesting links.
Joyk means Joy of geeK