

Dependency Injection Lifetimes in ASP.NET Core
source link: https://code-maze.com/dependency-injection-lifetimes-aspnet-core/
Go to the source link to view the article. You can view the picture content, updated content and better typesetting reading experience. If the link is broken, please click the button below to view the snapshot at that time.
Dependency Injection Lifetimes in ASP.NET Core
Posted by Muhammed Saleem | Updated Date Nov 23, 2021 | 0
BLACK FRIDAY DEAL IS ON! GET YOUR MATERIALS AT 40% OFF
Want to build great APIs? Or become even better at it? Check our program Ultimate ASP.NET Core Web API and learn how to create a full production-ready ASP.NET Core API using only the latest .NET technologies. Bonus materials included!
While registering our services in the ASP.NET Core DI container, we can configure them with different lifetimes. In this article, we are going to talk about the different dependency injection lifetimes.
We have divided this article into the following sections:
So without further ado, let’s dive into the details.
What is Dependency Injection Lifetime?
Dependency injection is the technique of providing an object its dependencies (which are nothing but other objects) instead of having it construct them itself. It helps us adhere to the Inversion of Control (IoC) design principle more easily. We have discussed this concept in detail in our Dependency Injection in ASP.NET Core article.
We’ve mentioned different ways in which we can register the dependencies based on what lifetime we require for them. Let’s refresh our memories on the different registration lifetimes available in .NET Core:
- Transient – created each time they’re requested from the service container
- Scoped – created once per client request and is reused within that request
- Singleton – created only once and is reused across the application’s lifetime
We can register these services with the AddTransient(), AddScoped() and AddSingleton() methods respectively.
For an ASP.NET Core application, we can represent the lifetime of injected services this way:
While a singleton instance has the application’s lifetime, a scoped instance lives within a request. In the case of a transient instance, it is created every time we request for it – for example, whenever it is injected into a controller or a service.
In this article, let’s deep dive into each of these service registration lifetimes. We are going to register services using each of these methods and observe how they behave. So without any further delay, let’s proceed to build an ASP.NET Core application to see them in action.
An Example ASP.NET Core Application with Dependencies
We are going to build an ASP.NET Core Web API application and add some dependencies to it.
We’ll start by creating a service. For that, first, let’s define an interface IMyService with a property InstanceId:
public interface IMyService
{
    string InstanceId { get; }
}
Now we are going to create three interfaces implementing the IMyService interface. This will enable us to inject the same service with different lifetime scopes into the application.
First, let’s create the IMyTransientService interface:
public interface IMyTransientService : IMyService
{
}
Then, let’s create the IMyScopedService interface:
public interface IMyScopedService : IMyService
{
}
After that, let’s create the IMySingletonService interface:
public interface IMySingletonService : IMyService
{
}
Finally, let’s create the MyService class by implementing all the above interfaces:
public class MyService : IMyTransientService, IMyScopedService, IMySingletonService
{
    public string InstanceId { get; } = Guid.NewGuid().ToString();
}
Inside the MyService class, we have initialized the InstanceId property with a new GUID. This will ensure that each time we create a new object it will have a unique InstanceId.
Creating the Controller
Now let’s get into our ValuesController class. In the controller, we are going to request the service three times using the three different interfaces. This will help us to understand how different lifetime scopes work:
public class ValuesController : ControllerBase
{
    public readonly ILogger _logger;
    public readonly IMyTransientService _myTransientService;
    public readonly IMyScopedService _myScopedService;
    public readonly IMySingletonService _mySingletonService;

    public ValuesController(
        IMyTransientService myTransientService,
        IMyScopedService myScopedService,
        IMySingletonService mySingletonService,
        ILogger<ValuesController> logger
        )
    {
        _logger = logger;
        _myTransientService = myTransientService ?? throw new ArgumentNullException(nameof(myTransientService));
        _myScopedService = myScopedService ?? throw new ArgumentNullException(nameof(myScopedService));
        _mySingletonService = mySingletonService ?? throw new ArgumentNullException(nameof(mySingletonService));
    }

    [HttpGet]
    public IActionResult Get()
    {
        _logger.LogInformation("Transient: " + _myTransientService.InstanceId);
        _logger.LogInformation("Scoped: " + _myScopedService.InstanceId);
        _logger.LogInformation("Singleton: " + _mySingletonService.InstanceId);

        return Ok();
    }
}
Additionally, we have injected the ILogger interface for enabling logging. Finally, in the Get() action method, we just log the InstanceId of each service instance.
Configuring the Middleware
The next step is building a custom middleware and injecting the services. Middleware is software that is plugged into the ASP.NET Core pipeline and when we configure a middleware, each request will pass through it.
So let’s create the MyMiddleware class:
public class MyMiddleware
{
    private readonly RequestDelegate _next;
    private readonly ILogger _logger;
    public readonly IMySingletonService _mySingletonService;

    public MyMiddleware(RequestDelegate next, ILogger<MyMiddleware> logger,
        IMySingletonService mySingletonService)
    {
        _logger = logger;
        _mySingletonService = mySingletonService;
        _next = next;
    }

    public async Task InvokeAsync(HttpContext context,
        IMyScopedService myScopedService, IMyTransientService myTransientService)
    {
        _logger.LogInformation("Transient: " + myTransientService.InstanceId);
        _logger.LogInformation("Scoped: " + myScopedService.InstanceId);
        _logger.LogInformation("Singleton: " + _mySingletonService.InstanceId);

        await _next(context);
    }
}
In the middleware, apart from the RequestDelegate that is required for middleware processing, we inject the ILogger for enabling logging support. Additionally, we inject the MyService object using different lifetime scopes as we did for the controller.
While injecting services with different lifetimes into another there are a few things that we should take into account. We should never inject Scoped & Transient services into Singleton service because this effectively converts the transient or scoped service into the singleton. Similarly, we should never inject Transient services into Scoped service as this converts the Transient service into the Scoped.
ASP.NET Core creates just a single instance of a middleware to process multiple requests and so they behave similarly to a singleton service. Keeping this in mind we should resolve the transient and scoped service in the InvokeAsync() method so that the middleware doesn’t override their behavior.
In the InvokeAsync method, we just log the InstanceId of each service instance before calling the next component in the pipeline.
Along with that, let’s create a MyMiddlewareExtensions class for defining a method that can be used to hook the middleware into the application pipeline:
public static class MyMiddlewareExtensions
{
    public static IApplicationBuilder UseMyMiddleware(this IApplicationBuilder builder)
    {
        return builder.UseMiddleware<MyMiddleware>();
    }
}
Finally, let’s add the services and middleware in the Startup class.
First, we need to configure the services in the ConfigureServices() method:
public void ConfigureServices(IServiceCollection services)
{
    ...
    services.AddControllers();
    services.AddTransient<IMyTransientService, MyService>();
    services.AddScoped<IMyScopedService, MyService>();
    services.AddSingleton<IMySingletonService, MyService>();
}
Note that we have configured the IMyTransientService as Transient, IMyScopedService as Scoped, and IMySingletonService as Singleton services.
For adding the middleware, we can call the app.UseMyMiddleware() in the Configure() method:
public void Configure(IApplicationBuilder app, IWebHostEnvironment env)
{
    ...
    app.UseAuthorization();
    app.UseMyMiddleware();
    app.UseEndpoints(endpoints =>
    {
        endpoints.MapControllers();
    });
}
We have configured the services and middleware.
Additionally, let’s modify the program class to add console logging support:
public static IHostBuilder CreateHostBuilder(string[] args) =>
    Host.CreateDefaultBuilder(args)
        .ConfigureLogging(logging =>
        {
            logging.ClearProviders();
            logging.AddConsole();
        })
        .ConfigureWebHostDefaults(webBuilder =>
        {
            webBuilder.UseStartup<Startup>();
        });
}
About the New .NET 6 Templates
If we’re using the new .NET 6 template without a Startup class, we can configure the services in the Program class.
In older templates, we had two classes for configuring the application- Program, and Startup. The program class builds and runs the application whereas the startup class is where we make our configuration changes such as adding a database connection, registering the services, etc.
However, with the new .NET 6 template, these two classes are now merged into the Program class. Furthermore, with the elimination of namespace, class, and main method, we can just start with the code to create the WebApplicationBuilder instance and configure the settings for the application in the Program class:
var builder = WebApplication.CreateBuilder(args);
builder.Services.AddEndpointsApiExplorer();

builder.Services.AddTransient<IMyTransientService, MyService>();
builder.Services.AddSingleton<IMyScopedService, MyService>();
builder.Services.AddSingleton<IMySingletonService, MyService>();

var app = builder.Build();
...
app.UseHttpsRedirection();
app.UseMyMiddleware();
That’s it. Our application is ready.
Now let’s run it and verify the behavior of the service with different registration lifetimes.
Different Dependency Injection Lifetimes
Let’s run the application and invoke the GET endpoint and make the request two times. This is important because we want to see how lifetimes work within the same request, and between requests.
We can see the logs coming from the middleware as well as the controller for each request. Middleware is highlighted in red.
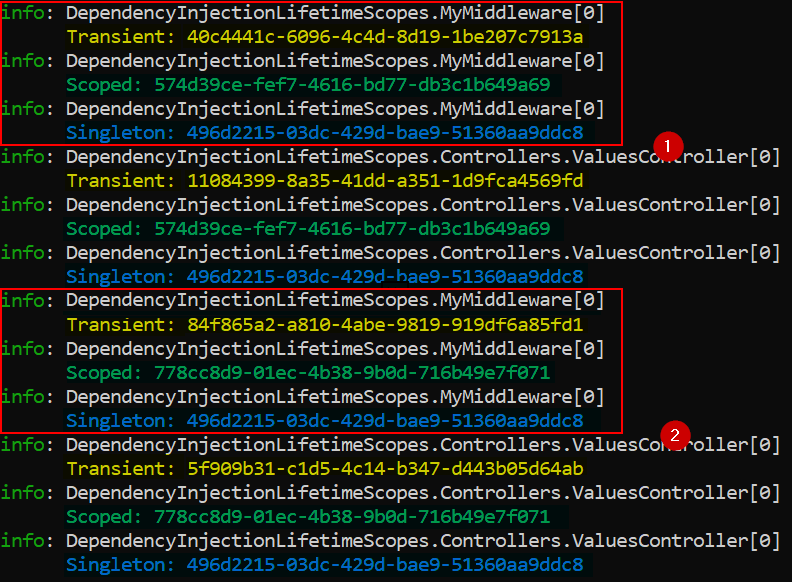
Let’s analyze the logs in detail.
We can see that the transient object instances are always different, regardless of the request. So this verifies that when we register a dependency with the transient lifetime, whenever we request for an instance, we get a new one each time.
If we look at the logs from the first request, we can see that the scoped object instances are the same when it is called from the middleware and controller. However, when we invoke the endpoint a second time, it returns a new instance. But again, within that request, it shares the same instance. So this confirms that once we register a dependency with a scoped lifetime, it shares the same instance within the same scope (request in this case). But when we make a new request, it creates a new instance and uses that instance instead.
From the logs, we can see that the singleton object uses the same instance every time even when we invoke the endpoint multiple times. This means that once we register a dependency with a singleton lifetime, it creates just one instance of the dependency and shares it across the application.
Comparing Different Dependency Injection Lifetimes
By now you might be wondering “Should I use transient or scoped lifetime?”.
Having learned the different ways of registering services using dependency injection, let’s do a comparison of different service registration lifetimes and look at a few recommendations on when to use each of them and when not to.
Conclusion
Okay, let’s recap what we’ve learned.
In this article, we have talked about the dependency injection lifetime scopes. We’ve covered different service lifetime scopes and explained what they are, how they work, and when to use them.
BLACK FRIDAY DEAL IS ON! GET YOUR MATERIALS AT 40% OFF
Want to build great APIs? Or become even better at it? Check our program Ultimate ASP.NET Core Web API and learn how to create a full production-ready ASP.NET Core API using only the latest .NET technologies. Bonus materials included!
Recommend
About Joyk
Aggregate valuable and interesting links.
Joyk means Joy of geeK