

How to Use Amazon SQS in a Spring Boot App
source link: https://mydeveloperplanet.com/2021/11/23/how-to-use-amazon-sqs-in-a-spring-boot-app/
Go to the source link to view the article. You can view the picture content, updated content and better typesetting reading experience. If the link is broken, please click the button below to view the snapshot at that time.
In this blog, you will learn how to use Amazon Simple Queue Service (SQS) in a Spring Boot App. You will use the AWS SDK for Java for this purpose. Most of the SQS features, which can also be executed manually via the AWS console, will be covered within this blog.
1. Introduction
Amazon Simple Queue Service (SQS) is a fully managed message queuing service that enables you to decouple and scale your applications. It is a fully managed service, so you will not have to take care of managing the service yourself. You can create queues, send and receive messages, send messages to a Dead Letter Queue when they could not be processed successfully, etc.
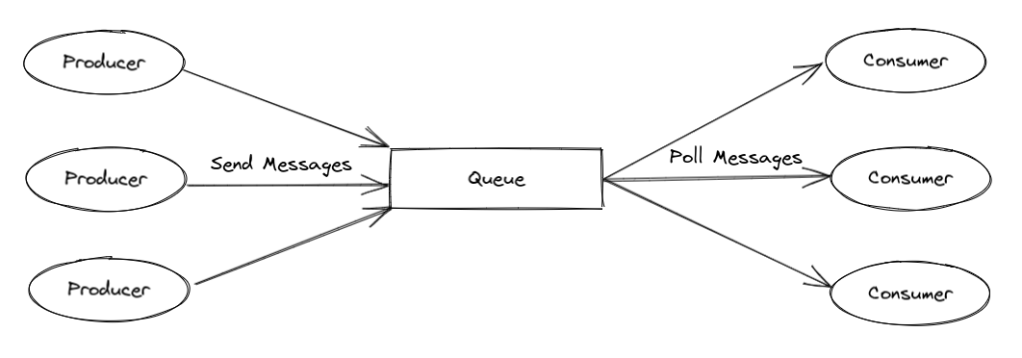
So what is a queue? Producers can send messages to a queue. The queue will receive those messages and will keep them in the queue until a consumer will poll the queue and will process the message. There can be more than one consumer of course. This is in simple words what a queue can do for you. This way, you have decoupled the producing applications from the consuming applications which is a quite nice integration pattern. Besides that, the queue can store the messages when there would be a burst of messages produced by the producers. The consumers can consume the messages at their own pace.
SQS is the Amazon solution for queues. In this post, you will create a Spring Boot application, you will create and delete queues, send and poll messages, and explore most of the features of SQS. For this purpose, the AWS SDK for Java will be used, but everything can also be executed manually from the AWS console. The sources used in this post are available at GitHub.
2. Setup
Before you can get started, you need to have an AWS account and you need to do some configuration on your local machine in order to be able to use the AWS SDK. It is a bit of work, but you only need to execute this once. The instructions how to do this are well documented at the AWS website.
Quite some information how to use the SDK for SQS is available at the AWS website. This is explained by means of examples and can be used as a first resource of information. Complete examples are also available at GitHub.
For creating the Spring Boot application, you navigate to start.spring.io and create a basic Spring Boot application. In the example used in this post, an already existing Spring Boot application which has been used for previous AWS blogs is extended.
In order to use the AWS SDK for Java, it is necessary to add the BOM (Bill of Materials) of the AWS SDK to the dependencyManagement section of the pom file. This will ensure that the dependencies of the AWS SDK are managed for you.
<dependencyManagement><dependencies><dependency><groupId>software.amazon.awssdk</groupId><artifactId>bom</artifactId><version>2.17.56</version><type>pom</type><scope>import</scope></dependency></dependencies></dependencyManagement>In order to be able to use the SQS functionality, you only need to add the sqs dependency to the dependencies section. As you can see, without version because this will be managed by the BOM.
<dependency><groupId>software.amazon.awssdk</groupId><artifactId>sqs</artifactId></dependency>That is all for the setup, you are ready to go to do some real work!
3. Create Queue
For every piece of functionality, a Rest endpoint will be created in the Spring Boot application. The endpoints are created in the SqsController.java file. This way, it is easy to trigger a piece of functionality.
First thing to do, is to create a queue. You need to create a CreateQueueRequest, which takes a queue name. The queue name will be uniquely defined by means of a QUEUE_PREFIX and the current timestamp. It is not really necessary to add the timestamp, but when you delete the queue and you want to recreate it, you need to wait 60 seconds before this will be possible. See also the Troubleshooting section at the end of this post. Also important is the creation of the SQS_CLIENT which will actually process the request. Beware that you create the SQS_CLIENT in the same region as you configured your local settings during the setup (you needed to set the region and this should correspond to the region where you create the SQS_CLIENT). For convenience and later use, the queue URL is retrieved by means of a GetQueueUrlResponse request.
private static final String QUEUE_PREFIX = "MyAWSPlanetSQS-";private static final SqsClient SQS_CLIENT = SqsClient.builder().region(Region.EU_WEST_3).build();private static String queueUrl;@GetMapping("/createQueue")public void createQueue() {String queueName = QUEUE_PREFIX + System.currentTimeMillis();CreateQueueRequest createQueueRequest = CreateQueueRequest.builder().queueName(queueName).build();SQS_CLIENT.createQueue(createQueueRequest);GetQueueUrlResponse getQueueUrlResponse =SQS_CLIENT.getQueueUrl(GetQueueUrlRequest.builder().queueName(queueName).build());queueUrl = getQueueUrlResponse.queueUrl();}Run the Spring Boot application from your local machine:
$ mvn spring-boot:runInvoke the createQueue endpoint:
$ curl http://localhost:8080/createQueueLogin to the AWS console and navigate to the SQS service. The queue has been created.

4. List Queue
Instead of verifying whether the queue was created in the AWS console, you can also retrieve the list of queues by means of a ListQueuesRequest based on e.g. a certain prefix QUEUE_PREFIX. The ListQueuesResponse contains the URL’s of the queues which can be printed.
@GetMapping("listQueues")public String listQueues() {ListQueuesRequest listQueuesRequest = ListQueuesRequest.builder().queueNamePrefix(QUEUE_PREFIX).build();ListQueuesResponse listQueuesResponse = SQS_CLIENT.listQueues(listQueuesRequest);String queues = "";for (String url : listQueuesResponse.queueUrls()) {queues += url + "\n";}return queues;}Invoke the listQueues endpoint and the URL of the created queue is returned. The <account ID> will be replaced by your own account ID of course.
$ curl http://localhost:8080/listQueueshttps://sqs.eu-west-3.amazonaws.com/<account ID>/MyAWSPlanetSQS-16338574454305. Send Message
In order to send a message to the queue, you use the SendMessageRequest request. Note that you need to specifiy the queue URL here otherwise it is not known where to send the message to. The contents of the message are taken as a parameter from the invocation of the endpoint. Beware that the size of a message is limited to 256KB. If you want to send larger messages, you will need to send some kind of metadata message to the queue with a location of the larger message in a S3 bucket.
@PostMapping("sendMessage")public void sendMessage(@RequestParam("text") String text) {SendMessageRequest messageRequest = SendMessageRequest.builder().queueUrl(queueUrl).messageBody(text).build();SQS_CLIENT.sendMessage(messageRequest);}Invoke the sendMessage endpoint.
$ curl -X POST -d "text=This is a message" http://localhost:8080/sendMessageIn the AWS console, you can see now that 1 message is available, ready to be consumed.

6. Receive Messages
For receiving messages, you need to use the ReceiveMessageRequest. Again, you need to specify the queue URL.
@GetMapping("receiveMessagesWithoutDelete")public String receiveMessagesWithoutDelete() {ReceiveMessageRequest receiveMessageRequest = ReceiveMessageRequest.builder().queueUrl(queueUrl).build();List<Message> receivedMessages = SQS_CLIENT.receiveMessage(receiveMessageRequest).messages();String messages = "";for (Message receivedMessage : receivedMessages) {messages += receivedMessage.body() + "\n";}return messages;}Invoke the receiveMessagesWithoutDelete endpoint.
$ curl http://localhost:8080/receiveMessagesWithoutDeleteThis is a messageTake a look at the AWS console now. It indicates one message in flight.

When invoking the endpoint again, the message is not processed again. But after 30 seconds, the message becomes available again and when you invoke the endpoint now, the message will be processed again. It is therefore important to delete the message after it has been processed. The endpoint receiveMessagesWithDelete will solve this problem. When the message has been processed, a DeleteMessageRequest is constructed with the queue URL and the receiptHandle of the received message. This way, the message will be deleted from the queue and it will not be processed multiple times.
@GetMapping("receiveMessagesWithDelete")public String receiveMessagesWithDelete() {ReceiveMessageRequest receiveMessageRequest = ReceiveMessageRequest.builder().queueUrl(queueUrl).build();List<Message> receivedMessages = SQS_CLIENT.receiveMessage(receiveMessageRequest).messages();String messages = "";for (Message receivedMessage : receivedMessages) {messages += receivedMessage.body() + "\n";DeleteMessageRequest deleteMessageRequest = DeleteMessageRequest.builder().queueUrl(queueUrl).receiptHandle(receivedMessage.receiptHandle()).build();SQS_CLIENT.deleteMessage(deleteMessageRequest);}return messages;}Invoke the receiveMessagesWithDelete endpoint and now the message is processed and deleted immediately. There will be no message in flight anymore after deletion.
$ curl http://localhost:8080/receiveMessagesWithDeleteThis is a message7. Dead Letter Queue
Sometimes, a message keeps on failing from being processed. As you have seen in the previous paragraph, the message will be put back into the queue when it has not been processed within 30 seconds. With a Dead Letter Queue it is possible to set a maximum number of retries for a message. When the message is not successfully processed within this maximum number, it will be moved to a DLQ. This is especially interesting for debugging purposes because the message is still available for further analysis.
In order to activate this, it is necessary to create a new queue which will serve as a DLQ. By means of a redrive policy, the DLQ can be linked to the original queue.
First, create the DLQ just like you did before with the regular queue. This is done in the ‘Create the DLQ’ section of method createDLQ.
Next, you need to retrieve the ARN (Amazon Resource Name, a unique name within AWS) of the DLQ. This can be retrieved by means of a GetQueueAttributesResponse request in the section ‘Link the DLQ to the source queue’.
Next, specify the Redrive Policy with a maximum number of retries of 3 and the DLQ ARN. By means of a SetQueueAttributesRequest, the Redrive Policy is linked to the original queue.
private static final String DLQ_QUEUE_NAME = "MyAWSPlanetSQS-DLQ";private static String dlqQueueUrl;...@GetMapping("createDLQ")public void createDLQ() {// Create the DLQCreateQueueRequest createQueueRequest = CreateQueueRequest.builder().queueName(DLQ_QUEUE_NAME).build();SQS_CLIENT.createQueue(createQueueRequest);GetQueueUrlResponse getQueueUrlResponse =SQS_CLIENT.getQueueUrl(GetQueueUrlRequest.builder().queueName(DLQ_QUEUE_NAME).build());dlqQueueUrl = getQueueUrlResponse.queueUrl();// Link the DLQ to the source queueGetQueueAttributesResponse queueAttributes = SQS_CLIENT.getQueueAttributes(GetQueueAttributesRequest.builder().queueUrl(DLQ_QUEUE_NAME).attributeNames(QueueAttributeName.QUEUE_ARN).build());String dlqArn = queueAttributes.attributes().get(QueueAttributeName.QUEUE_ARN);// Specify the Redrive PolicyHashMap<QueueAttributeName, String> attributes = new HashMap<QueueAttributeName, String>();attributes.put(QueueAttributeName.REDRIVE_POLICY, "{\"maxReceiveCount\":\"3\", \"deadLetterTargetArn\":\""+ dlqArn + "\"}");SetQueueAttributesRequest setAttrRequest = SetQueueAttributesRequest.builder().queueUrl(queueUrl).attributes(attributes).build();SetQueueAttributesResponse setAttrResponse = SQS_CLIENT.setQueueAttributes(setAttrRequest);}Create the DLQ by invoking the createDLQ URL.
$ curl http://localhost:8080/createDLQNavigate to the AWS console. The DLQ is created.

Click the original queue and navigate to the Dead-letter queue tab. The DLQ is linked to the original queue with a maximum of 3 retries.

For testing purposes, create a new receiveMessagesWithoutDeleteLimitedVisibilityTimeout endpoint. A message will be processed, but the Visibility Timeout (the time a client gets to process the message) is set to 5 seconds instead of 30 seconds.
@GetMapping("receiveMessagesWithoutDeleteLimitedVisibilityTimeout")public void receiveMessagesWithoutDeleteLimitedVisibilityTimeout() {ReceiveMessageRequest receiveMessageRequest = ReceiveMessageRequest.builder().queueUrl(queueUrl).build();String receipt = SQS_CLIENT.receiveMessage(receiveMessageRequest).messages().get(0).receiptHandle();ChangeMessageVisibilityRequest visibilityRequest = ChangeMessageVisibilityRequest.builder().queueUrl(queueUrl).receiptHandle(receipt).visibilityTimeout(5).build();SQS_CLIENT.changeMessageVisibility(visibilityRequest);}Send a message to the queue and invoke the above endpoint with at least 5 seconds time in between. The fourth time, an error is received when processing the message because the code is not very robust. More important is to notice that the message has been moved to the DLQ, as can be seen in the AWS console.
$ curl -X POST -d "text=This is a message" http://localhost:8080/sendMessage$ curl http://localhost:8080/receiveMessagesWithoutDeleteLimitedVisibilityTimeout$ curl http://localhost:8080/receiveMessagesWithoutDeleteLimitedVisibilityTimeout$ curl http://localhost:8080/receiveMessagesWithoutDeleteLimitedVisibilityTimeoutcurl http://localhost:8080/receiveMessagesWithoutDeleteLimitedVisibilityTimeout{"timestamp":"2021-10-16T12:19:20.362+00:00","status":500,"error":"Internal Server Error","message":"","path":"/receiveMessagesWithoutDeleteLimitedVisibilityTimeout"}
8. Long Polling
A best practice when using SQS is to make use of Long Polling. With Long Polling the client will wait a certain amount of time when during the start of the poll no message was available in the queue. This is a more efficient way of polling queues and will reduce your costs. Enabling Long Polling is similar as you did with the DLQ Redrive Policy. You create a queue, and with the help of the SetAttributesRequest, you set the parameter RECEIVE_MESSAGE_WAIT_TIME_SECONDS to e.g. 20 seconds.
@GetMapping("/createQueueWithLongPolling")public void createQueueWithLongPolling() {String queueName = QUEUE_PREFIX + System.currentTimeMillis();CreateQueueRequest createQueueRequest = CreateQueueRequest.builder().queueName(queueName).build();SQS_CLIENT.createQueue(createQueueRequest);GetQueueUrlResponse getQueueUrlResponse =SQS_CLIENT.getQueueUrl(GetQueueUrlRequest.builder().queueName(queueName).build());queueUrl = getQueueUrlResponse.queueUrl();HashMap<QueueAttributeName, String> attributes = new HashMap<QueueAttributeName, String>();attributes.put(QueueAttributeName.RECEIVE_MESSAGE_WAIT_TIME_SECONDS, "20");SetQueueAttributesRequest setAttrsRequest = SetQueueAttributesRequest.builder().queueUrl(queueUrl).attributes(attributes).build();SQS_CLIENT.setQueueAttributes(setAttrsRequest);}The queue must support Long Polling and from the client side, you also need to configure that Long Polling needs to be used. The only difference compared to the receiveMessagesWithDelete method, is that during creating the ReceiveMessageRequest, the waitTimeSeconds is set.
@GetMapping("receiveMessagesWithLongPolling")public String receiveMessagesWithLongPolling() {ReceiveMessageRequest receiveMessageRequest = ReceiveMessageRequest.builder().queueUrl(queueUrl).waitTimeSeconds(20).build();List<Message> receivedMessages = SQS_CLIENT.receiveMessage(receiveMessageRequest).messages();String messages = "";for (Message receivedMessage : receivedMessages) {messages += receivedMessage.body() + "\n";DeleteMessageRequest deleteMessageRequest = DeleteMessageRequest.builder().queueUrl(queueUrl).receiptHandle(receivedMessage.receiptHandle()).build();SQS_CLIENT.deleteMessage(deleteMessageRequest);}return messages;}Open a terminal and create the queue and invoke the receiveMessagesWithLongPolling endpoint.
$ curl http://localhost:8080/createQueueWithLongPolling$ curl http://localhost:8080/receiveMessagesWithLongPollingOpen another terminal window and send a message to the queue within 20 seconds after invoking the receiveMessagesWithLongPolling endpoint. You will notice that the message is processed immediately.
9. Delete Queue
Deleting a queue can be done by means of a DeleteQueueRequest.
@GetMapping("/deleteQueue")public void deleteQueue() {DeleteQueueRequest deleteQueueRequest = DeleteQueueRequest.builder().queueUrl(queueUrl).build();SQS_CLIENT.deleteQueue(deleteQueueRequest);}Invoking the deleteQueue endpoint will remove the queue. There is also a deleteDLQ endpoint available for removing the DLQ in the sources at GitHub.
$ curl http://localhost:8080/deleteQueue10. Troubleshooting
This section contains some problems that were encountered during the creation of this blog.
Once, it was forgotten to add the queue URL for a request builder. This will throw the following exception.
software.amazon.awssdk.services.sqs.model.QueueDoesNotExistException: The specified queue does not exist for this wsdl version. (Service: Sqs, Status Code: 400, Request ID: 5123f6b0-e260-5dbe-9248-af6c51ac50f5, Extended Request ID: null)This exception can have numerous causes, see this url for a list.
As mentioned before, you need to wait 60 seconds before creating a queue with an identical name as a previously deleted queue. The error is quite clear about this.
software.amazon.awssdk.services.sqs.model.QueueDeletedRecentlyException: You must wait 60 seconds after deleting a queue before you can create another with the same name.11. Conclusion
In this post, you learned how to use the AWS SDK for Java for creating SQS queues, sending and receiving messages, and some extra features of SQS. It is quite easy to do all of this programmatically.
Recommend
About Joyk
Aggregate valuable and interesting links.
Joyk means Joy of geeK