

Plan 9 Desktop Guide
source link: https://pspodcasting.net/dan/blog/2019/plan9_desktop.html
Go to the source link to view the article. You can view the picture content, updated content and better typesetting reading experience. If the link is broken, please click the button below to view the snapshot at that time.
PLAN 9 DESKTOP GUIDE
INDEX
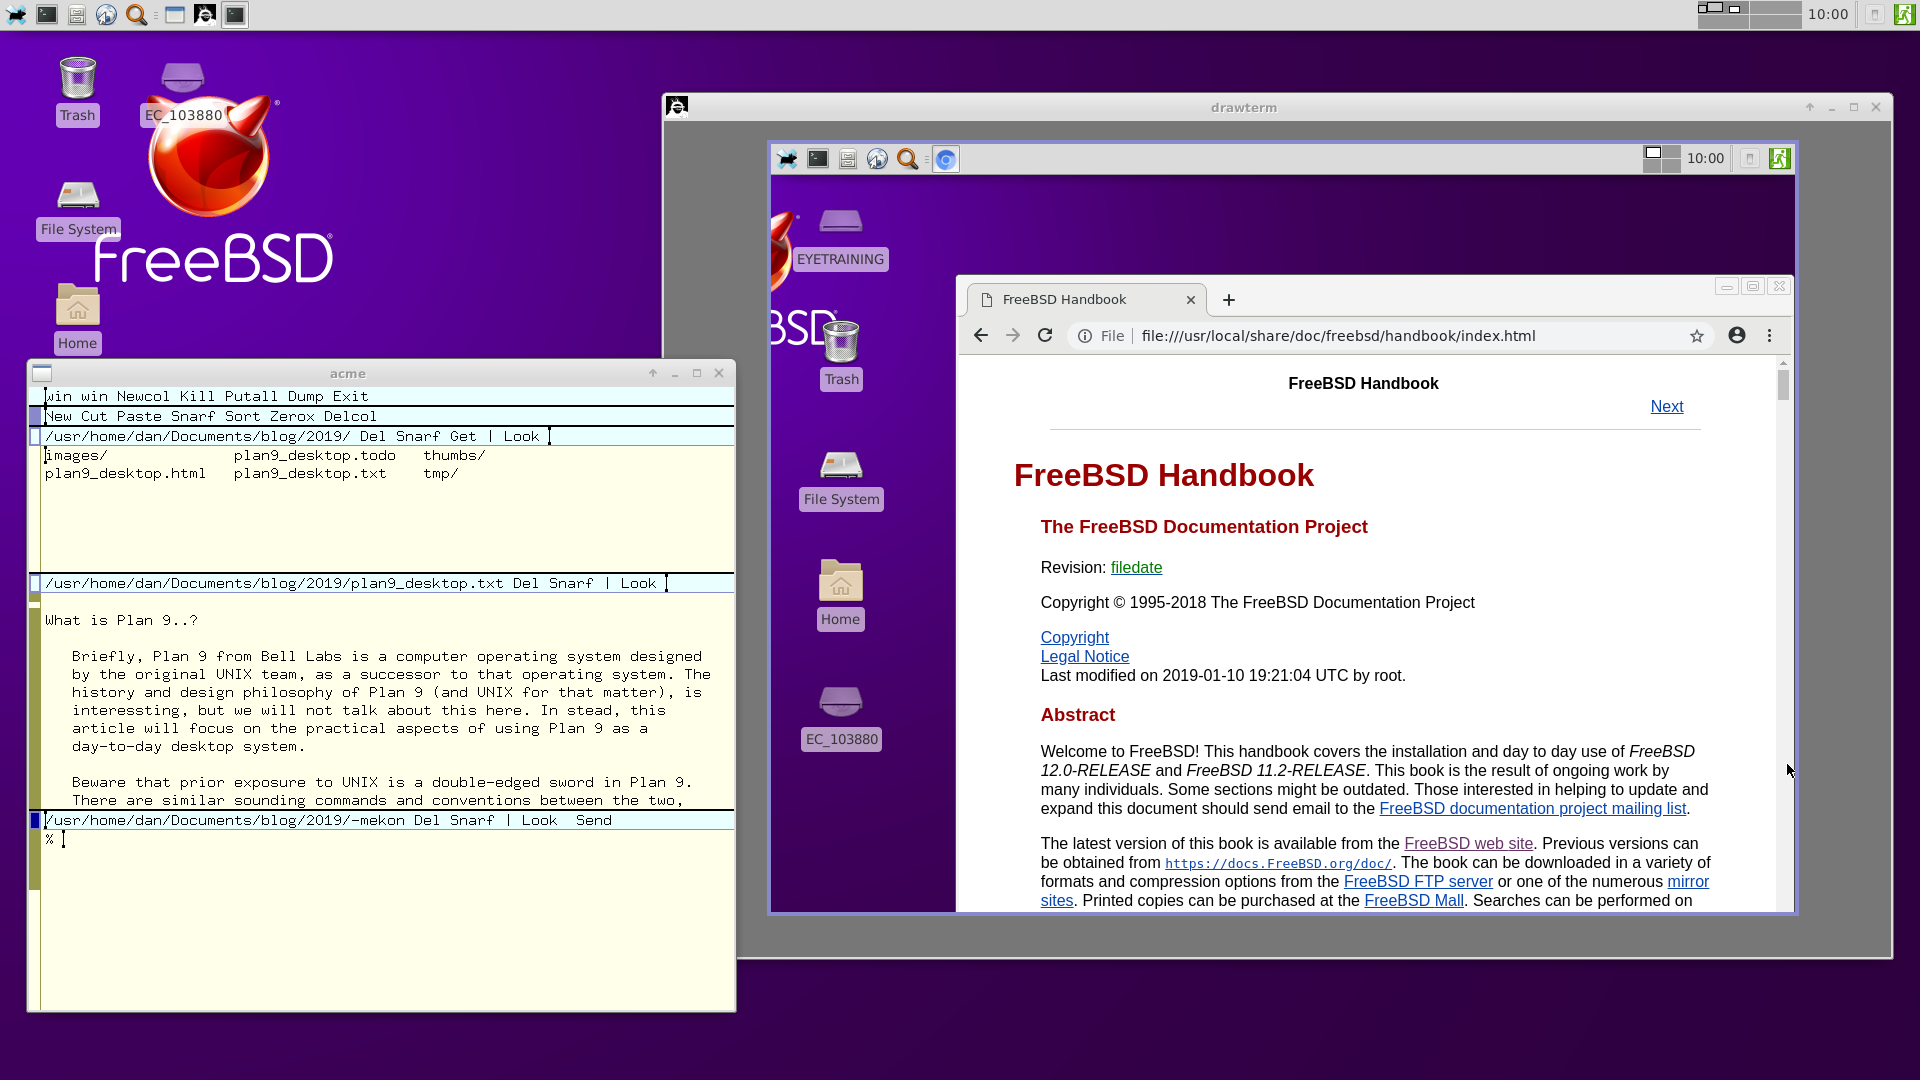
What is Plan 9..?
Briefly, Plan 9 from Bell Labs is a computer operating system designed by the original UNIX design team, after decades of work on Research UNIX in the late 80's, the team decided to write a new operating system from scratch, Plan 9 was finally released in 1992, and a few years later they released yet another operating system called Inferno, which share many of the same characteristics as its sister project. These systems, and variations thereof, have more or less been in continual development since. The history and design philosophy behind these operating systems, is interesting, but we will not talk about that here. Instead, this article will focus on the practical aspects of using Plan 9 as day-to-day desktop system.
Beware that prior exposure to UNIX is a double-edged sword. There are similar sounding commands and conventions between the two platforms, and Plan 9 does follow the UNIX philosophy (much more so then UNIX in fact). Nevertheless, Plan 9 is not UNIX! It is an operating system written entirely from scratch, backwards compatibility was not a goal. If you expect just another Ubuntu spin-off, you will be very disappointed. In fact, lets be clear here: You will be disappointed, period. Now with that disclaimer out of the way, lets have some fun!
In 2002 the 4th edition of Plan 9 was released, it was essentially a rolling release, that continued to receive updated from Bell Labs until 2015, when the project was officially discontinued. In mid 2021 though, Bell Labs gave ownership of all previous Plan 9 sources to the Plan 9 foundation. The goal of this foundation is to continue the development of Plan 9, but so far, not much has happened. There are several community forks around though, two of them, 9legacy and 9front, sprang into existence around 2010. If you want to use Plan 9 as a day-to-day desktop, which will be the focus of this article, I strongly recommend going with 9front. It is likely the only candidate that will actually run on your physical hardware, and it has many features that a modern user takes for granted, such as auto-mounting USB sticks, wifi support, working audio, video playback and git. 9front has an excellent fqa and community wiki, that do a far better job of presenting accurate information then I do (be prepared for quirky humor though!). Still, it can be interesting to play with 9legacy too, if only for historical curiosity, so I will give some pointers in this article on "classic Plan 9" (9legacy and the old 4th edition of Plan 9 are nearly identical), where it differs significantly from 9front. For classic Plan 9, the Plan 9 wiki from Bell Labs website is a better source of documentation then the 9front resources.
Limitations and workarounds
More then anything, Plan 9 is a simple operating system. The kernel is only 200,000 lines of code, and the userland about a million. In comparison the source code for the Firefox web browser is more than 24 million lines of code! As you might imagine then, there are no "modern" web browsers in Plan 9. There are no office suits, triple A games, VOIP or repositories of 30,000 pre-compiled packages. Plan 9 is not for the faint of heart!
Of course there are workarounds for the above limitations, here are a few suggestions:
Connecting to Other Systems
It is simple enough to connect to a remote UNIX/Windows machine from Plan 9 using VNC, or vice versa (I use the term "UNIX" broadly - it includes Mac, Android, Linux, BSD, etc...). From Plan 9 you can connect to a VNC server using vncv, or run a VNC server with vncs (there is little reason to run a VNC server on Plan 9 though, use drawterm, mentioned below, instead).
For example, assuming you have tigervnc installed on a UNIX machine, with the ip address 192.168.0.1, and a desired VNC screen resolution of 1366 x 768 pixels: You can run vncserver -geometry 1366x768 :1, and give it a login password (if you are not prompted for a password you may need to run vncpasswd first). Now, on the Plan 9 machine, run the command vncv 192.168.0.1:1, and login. By default this will probably run a very basic twm desktop, which makes many inexperienced users suspect that the desktop failed somehow. You probably want to change ~/.vnc/xstartup, to run a fancier window manager. To use openbox instead of twm for instance, add this line to the file:
exec /usr/bin/openbox-session
You can choose whatever desktop you want here, but beware that configuring xstartup gets vastly more complex if you use some bloated mess like Gnome or KDE.
It is possible to connect to a remote Windows machine using RDP (remote desktop protocol), see rd if you need that sort of thing.
9front ships with a working ssh and sshfs client (sshfs mounts the remote filesystem in /n/ssh), but classic Plan 9 has a very outdated version of ssh, that in all likelihood will not (or at least should not) be able to connect to your UNIX machines.
It is in fact much easier to import Plan 9 technologies to foreign systems then vice versa, and there are good solutions for working with Plan 9 from UNIX. We will discuss technologies such as plan9port and drawterm later, but for now, lets talk about mounting the Plan 9 filesystem natively in UNIX using the 9P protocol. There are various ways you can do this, including mounting it directly, in Linux at least, like so: sudo mount -o rw -t 9p 192.168.0.1 /mnt (substitute the ip address for the Plan 9 machine you're using). But you will probably get better results using one of the many 9P clients thats out there, such as 9pfuse from the plan9port package, or 9pfs (wich also require plan9port). You use it like so: 9pfs 192.168.0.1 /mnt, assuming you have the right privileges.
Other methods
There is some support for NFS and SMB in Plan 9 (see nfs(4) and cifs(4)), but I don't recommend using NFS, the Plan 9 client is very outdated. Speaking of outdated, you naturally have ftpfs and telnet as well.
Porting applications
There exists a fairly good port of Plan 9 userland programs and services for UNIX, called Plan9Port (or p9p for short - a more lightweight alternative is 9base), it is available in the repositories of most popular UNIX systems. Once installed, use the 9 command to run the Plan9Port programs rather then the UNIX counterparts, eg. 9 acme. It does not fully replicate the Plan 9 experience of course, but it does make UNIX less of a pain to use.
To run a full Plan 9 shell, using Plan9Port commands instead of the UNIX equivalents, either run 9 acme, execute win in it and run 9 rc. Or run 9 9term, then run 9 rc. You can configure your ~/.xinitrc file to start the Plan 9 look-alike window manager, with exec 9 rio, and set up a very authentic looking Plan 9 desktop. But there is little point in doing so, unless you really want to hide the fact that UNIX is running in the background. Plan9Port's rio only looks like the Plan 9 window manager, but it doesn't have the same useful features, and it is quite flaky to boot. In my opinion there are far better native UNIX alternatives, including the Plan9 inspired wmii/dwm window managers, or variations thereof.
It is possible, but much harder, to go in the other direction. Plan 9 has a UNIX compatibility suit of programs and libraries in /bin/ape, such as ape/sh, which gives you a ksh like UNIX shell (run vt first to emulate a VT-100 terminal). And ape/cc a POSIX compliant C compiler, with corresponding UNIX-friendly libraries. Plus a few other UNIX'y utilities. This UNIX compatibility is old and quite unmaintained. 9front has its own semi-official portability layer called npe, see the 9front porting guide for further tips.
Note however that simply having a UNIX shell, does not mean that all your shell scripts will magically work. Plan 9 has it's own version of cat, echo, ls, sed and so on. If your script uses these programs, it needs to be adapted to use the Plan 9 versions of them. As always, read the man pages carefully (no really - read them!).
Finally, even though Plan 9 has had a very good POSIX compliance, it's by no means certain that UNIX programs will compile. Most will not. The majority of UNIX software does not restrict themselves to POSIX alone, but require large extensions. Most of which are not supported. For example, Plan 9 does not have Xorg, curses, sockets or links, so any programs depending on such things needs to be patched and rewritten before they will compile. In practice only the simplest of programs can be ported with any reasonable amount of effort.
Emulating other operating systems
In a traditional Plan 9 network, one or more CPU servers are providing file and authentication services to multiple diskless workstations, called "terminals". These terminals are desktop systems connected to the CPU server. This is a bit confusing for UNIX users, so in this article we will refer to a diskless workstation as a remote desktop, and a window running a shell as a terminal, as is the custom in UNIX. If you have set up a CPU Server in Plan 9 (see section 7.5 and 7.6 in the 9front fqa - see also Quick CPU+AUTH+Qemu+Drawterm HOWTO below), either physically, or on a virtual machine, you can emulate a Plan 9 remote desktop on a UNIX/Windows machine with drawterm (for classic Plan 9 use this link). drawterm works very well, it also has access to the host filesystem under /mnt/term, making it easy to work on files across operating systems.
There is a 3rd party port of Xorg for Plan 9, together with linuxemu, it can be used to run Linux software natively (see section 8.7.1 in the 9front fqa). This implementation is not perfect however, it is tedious to work with, and I have had little success with it myself.
Virtualizing other operating systems
There are many different virtualization solutions available for UNIX/Windows capable of running Plan 9, such as qemu and VirtualBox. Plan 9 has very limited hardware support, especially if you want to use the classic versions of this operating system. Virtualization is a practical way to eliminate such concerns.
9front also includes its own hypervisor (see section 8.7.5 in their fqa), vmx, capable of running Linux, OpenBSD, allegedly Windows, and plausibly other operating systems. PS: You need modern Intel hardware for this to work.
Basics
I assume you have already downloaded and installed Plan 9, either on a physical machine or on a virtual one. If not you can get the 9front iso, and follow the installation instructions in section 4 of their fqa. Again, this is not a guide for installing and configuring a Plan 9 system, use the 9front fqa for that. Our focus here is doing day-to-day tasks after the initial setup is done.
PS: This is also the subject of section 8 in the 9front fqa - Using 9front. This article simply repeats and expands upon some of that content.
PS: If you want to install 9legacy, it follows much the same steps as 9front, but here are a couple of tips: After hitting Return at the "Location of archives [browse]:" prompt, you will see /%, just type exit to continue the installation. Choose plan9 when asked to "Enable boot method", otherwise just follow the defaults and choose "y" at yes or no prompts. Finally: when installing 9legacy in qemu, be sure to set the virtual harddisk as the first disk drive, eg. qemu-system-x86 -m 2G -hda 9legacy.img, do not use -hdd or similar, otherwise boot setup will fail during installation.
Window Management
The window manager in Plan 9 is called rio, it provides a remarkably clean and simple desktop, somewhat akin to twm in UNIX. Unlike twm though, it doesn't look like crap by default, and the source code is only 6000 lines of code, which incidentally is also about the same size as Plan 9's graphical library, libdraw. In contrast twm's source is closer to 30,000 lines, and the Xorg backend more then 8 million!
Window management is straight forward: rio provides only one menu, which you can access by right clicking the mouse on the desktop background. Hold down the mouse button while you are selecting a menu option, and release the mouse button only after you have made your selection. To create a new window, which is always a terminal, choose New. The mouse pointer changes to a cross, this tells you that rio is waiting for you to specify a window size. Right click in a corner and drag the mouse, a red rectangular box appears, release the mouse button when the window has the size you want.
If you choose the Delete option in the rio menu, the mouse pointer changes to a cross with a circle, this tells you that rio is waiting for you to specify a window. Right click on the window you wish to delete. If you Hide a window, it will appear in the rio menu, just select it from here to make it visible again.
You can also Resize and Move a window by using the rio menu, but it's easier to click and drag the windows directly: To resize a window, left click the blue border and drag, to move it, right click and drag.
Right clicking in a terminal window will also bring up the rio menu, but other programs will not necessarily do so. If you need to access the window manager menu while running a fullscreened acme window for instance, you must first shrink the window or move it out of the way, and then right click the gray rio background. By default there are no key-bindings to control rio, you can only do so using your mouse (What?!? The mouse actions are required?!? I know right, Plan 9 is so radical...).
Copy Pasting
In order to use Plan 9 effectively, you need a 3-button mouse. Such mice are quite common nowadays, with the scroll wheel doubling as the middle mouse button. The 3 mouse buttons, and combinations of clicks, are used throughout Plan 9 for manipulating text. If you don't have a mouse with 3 buttons, you can simulate the middle click by holding down the Shift key and right clicking. But this will quickly become tedious, so go out and buy a 3-button mouse ASAP.
You can select text in the normal way, by left click and drag. You can also double left click a word to select it. If you double click the end of a line, the whole line will be selected, and if you double click a parenthesis, or square bracket or some such delimiter, the text inside these parenthesis will be selected.
To cut the selected text, hold down the left button and click the middle mouse button. To paste the text, click the left button and while holding it down, click the right button. To "copy" text, left click and middle click, release the middle mouse button and click the right button, all the while keeping the initial left button depressed. Such combinations of mouse clicks are called mouse chording. They are used very consistently in Plan 9 programs, and feel intuitive enough once you get the hang of it.
Essential Programs
There are only a handful of programs in Plan 9, they are simple to learn and work very well. Some essential applications are:
- rio - the window manager
- rc - the shell
- acme - a text editor, and more!
- mothra - the web browser (use abaco in classic Plan 9)
- page - a document/image viewer
- play, zuke - music players (use juke in classic Plan 9)
- stats - monitoring system load
Manipulating Text in the Terminal
You do not have to play around much in the Plan 9 terminal before you realize that it works quite differently from UNIX. The first annoyance might be that there is no Tab auto-completion. Don't worry, use Ctrl-f instead, it does much the same thing. There is no advanced auto-completion of program names and flags, like hipster zsh and fish users might be accustomed to. But this really isn't an issue since Plan 9 has virtually no programs or flags to speak of, as you will discover soon enough.
The second thing you may notice is that the terminal text can be freely edited. You can add any text anywhere and copy paste the text arbitrarily, the Plan 9 terminal thus feels much more like a text editor then a UNIX terminal (a consequence of this free-form text editing is that the mouse cursor has to be put at the end of the last line in order to execute a command with the Return key, otherwise it will just add a literal newline to the text - this is only mildly annoying once you get used to it). What's the point of this novel design? First of all it eliminates a host of special purpose programs that UNIX requires, for example there is no clear command in Plan 9, you just cut the text. There is no reset or readline either, as they are not needed. Secondly, once learned, this behavior feels very intuitive. Why shouldn't you be able to cut and paste text and freely sprinkle your terminal output with random comments? Going back to a UNIX terminal, after having spent some time in Plan 9, really feels like leaving the 90's - and going back to the 70's (fun tip: check out /bin/hold to see how a basic text editor in Plan 9 can be written in just five lines of shell script!).
Lastly, there is no history command in the Plan 9 terminal, hitting the up arrow key on the keyboard will just move the pointer one line up, like any text editor would. What else did you expect? Relax though, you can rerun the previous command with "" (" will reprint it).
Hang on! The command "", isn't double quotes used for quoting?!? Not in Plan 9, double quotes are just ordinary characters. Whereas UNIX has three escape characters, Plan 9 has only one, the single quote (well, ok, backslash is also used in some situations). The UNIX command "$message has a literal \$$ and '", would be ''$message' has a literal $$ and ''' in Plan 9 (two single quotes within single quotes is interpreted as one literal single quote).
PS: " and "" are actually shell scripts, provided by 9front, classic Plan 9 systems do not have these.
Back to our topic of rerunning commands, note that the need to auto-complete text and rerun commands are much greater in UNIX then in Plan 9. It is easy to copy paste text in the terminal, so use that functionality for what it's worth! You don't need to use insane syntax like ls !$ to run ls with the previous arguments, or ^foo^bar to spell correct the last argument and rerun it. Just type ls in the terminal and copy paste the previous arguments, and if you need to spell correct the last argument, then just do so, copy paste the result when you're done. There is also a full copy of the terminal text in /dev/text. So the command cat /dev/text > transcript is essentially the same as script in UNIX, > /dev/text is basically clear, and the command grep '^; ' /dev/text the same as history (assuming of course that your shell prompt is ; ). Note that you can search this log for other things then just your previous commands, and you can manipulate this data in many other interesting ways as well. For example, need to do advanced searching or manipulation of the shell history? Just open /dev/text in a text editor, eg. sam /dev/text.
But what if you want a system wide history log for all of your windows? There is no such file in Plan 9, but it's easy enough to make one. For example, the following script will save your command history to a central file. Only unique commands are saved, if we saved all of the text, our central history file would grow extremely large. For example, it would be quite redundant to have ten thousand entries of cd in our history log, not to mention hundreds of copies of the manpages and text files that have been printed in our terminals.
#!/bin/rc
# savehist - prune and save command history
# usage: savehist

# set some defaults
rfork ne
temp=/tmp/quit-$pid
hist=$home/lib/text
touch $hist
sigexit{ rm -f $temp }

# rewrite history
grep '^; ' /dev/text > $temp
cat $temp $hist | sort | uniq > /tmp/TMP-$pid
mv /tmp/TMP-$pid $hist
With this in place we can run savehist before exit to save our current history, or we can wrap these steps into one by adding something like this to our $home/lib/profile: fn quit{ savehist; exit } (PS: Don't call this function exit unless you really want a fork bomb!)
In addition to /dev/text you also have /dev/snarf, which holds the "snarf" buffer, which is the clipboard in Plan 9 speak (if you want to write to the window, use /dev/cons). All of these files refer to your current window, if you want to use these files for a different window, see the rio scripting section below.
The graphical desktop runs "within" the text console in Plan 9, so writing to the system console will actually print the text verbatim onto the screen. For example, running sleep 600; echo Bug Me! > '#c/cons' will send a fairly obtrusive notification to your screen in 10 minutes. This can be a bit disconcerting for a beginner, but it's easy to redirect such messages if you don't want them to clutter up your screen. Just run cat /dev/kprint in a window and hide it. See the rio scripting section below, for some ideas on how to avoid or abuse this functionality further.
Acme - The Do It All Application
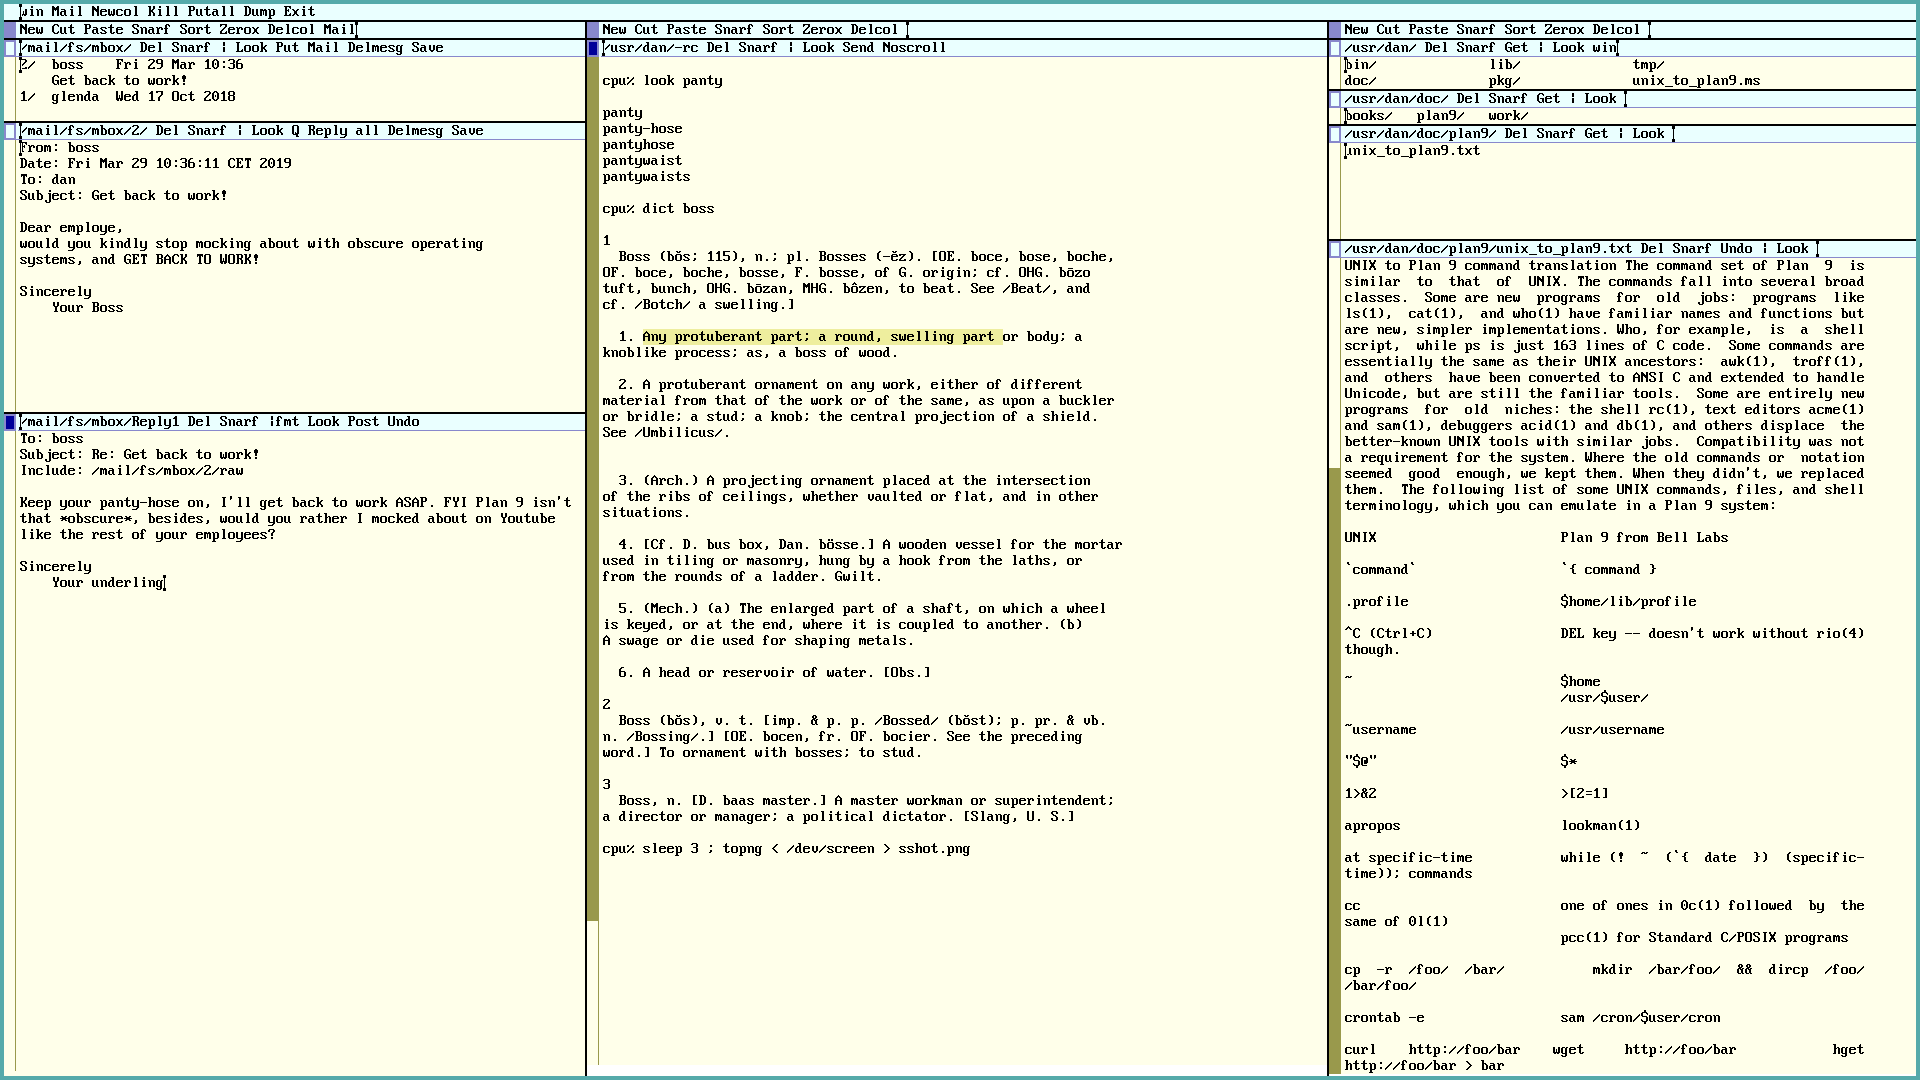
The acme text editor is arguably the main user application for Plan 9, it doubles as the systems file manager, terminal, mail reader and more. It can even be used as a fully fledged window manager, by replacing rio with acme in your $home/lib/profile (but I don't recommend it - you will not be able to run any other programs - but then again, why would you want to..?).
Let's do a whirlwind tour of acme: The first blue row contains commands for the entire acme window, such as Exit, if you middle-click this button, acme will exit. Dump will create a file called acme.dump, this can be used to save a particular window arrangement, and restored with acme -l acme.dump. Pullall will save all modified text files.
If you middle-click Newcol a new column will appear. The column has it's own row of commands, in the second blue row. Delcol will delete the column. Cut, Paste and Snarf (eg. "Copy"), will do text manipulations. But it's easier to use mouse chords for this: Left and middle-click to Cut, Left and right-click to Paste, and finally Left and middle-click, then right-click to Snarf, or Copy. The mouse chords are awkward to explain, but try it out, it will feel very intuitive with a little practice.
Middle-clicking New will create a new window in the column. Again, it too, will have it's own row of commands. Del will delete the window. The window is initially empty, try writing some random text into it. You will see that a new command appears, Undo (it's meaning should be obvious). After typing in some text, you can also hit the Esc key to mark the recently added text, hitting Esc again, will cut the text. How do we save our file? First we need to give it a name: Click on the far left of the menu, left of Del, and type /usr/glenda/testfile (glenda is the default user in Plan 9, and /usr/glenda is the default home directory). Yet another command will appear, Put, middle click it to save your work. That was a lot of typing! Isn't there an easier way to do this? Sure, remember that Plan 9 allows you to copy paste pretty much anything. Find the directory you want in a terminal, with Ctrl-f auto-completion and everything, then print the directory name with pwd, and just copy paste that into the acme window, and append your new filename. Easier yet, run touch testfile; B testfile from a terminal and the file will be opened for you in acme.
By now you will have noticed a very unique feature of acme, it's menus are pure text. The "buttons" are just regular words. To illustrate: Type Del (case sensitive!) somewhere in the yellow text window, then middle click it. The window will disappear. Del is just a command, same as echo or cat. Another test: Type echo hi there and middle click, and drag, so that the red mark covers all three words. hi there will be printed in a new window.
You can use the Look command to search for words in the window. Type monkey a couple of times in the yellow text window, now type Look monkey in the blue window menu, and middle click and drag, to mark the two words. The first occurrence of monkey will be highlighted, run the command again, and the second occurrence will be highlighted, and so on. An easier method however would be to just right-click the word monkey, anywhere in the text, the next occurrence of the word will be highlighted, and the mouse pointer will be moved there. Just right-click again to see the next occurrence of the word, and so on.
The Zerox command in the column menu will duplicate a window, this is very useful if you are editing a long file, and you need to see or edit different parts of the file at the same time, any changes made in one window will appear in the other. Sort will sort the column windows by name, it does not sort the content of the windows. To do that, mark the text, type |sort in the window menu, and middle-click it. As you can see, you can freely use arbitrary Plan 9 commands to manipulate the text in acme.
If you want to do search and replace operations, use the Edit command. This command is a back end for the sam text editor, which uses much the same text editing commands as ed (which again is similar to sed or vi). For example, double click one of the monkey words to highlight it, then type Edit s/monkey/chimpanzee/, and middle click and drag to execute this command. The highlighted word will be changed to chimpanzee. To change all the occurrences of monkey, type Edit ,s/monkey/chimpanzee/g (in vi this would be :%s/monkey/chimpanzee/g).
Side note: Although the above ed style substitution works in sam, sam is not a line-based editor like ed, and a more proper sam command for the above would be: Edit ,x/monkey/c/chimpanzee/ (that is: for each /monkey/ change to /chimpanzee/). To read the sam tutorial, run: page /sys/doc/sam/sam.tut.out
acme lacks many built-in features that UNIX user might expect, but you can create much of this functionality simply by piping the text through standard utilities. Here are some examples:
- Edit = print current line number
- Edit ,|sort -r reverse sort the file
- Edit ,|grep -n . add line numbers
- Edit ,s/^.*: //g remove line numbers
- Edit s/^/ /g indent text
- Edit s/^ //g unindent text
- Edit s/^/#/g comment out lines of code
- Edit s/^#//g uncomment lines of code
- Edit ,|wc -c file word count
- Edit ,|fmt nicely format the file
- Edit ,|cb beutify C source code
- Edit s/./-/g underline after copying a line
- |tr A-Z a-z lowercase text
- |tr a-z A-Z uppercase text
- |tr a-zA-Z n-za-mN-ZA-M rot13 text
Open a New window and type in the filename /usr/glenda to the far left, then type Get to the far right, right of Look, and middle click it. The contents of the /usr/glenda directory will fill the window. If you right-click on a directory in this window, the contents of that directory will be opened in a new window. On the other hand, if you right-click a text file, the contents of that file will be opened for editing in acme.
Exactly what happens when you right-click something in acme, depends on the word you click. For example clicking on the word /usr/glenda/pictures/cirno.png, will open this picture in the image viewer page, and clicking jazz.mp3, will start playing the audio file with play. Provided of course that the files in question exist on your system. The last example also assumes that the jazz.mp3 file is located in the same directory as the one you launched acme from, if not you need to specify a correct file path. The actual work of connecting the right files to the right program is handled by plumber, which we will talk about later, but for now it's enough to know that right clicking a filename anywhere in acme will usually just "do the right thing".
Each window has a dark blue square to the far left of the menu, you can click and drag this box to resize or move the window to another column. The columns themselves also have a dark blue square, click and drag this to resize or move the column.
You can also right-click on the dark blue window square, to hide all the column windows except that one, left-click on it to bring the windows back. Left-clicking on the square will increase the window size a little, middle-clicking will maximize the window.
Left-clicking on the scroll bar will scroll upwards, right-clicking downwards. Clicking towards the bottom of the scroll bar will scroll a lot, clicking towards the top will only scroll a little. Middle clicking will transport you directly to that portion of the file. Play around and experiment with these mouse actions, pretty soon you will get the hang of it. Other Plan 9 applications with scroll bars work the same way.
Multiple Workspaces
rio does not have virtual workspaces, there exists an old fork, called rio-virtual, that does. Note however that this fork will not compile on 9front, check out riow in the 9front extra repository instead. It is easy enough though to create pseudo-workspaces in rio: Just create a new terminal window and run plumber ; rio. This will run a rio desktop in this window (plumber is not required here, but it will make sure that files automatically opened will only be opened in this isolated rio and not outside of it).
You can maximize this "virtual workspace" and do your work, hide this window when you want to go back to your first workspace, then switch back to it by selecting the hidden window in the rio menu. You can have as many of these workspaces as you like, and you can run rio inside rio inside rio ad infinitum... To organize this mess a bit you can also manually label your workspaces. Lets say you have 4 rio workspaces hidden in the background, the rio menu will just list them as: rio, rio, rio, rio. That's not very helpful. By running grep rio /mnt/wsys/wsys/*/label you will see what window id these workspaces have. You can then redefine their label, eg. echo -n workspace1 > /mnt/wsys/wsys/3/label. The rio menu will now list this window as "workspace1", instead of "rio".
Another simple workspace solution is drawterm. Once a Plan 9 CPU server (see section 7.5 and 7.6 in the 9front fqa, and the Quick CPU+AUTH+Qemu+Drawterm HOWTO section below) has been configured, you can connect as many drawterm clients to it as you wish. For yet another approach to this problem, see the rio scripting section below.
Tiling Windows
First of all, acme is a tiling window manager. Just maximize the editor and do your stuff.
Secondly, you can use your rio startup file, $home/bin/rc/riostart, to automatically set up a desktop that suits your needs. For example, if you have a 1366x768 screen, you can add these instructions to add an acme window to the left half of the screen, and a terminal window on the right half:
window 0,0,683,768 acme
window 683,0,1366,768
Unlike UNIX, graphical programs executed in a Plan 9 terminal will not launch a new window, rather, the terminal will morph into this new program. In other words, running the PDF/Image viewer page, or the web browser mothra in a terminal for instance, will in no way effect window placement. So having an initial window placement that works on your desktop, will significantly reduce the need for automatic window tiling. But if you need that, take a look at the rio scripting section below.
Plumbing
We have already seen brief mentions of the Plan 9 plumber a few times in this guide, but lets take a closer look. The plumber is essentially a simple inter-process messaging system. It lets you define a set of actions based on text patterns given to it. For instance, in the system wide plumber rules in /sys/lib/plumb/basic, you will find the following section:
# open urls with web browser
type is text
data matches 'https?://[^ ]+'
plumb to web
plumb client window $browser
This rule is very simple: If the message is text (it's always text), if it matches "http://" or "https://" something or other, define it as "web" related, and launch a new program, "$browser", with the given text as arguments. So in effect, whenever an URL is sent to the plumber, it opens it up in your default web browser. So, right clicking http://9front.org in acme will open up that web page, likely in mothra. You can also run the command plumb http://9front.org in a terminal, for the same effect.
You can define your own rules too. For example, I wrote my own simple Epub reader, and added these lines to $home/lib/plumbing, in order to always open Epub files with my custom reader:
# open epubs with custom script
type is text
data matches '([a-zA-Z0-9_\-./]+).(epub|EPUB)'
arg isfile $0
plumb to image
plumb start window eread $file
This rule adds a check to see if the given argument is an existing file, if it is $file is set to this filename, but the logic is otherwise much the same as the above URL rule. Just make sure that your custom plumber rules end with the line include basic, otherwise you will loose all of the system defaults.
Plumbing rules are not restricted to file suffixes. Suppose you are reading through several documents at the moment, and you want to bookmark these to keep track of your reading progress. The solution is simple, write a database, lets call it $home/lib/bookmarks, with content similar to this:
# work stuff
/usr/glenda/doc/papers/lengthy.pdf!123
/usr/glenda/doc/papers/plain.txt:206

# plan 9 stuff
/sys/doc/9.ps!3
/sys/doc/acme/acme.ps
acme(1)

# fun stuff
/usr/glenda/doc/books/peter_pan.txt:/Chapter 2/
/usr/glenda/music/podcasts/bsdnow/acdecc6a-f7b7-4d64-b64d-f7be713b78e2.mp3
Right clicking on any of these lines in acme, will open up the file with an appropriate program. page for PDF's and postscript files, play for audio files, and plain text files directly in acme. But the default plumbing rules allow you to be even more specific then that. Piping something like lengthy.pdf!123, will not only open the PDF in page, but also on page number 123. Plain text files can also be addressed, such as plain.txt:206 for line 206 of that file, or peter_pan.txt:/Chapter 2/ to open up or Peter Pan book and look for the text string "Chapter 2". Usually such textual plumbing rules are used when programming, to open a source file on the offending line by right clicking a diagnostic message for instance, but we can also used them to keep track of ourselves.
Speaking of which, lets look at one more example of how we can modify plumbing rules to suit our workflow. in the PIM section below, I mention a script called que, which iterates over a list (a queue), by printing the next line in the file whenever you run que on it. Lets assume we have a list called $home/lib/que/peterpan with the following content:
/usr/glenda/doc/books/peter_pan.txt:/Chapter 1/
/usr/glenda/doc/books/peter_pan.txt:/Chapter 2/
/usr/glenda/doc/books/peter_pan.txt:/Chapter 3/
...
Now, each time we run que $home/lib/que/peterpan, it will tell us what chapter to read next in our book. And sure enough, we can right click this output in acme to open up the book in the right place (since "Chapter x" contains whitespace we need to right click and drag to mark the whole line). But that is waaay too much work for a lazy pants such as myself! What I really want is just to add something like this to my bookmark database:
/usr/glenda/lib/que/peterpan:que
Right click this in acme, and have it automatically call que and open up the right chapter for me. As it turns out, such automation is easy peasy, I just need to add this plumbing rule to my $home/lib/plumbing (and update my rule set with the command: cp $home/lib/plumbing /mnt/plumb/rules):
# plumb the next item in a queue file
type is text
data matches '([a-zA-Z0-9_-./]+)(:que)'
arg isfile $1
plumb to none
plumb start rc -c 'plumb `{que '$file'}'
This rule checks if the plumber received "something_something:que", and that the first argument (excluding the :que) was a real file. We are not interested in opening this file, so we plumb it to "none", and then we run our shell command plumb `{que $file}. Of course our queue doesn't need to be plain text chapters, they could be PDF's with page numbers or sequential audio files in a podcast, or what have you.
We can abuse the plumber in all kinds of fun and potentially destructive ways. It basically allows you to define any text pattern and connect that to any command. Even if you don't go bananas with this, it is nevertheless an eye opening experience to read /sys/lib/plumb/basic and realize just how simple inter-process messaging can be!
System Administration
Basic System Administration
To shutdown or reboot a Plan 9 system, you can use the fshalt and reboot commands. The fshalt command only halts the filesystem, but if you have enabled ACPI support, by adding *acpi=1 in plan9.ini (see section 9.2.3 in the fqa), it will also power off the system on supported hardware (in either case it is perfectly safe to turn off the machine using the power button once the filesystem is halted).
If you are using a remote Plan 9 desktop, such as drawterm, it is safe to just kill the application directly. The remote desktop is stateless, and thus shutting it down will in no way effect the host filesystem. In fact, the system is designed to run a CPU server 24/7, and connect to it with diskless clients. Probably because of this design, Plan 9 is quite careless about its shutdown procedure, and I have seen situations where shutting down the system right after heavy disk writes causes data loss. A simple workaround here is to wait a few seconds before powering off the machine, naturally such paranoia can be automated too, just add these lines to your $home/lib/profile:
fn halt{ sleep 5; fshalt }
PS: fshalt does not work right in qemu if you use classic Plan 9, such as 9legacy. In such cases you should write your own shutdown script, like so (note: this is not an issue in 9front):
#!/bin/rc
# halt - shutdown file server
# usage: halt
echo fsys main sync >>/srv/fscons
sleep 5
echo Its now safe to turn off your computer
echo fsys main halt >>/srv/fscons
To monitor your remaining battery, memory usage, ethernet traffic, system load and other resources, you can use the stats and memory commands. Simply cat'ing around in /dev will also provide much system information, for instance cat /dev/kmesg is essentially equivalent to dmesg in UNIX. There is also limited support for suspend and hibernate if you add the apm0= value to plan9.ini (see section 9.2.3 in the fqa and apm(8)). Don't expect this to work though, ACPI and APM is a hairy business!
PS: memory is just a simple shell script in 9front that cat's /dev/swap and reformats the values in more human readable form, classic Plan 9 systems do not have this script. There is some ACPI support in 9front, which can be enabled by setting *acpi=1 in plan9.ini. Classic Plan 9 systems does not have this feature.
Battery Monitoring
Speaking of not working, battery monitoring usually doesn't in my experience (to check if it works on your box, just run stats, right click and add battery). And unless you are very lucky, plugging in a headset will not automatically redirect audio output either. I had both problems on my cheap Acer laptop (note to self: only buy Lenovo ThinkPads from now on). The last problem will be revisited in the audio section, as for the battery problem, a very simple solution for this is to run sleep 7200; echo Warning: batterys about to go out! > '#c/cons'. Assuming that your computer has 2 hours (7200 seconds) and 15 minutes of battery capacity, and you run this command when you know that the machine is fully charged, you will get notified 15 minutes before your battery runs out.
The main problem with this elegant command, is that it does not work at all if you expect to reboot your computer at some unknown point in the future. I find that this is frequently the case when I am traveling, and need battery monitoring the most. So I need a way to start a 2 hour countdown that persists across reboots, this script does the trick:
#!/bin/rc
# batt - print estimated remaining battery power
# usage: batt [-c || min]
#
# bug: the script doesn't actually know anything about your battery,
#      the user is required to run batt min initially to set a timer.

# set some defaults
rfork ne
batt=$home/lib/battery
capa=120    # hardware dependent
if(~ $1 [0-9]*) capa=$1

# parse arguments
switch($#*){
case 0
    if(! test -f $batt){
        echo 'batt: countdown hasn''t started, run batt - first!' >[2=1]
        exit notstarted
    }
    used = `{cat $batt}
    pros = `{echo 100 - ($used^00 / $capa) | hoc | sed 's/\..*//'}
    remn = `{echo $capa - $used | hoc}
    echo 'Battery at '$pros'% estimated remaining time: '$remn' min'
case 1
    # -c, continue a countdown after a reboot, don't reset timer
    if(! ~ $1 -c) echo 0 > $batt
    while (sleep 60) {
        date > $home/lib/end
        used = `{echo `{cat $batt} + 1 | hoc}
        if (test $used -ge $capa) {
            echo 'Your battery is about to run out!' >'#c/cons'
            play $home/media/music/samples/mario.mp3 >[2]/dev/null
            rm -rf $batt
            exit
        }
        echo $used > $batt
    }&
case *
    echo Usage: batt [-c || min] >[2=1]
    exit usage
}
You'll note that this simple countdown script measures time in minutes (120, not 7200), the main reason for this crude measurement of time is battery related, if we counted every second, the script would be 60 times harder on your battery. Anyway, using this script you can start a countdown when you know the batteries are fully charged with the command batt - (or batt 80 or whatever to set a countdown other then the default 120 minutes). Once that daemon has started, run batt to get an estimated remaining time of juice. But here comes the clever part: After a reboot run batt -c to continue a battery countdown! In fact, you can fully automate this step by adding something like this to your $home/lib/profile:
...
if (test -d /mnt/term/dev){
    # do drawterm stuff
    ...
}
if not {
    # do non-drawterm stuff
    if(test -f $home/lib/battery) batt -c
    ...
}
...
Don't let the boilerplate here scare you. If you don't use drawterm, just add if(test -f $home/lib/battery) batt -c, and your done (but you probably don't want to mess with battery stuff if you are using drawterm, for obvious reasons). This command simply checks to see if the file that the batt daemon uses to measure the battery countdown exists. Since our batt script removes this file once the countdown has expired, it knows that an unfinished countdown was in progress before the last reboot, and so it respawns the daemon.
Finally, to know when the latop is done recharging from a depleted battery, just measure the time it takes in Ubuntu, or other suitable grandma distro, and set an appropriate timer in Plan 9. We could also wrap this up in a simple script that stops the battery countdown and cleans up the temp file:
#!/bin/rc
# recharge - estimate when battery is recharged
# usage: recharge

kill batt | rc
rm -f $home/lib/battery
sleep 1800; echo Battery fully charged > '#c/cons'
In my opinion this is a really nice example of how you can create fairly useful and simple workaround on UNIX-like operating systems, even when they lack vital features.
Configuring Startup and Shutdown
Plan 9 has no /etc directory like UNIX, instead it is configured through a small handful of files. The most important of which is probably $home/lib/profile, the user startup file. This is where you customize your user specific settings, it is somewhat analogous to ~/.profile in UNIX, but more important since desktop and shell are much more integrated in Plan 9. Personally I like to add this line to my lib/profile: . $home/lib/aliases, which enables me to add custom aliases to this separate file, while keeping only system related configurations in lib/profile. But that is just a matter of taste.
Beware that the settings in $home/lib/profile needs to cater to very different situations! Whether you are booting a CPU server, a standalone "terminal", or a diskless one, or are logging in through a remote connection (rcpu or drawterm for example), they all read lib/profile, but often need different customizations. The moral is, be careful when editing your profile, hubris cause debris.
The kernel configuration is in the plan9.ini file, which resides in a special boot partition. To read the contents of this partition you must first run 9fs 9fat (for classic Plan 9 run 9fat:), you can then read this file in /n/9fat/plan9.ini (note: like all Plan 9 commands this manipulates the namespace of your current process, so you will not see this file in other processes). It is by editing this file that you configure your system to run as a CPU server or terminal, you may also need to tweak some hardware specific values here. See plan9.ini(8) and section 3 of the fqa.
Network configuration is handled in /lib/ndb/local, with additional related files in that directory. But you don't need to mess around with this file if you just want to quickly connect to the internet on a laptop (see section 6 in the fqa). Mail configuration is handled by a number of files in /mail/lib (see section 7.7 in the fqa).
Lastly there is also a desktop specific startup file in $home/bin/rc/riostart, which is useful for specifying what programs and windows to auto launch, it is discussed more in depth in the tiling windows section of this article.
Wallpapers, themes, etc...
The rio window manager is painstakingly crafted with love and care to be as boring as humanly possible. This is important - a distraction free environment is a productive environment. But it is possible to install 3rd party patches that let you customize the rio theme, set a wallpaper, control it with key combinations and customize a panel:
Installing 3rd party extensions to rio in 9front:
# install bar, a customizable panel for rio
; cd /tmp
; git/clone https://git.sr.ht/~ft/bar
; cd bar
; mk install

# install riow, rio with key combos
; cd /tmp
; git/clone https://git.sr.ht/~ft/riow
; cd riow
; mk install
; cat 9front.diff | @{cd /sys/src/cmd/rio && ape/patch -p5 && mk install}
; reboot # or otherwise restart rio

# start riow (add to riostart if you want)
; window -scroll riow # optionally add -hide

# install rio-themes
; bind -ac /dist/plan9front /
; cd /sys/src/cmd/rio
; hget https://ftrv.se/_/9/patches/rio-themes.patch | ape/patch -p5
; mk install
; reboot # or otherwise restart rio

# write a theme, eg. in $home/lib/theme/rio.theme
# ps: wallpaper must be in the plan 9 image format,
# eg. jpg -9t <pic_1920x1080.jpg >$home/lib/1920x1080.img
rioback /usr/glenda/lib/1920x1080.img
back      f1f1f1
high      cccccc
border    999999
text      000000
htext     000000
title     000000
ltitle    bcbcbc
hold      000099
lhold     005dbb
palehold  4993dd
paletext  6f6f6f
size      000000
menubar   448844
menuback  eaffea
menuhigh  448844
menubord  88cc88
menutext  000000
menuhtext eaffea

# use your theme (add it to riostart if you want)
; window 'cat $home/lib/theme/rio.theme > /mnt/wsys/theme;
    	sleep 0.5;
    	grep softscreen /dev/vgactl >> /dev/vgactl;
    	echo hwblank off >> /dev/vgactl'
Internationalization
For better or worse, computing is an English affair. I'm sorry, but if you want to program and use any operating system in any professional capacity, you need to learn the English language. Nearly all vital documentation, and any defining works in programming, computer science and computing history, will be written in this language. I don't mean to be unsympathetic here, I am not a native English speaker myself, so I know that this can be a tall order, but that's just the way it is.
Having that said, technically speaking, Plan 9 does have very good internationalization support. Of course, all of the instructions given during installation, and all of the available documentation is in English. But the system itself supports any language as everything is Unicode throughout. So as long as you have the necessary fonts installed, you can read and write any language (UTF-8 was in fact invented by the Plan 9 developers!). For example, to write the Northern Norwegian sentence "Æ e i Å æ å" (yes, this is a real sentence), type Alt+Shift+a+e e i Alt+o+Shift+a Alt+a+e Alt+o+a. A list of the international characters available with the Alt key combo, can be found in /lib/keyboard. So to find out how to write a smiley face in Plan 9, just type grep ☺ /lib/keyboard (naturally the ☺ can be copy pasted), and it will print:
263A :) ☺ smiley face
That is, type Alt+:+) to produce the Unicode character 0x263A, aka a smiley face. You can change the default US qwerty layout too with the kbmap command, right click on the layout you want, then type q to quit. To set this change permanently:
# change dvorak to whatever layout you prefer
# setting layout in 9front:
9fs 9fat
echo 'kbmap=dvorak' >> /n/9fat/plan9.ini

# setting layout in classic Plan 9:
sam $home/lib/profile
# add the following line somewhere near the top
cp /sys/lib/kbmap/dvorak /dev/kbmap
User Management
To add a new user called bob, that is a member of the email (upas) and admin groups, on a system using the hjfs filesystem type:
; echo newuser bob >> /srv/hjfs.cmd
; echo newuser upas +bob >> /srv/hjfs.cmd
; echo newuser adm +bob >> /srv/hjfs.cmd
; echo newuser sys +bob >> /srv/hjfs.cmd
; auth/keyfs
; auth/changeuser bob
; auth/enable bob
If you are using the cwfs filesystem instead, use cwfs.cmd instead of hjfs.cmd. If you are using a classic Plan 9 system, use fscons, and use the command uname rather then newuser, but otherwise it's the same. The very first thing Bob needs to do when he first logs in to the Plan 9 box, is to type /sys/lib/newuser. This will create an initial home directory with basic files such as a lib/profile and a tmp directory. You may also wish to add the new user to secstore (see section 7.4.3.1 in the fqa).
Disk Management
There is no df command in Plan 9 for measuring disk usage, but you can get that information in other ways. On an hjfs filesystem run this command: echo df >> /srv/hjfs.cmd. On cwfs the method is a bit awkward: echo statw >> /srv/cwfs.cmd && cat /srv/cwfs.cmd, will give you a bunch of statistics, currently using 16 Kb filesystem blocks (hit Del when your done) What you probably want is the last digit in the wmax line, which will tell you how much percentage of the disk you are using (the cache line here is also important, the cache is only 1/5 the size of the main storage area, but if it runs out of space - you will run into problems!). Here is a crude df script for 9front that you may find useful:
#!/bin/rc
# df - print disk usage on hjfs/cwfs
# usage: df

if (test -f /srv/hjfs.cmd) {
	echo df >> /srv/hjfs.cmd
}
if not {
	echo statw >> /srv/cwfs.cmd
	dd -if /srv/cwfs.cmd -bs 1024 -count 21 -quiet 1 |
	grep wmax | sed 's/.*\+//'
}
I think the method is similar to this in classic Plan 9, but I am not exactly sure how to do this. For individual files and folders you can of course use the trusty old du command to measure their size. Here is a simple and handy script that lists the files and folders in your current directory by disk usage:
#!/bin/rc
# dus - disk usage summary for current dir
# usage: dus

du -s * | sort -nrk 1 | awk '{
    if ($1 > 1073741824) printf("%7.2f %s\t%s\n", $1/1073741824, "Tb", $2)
    else if ($1 > 1048576) printf("%7.2f %s\t%s\n", $1/1048576, "Gb", $2)
    else if ($1 > 1024) printf("%7.2f %s\t%s\n", $1/1024, "Mb", $2)
    else printf("%7.2f %s\t%s\n", $1, "Kb", $2)
}'
For an example of how to format a USB stick with FAT32 (ei. a DOS partition) and use it in Plan 9, see the section about USB sticks below. The process for creating a Plan 9 partition, instead of FAT32, is fairly similar. Assuming the usb stick is called sdUc59fd, here is how to format it with an hjfs filesystem:
; disk/fdisk -baw /dev/sdUc59fd/data
; disk/prep -bw -a fs /dev/sdUc59fd/plan9
; hjfs -r -f /dev/sdUc59fd/fs
; hjfs -n hjfsusb -f /dev/sdUc59fd/fs
; mount /srv/hjfsusb /n/hjfsusb
; touch /n/hjfsusb/anewfile
And here is how to do it using cwfs:
; disk/fdisk -baw /dev/sdUc59fd/data
; disk/prep -bw -a^(fscache fsworm other) /dev/sdUc59fd/plan9
; cwfs64x -n fsusb -f /dev/sdUc59fd/fscache -C -c
config: service cwfs
config: config /dev/sdUc59fd/fscache
config: noauth
config: filsys main c(/dev/sdUc59fd/fscache)(/dev/sdUc59fd/fsworm)
config: filsys dump o
config: filsys other (/dev/sdUc59fd/other)
config: ream other
config: ream main
config: end
; mount /srv/fsusb /n/fsusb
; touch /n/fsusb/anewfile
The above example is for 9front, as for classic Plan 9 systems, here is how you create a kfs filesystem:
; disk/fdisk -baw /dev/sdUc59fd/data
; disk/prep -a fs /dev/sdUc59fd/plan9
; disk/kfs -f /dev/sdUc59fd/fs
; mount -c /srv/kfs /n/kfs
; touch /n/kfs/anewfile
Package Management
Plan 9 does not really have package management facilities in the sense that a UNIX user would expect. The system is intended to be "fully-featured" (albeit minimalistic) and few 3rd party software exists, those that do tend to be distributed as plain source code requiring the user to compile them manually. It has been toyed with some package management solutions for Plan 9, but for the most part Plan 9 users usually just compile what they need by hand. Here are a few examples to demonstrate what "package management" may entail in Plan 9:
Updating the 9front system - elaborately:
; sysupdate    # download latest sources
; cd /         # rebuild system
; . /sys/lib/rootstub
; cd /sys/src
; mk install
; mk clean
; cd /sys/man  # optionally rebuild documentation
; mk
; cd /sys/doc
; mk
; mk html
; cd /sys/src/9/pc
; mk install   # optionally rebuild (32-bit) kernel
; 9fs 9fat
; rm /n/9fat/9bootfat
; cp /386/9bootfat /n/9fat
; chmod +al /n/9fat/9bootfat
; cp /386/9pc /n/9fat
; reboot       # if you have installed a new kernel
Of course, you do not need to reinstall the kernel and rebuild the docs for every minor update, usually all you need to do is:
Updating the 9front system - quickly:
; sysupdate
; cd /sys/src
; mk install
Install xscreensaver package from the 9front extras:
; cd /tmp
; 9fs 9front     # download package
; tar xzf /n/9front.org/extra/xscr.tgz
; cd xscr        # compile programs and install them
; mk
; for(f in 8.*){ mv $f $home/bin/$cputype/^`{echo $f | sed 's/8.//'} }
Install vim port from Bell Labs contrib repository (old stuff):
; 9fs sources    # install the binary
; cp /n/sources/contrib/stefanha/root/386/bin/vim $home/bin/386
Install the Bell-Labs port of perl (old stuff):
; 9fs sources    # download iso and mount it
; bunzip2 < /n/sources/extra/perl.iso.bz2 > /tmp/perl.iso
; mount <{9660srv -s >[0=1]} /n/iso /tmp/perl.iso
; cp /n/iso/386/bin/perl $home/bin/386    # install the binary
Recompile 9front to amd64 and install golang:
# go will only work on amd64 architecture, so if you are
# running 386, rebuilt to 64-bit first:
; cd /
; . /sys/lib/rootstub
; cd /sys/src
; objtype=amd64 mk install
; cd /sys/src/9/pc64        # build and install a 64-bit kernel
; mk install
; 9fs 9fat
; rm /n/9fat/9bootfat
; cp /386/9bootfat /n/9fat
; chmod +al /n/9fat/9bootfat
; cp /amd64/9pc64 /n/9fat
; sam /n/9fat/plan9.ini    # make sure bootfile=9pc64 (not 9pc!)
; reboot                   # reboot to a 64-bit system, download Go stuff

# now, lets build go, we will bootstrap the latest version
# of go from 9legacy, then use that to build the go source
# (these instructions quickly get outdated):
; mkdir /sys/lib/go
; cd /sys/lib/go
; hget http://www.9legacy.org/download/go/go1.16.3-plan9-amd64-bootstrap.tbz |
;     bunzip2 -c | tar x
; hget https://golang.org/dl/go1.16.3.src.tar.gz |
;     gunzip -c  | tar x
; mv go amd64-1.16.3
; GOROOT_BOOTSTRAP=/sys/lib/go/go-plan9-amd64-bootstrap
; GOROOT=/sys/lib/go/amd64-1.16.3
; cd amd64-1.16.3/src
; make.rc
; bind -b $GOROOT/bin /bin
# get some recent certificates
; hget https://curl.haxx.se/ca/cacert.pem > /sys/lib/tls/ca.pem
; go get golang.org/x/tools/cmd/godoc

# to make the go environment permanent, add these
# instructions to your $home/lib/profile
; GOROOT=/sys/lib/go/amd64-1.16.3
; bind -b $GOROOT/bin /bin
PS: In classic Plan 9, you would run replica/pull /dist/replica/network to get the latest sources from Bell Labs, and 9fs sources to get the Bell Labs repository of contributory software listed under /n/sources. Today however, these resources are gone. You can still mount a snapshot of the contrib repository in 9legacy by running the command srv -nqC tcp!9p.io sources /n/sources, the official 3rd party software from Bell Labs will be in /n/sources/extra, while the repository of contributors are in /n/sources/contrib. You can also manually mount the Bell Labs wiki from 9p.io like so: srv -m 'net!9p.io!wiki' wiki /mnt/wiki, you can then access the wiki by running acme /acme/wiki/guide, and follow the instructions there (in 9front accessing these resources are done with: 9fs sources and 9fs wiki). Note however that these old resources are in no way maintained, so they are more of archeological, then practical, interest. Note that many of the 9front specific scripts and programs mentioned in this article, may work just fine in 9legacy, or any other classic Plan 9 system. Feel free to try it out :)
File Management
The only default "file manager" in Plan 9 is acme. If you run B path/mydir for instance, the contents of mydir will be listed in acme. Right clicking on a directory here will list its contents, clicking on a text file will open it up for editing, and clicking a PDF or audio file will open it up in page or play, and so on.
You can of course use the shell to manage your files, but there are a few differences between UNIX and Plan 9, that might trip you up. For example, you don't have rmdir, just use rm to delete your directories. Also there is no cp -r, instead you have dircp that copies directories. So, if you need to copy mydir to otherpath, you need to run mkdir otherpath/mydir; dircp mydir otherpath/mydir. If you only want to copy the content of mydir, not the directory itself however, just run dircp mydir otherpath. This may seem cumbersome to a UNIX user, but it does actually have some benefits. Beyond a simpler implementation, the approach is unambiguous. I do not know how many times I have run cp -r mydir otherpath in UNIX, when I actually meant to run cp -r mydir/* otherpath (ei. I only wanted to copy the contents of mydir). In Plan 9 you don't have this problem.
Lastly, if you really want a GUI, there is a nice graphical 3rd party file manager, called vdir. It works much like the acme file manager, you right click on things to open them up.
Tips for UNIX Sysadmins
As the previous section illustrates, there are some fundamental differences between UNIX utilities, and Plan 9 equivalents. A very good UNIX to Plan 9 translation of various sysadmin commands are given here. You will note that many essential tools that *nix graybeards take for granted, such as find or top, are not available in Plan 9. And naturally, standard tools may not work as you expect either, the shell does not Tab auto-complete, cp does not copy recursively, ls does not list multiple columns, and so on. This can be very unsettling for seasoned UNIX veterans, but don't panic, the Plan 9 way of doing things will make sense if you give it time. Incidentally, walk (or even du -a) can be used as a lightweight alternative to find, pstree, memory and winwatch should help you monitor your programs, Ctrl-f auto-completes filenames in the shell, and as we have seen, dircp copies recursively and lc lists files in multiple columns. You can usually reach your goal in Plan 9, you just have to learn to walk a different path...
Quick CPU+AUTH+Qemu+Drawterm HOWTO
As mentioned at the onset, the focus of this guide is on using Plan 9 as a day-to-day desktop, not installation and configuration. So I really didn't want to to do this... but I suppose it's unavoidable. The problem here is that there are just so many variables when setting up a Plan 9 CPU server. For example, do you run the machine on bare metal or virtually, if virtually what virtual machine do you use, in what operating system, if Linux, what distro... And we haven't even begun considering the many different ways you can configure Plan 9 itself! What I present here then is just a quick howto. I assume you want to install a Plan 9 CPU server in qemu on a Linux, or other UNIX, machine, and that you go with all of the default options during the installation of Plan 9, and that you say "y" to all yes or no questions. I will not explain the steps we take here, and I gloss over details that are unimportant. But if you follow the steps carefully, you will end up with a drawterm connected to a Plan 9 CPU+AUTH server running in qemu, well... at least on my machine ;)
To make this work, we need to use some painfully detailed qemu flags, so I recommend using the following wrapper script to launch qemu:
#!/bin/sh
# 9qemu: wrapper script for launching Plan 9 in qemu
# usage: 9qemu disk [args...]

disk=$1 && shift
if [ $(uname -s) = Linux ]; then
	# non-linux systems may not have this
	kvm=-enable-kvm
fi
flags="-net nic,model=virtio,macaddr=52:54:00:12:34:56 \
	-net user,hostfwd=tcp::17010-:17010,hostfwd=tcp::17019-:17019,\
	hostfwd=tcp::17020-:17020,hostfwd=tcp::12567-:567 \
	-device virtio-scsi-pci,id=scsi -device scsi-hd,drive=vd0 \
	-device sb16 -vga std -drive if=none,id=vd0,file=$disk"

qemu-system-x86_64 $kvm -m 2G $flags $*
9front
I recommend using hjfs, rather then the default cwfs filesystem during installation (hjfs is nicer, cwfs is faster - only use cwfs with a big harddisk!). If you want to go with cwfs, follow the steps that are commented out:
# Step 0: install qemu and drawterm (9front edition)
$ sudo apt install qemu # adjust to suit your system
$ firefox https://drawterm.9front.org # download drawterm
$ tar xzf drawterm-*.tar.gz
$ cd drawterm-*
$ CONF=linux386 make    # adjust to suit your system
$ cp drawterm $HOME/bin

# Step 1: install 9front and reboot
$ qemu-img create -f qcow2 9front.img 2G
#qemu-img create -f qcow2 9front.img 30G # cwfs needs a big disk!
$ 9qemu 9front.img -cdrom 9front.iso -boot d # use hjfs filesystem!
$ 9qemu 9front.img

# Step 2: configure boot
; 9fs 9fat
; sam /n/9fat/plan9.ini
# change bootargs and add this:
bootargs=local!/dev/sd00/fs -m 448 -A -a tcp!*!564
nobootprompt=local!/dev/sd00/fs -m 448 -A -a tcp!*!564
#bootargs=local!/dev/sd00/fscache -a tcp!*!564
# do not set nobootprompt yet for cwfs!
user=glenda
auth=10.0.2.15
cpu=10.0.2.15
authdom=virtual
service=cpu

# Step 3: write nvram and add user
; auth/wrkey
authid: glenda
authdom: virtual
secstore key: ******
password: ******

; auth/keyfs
; auth/changeuser glenda
password: ******
post id: glenda

# Step 4: configure network
; sam /lib/ndb/local
# change last line and add this:
sys=cirno ether=525400123456 authdom=virtual auth=10.0.2.15 ip=10.0.2.15

ipnet=qemu ip=10.0.2.0 ipmask=255.255.255.0
	ipgw=10.0.2.2
	auth=10.0.2.15
	authdom=virtual
	fs=10.0.2.15
	cpu=10.0.2.15
	dns=8.8.8.8

# Step 5: configure startup
; sam $home/lib/profile
# add these lines at the end of the cpu section, before "case con":
if (test -d /mnt/term/dev) {
	# cpu call from drawterm
	webfs
	plumber
	rio -i riostart
}

# reboot
; sleep 5; fshalt -r

# Step Z: enable auth services for cwfs, you only need to do this if you
# used the cwfs filesystem rather then hjfs during installation (ps: you
# may want to set nobootprompt in plan9.ini after this):
#bootargs:local!/dev/sd00/fscache -c
#config: noauth
#config: noauth
#config: end

# Connecting to the server with drawterm:
$ drawterm -a 'tcp!localhost!12567' -s localhost -h localhost -u glenda
9legacy
As you will see, setting up a 9legacy CPU+AUTH server is notably different from 9front. Classic Plan 9 has also a few issues with qemu, first of all, Plan 9 from Bell Labs does not recognize the harddisk with this setup, although 9legacy does. The fshalt script in the original Plan 9 system does not work right in qemu, which is why we make our own halt script in this example. Finally, graphics do not work with this setup. This isn't a huge deal (unless you hate ed), since we can connect to the CPU server with a graphical drawterm once things have been configured. However, if you just want to quickly install 9legacy and play around in the desktop without drawterm, run something like this instead: qemu-systex-x86_64 -m 2G -hda 9legacy.img PS: To avoid a naming conflict with the 9front drawterm, we call the original version 9drawterm.
# Step 0: install qemu and drawterm (original plan9 edition)
$ sudo apt install qemu # adjust to suit your system
$ firefox https://github.com/9fans/drawterm # download drawterm
$ unzip drawterm-master.zip
$ cd drawterm-master
$ CONF=unix make
$ cp drawterm $HOME/bin/9drawterm

# Step 1: install 9legacy and reboot
$ qemu-img create -f qcow2 9legacy.img 2G
$ 9qemu 9legacy.img -cdrom 9legacy.iso -boot d
# PS: choose /dev/sdD0/data as the distribution source, type exit at the
# /% prompt, and choose plan9 as the boot method.
$ 9qemu 9legacy.img

# Step 2: Do some initial configurations
; echo uname adm +glenda >>/srv/fscons
; cp /adm/timezone/GMT /adm/timezone/local # adjust to suit your needs
; mv /cfg/example /cfg/gnot
; echo ip/ipconfig >> /cfg/gnot/cpurc
; echo aux/listen -q -t /rc/bin/service.auth -d /rc/bin/service tcp >> /cfg/gnot/cpustart
; mv /rc/bin/service.auth/authsrv.tcp567 /rc/bin/service.auth/tcp567
; echo fsys main create /active/cron/glenda glenda glenda d775 >>/srv/fscons
; echo fsys main create /active/sys/log/cron glenda glenda a664 >>/srv/fscons
; ed /rc/bin/cpurc
g/^# auth/s/# (auth.+)/\1/
w
q

# Step 3: configure network
; ed /lib/ndb/local
$
a

sys=gnot ether=525400123456 authdom=virtual auth=10.0.2.15 ip=10.0.2.15

ipnet=qemu ip=10.0.2.0 ipmask=255.255.255.0
	ipgw=10.0.2.2
	auth=10.0.2.15
	authdom=virtual
	fs=10.0.2.15
	cpu=10.0.2.15
	dns=8.8.8.8
.
w
q
; ed /lib/ndb/auth
$
a
hostid=glenda
	uid=!sys uid=!adm uid=*
.
w
q

# Step 4: rebuild kernel
; cd /sys/src/9/pc
; mk 'CONF=pccpuf'
; 9fat:
; cp 9pccpuf /n/9fat
; ed /n/9fat/plan9.ini
/9pcf/s/9pcf/9pccpuf/
w
q

# Step 5: Setup nvram and users
; auth/wrkey
authid: glenda
authdom: virtual
password: ******

; auth/keyfs
auth/changeuser glenda
password: ******
post id: glenda

# Step 6: Halt system and reboot
# PS: the classic fshalt script doesnt work in qemu
; ed /rc/bin/halt
a
#!/bin/rc
echo fsys main sync >>/srv/fscons
sleep 5
echo Its now safe to turn off your computer
echo fsys main halt >>/srv/fscons
.
w
q
; chmod +x /rc/bin/halt
; halt
# click Machine -> Reset in qemu when its safe to reboot

# Connecting to the server with (the original) drawterm:
$ 9drawterm -a 'tcp!localhost!12567' -s localhost -c localhost -u glenda
Automation
What is the fundamental value of a computer? However controversial it is to say so, it is not watching skaters trip over themselves on Youtube, or emailing cute cat photos to your colleagues. The fundamental value of a computer is automation. Just as a tractor allows you to quickly plow a field with much less effort then a shovel would, so a computer allows you to quickly do your monthly accounting with much less effort then pen and paper would. So the question of how to use a computer efficiently and wisely, boils down to programming it to do your chores. Now I know what you are thinking, but relax. There is "programming", and then there is programming, we are only going to cover the first topic here, and leave the later for the professionals ;)
Shell Scripting
Plan 9's shell, rc is heavily inspired by the classic UNIX shell, sh (the Bourne Shell). Nevertheless it is a complete rewrite and behaves quite differently. One obvious difference is the syntax. The original UNIX shell was designed to mimic the syntax of a user-friendly programming language called ALGOL. In retrospect this was undoubtedly a mistake. rc however mimics the C syntax, which makes a lot more sense, since this is the programming language used elsewhere in the system.
Another big difference is that sh treats everything as a string, support for arrays were added later. This means that correct quoting is super important in the UNIX shell, and arrays are clunky. The Plan 9 shell on the other hand treats everything as a list, so arrays are seamless. Quoting is also simpler since there is only one escape character.
You will find several rc scripts in this article that demonstrate it's use, but here is a short list of sh to rc translations:
UNIX SHELL               PLAN 9 SHELL

mesg="Hello World!"      mesg=(Hello World!)
echo "\$mesg is $mesg"   echo '$mesg' is $mesg
echo "& a literal '"     echo '& a literal '''
echo ${one}${two}        echo $one^$two
echo contents: `ls`      echo contents: `{ls}
list=(`ls`)              list=`{ls}
echo 1st: ${list[0]}     echo 1st: $list(1)
echo all: ${list[@]}     echo all: $list
echo nr is ${#list[@]}   echo nr is $#list
echo 2>/dev/null         echo >[2]/dev/null
echo >/dev/null 2>&1     echo >/dev/null >[2=1]
if [ "$1" = yes ]; then  if (~ $1 yes)
    echo hi                  echo hi
else                     if not{
    echo goodbye             echo goodbye
    exit                     exit
fi                       }
while true; do           while(true){
    something                something
done                     }
for i in "$@"; do        for(i in $*){
    echo $i                  echo $i
done                     }
case in "$@"; do         switch($*){
    a) echo Abe          case a
       ;;                    echo Abe
    b) echo Bob          case b
       ;;                    echo Bob
    c) echo Carl         case c
       ;;                    echo Carl
    *) echo Who?         case *
       ;;                    echo Who?
esac                     }
alias l='ls -l'          fn l{ ls -l }
f(){                     fn f{
    echo funky!              echo funky!
}                        }
Many short script examples in this article are written as functions, this is because I usually add them to a custom alias file, as mentioned in the configuring startup and shutdown section. But you can easily rewrite these functions as standalone shell scripts if you want to.
Rio Scripting
The desktop in Plan 9 is fully scriptable, and in true UNIX fashion, you control it by using a file interface.
For example, if you only have one window open, and run the command ls /dev/wsys/wsys, you should see something similar to this: /mnt/wsys/wsys/1/ This tells you that there is only one window currently open, which has the ID 1.
Now run the command echo new sam > /mnt/wsys/wctl, this should open up a new sam window. If you ls the /mnt/wsys/wsys directory again, you should see two windows listed. You can now delete the sam window with the command echo delete > /mnt/wsys/wsys/2/wctl, assuming that your sam window had the ID 2. To resize the first terminal window, either run echo resize -r 0 0 1360 1080 > /mnt/wsys/wsys/1/wctl, or more simply echo resize -r 0 0 1360 1080 > /dev/wctl.
- /dev/wctl - window control file for the current window
- /mnt/wsys/wctl - window control file for the system (this file is not for you!)
- /mnt/wsys/wsys/n/wctl - window control file for window n
rio also provides other files that you can use to control its interface, some of these are discussed in the manipulating text in the terminal and taking a screenshot sections. For all of these files, the ones in /dev refer to your current window, use /mnt/wsys/wsys/n/ to manipulate another window. Here is the full list of files that rio provides:
- cons the console
- consctl the console control file
- kbd raw keyboard events
- cursor appearence of the mouse cursor
- label the window label
- mouse raw mouse input
- screen image of the screen
- snarf the snarf buffer, or "clipboard"
- text copy of the window text
- wctl the window control file
- wdir the current working directory
- winid the window ID number
- window image of the window
- wsys a subdirectory containing the other windows in rio
The fact that the window manager can be easily scripted with standard shell tools gives it enormous flexibility. Just a quick example to wet your appetite: The following command will print the window ID number for each window on the screen: for (win in /mnt/wsys/wsys/*) cat $win/winid > $win/cons (if you only want to print ID's on visible windows use this command: for (win in /mnt/wsys/wsys/*) if (dd -if $win/wctl -bs 128 -count 1 -quiet 1 | grep -s visible) cat $win/winid > $win/cons) PS: If you just want to quickly get the window id of some application, say acme, you can grep for it: grep acme /mnt/wsys/wsys/*/label.
Scrambling and Unscrambling a Rio Screen
As mentioned in the manipulating text section, text written to the system console will appear directly on your screen. This can be seriously annoying, especially if you have buggy hardware, which can make the kernel spam error messages onto your screen. To automatically ignore all such messages, you can add this line: window -hide -scroll cat /dev/kprint to $home/bin/rc/riostart. You may also find the following script helpful, it basically redraws the active rio windows, and thus unscrambles the screen:
#!/bin/rc
# unscramble - clear up a garbled rio screen
# usage: unscramble

screensize=(`{echo $vgasize | sed 's/x/ /g'})
window -r 0 0 $screensize(1) $screensize(2) exit
for (win in /mnt/wsys/wsys/*) {
    if(dd -if $win/wctl -bs 128 -count 1 -quiet 1 | grep -s visible){
        echo hide > $win/wctl
        echo unhide > $win/wctl
    }
}
Of course if you happen to be a weird cookie such as myself, you may actually enjoy scrambling the screen on purpose. We have already seen examples of how this feature provides an easy notification mechanism, but you can abuse it in other ways as well. For instance, I have a bat script that draws an ASCII bat signal on the system console and plays the batman theme song. It totally messes up the display, and is a nice facepalmer if I happen to mistype batt, mentioned in the battery monitoring section above. Here is another, more "useful" example. The script draws a fast moving fullscreen stats display, and then garbles it up at regular intervals. I find it sufficiently newb repellent to work as a defacto screen locker. A non-Plan 9 user (aka everyone) who sees such a screen, will assume that the computer is horribly broken somehow and refuse to touch it with a ten foot pole. Of course, once you delete the stats window everything will return back to normal.
#!/bin/rc
# scramble - garbles up a rio screen
# usage: scramble

fn sigexit{ kill stats | rc }
screensize=(`{echo $vgasize | sed 's/x/ /g'})
window -r 0 0 $screensize(1) $screensize(2) stats -T 0.01 -cflmsz &
while(sleep 5){
    if (! ps | grep -s stats) exit
    dd -if /dev/random -of '#c/cons' -bs 1024 -count 1 -quiet 1
}
max - Maximizing Windows
The following script lets you maximize windows in various ways, eg. max will make your current window fullscreened, and max u will restore its previous dimensions. max r 2 will place window with ID 2 on the right half of the screen, and so on, enjoy!
#!/bin/rc
# max - maximize windows
# usage: max [orientation] [winid]
#
# orientation can be: f (fullscreen), l (left), r (right), t (top), b (bottom),
# tl (top-left), tr (top-right), bl (bottom-left), br (bottom-right) or u
# (unmaximize), default is fullscreen.
#
# bugs: if you are maximizing another window, orientation is required
#    unmaximize is only useful right after maximizing a window.

# set some defaults
screensize=(0 0 `{echo $vgasize | awk -Fx '{ print $1, $2 }'})
if(~ $#windowsize 0)
    windowsize=`{dd -if /dev/window -bs 1 -count 70 -quiet 1 |
    awk '{ print $2, $3, $4, $5}'}
window=/dev/wctl
if(~ $#* 0) echo resize -r $screensize > $window
if(~ $#* 2) window=/mnt/wsys/wsys/$2/wctl
if(test $#* -gt 2){
    echo usage: max [orientation] [winid] >[2=1]
    exit
}

# maximize window
echo current > $window
switch $1 {
case f
    echo resize -r $screensize > $window
case l
    echo resize -r $screensize |
    awk '{ printf("%s %s %d %d %d %d", $1, $2, $3, $4, $5/2, $6) }' > $window
case r
    echo resize -r $screensize |
    awk '{ printf("%s %s %d %d %d %d", $1, $2, $3/2, $2, $3, $4) }' > $window
case t
    echo resize -r $screensize |
    awk '{ printf("%s %s %d %d %d %d", $1, $2, $3, $4, $5, $6/2) }' > $window
case b
    echo resize -r $screensize |
    awk '{ printf("%s %s %d %d %d %d", $1, $2, $3, $6/2, $5, $6) }' > $window
case tl
    echo resize -r $screensize |
    awk '{ printf("%s %s %d %d %d %d", $1, $2, $3, $4, $5/2, $6/2) }' > $window
case tr
    echo resize -r $screensize |
    awk '{ printf("%s %s %d %d %d %d", $1, $2, $5/2, $4, $5, $6/2) }' > $window
case bl
    echo resize -r $screensize |
    awk '{ printf("%s %s %d %d %d %d", $1, $2, $3, $6/2, $5/2, $6) }' > $window
case br
    echo resize -r $screensize |
    awk '{ printf("%s %s %d %d %d %d", $1, $2, $5/2, $6/2, $5, $6) }' > $window
case u
    echo resize -r $windowsize > $window
    windowsize=()
}
ws - Multiple Workspaces
This script provides a virtual workspace-like service for rio. You use it by typing ws n, where n is an arbitrary workspace number. The script works by registering which windows belongs to which "workspace", and then automatically hides or unhides the correct windows as you "switch" between them. Of course this is only a pseudo-virtual workspace, all the windows are still available in the rio menu, and plumbing a file in one "workspace" may pop-up a window in a different "workspace", but it's surprisingly practical nonetheless (if you want these workspaces to be isolated from each other, run a fullscreened window in each one with the following command: plumber; rio).
#!/bin/rc
# ws - pseudo virtual workspaces for rio
# usage: ws n
#
# bugs: the ws workspaces are not isolated from each other, if you need
#       that open a fullscreen window in each ws workspace and run
#       plumber followed by rio in it.

# set some defaults
rfork ne
tmp=$home/tmp/ws
winid=`{cat /dev/winid}

# initialize 1st desktop on first run
if(! test -d $tmp){
    mkdir -p $tmp
    touch $tmp/1
    echo 1 > $tmp/currentws
    ls -np /mnt/wsys/wsys > $tmp/`{cat $tmp/currentws}
}

# update window lists
ls -np /mnt/wsys/wsys > $tmp/riowindows
cat $tmp/[0-9]* | sort -n > $tmp/wswindows
comm -23 $tmp/riowindows $tmp/wswindows >> $tmp/`{cat $tmp/currentws}
for(i in `{comm -13 $tmp/riowindows $tmp/wswindows}){
    for(w in $tmp/[0-9]*) sed '/^'$i'$/d' $w > $tmp/TMP && mv $tmp/TMP $w
}
currentws=`{cat $tmp/currentws}
# no args: echo current ws (after updating windows) and exit
if(~ $#* 0){ echo $currentws && exit }
touch $tmp/$1

# switch desktop
if(~ $1 $currentws){ echo this is workspace $1 && exit }
for(i in `{cat $tmp/`{cat $tmp/currentws} | sed '/^'$winid'$/d' })
    echo hide > /mnt/wsys/wsys/$i^/wctl
echo $1 > $tmp/currentws
for(i in `{cat $tmp/`{cat $tmp/currentws}}) echo unhide > /mnt/wsys/wsys/$i^/wctl
echo hide > /mnt/wsys/wsys/$winid^/wctl
tile - Tiling Window Manager
tile will auto arrange your windows in a tiling fashion. The algorithm is simple, place one window on the left half of the screen, then carve up the right half in even slices for the remaining windows. The script is intentionally basic, so feel free to expand or adjust it to suit your own needs.
#!/bin/rc
# tile - tile windows
# usage: tile

# gather some information
screensize=(0 0 `{echo $vgasize | awk -Fx '{print $1, $2}'})
windows=`{for (win in /mnt/wsys/wsys/*)
    if(dd -if $win/wctl -bs 128 -count 1 -quiet 1|grep -s visible)
        echo `{basename $win}
}
fn left{awk  '{printf("%s %s %d %d %d %d",$1,$2,   0,   0,$5/2,$6 )}'}
fn right{awk '{printf("%s %s %d %d %d %d",$1,$2,$5/2,'$b',$5, '$e')}'}

# auto tile windows
if(~ $#windows 1)
    echo resize -r $screensize > /mnt/wsys/wsys/$windows/wctl
if not {
    echo current > /mnt/wsys/wsys/$windows(1)^/wctl
    echo resize -r $screensize | left > /mnt/wsys/wsys/$windows(1)^/wctl
    windows=`{echo $windows | sed 's/^[^ ]+ //'}    # shift windows
    step=`{ echo $screensize(4) / $#windows | bc }
    b=0; e=$step                # begin, end
    for(i in $windows){
        echo current > /mnt/wsys/wsys/$i/wctl
        echo resize -r $screensize | right > /mnt/wsys/wsys/$i/wctl
        b=`{ echo $b + $step | bc }
        e=`{ echo $e + $step | bc }
    }
}
Acme Scripting
In the above section several window manager scripts are demonstrated, but if you middle click tile, or any of the other window manager scripts, in acme, nothing will happen. The reason for this is that the namespace of a terminal window, and acme, are different. If you middle click win and look around in /dev and /mnt you will see that these directories have different contents then the same directories in a regular terminal. But don't fret, you can ask acme to run a command using the namespace of the shell that invoked it with the Local command. So middle clicking Local tile will tile your rio windows just fine (to "middle click" two words you need to middle click and drag to select the text).
Another way to do this, if you plan on using tile a lot in acme, is to write a wrapper script for it in /acme/bin/Tile:
#!/bin/rc
# Tile - wrapper for tile
tile $*
As you can see, this is just an ordinary shell script. The only difference is that while acme binds /acme/bin to /bin, other programs don't, and hence files in /acme/bin are specific to this programs namespace. When we execute tile here it will have a regular shell namespace, and thus work as expected. Note that our acme wrapper has a capital T, to avoid a naming conflict with our rio tiling script. There are other simple shell scripts you may want to add to /acme/bin. In our introductory section on acme, we listed several examples of how you can do basic text editing operations using external tools. It is easy to make acme commands out of these examples, by adding shell scripts for them in /acme/bin. For example, the following scripts will give us indent and unindent commands in acme, called t+ and t-:
#!/bin/rc
# t+ - indent text
sed 's/^/    /'

#!/bin/rc
# t- - unindent text
sed 's/^    //'
We can now indent lines in acme by highlighting the text and pipe it to our new script by middle clicking |t+. Naturally we can just as easily write commands for commenting and uncommenting text, for adding and removing line numbers to a file, for upper and lower casing text, for obfuscating text with rot13, and so on. But the real fun stars when you begin to script acme itself! Like rio, acme can be fully controlled by writing plain text to a set of control files. Lets look at a couple of quick examples:
Coffee - Chill ASCII Animations
Suppose we have created a series of ASCII coffee mugs in a directory, our first artwork, $home/lib/animation/coffee/1, may look something like this:
                (

              ) (
              ( ) (
            ,---------.
            |         |__
            |         |  |
            |         |  |
            |         |  |
            |         |--'
            `_________'
          --===========--

            COFFEE BREAK
The other files I will leave to your imagination, but the point is that when they are displayed in rapid order, an ASCII animation of a steaming coffee mug will be the result. In a rio terminal, we could write such an animation script like this:
#!/bin/rc
# coffee - print ASCII animation of steaming coffee mug
# usage: coffee

play $home/music/samples/coffee.mp3 >[2]/dev/null &
while()
    for(i in $home/lib/animation/coffee/*)
        > /dev/text && cat $i && sleep 1
But this will not work in an acme win terminal, since we don't have /dev/text in our namespace. To clear the text in an acme window we need to write the command Edit ,d (that is :%d for all you vi users out there), select this command, then click it with our middle mouse button. Can we do this programmatically? Sure:
#!/bin/rc
echo -n Edit ,d   > /dev/acme/body
echo -n /Edit ,d/ > /dev/acme/addr
cat /dev/acme/addr | awk '{ print "MX", $1, $2 }' > /dev/acme/event
This essentially follows the three steps mentioned above. The last line is the most cryptic. What we are doing here is reading the address (the marked text), which returns information like the beginning and end positions, which we then feed to awk. We also append the "MX" command to event, which tells acme that a middle mouse button was "clicked" on this region of text.
Lets call this script /acme/bin/clear, and lets add a script in $home/bin/rc/clear that clears a rio terminal:
#!/bin/rc
# clear - clear up a rio terminal
# usage: clear (see also /acme/bin/clear)
> /dev/text
We can now adjust our coffee animation script so that it works in both the rio terminal and in acme's win terminal:
while()
    for(i in $home/lib/animation/coffee/*)
        clear && cat $i && sleep 1
Slides - Acme Presentation Show
Here is another simple example. Suppose we have a directory of files called 1, 2, 3... and so on, each providing a slide in a textual slide show. We could open the first slide by right clicking 1. Then manually editing the filename to 2, type Get and middle click it. Annoyingly we would need to click Get twice, since acme will warn us that loading this file will change the contents of our window. Lets write a script that automates this:
#!/bin/rc
# Slide[-+] - go back and forwards in a slide show
# usage: Slide[-+]
#
# bugs:  slides must be named 1, 2, 3...
#        to "install" the script copy it to /acme/bin/Slide^(- +)
#        (that is to /acme/bin/Slide{,-,+} in UNIX speak)

switch($0){
case *Slide
    ls `{pwd}
    exit
case *Slide+
    page=`{echo `{basename $%} + 1 | hoc}
    if(! test -f $page) exit
case *Slide-
    page=`{echo `{basename $%} - 1 | hoc}
    if(! test -f $page) exit
case *
    echo Error: bogus program name!
    exit wrongname
}

echo 'name '`{pwd}^/$page'' > /mnt/acme/$winid/ctl
echo clean > /mnt/acme/$winid/ctl
echo get   > /mnt/acme/$winid/ctl
To install this script copy it to /acme/bin/Slide and make it executable, then copy this script to Slide+ and Slide- in the same location. If we now open up one of our iterative slides in acme, we can middle click Slide+ to advance to the next slide, Slide- to go back to the previous one, or Slide to list our slides. We can click Slide+ or Slide- repeatedly, the slide show will stop once we reach the end, or the beginning, respectably.
Our script contains a couple of special variables, $0 refer to the name of the program that is running. The behavior of our program will change depending on what its called, if its called Slide+ it will advance the slide, if its called Slide- it will retreat the slide, and so on. $% is a variable particular to acme, it refers to the filename in the tag of the current acme window. The last three lines are simple enough, change the filename, tell acme not to bother us about changing contents, and finally load the new file.
Chat - Simple Peer to Peer Chatting
Long before the days of modern chat protocols - such as IRC, the ancient UNIX systems came with a simple peer-to-peer chat program called write. This program established a simple connection between two users, and just wrote whatever the users had written verbatim to a common text window. The text would be garbled if both users wrote simultaneously, so it was customary for the user who had initiated the conversation to write first, and end his input with (o), for "over". Then the other user would reply, and end his input with (o). And finally, when the conversation had run its course, a user would signal that he ended the conversation with (oo), for "over and out".
Surprisingly enough, you will actually find this 50 year old program on most modern UNIX boxes today, even though nobody uses it. Plan 9 however is a modern operating system for the 90's, and thus do not include this archaic program. But if you are feeling nostalgic, it's trivial to implement it. For example, if you just run touch /usr/chat; tail -f /usr/chat in one window, then run while(){ echo $user: `{read} >> /usr/chat in another, you have established a "chat" client. If you get the other user to run the same commands, you can write to each other, and whatever you write will be printed verbatim in the text file you are both viewing. An arbitrary amount of people can join this chat, and remote Plan 9 users can join too, they just need to import the chat machines filesystem, and they are good to go.
But this solution is a bit awkward, primarily because you need to use two windows, one for writing and one for reading. So lets write an acme client for this. We will implement it as two commands, Chat for launching a new chat window, and Reply for taking whatever we have written in the tag line, and add it to the chat log:
#!/bin/rc
# Chat - open a new chat window
# usage: Chat

rfork ne
log=/usr/chat
id=`{awk '{ print $1 }' /dev/new/ctl}

echo nomenu   > /mnt/acme/$id/ctl
echo cleartag > /mnt/acme/$id/ctl
echo scratch  > /mnt/acme/$id/ctl
echo -n ' Reply ' > /mnt/acme/$id/tag
touch $log
tail -f $log > /mnt/acme/$id/body >[2]/dev/null


#!/bin/rc
# Reply - write tag comments to a chat log
# usage: Reply

rfork ne
log=/usr/chat
reply=`{sed 's/.*Reply //' /mnt/acme/$winid/tag}

echo $user: $reply >> $log
echo cleartag > /mnt/acme/$winid/ctl
echo -n ' Reply ' > /mnt/acme/$winid/tag
The Chat program spawns a new acme window by reading /dev/new/ctl, the first argument returned when reading this file, is the ID number of our newly spawned window. Then we write a few commands to the control file of the new window, specifying that it should have an empty tag line, and that acme shouldn't warn us if the content of this window changes. Finally we add the command Reply to the tag line, and start listening for changes to the file /usr/chat, which will be printed to the body of our new window.
To write something in the chat window, just add your comment after the Reply command in the tag list, and middle click Reply when you are done. The comment will be added to the chat log, prefixed with your user name, and the tag line will be reset.
Naturally, this "Chat" program of ours is amazingly primitive. Much like the original UNIX write program, it is even historically accurate by being slow and unreliable, which is a nice touch. One difference though, is that Chat provides no way for us to notify the user we want to talk to, neither does it clear up the chat log when people leave. Its easy enough to implement that, but I leave it as an exercise to the reader, since this is more a question of user conventions then mechanics.
Play - An Acme Music Player
In the audio section below, we list some simple shell functions for pausing, resuming and skipping songs we are playing. But these functions have two limitations, first they do not show you a visual playlist, neither do they allow you to move freely back and forth in the playlist, you can only skip the current song and play the next one on the list.
But we can easily work around both these limitations with acme and que, a simple script that manages queues, such as a playlist of songs. Our acme Play command looks like this:
#!/bin/rc
# Play - play a list of audio files
# usage: Play (in a window with a playlist)
# see also: Skip, Pause, Resume, Vol

while(){
    if(! test -d /mnt/acme/$winid) exit
    song=`{que $%}
    echo clean > /mnt/acme/$winid/ctl
    echo get   > /mnt/acme/$winid/ctl
    play $song > /dev/null >[2=1]
}
To use this program, we must first write a playlist of audio files. We can easily generate one, by running: du -a $home/music/creedence | awk '/\.mp3/ { print $2 }' > $home/lib/playlist/creedence Lets assume we have opened a playlist in acme that looks like this:
/usr/glenda/music/creedence/01_pagan_baby.mp3
/usr/glenda/music/creedence/02_sailors_lament.mp3
/usr/glenda/music/creedence/03_chameleon.mp3
...
If we type Play now in the tag line and middle click it, it will play 01_pagan_baby.mp3, and then update our playlist, so that it looks like this:
/usr/glenda/music/creedence/01_pagan_baby.mp3
/usr/glenda/music/creedence/02_sailors_lament.mp3<--
/usr/glenda/music/creedence/03_chameleon.mp3
...
When 01_pagan_baby.mp3 is finished playing, 02_sailors_lament.mp3 will start playing, and the "<--" marker will move to 03_chameleon.mp3, the next song to be played, and so on. What is important to note here, is that the playlist is just a plain text file. So we can freely add or remove lines here as we see fit, we can also freely move the "<--" arrow to whatever line we want. After we have middle clicked Put to save our changes, the next song to be played will be whatever line our arrow is at. Our script also mention Skip, Pause, Resume and Vol. These are simply acme wrappers for the functions with the same name, mentioned in the audio section below. Pause for instance, looks like this:
#!/bin/rc
# Pause - pause a song that is playing

stop pcmconv | rc
We have not implemented a Shuffle or Norepeat command here (the playlist will repeat forever), and worse, quitting the playlist is clunky. The playlist will stop iterating over the list once we delete the window, but it will still continue to play the last song until it is finished. We can manually stop this by executing Skip, after first deleting the window, but it's clunky... Fixing this, and adding shuffle and norepeat functionality, is another fine exercise for you, dear reader ;)
We have only provided a handful of crude scripts in this section, but hopefully they illustrate how easy it is to expand acme's capabilities using only a handful of tiny shell scripts. Who needs a bloated graphical toolkit anyway, when you've got acme!
Web Scripting
As mentioned elsewhere, Plan 9 networks are controlled through plain files. This implementation is unusual, and you should read /sys/doc/net/net.ps to familiarize yourself with the concept. As with the notion that a desktop is controlled by writing text strings to files, this idea that networks are plain files, may seem bizarre or even amusing at first. But any smirk you may have quickly fades as the rio scripting section describes how to develop advanced desktop features with simple shell scripts (try enabling virtual workspaces in Windows 7 with CMD!). I think the same will be true for web scripting. Here is a fully-fledged telnet implementation just to wet your appetite:
#!/bin/rc
clonefile=/net/tcp/clone
<[4] $clonefile {
    netdir=`{basename -d $clonefile} ^ / ^ `{cat /fd/4}
    echo connect $1|$2 >$netdir/ctl || exit 'cannot connect'
    cat $netdir/data &
    cat >$netdir/data
}
9front Web Scripts
9front ships with the IRC client ircrc, the pastebin command webpaste, and the hget and hpost commands. All of these programs are shell scripts. hget and hpost are somewhat like wget and curl in UNIX, but they are only a hundred, and two hundred, line shell scripts, respectfully (in contrast wget and curl are 300,000 lines of C each!). We will not print their source code here, but they are worth studying if you plan on writing web scripts in Plan 9 yourself. As for webpaste it is just a few lines long, and it is a good demonstration of how to transmit data to a web service (note that it depends on hpost):
#!/bin/rc
if(~ $#* 0)
    file=/fd/0
if not
    file=$1
hpost -u http://okturing.com -p / a_body@file submit:submit fake:fake a_func:add_post url: |
grep -e '\/body\"' |
sed 1q | sed 's/^.*href=\"//g; s/body\".*$/body/g'
PS: Classic Plan 9 does not include the above mentioned scripts.
ircrc is also about two hundred lines of code, and is well worth studying. But here is a stripped down version to illustrate what is possible in Plan 9. It is a very primitive IRC client that only supports a few IRC commands and hardcodes your nick and channel, but it is a working IRC client nonetheless. And at under 70 lines of shell that isn't bad at all:
#!/bin/rc
rfork ne
server=irc.oftc.net
port=6667
realname=myrealname
target='#cat-v'
netdir=()
nick=mynick

fn sighup {
    exit 'hang up'
}
fn sigint sigterm {
    if (! ~ $#netdir 0)
        echo QUIT : Leaving... > $netdir/data
}
fn mshift {
    shift
    echo $*
}
fn etime {
    date | awk '{print $4}' | awk -F ':' '{print "[" $1 ":" $2 "]"}'
}

fn work {
    echo USER $user foo bar :$realname > $netdir/data
    echo NICK $nick > $netdir/data
    echo PRIVMSG 'nickserv :'identify $"pass > $netdir/data
    echo JOIN $target > $netdir/data
    while (cmd=`{read}) {
        s=$status
        if(~ $s *eof) {
            echo QUIT : Leaving... > $netdir/data
            exit
        }
        msg=()
        out=()
        switch ($cmd(1)) {
        case /j
            if (~ $#cmd 2) {
                target=$cmd(2)
                msg = (JOIN `{mshift $cmd})
            }
        case /q
            msg = `{mshift $cmd}
        case /x
            echo QUIT : Leaving... > $netdir/data
            exit
        case /*
            echo unknown command
        case *
            msg = 'PRIVMSG '^$target^' :'^$"cmd
            out = '('^$target^')    ⇐    '^$"cmd
        }
        echo $msg > $netdir/data
        echo `{etime}^' '^$out
    }
}

userpass=`{auth/userpasswd 'server='^$server^' service=irc user='^$nick >[2]/dev/null}
if(~ $#userpass 2) {
    nick=$userpass(1)
    pass=$userpass(2)
}

p='/n/ircrc'
bind '#|' $p
echo connecting to tcp!$server!$port...
aux/trampoline tcp!$server!$port <>$p/data1 >[1=0] &
netdir=$p
work
Development
As this article is about using Plan 9 as a desktop, we will only mention development in passing. The programming language used throughout the system is C, or more specifically a Plan 9 dialect of C. The system also has its own set of compilers and linkers, one set for each supported architecture. Here is a quick example of how to write and compile a C program in Plan 9:
; ed take.c
?take.c
a # ed: append text
#include <u.h>
#include <libc.h>

void
main(int, char*[])
{
    print("take me to your leader!\n");
    exits(nil);
}
. # ed: end text input
w # ed: write file
112
q # ed: quit
; 8c take.c
; 8l take.8
; 8.out
take me to your leader!
Don't worry about the ed stuff if your not used to this editor, there are alternative text editors in Plan 9 that will also be unfamiliar to you, such as acme or sam. Plan 9 users will often open a file with the B command, which will open the file in whatever text editor happens to be open, or it will launch the default editor if none is running (you can add editor=acme to $home/lib/plumbing, if you want acme to be your default text editor, rather then sam). At a casual glance the C program looks much like a UNIX equivalent, but a keen observer will notice many startling differences. Most Plan 9 programs only have two included headers, the architecture dependent code u.h and the standard library libc.h. Notice also that it's perfectly legal for a main to return void, and that exits, not exit, returns a string.
There are other differences too. For one we see that a program in the current directory can be executed just by giving its name, in UNIX this isn't usually tolerated, or at the very least, sternly frowned upon. Another difference is that compiler and linker are two separate programs, and that each architecture has their own set. This makes it very easy to cross-compile programs. For instance, in the above example a 32-bit PC architecture is assumed, but on a 32-bit PC you can easily compile 64-bit programs using 6c and 6l, or you can compile ARM programs using 5c and 5l (see 2c(1)). Of course you cannot run ARM programs on PC hardware, but a Raspberry Pi running Plan 9 can easily compile its software on a PC running Plan 9 (or vice versa for that matter). In fact it's easy peasy to cross compile a 32-bit Plan 9 system into 64-bits (see section 5.2.2.1 in the 9front fqa).
Probably, the best place to start if you want to develop in Plan 9, is to read the article C Programming in Plan 9. The specific details of the Plan 9 C dialect is discussed in /sys/doc/comp.ps. Other important papers in this directory for programmers are, the acid debugger paper acidpaper.ps and the mk paper mkfiles.ps (equivalent to make in UNIX) The other papers here are of interest too, although some are a bit dated. Lastly, manpages and source code is very readable in Plan 9, so use it for what it's worth! The src command will let you quickly look up source code for any given command, eg. src echo. Another resource that I highly recommend is Introduction to Operating Systems Abstractions Using Plan 9 from Bell Labs, by Francisco J. Ballesteros. You can download the PDF for free from the internet, and despite its tedious name, it is a marvelous programming introduction to Plan 9. Naturally many classic UNIX resources are also useful for Plan 9, even though many details aren't directly applicable, such as The C Programming Language by Kernighan and Pike, The UNIX Programming Environment by the same, and The AWK Programming Language by Aho, Kernighan and Weinberger.
Beyond shell and awk programming, there are also some support for external programming languages, such as POSIX C and sh (see /sys/doc/ape.ps), Perl, Python, Go, Scheme, and of course you can install Inferno and program in its Limbo language (see appendix L in 9fronts fqa). Generally though C and shell programming are by far the best supported languages. The Perl port is very old for instance, and Python was recently dropped from 9front (you can still get it if you want - see instructions below). If you plan on doing any serious development in Plan 9, you really should learn C.
Version Control
All the Plan 9 filesystems (cwfs or hfs in 9front, or fossil or kfs in classic Plan 9) have built-in support for snapshots. And like all filesystems with snapshot abilities, only the difference between the versions are saved, so a snapshot of a 1 Gb file with 10 Kb of difference, will only consume 10 Kb of disk space. Snapshots are usually taken at regular intervals automatically, but you can take one manually if you want, e.g. echo dump >>/srv/hjfs.cmd in 9front (use /srv/cwfs.cmd if you are using the cwfs filesystem). To read snapshots run 9fs dump, the files will be located in /n/dump. For example if you are looking for the snapshot of /usr/glenda/prj/code.c taken 23 February 2020, it will be located in /n/dump/2020/0223/usr/glenda/prj/code.c. The yesterday command is a quick way to print the path of the most recent snapshot. history will print all available snapshots where the file content differs.
The Bell Labs developers used the built in snapshot feature of Plan 9 as their version control system, and for personal use this works great. But if you are collaborating online with other programmers, or if you are working on non-Plan 9 software, you probably want to use a more traditional version control software. Traditionally the 9front developers used mercurial to maintain their project, but recently a switch was made to git, using the Plan 9 port called git9 (it is still possible to get mercurial if you really need it):
Installing python and hg (mercurial):
cd /tmp
git/clone gits://git.9front.org/plan9front/pyhg
cd pyhg
install.rc
Files and Namespaces
The big difference between UNIX and Plan 9, which is especially important for developers to note, is that while "everything" is a file in UNIX, everything is a file in Plan 9! There are no sockets or ioctl for instance, all networks and devices are controlled through plain files. It is hard to emphasize just how much simpler this makes programming, but some illustrative examples can be found in the web scripting and rio scripting sections above.
In order to make everything in this dynamic and complex world of ours work as files, Plan 9 uses some conventions and mechanics that are unfamiliar to UNIX users. For example, devices often need control interfaces as well as input/output interfaces, so Plan 9 often implements a device as a directory with multiple files. For example audio input/output is handled through /dev/audio, but the control interface is /dev/audioctl, and hardware statistics are available through /dev/audiostat. Another example is the /bin directory, which unlike UNIX contains all available programs in Plan 9. However, what that means may differ from program to program, and notably, from process to process. Files in /bin can also be directories that group related programs together. All games are in /bin/games for instance, so launching /bin/games/sudoku requires you to type games/sudoku.
There are no links in Plan 9, instead files and directories can be bound to different locations using the bind command. Lets again consider /bin: Programs are actually sprinkled in different places throughout the system, 32-bit PC binaries are in /386/bin, 32-bit PC binaries for acme are in /acme/bin/386. Shell scripts are in /rc/bin and personal shell scripts are in $home/bin/rc, and so on. When the system boots, the relevant program directories are all bound to /bin. If the system is 32-bit PC /386/bin is bound to /bin, if it's a 64-bit Sparc system /sparc64/bin is bound instead, and so on. The important lesson here is that the correct filestructure is assembled during boot. To see the full details of how your filestructure is assembled, use the ns command. This namespace can be manipulated freely, and it only effects the current process (and any child processes executed afterwards).
For example, in the previous version control section, we mentioned how you can look up old versions of some file. But this might be tedious if we need to check many files for a given date, in such a case it would be simpler to manipulate our namespace instead. Let say we want to check out all of our project files, as they were on 23 February 2020, the following commands should do the trick:
; 9fs dump
; bind /n/dump/2020/0223/usr/glenda/prj $home/prj
Now all of the files in $home/prj in this window refer to our old copies of 2020. To go back to the current version of this directory, just run unmount $home/prj. The bind command can be used much like ln in UNIX, to create shortcuts from one point to another in the filesystem. But it is much more powerful. For one it doesn't care if the files are in the same file partition, or even on the same physical machine. For another you don't need to replace directories, you can merge them. That is what Plan 9 does with /bin, many directories are bound together in this location. Various flags to bind let you specify if the directory should be prepended or appended, and whether or not to allow file creation in such a union.
Another example of such namespace manipulation is the rcpu (cpu in classic Plan 9) command, which binds a remote CPU servers processor to the current process, while the local files and devices, such as the keyboard, are kept unmodified. The window still looks and behaves like a normal Plan 9 terminal, but it's now using the remote machines processor. This is handy if the remote machine is fast, while the local machine is slow or over taxed. It is also useful if you are testing software for a different architecture, such as running ARM programs from a PC or vice versa. Other remote resources can be imported as well, such as an external audio or ethernet device. Again, only the process in question is manipulated, other running processes are unaffected. Namespaces lies at the very heart of Plan 9's capabilities, but it's hard for UNIX users to grasp the concept. If it helps, think of each Plan 9 process running inside its own jail. The difference though is that namespaces in Plan 9 were not primarily deviced as a way to isolate resources, but to distribute them.
The Web
If you have a wired connection to the internet (you do if your using a virtual machine), you should already be connected. If not run the command ip/ipconfig. If your having trouble, you can run the netaudit script, and see if the network status looks like it's supposed to (classic Plan 9 does not have this script).
Wireless Network
Wireless networking is only supported in 9front. During startup you may see a line similar to #l1: '/lib/firmware/iwn-6005' does not exist (you can check startup messages later with cat /dev/kmesg). This tells you that firmware for the wireless device #l1 is missing.
9front uses firmware from OpenBSD, so download the correct package for your device from firmware.openbsd.org, and unpack it in /lib, reboot, and then you can connect to a wireless network. To illustrate:
; cd /lib
; hget https://firmware.openbsd.org/firmware/6.6/iwn-firmware-5.11p1.tgz
; tar xzf iwn-firmware-5.11p1.tgz
; reboot
; aux/wpa -s mynetwork -p /net/ether1
!Adding key: proto=wpapsk essid=mynetwork
password: ******
!
; ip/ipconfig ether /net/ether1
You can easily automate the last two steps with a short script:
fn wifi{
    aux/wpa -s $1 -p /net/ether1
    ip/ipconfig ether /net/ether1
}
Browsing The Web
The preferred web browser for 9front is mothra, but the classic Plan 9 browser, abaco, is also available. Both of these web browsers have only basic support for HTML, they do not support any CSS, let alone javascript. Also, you must supply a full URL with a protocol prefix, eg. https://www.wikipedia.org, not just wikipedia.org.
To open a local HTML file in mothra, write file:///path/to/file. To download content from a website, right-click and choose moth mode. The mouse cursor will change to a moth, you can now click on any link or image to download it. Choose moth mode again, to return to the default mode, where clicking on a link will follow it instead of downloading it (abaco cannot open local files or download content).
As for acme, you cannot use it to browse the web interactively, but you can do a basic text dump of a webpage, by middle clicking something like wurl2txt http://9front.org.
Recently, NetSurf has been ported to Plan 9 by the 9front developers. The browser is slow and glitchy with a ton of bugs, and thus provides a fairly convincing web 2.0 experience. It is still a very simple browser though, so don't expect to do your online shopping in Plan 9 anytime soon (you can do youtube - but not in a browser).
Install the Plan 9 port of NetSurf from github:
cd $home/src
git/clone git://github.com/netsurf-plan9/nsport
cd nsport
fetch clone git
mk
mk install
netsurf    # browse! (make sure webfs is running)
Hints on setting up an email server can be found in section 7.7 of the 9front fqa. And see section 8.4.1.1 for tips on interfacing the Plan 9 mail server with GMail. Once you have configured this to your suit your needs, Plan 9 provides a few alternative email clients. Probably the most useful one will be acme's mail client Mail, but you can check out faces and nedmail too if you want.
Chatting
To join the fairly active #cat-v channel, on irc.oftc.net, where 9front developers hang out, run this command ircrc -n mynick -t '#cat-v'. A few alternative 3rd party IRC clients are also available, and an xmpp (jabber, eg. Google Talk) client. You can check out the later projects web site if you are interested.
Running a Web Server
Plan 9 is quite capable of serving web pages, just as long as you keep things simple. To quickly set up a local web page, do the following:
Write some static html file(s), $home/www/mysite/index.html for instance. And check that it works (eg. mothra file://$home/www/mysite/index.html). Now we can configure the rc-httpd web server, by adding the following to /bin/rc-httpd/select-handler:
if(~ $SERVER_NAME mysite){
	PATH_INFO=$location
	FS_ROOT=/usr/myname/www/$SERVER_NAME
	exec static-or-index
}
Start the web server by running aux/listen1 tcp!mysite!80 rc-httpd/rc-httpd (make sure you middle click the terminal window and select "scroll"). You should now be able to connect to your web server with mothra http://mysite!
PS: Supstitute mysite for whatever hostname or ip address is appropriate for your machine.
Using werc
werc is a sane web anti-framework, that can serve webcontent on Plan 9, Linux, BSD, OS X and Solaris (you need plan9port -or- 9base installed on UNIX systems). If you have a working rc-httpd server going, here is a quick howto on setting up werc:
cd $home/www
9fs 9front
tar xzf /n/9front.org/extra/werc.tgz
mkdir werc/sites/mysite
dircp werc/sites/werc.cat-v.org werc/sites/mysite
sed 's,.*PLAN9,PLAN9=/\nplan9port=$PLAN9,' etc/initrc > TMP
mv TMP etc/initrc
What we have done here is installed werc, used one of the provided example sites as our template, and added the variable PLAN9=/ to the main configuration file (werc needs this since it assumes you are running plan9port, not native Plan 9). With all that in place we can configure rc-httpd to use our werc site by adding this to /bin/rc-httpd/select-handler:
if(~ $SERVER_NAME mysite){
	PATH_INFO=$location
	FS_ROOT=/usr/myname/www/werc/sites/$SERVER_NAME
	exec static-or-cgi /usr/myname/www/werc/bin/werc.rc
}
Multimedia
9front has quite decent multimedia support as we shall see, but classic Plan 9 systems are very limited in this respect. They only support SoundBlaster cards for instance, and MP3 file formats (oddly enough you will find the MP3 decoder and encoder under /bin/games). To enable audio in a qemu virtual machine (for both 9legacy and 9front), run qemu with the -device sb16 flag, and add this line to plan9.ini: audio0=type=sb16 port=0x220 irq=5 dma=5. After this, you still need to bind the audio device in 9legacy, like so: bind -a '#A' /dev You can add this command to $home/lib/profile, to enable audio by default.
Audio
Adjusting the volume, to say 80%, can be done like this: echo 80 > /dev/volume, or more precisely: echo master 80 80 > /dev/volume. But switching between headphones and speakers can be a bit tricky. If your are lucky the hardware will just take care of it, but if you aren't you have to manually redirect audio pins. On one of my machines the command echo pin 21 > /dev/audioctl switches audio output to the jack port, on another the command echo pin 33,12,2 > /dev/audioctl does the trick. It varies from machine to machine, you can figure out the correct command by analyzing the output of cat /dev/audiostat. This can be a bit daunting, but don't panic, just look for words such as jack, speaker, out, pin, and experiment. Don't worry, the machine will not blow up if you get it wrong ;)
You might find some of the following functions helpful, keep in mind though that some specifics here are hardware dependent:
fn volume{ echo master $1 $1 > /dev/volume }
fn headphones{ echo pin 21 > /dev/audioctl ; volume 40 }
fn speaker{ echo pin 20 > /dev/audioctl ; volume 80 }
fn mute{ volume 0 }
fn pause{ stop pcmconv  | rc }
fn resume{ start pcmconv | rc }
fn skip{ kill pcmconv  | rc }
fn shufplay{ play <{fortune <{ls $*}} }
Of course, there are more user friendly 3rd party utilities that can help you out. jacksense tries to automatically switch between output pins, whenever you plug in a headset. And volume.c from the 9front extra repository, gives you a really simple button for adjusting output volume.
Technically you can play a raw audio file just by running cat file > /dev/audio, or you can decode it first: audio/mp3dec < file.mp3 > /dev/audio. But 9front includes a userfriendly shell script that makes life much easier: play file.mp3.
Doing audio recording is theoretically possible in 9front, you first need to redirect the correct pins as in the above example to set audio for input instead of output, and then a read from /dev/audio will record sound. Eg. cat < /dev/audio > file, or oggenc < /dev/audio > file.ogg. However, I have not been able to make this work in practice on my test machines, but maybe you will have better luck then I did.
The classic way to play music in Plan 9, was using the archaic juke player. You first needed to write a fairly verbose database of your audio files though (see juke(7) if you really want to do this). Thankfully, 9front recently added a cool new audio player called zuke (juke has been dropped in 9front). It easy and pleasant to use:
audio/mkplist $home/music/myalbum > $home/lib/plist/myalbum
audio/zuke < $home/lib/plist/myalbum
Video
For the longest time there were no video playing options at all in Plan 9, but just recently a video player called treason has been written by the ever progressive 9front developers. So yes, you can watch Plan 9 in Plan 9 nowadays!
Install the video player Treason from the developers website:
mkdir /tmp/treason
cd /tmp/treason
hget https://ftrv.se/_/treason.gz | gunzip | disk/mkext -d .
./treason/install.rc
treason der_film.mkv # watch some vids :)
Youtube
Oh yes. With treason installed, you absolutely can watch Youtube videos in Plan 9. But first you need to install a Youtube downloader, and optionally a script that automatically retrieves the best video format for a given URL:
# install youtubedr, similar to youtube-dl in unix:
9fs ftrv.se
gunzip < /n/ftrv.se/bin/youtubedr.$objtype.gz > $home/bin/$objtype/youtubedr
chmod +x $home/bin/$objtype/youtubedr
# get some recent certificates
hget https://curl.haxx.se/ca/cacert.pem > /sys/lib/tls/ca.pem

# then add the following script to $home/bin/rc/youtube:

#!/bin/rc
rfork ne
vitag=`{youtubedr -info $"1 | awk '
    /av01/ {
        tags[ntags++] = $2
        if($2 == "398"){ # prefer hd720
            tags[0] = $2
            exit
        }
    }
    END {
        if(ntags > 0)
        print tags[0]
    }
'}
if(~ $#vitag 0)
    treason `"{youtubedr -i 18 -o /tmp/_vid.mp4 $"1}
if not
    treason -a `"{youtubedr -i 140 -o /tmp/_aud.mp4 $"1}
               `"{youtubedr -i $vitag -o /tmp/_vid.mp4 $"1}
#rm -f /tmp/_^(aud vid)^.mp4
With this in place, you can now do the following (all of these examples takes some time to start, since the video must be downloaded first):
# watch Plan 9 in Plan 9
youtube 'https://www.youtube.com/watch?v=Ln7WF78PolA'

# play quickly a youtube film with poor resolution, good for weak cpu's
treason `"{youtubedr -i 18 -o /tmp/_vid.mp4 Ln7WF78PolA}; rm -f /tmp/_vid.mp4

# play the audio only from a youtube link
mcfs -t 1 `"{youtubedr -i 140 -o /tmp/audio.mp4 Ln7WF78PolA} |
audio/aacdec > /dev/audio
Note that you only need the youtube script for the first of these examples, but you need the Youtube downloader youtubedr for all of them. You can also add a plumbing rule to automatically open any Youtube URL's with the youtube script, just add this to $home/lib/plumbing before the include basic line.
type is text
data matches 'https://(www.)?youtube[^ ]+'
plumb start window youtube ''''$0''''
Graphics
Viewing Images/Documents
There is only one program to display images and documents alike, and that is page. It is truly a fantastic application, despite lacking support for some documents types such as DOCX or ODT, and poor support for others such as Epub. PDF's, old Microsoft Office documents, images and other simple formats usually work.
Reading Comics
Comic books are often distributed as CBR or CBZ files, these are just rared or zipped images, so to read them unrar (you can get unrar in 9fronts extra repository - go is a dependency) or unzip the file, and then view the extracted images in page:
; unzip -af voyage_to_venus_1.cbz
; lc voyage_to_venus_1
001.jpg 018.jpg 035.jpg 052.jpg 070.jpg 087.jpg
002.jpg 019.jpg 036.jpg 053.jpg 071.jpg 088.jpg
003.jpg 020.jpg 037.jpg 054.jpg 072.jpg 089.jpg
...
# to view all of these, starting with 001.jpg:
; page voyage_to_venus_1
Creating Images
paint is available, though you would be hard pressed to use it for anything but kindergarten art. resample(1), crop(1) and rotate(1) on the other hand, are useful little tools for image manipulation, see their manpages for more information.
Another good alternative for image manipulation (as in ImageMagic not as in PhotoShop), is pico9, available in the 9front extra repository. It's still in the early stages of development, but it's looking good!
Taking a Screenshot
Not only is there a file in /dev for your window text, but there is also a file for your window screen, /dev/window. To take a screenshot of your current window, you can run this command: cat /dev/window > windowdump ; page windowdump. To take a screenshot of your entire screen, do this: cat /dev/screen > screendump.
Now these images are saved as the native Plan 9 image format, which of course the document/image viewer page can read. But if you want to use these images on other operating systems, you should convert them to the more popular PNG or JPEG formats: cat /dev/screen | topng > sshot.png or simply tojpg < /dev/window > window.jpg
As for taking a screenshot of a different window then the current one, take a look at the rio scripting section above. You can also do this in a more GUI-like fashion, if you install the 3rd party program vshot.
Screencasting
There is work in progress on a screen recording program for 9front, called wrec, available in the extra repository. It can do simple screen capturing, but doesn't record sound yet. PS: I recommend recording with very few frames per second, eg wrec -f 3, for best results. If you want to scale down a GIF and make it continually loop, as in the above example, you can export the file to a UNIX machine with ImageMagick installed and run convert -delay 20 -loop 0 -resize 600 screencast.gif small.gif.
Peripherals
USB sticks
In 9front USB sticks are automatically mounted in /shr, but if you need to manually mount it, run ls /dev | grep sd before and after plugging in your memory stick, to find its device name. Supposing it's sdUc59fd run the following command to mount the memory stick in /n/dos: mount <{dossrv -s} /n/dos /dev/sdUc59fd/dos, and unmount it with unmount /n/dos, see dossrv(4) for more information. If the device doesn't show up in /dev after plugging it in, there is either some hardware/driver issue, or the device uses a filesystem that isn't supported. Traditionally only DOS and Plan 9 filesystems have been supported, but with the addition of ext4srv in the 9front extra repository, it is also possible to work with Linux filesystems.If you need to reformat a memstick as FAT32 (ei. a DOS partition), assuming it is still called sdUc59fd, you can do it like so:
; disk/fdisk /dev/sdUc59fd/data
p      # print a table of partitions
?      # get help instructions
d p1   # delete a couple of partitions
d p2
a p1   # add a new partition
1      # just follow suggested size
971
t p1   # set partition type
?      # list available types
FAT32
w      # write and quit
q
; disk/format -d /dev/sdUc59fd/dos
CD/DVD/BD's
To mount an iso image in /n/iso run the command mount <{9660srv -s >[0=1]} /n/iso /path/to/your/cdrom.iso. This may look cryptic, but it's actually very easy to work with CD/DVD/BD's in Plan 9 (see cdfs(4)), the following demonstration shows how to mount an audio CD (you only need to specify the device if it isn't /dev/sdD0), play it, and rip it:
; cdfs -d /dev/sdE1
; cat /mnt/cd/a* > /dev/audio
; cp /mnt/cd/a* /tmp/songs
You might find these custom functions helpful too:
fn mem{   mount <{dossrv  -s >[0=1]} /n/dos $1 }
fn iso{   mount <{9660srv -s >[0=1]} /n/iso $1 }
fn eject{ echo eject > /mnt/cd/ctl }
fn cdfs{  /bin/cdfs -d /dev/sdE1   }
fn cddb{ # query the internet CD database
    cdfs
    grep aux/cddb /mnt/cd/ctl | rc
}
fn rip{  # rip a CD and convert it to ogg
    cdfs
    for(t in /mnt/cd/a*) audio/oggenc < $t > `{basename $t}^.ogg
}
The next example shows how to burn an audio CD. Simply change 'a' for 'd' to burn a data disk (DVD's and Bluerays are always data disks). The last command fixates the disk, which is not necessary on rewritable CD's or data disks:
; cdfs -d /dev/sdE1
; cp /tmp/files/* /mnt/cd/wa
; rm /mnt/cd/wa
Printers
Let me save you a lot of trouble: put LPDEST=stdout in your $home/lib/profile, now lp will print its postscript to standard output. Convert files to PS or PDF as you see fit, then copy or email them to a Windows/UNIX machine, and print out a hardcopy from there if you really need it:
; lp doc.html | ps2pdf > doc.pdf
; doctype doc.ms | rc | lp | ssh unixmonster 'cat | lpr'
Games and other Fun Stuff
Gaming is a potentially contentious topic when it comes to computers. Although massively popular of course, nothing is more detrimental to productivity (except a modern web browser perhaps). So the trick to creating a good computer game, is making a fun distraction for a few minutes of recuperation, but boring enough not to keep you from doing important tasks. By this definition Plan 9 has a few "good" games.
Included Games
Plan 9 comes with a collection of games in /bin/games. My favorites include:
- games/sudoku
- games/mahjongg
- games/sokoban
- games/mines (9front only)
Included Game Emulators
In 9front you will also find a number of emulators in the game directory, assuming you can get hold of a legal copy of the Mario World ROM for instance, you can play it like so: games/snes -a -3 mario.sfc (beware though some of these oldschool games can be dangerously fun!)
- games/nes Nintendo
- games/snes Super Nintendo
- games/gb GameBoy
- games/gba GameBoy Advanced
- games/md Sega Mega Drive
- games/c64 Commodore 64
In my experience, it is surprisingly hard to get good audio from old game emulators (on Plan 9 as well as on other systems). You might find it more enjoyable to put on some good music yourself, and play these games without sound.
3rd Party Games
3rd party games, or indeed software, for Plan 9 is rare. But there are exceptions, some good ones are 2048, hack and snake.
Install 2048 and hack9 game from the 9front extras:
cd /tmp
9fs 9front
# download packages
cp /n/9front.org/extra/2048.c .
tar xzf /n/9front.org/extra/hack9.tgz

# compile and install 2048
8c 2048.c
8l 2048.8
mv 8.out $home/bin/386/2048

# compile and install hack9
cd hack9
mk
mv 8.out $home/bin/386/hack9
Install snake game from Bell Labs contrib repository:
cd /tmp
9fs sources    # download file
cp /n/sources/contrib/john/snake.c /tmp
8c snake.c    # compile and install it
8l snake.8
mv 8.out $home/bin/386/snake
Edutainment
There are a few educational applications in Plan 9, such as scat, map and graph for drawing star charts, maps and graphs (all of which use plot to actually draw the graphics). Many of the programs in /bin/games are also more edutainment then actual games. This includes simulators such as life, galaxy and timmy. You also have some very computer science nerdy "games" such as blit (more on this later) and mix (the last four examples here are 9front specific).
Arithmetic
The classic bsdgames collection provides UNIX with many simple edutainment programs, most of which are not available in Plan 9. No matter, we can just write them from scratch. Or at least, I can demonstrate how to implement some of the basic ones. Who knows, maybe these simple scripts will inspire you to write an actually entertaining game yourself :^)
#!/bin/rc
# arithmetic - basic arithmetic quiz
# usage: arithmetic [-q n][-r n][-o '+-*/%^']

# set some default values
rfork ne
right=0
wrong=0
questions=20
range=1            # in digits
operands='+-'
start=`{date -n}

# parse optional flags
for(i in $*){
    switch($i){
        case -q
            questions=$2 && shift 2
        case -r
            range=$2 && shift 2
        case -o
            operands=''$2'' && shift 2
    }
}

# rnum: generate a random digit based on cpu clock
fn rnum{
    awk '{ print $2 }' /dev/time | sed 's/.*(.)$/\1/'
}

# ask math questions
opleft=$operands
for(i in `{seq $questions}){
    # generate random math puzzle
    a=`{rnum}
    b=`{rnum}
    if(test $range -gt 1){
        for(i in `{seq `{echo $range - 1 | bc}}){
            a=`{echo $a^`{rnum}}
            b=`{echo $b^`{rnum}}
        }
    }
    if(~ $#opleft 0) opleft=$operands
    if not{
        opused=`{echo $opleft | sed 's/^(.).*/\1/'}
        opleft=`{echo $opleft | sed 's/^.(.*)/\1/'}
    }
    echo $a $"opused $b
    correct=`{ echo $a $"opused $b | bc }
    answer=`{ read }

    # evaluate given answer
    while(! ~ $answer $correct){
        if(echo $answer | grep -s '^[-+]?[0-9]+$'){
            echo What?
            wrong=`{ echo $wrong + 1 | bc }
        }
        if not echo Please type a number '(no decimals!)'
        answer=`{ read }
    }
    echo Right!
    right=`{ echo $right + 1 | bc }
}

# print result of math quiz
finish=`{date -n}
time=`{echo $finish - $start | bc}
total=`{echo $right + $wrong | bc}
timepq=`{echo $time / $total | bc}
if(~ $right 0){ prct=0% }
if not prct=`{ echo 'scale=2 ; '$right' / '$total'' |
    bc | sed 's/\.//' | sed 's/$/%/' }
echo -n $right right, $wrong wrong '('$prct' correct)'
    in $time seconds '('$timepq's per answer)'
quiz is another simple classic from bsdgames, it just asks you a bunch of questions and keeps track of your progress. Originally the UNIX quiz programs could ask you some fairly dated questions about geography, Star Trek or the ed editor, but the real beauty of this program is that you can write your own quiz files. In theory you could even use this program for serious purposes, such as training vocabulary or prepping for an exam.
#!/bin/rc
# quiz - ask questions and look for correct answers
# usage: quiz [-as][-q questions][file]
#
# bug: case is normally ignored, but not for exotic unicode characters, this is
#      a grep bug.
# bug: special characters in the correct answers must be escaped (eg. \?\!)

# variables
rfork ne
ifs='
'
dir=$home/lib/quiz
is=(Correct answer is)
right=0
wrong=0
printanswer=no
if(~ $1 -a) printanswer=yes && shift 1
silenterror=no
if(~ $1 -s) silenterror=yes && shift 1
questions=20
if(~ $1 -q) questions=$2 && shift 2

# parse args
if(~ $#* 0) ls -p $dir && exit
if(~ $#* 1) file=$dir/$1
if not echo usage: quiz [-as][-q questions][file] && exit
if(test `{cat $file | wc -l} -le $questions) questions=`{cat $file | wc -l}

# ask questions, and check answers
for(i in `{sed -e '/^$/d' -e '/^#/d' $file | shuf | sed ''$questions'q'}){
    question=`{ echo $i | awk -F@@@ '{ print $1 }' }
    if(echo $question | grep -s '^cmd ')
    	eval `{ echo $question | sed 's/^cmd //'}
    if not echo $question
    correct=`{ echo $i | awk -F@@@ '{ print $2 }' }
    correct_answer=`{ echo $i | awk -F@@@ '{ print $3 }' }
    if(~ $#correct_answer 0) correct_answer=$correct
    answer=`{ read }
    if(echo $answer | grep -si '^'$correct'$'){
        if(~ $printanswer yes) echo -n Right! $"is $"correct_answer
        if not echo -n Right!
        right=`{ echo $right + 1 | bc }
    }
    if not{
        if(~ $silenterror yes) echo -n Wrong!
        if not echo -n Wrong! $"is $"correct_answer
        wrong=`{ echo $wrong + 1 | bc }
    }
    read
}

# calculate results
if(~ $right 0){ prct=0% }
if not prct=`{ echo 'scale=2 ; '$right' / '$questions'' |
    bc | sed 's/\.//' | sed 's/$/%/' }
if not echo $right right, $wrong wrong '('$prct' correct)'
This program expects a plain text database in $home/lib/quiz with two, optionally three, fields separated by @@@. The fields are: question, answer. The correct answer can be written as a regex, to allow for variations, if so then a third field must also be written, the default answer. Here is what the end of my $home/lib/quiz/capitols file looks like:
Ukraine@@@Kyiv|Kiev@@@Kyiv
United Kingdom@@@London
Uruguay@@@Montevideo
Uzbekistan@@@T[oa]shkent@@@Toshkent
Vanuatu@@@Port Vila
Venezuela@@@Caracas
Vietnam@@@Ha ?Noi@@@Ha Noi
Yemen@@@[ŞS]an'?a'?@@@Şan'a'
Zambia@@@Lusaka
Zimbabwe@@@Harare
Touchtype
Learning to touchtype is a must for any serious computer user, and even for the seasoned sysadmin it is a skill that one might want to brush up on from time to time. There are elaborate touchtyping tutors in UNIX, such as ktouch, but the basic method of learning this skill is fairly simple: Print out a picture of your keyboard layout and stick it to the wall, then type what you need and look at this picture, do not look down at your keyboard (ideally you should also place your fingers on the middle row of keys, with your pinky fingers on the two keys which have little bumps on them). This is hard to do in the beginning, but if you keep at it, you will gradually learn to touchtype. The following script will not take away the pain and discipline required to learn this skill, but it can help you track your progress. Just retype each line that you are given, but do not hit backspace and correct your mistakes, just keep on typing. When you are done the script will tell you how well/bad your typing skills are.
#!/bin/rc
# touchtype - check your typing speed and accuracy
# usage: touchtype [ file ]

# choose input sample
rfork ne
tmp=/tmp/touchtype-$pid
out=/tmp/touchtype-out-$pid
fortune > $tmp
if(~ $#* 1) cat $1 > $tmp
ifs='
'

# do some touchtyping
start=`{date -n}
for(line in `{cat $tmp}){
    echo $line
    read >> $out
}
stop=`{date -n}

# calculate results
time=`{echo $stop - $start | bc}
char=`{cat $tmp | wc -c}
speed=`{echo '('$char' / '$time') * 60' | bc}
err=`{cmp -l $out $tmp | wc -l}
if(~ $#err 0) prc=0
if not prc=`{echo 'scale=2 ; '$err' / '$char'' | bc | sed 's/\.//'}

# print results
rm $tmp $out
echo
echo 'RESULT (<2% errors and >200 c/m is good):'
echo your write speed is $speed c/m with $prc^% errors
Playing With Telnet
Believe it or not, but there are actually a lot of fun stuff to be done with telnet, even in 2021! Not least of which is playing MUD's, multi-user-dungeons are still alive and kicking. You can find a list of popular ones on http://mudconnect.com. Here are some fun telnet examples (PS: run vt first for a better user experience):
- telnet discworld.starturtle.net Play the Discworld MUD
- telnet towel.blinkenlights.nl Watch Star Wars IV in ASCII
- telnet twenex.org Login to a shell server with a handful of tty games
Miscellaneous Fun
You can do a lot of fun stuff on Plan 9, that do not strictly fall into the category of "gaming". A classic UNIX example is fortune, which will display a random quote. 9front also ships with troll and theo, which does much the same thing, but are more specific. Another fun program is games/festoon, which generates a gibberish troff document, you can use it like so: games/festoon -pet | pic | eqn | tbl | troff -mm | page
Some of the programs in /bin/games are more or less screensavers, such as juggle and catclock. 9front also throws in mole and packet, which fit this category. Lastly, there is a port of classic UNIX screensavers in the 9front extra repository, called xsr.
Obscure Operating Systems
We have already touch on vmx in the virtualizing section above, which let you run things like Linux, and plausibly Windows, in 9front. But you can also run a few obscure operating systems more natively in Plan 9, and these systems may be of special interest, and provide a lot of fun, for a Plan 9 fan:
Inferno
The Inferno project was started a few years after Plan 9 was initially released, and it was more or less developed in tandem at Bell Labs, with the same group of developers. The operating system share much in common with Plan 9, you will find acme and many other programs similar to the Plan 9 equivalents, and it shares the exact same filesystem protocol (although it is refered to as styx, not 9p, in the docs for historical reasons). Since everything in Inferno is a file, you can seamlessly share devices and other resources between it and Plan 9.
This last point is especially valuable, because Inferno was designed to run on top of other operating systems. It can run on virtually any UNIX system, Plan 9 of course, and even in old Internet Explorers! Inferno presents the network, audio, memory etc. of these systems as regular files, and thus provide an elegant bridge between a Plan 9 system and, say, a Linux or FreeBSD box. It can also run in as little as 256 Kb of memory, a quarter of a Megabyte! So it is well suited for embedded applications. Sadly though, Inferno suffers badly from neglect and code rot. Audio will not work today, and with it, any of the multimedia applications that Inferno provides. Worse, Inferno is only supported on 32-bit systems. Interestingly the 9front developers have recently started hacking away at the Inferno code, and created the forks purgatorio and 9ferno. The long term goal of this work is to make Inferno build on amd64. It is still early days, but it will be fun to see if these efforts can breath some much needed new life into the old project! You can install and run Inferno in Plan 9 like so:
; cd $home/src
; git/clone https://bitbucket.org/inferno-os/inferno-os
; mkdir /usr/inferno
; dircp inferno-os /usr/inferno
; cd /usr/inferno
; path=(/usr/inferno/Plan9/386/bin $path)
; mk install

# install a new user
; mkdir tmp
; mkdir usr/$myuser
; dircp usr/inferno usr/$myuser

# run inferno and start a desktop
; emu
; wm/wm

# to get purgatorio or 9ferno
; cd $home/src
; git/clone gits://git.9front.org/plan9front/purgatorio
; git/clone gits://git.9front.org/plan9front/9ferno
Be sure to read the papers in the doc directory here, especially bltj.pdf, sh.pdf, descent/descent.pdf, and limbotk/tk.pdf, which introduces the Inferno operating system, its rc-inspired shell, its unique programming language, Limbo, and the tk GUI toolkit for it. Inferno was written in an entirely new programming language, Limbo, a precursor to Go. Unlike Plan 9, its approach to GUI's is also much closer to traditional systems. So if you have experience with tk, or really any other toolkit in UNIX or Windows, you will find it quite easy to develop graphical programs in Inferno. Btw, the default startup menu is quite scarce, but you will find many additional GUI programs under /dis/wm, and you can modify the startup menu configuration file in /lib/wmsetup.
Inferno was intended as a commercial product, and it has a sort of Windows'y feel to it. And yet, despite deep differences, it is very reminiscent of Plan 9. It is an interesting blend, and a fun programming environment. But be prepared for bugs and limitations, the project has been quite dead for a long time.
PS: You can get around many of the limitations in Inferno with the os command, it lets you execute a host program from within Inferno. So for example, Inferno does not include awk, tar or lp (lpr in UNIX), but you can easily write wrapper functions that use the host commands for these. You might also want to add some startup shortcuts to your $home/lib/profile, or other appropriate place.
# inferno startup shortcuts for plan 9, adjust to suit your needs:
EMU=(-g1600x900 -C x8r8g8b8 -f /fonts/vera/veramono/veramono.12.font -c1)
fn inferno{ /usr/inferno/Plan9/386/bin/emu wm/wm wm/logon -u myuser }

# to halt inferno, run this in an inferno shell
; shutdown -h

# adding awk to inferno (do this within inferno):
; mkdir $home/dis
; echo bind -a $home/dis /dis >> $home/lib/wmsetup
; touch $home/dis/awk
; chmod +x $home/dis/awk

# then, you can add this to $home/dis/awk:
if {~ $#* } { file = /fd/0 } { file = $2 }
os -d $emuroot^`{pwd} awk $1 $file
UNIX V8
In the late 80's, the designers of UNIX continued to work on their operating system, and created Research UNIX Version 8 through 10, before they went on to develop Plan 9. You can see the prototypes of many Plan 9 ideas in these UNIX systems. For example, mux, jim and face, are essentially the prototypes for rio, sam and faces in Plan 9, you will find early versions of plot and proof too. You can run early editions of UNIX with the SIMH emulators, using the vax780 emulator for V8 and the BSD's, and the pdp11 emulator for the earliest editions of UNIX. Here is how you install and run V8:
# first, install the simh emulators
; cd /tmp
; 9fs 9front
; tar xzf /n/9front.org/extra/simh.tgz
; cd simh
; plan9/build_all
; mkdir $home/bin/$objtype/simh
; dircp BIN $home/bin/$objtype/simh

# download v8 and run it
; hget http://9legacy.org/download/unix/v8-simh.tar.bz2 | bunzip2 | tar x
; cd v8-simh
; vt
; simh/vax780 v8.ini
root
Using the ANSI terminal vt is not a hard requirement, but it provides for a much better experience. Once the server is running, right click and choose "raw". This will prevent text from echoing twice, and it will allow you to use key combinations, like Del and Ctrl-D (otherwise Plan 9 will interpret these signals). And yes, early UNIX'es used Delete to kill a process, just like Plan 9 does. After halting the system (see notes below), right click and choose "cooked". When you now hit the Delete key, Plan 9 will stop the VAX emulator. Lets add a new user to our V8 system:
# install a new user
$ echo myuser::8:4:mh1092,m069:/usr/myuser: >> /etc/passwd
$ mkdir /usr/myuser
$ /etc/chown myuser /usr/myuser
$ exit
$ myuser

# set up your environment
$ cat << eof > .profile
TERM=blit # or vt100
export TERM
PATH=$PATH:/etc:/usr/games:/usr/blit/bin:$HOME/bin
export PATH
eof

# halt the system
$ sync
$ sync
$ sync
$ kill -1 1
# you can now safely kill the vax780 emulator
As you can see, the system is quite similar to Plan 9, in its simplistic approach to user management and shutdown procedures. We will get back to the TERM value later, but basically, if you plan on connecting to V8 with vt, or a UNIX terminal, use vt100. And this is the value you want to set, if you are running V7 or one of the BSD's in SIMH. Setting the TERM value will allow you to use programs like vi and rogue. Setting the PATH variable will make it easier to launch programs, you can execute chown for example, rather then /etc/chown. If you don't already have it, I highly recommend that you get The UNIX Programming Environment by Kernighan and Pike. This is the book on UNIX, whether you use V8 or a Mac or anything in between! Also, if you have the interest, you can look up the abstract papers provided with UNIX Version 7 and 10, refered to as "Volume 2" of the manual. They provide some historical context and useful hints for V8.
In the olden days, UNIX ran on a server somewhere in the basement, with multiple people connected to it through diskless terminals. You can simulate this by opening up several windows and connect to the server via telnet: telnet tcp!mycomputer!8888, just make sure to change "mycomputer" to your actual computer name. Since these terminals are stateless, you don't need any shutdown procedure, just delete the window. The server however runs a filesystem, so it should be halted with the above instructions.
As mentioned though, V8 was meant to be a graphical system, and it included a window manager, graphical text editor and other things. Bell Labs created their own graphical terminal for V8, called the Blit (originally the Jerq, but for some reason management had problems with that name). To use graphical programs in V8, you need to connect to a V8 server with a Blit terminal. 9front includes a blit emulator, and you can connect it to a V8 server like so: games/blit -b 19200 -C 000000,00ff00 -t tcp!mycomputer!8888 (the first two flags here are optional). You can start the window manager with /usr/blit/bin/mux, or if you have set your PATH variable correctly, just mux. If you access V8 with this blit emulator, you want to set the TERM variable to blit. However, programs such as vi and rogue will not work in mux. To run such programs you first need to quit the window manager with mux exit, and then run these programs in the text terminal. You will find some fun graphical programs under /usr/blit/bin, including demo pacman and crabs. The later spawns a bunch of tiny crabs that wonder about the screen and randomly eats chunks of your windows. According to Rob Pike it was a favorite pun among the developers to schedule such a program to run 30 minutes into the future, whenever some boss at Bell Labs needed to use the computer for an important meeting. Enjoy :)
Office
There are a great many office suits on most operating systems, and other office utilities besides too numerous to count. So many are the choices in fact that it's easy to forget that "office" is just a fancy word for working with text. Plan 9 does not delude it's users: You need to be a proficient reader and writer to use the system, and you need to organize and manage your files. In other words, you need to learn essential office skills to use the system.
Reading Office Documents
As far as it's up to you, I'm sure all of your documents are plain text as a matter of course. Plain text is editable, searchable, pipeable, programmable. You can mangle it freely with standard tools such as grep, sed and awk, and it doesn't require a flippin Terrabyte of diskspace. In Plan 9 text is even more powerful, it's always unicode, it's plumable, acmeable, zeroxable, yesterdayable, snarfable and devable (yes, these are "real" words in Plan 9). It's the magic goo that holds everything together, much like in the real world. You would be insane not to write documents as plain text! But sadly it's not always up to you. Your pesky boss may send you important Word documents, with little or no regard for your taste in operating systems. Don't panic! Many office documents are readable with page (naturally HTML files can be read with mothra). Documents that aren't handled by page, such as DOCX or ODT, can easily enough be converted to PDF before importing them to your Plan 9 box (assuming you don't run Plan 9 on all your machines that is). *
Reading Epubs
In theory, page can handle Epubs, but in my experience it can't. Epubs are basically just zipped HTML files, so it is possible to unzip them, search around for a "toc" file (table of contents) to find what files constitute what chapters, and then read them one by one in a web browser. The following crude shell script automates that process, although I cannot guarantee that it will handle absolutely all Epubs gracefully. Feel free to adjust the script to suit your needs, or if you aren't a lazy bum like me, feel free to patch up page so that it handles Epubs correctly ;)
#!/bin/rc
# eread - a basic epub reader
# usage: eread file.epub

# set some defaults
rfork ne
cwd=`{pwd}
tmp=/tmp/epub-$pid
mkdir -p $tmp
cd $tmp
fn sigexit{ rm -rf $tmp }    # tidy up before you leave
ifs='
'

# fail if no file is given
if (! ~ $#* 1) {
    echo Usage: eread file.epub >[2=1]
    exit usage
}

# ops, locate ops and toc.ncx in epub
fn ops{
    ops=`{ls -p $1 | grep -i '^o'}
    if(~ $#ops 0) echo $1
    if not{
        toc=`{ls -p $1/$ops | grep -i 'toc.ncx'}
        if(~ $#toc 0) echo $1
        if not echo $1/$ops
    }
}

# extract epub
if (! test -f $cwd/$1){
    echo Error, $1 does not exist! >[2=1]
    exit nonexistent
}
unzip -af $cwd/$1

# extract chapter information from the epub
cd `{ops .}
cat [Tt][Oo][Cc].[Nn][Cc][Xx] | sed -n '/<navPoint/,/<\/navPoint/p' |
	sed -n 's/.*<text>(.*)<\/text>.*/\1/p' > chapters
cat [Tt][Oo][Cc].[Nn][Cc][Xx] | sed -n '/<navPoint/,/<\/navPoint/p' |
	sed -n 's/.*src="(.*)".*/\1/p' | sed 's/%20/ /g' > links
chapters=`{cat chapters | wc -l}

# ugly hack: remove xml tags from files so mothra doesnt get confused
for (file in `{du -a . | grep -i '\.x?html' | sed 's/^[0-9]+	//' | tr -d ''''})
	sed '/<\?xml/d' $file > TMP && mv TMP $file

# generate html index
cat <<eof > eread_index.xhtml
<html>
<head>
<title>Contents:</title>
</head>
<body>
eof
for(i in `{seq $chapters}){
    link=`{sed -n $i^p links}
    chapter=`{sed -n $i^p chapters}
    echo -n '<a href="'$link'">' >> eread_index.xhtml
    echo ''$chapter'</a><br>' >> eread_index.xhtml
}
cat <<eof >> eread_index.xhtml
</body>
</html>
eof

# read html files
mothra -a file://^`{pwd}^/eread_index.xhtml
Writing Office Documents
For all it's wondrous benefits, plain text documents has an obvious flaw: They don't look good. If you need to write an article or even just a professional looking letter, you need something a little more sophisticated then monospace fonts. Troff is your friend (an old version of Tex has also been ported to Plan 9, but i recommend troff). Don't be too quick to dismiss this venerable old tool! While the command man man will print a rather unimpressive manual in boring monospaced text, try running the command man -t man | page, and compare the results. Clearly, troff can produce professional looking documents! Besides the man(6) macros for writing manual pages, Plan 9 also includes the ms(6) macros for writing generic articles and letters, naturally with full unicode support (a feature sadly lacking in UNIX Troff, not to mention Tex or DocBook). You can also use the mpictures(6) macros for including images (these must be converted to Postscript first, eg: jpg -9t < image.jpg | lp -dstdout > image.ps) and the html2ms/ms2html commands for converting troff articles to/from HTML.
Here is a letter in troff, and a screenshot of what it would look like:
.DS L
To: Archduke Poggle of Geonosis
23 Insectoid Str.
Hive
103133
GEONOSIS

From: Emperor Palpatine
Imperial Palace
P0 000001
Senate District
CORUSCANT
.DE
.SH
Dear Archduke
.PP
The so called
.I
undefeatable
.R
Death Star was blown to bits by a bunch of teenagers yesterday.
I must say I am disappointed!
We need to construct a new planet killer ASAP,
and this time lets try to avoid an
.B
Achilles heel
.R
in our design shall we?
.PP
I have some other ideas for further improvements.
First of all we need a
.I
menacing
.R
throne room with a view...
.DS
Yours truely,
	Palpatine
.DE
troff syntax is very simple, add a troff or macro command, such as .SH for a section header or .PP for a paragraph on a line by itself, then the text content after it. Technically these are ms macro commands, which differ slightly from man macros, and low level troff commands are written in lower case (eg. .br to force a line break). But you don't need to know all that if you just want to write a simple letter, in fact .SH and .PP will suffice, but see ms(6) if you are thirsty for more.
Make no mistake, troff can be used to write highly professional documents. The development section mentioned Francisco J. Ballesteros excellent book on Plan 9, it is worth mentioning that this book was written and converted to a PDF file on a Plan 9 machine. A less professional, but perhaps still useful example, is my article on Operating System Complexity. You can compare this PDF with the ms source code for a taste of what writing a troff document looks like.
One issue when working with troff is that you need to use a plethora of different troff preprocessors, macro packages and what not. Run doctype myfile.ms to see what commands are needed to convert the file into pure troff, this can then be read in page or converted to PDF or other formats. To illustrate:
; doctype myfile.ms
tbl myfile.ms | troff -ms -mpictures
; doctype myfile.ms | rc | page
; doctype myfile.ms | rc | dpost > myfile.ps    # ei. postscript
; doctype myfile.ms | rc | dpost | ssh unixmachine 'lpr'
; doctype myfile.ms | rc | dpost | ps2pdf > myfile.pdf
; tbl myfile.ms | nroff -ms > myfile.txt
; ms2html < myfile.ms > myfile.html
Depending on your document, some of these conversions may not work very well. Plain text and HTML conversions are often quite bad, but Postscript and PDF should work well. If you work a lot on troff documents you may find it useful to create some shortcuts, such as:
fn readms{ doctype $* | rc | page }
fn ms2pdf{ doctype $* | rc | dpost | ps2pdf > out.pdf }
Spellchecking
The spellchecker spell(1), and the acme equivalent aspell, is a simple but useful tool for spellchecking English text (sadly it does not support user supplied dictionaries). Speaking of which, dict(7) is an excellent English dictionary, somewhat equivalent to WordNet in UNIX. To use this tool you need to install some dictionaries from the internet, see the README's in /lib/dict for instructions.
There is precious little support for non-English languages in any operating system, but you can use various strategies for spell checking at least, as an example consider these functions for spell checking Norwegian:
fn lower{
    tr A-ZÆØÅ a-zæøå
}
fn words{
    tr -c 'a-zæøåA-ZÆØÅea''' '
    ' | sed 's/''//g' | sort | uniq
}
fn addwords{
    odict=$1 && shift
    for(word in $*) echo $word >> /tmp/ndict-$pid
    mv /tmp/ndict-$pid $odict
}

nodict=/lib/words.no    # dictionary of correct Norwegian spellings
fn nospell{
    for(word in `{deroff $* | lower | words | comm -13 $nodict -}){
        if(! grep -s '^'$word'$' $nodict) echo $word
    }
}
fn addnoword{
    addwords $nodict $*
}

noundict=/lib/unwords.no    # dictionary of Norwegian misspellings
fn nomiss{
    cat $* | lower | words > /tmp/nomiss-$pid
    for(word in `{deroff $noundict}){
        if(grep -s '^'$word'$' /tmp/nomiss-$pid) echo $word
    }
    rm /tmp/nomiss-$pid
}
fn addnounword{
    addwords $noundict $*
}

fn nolook{
    look $* $nodict
}
These functions require you to have a dictionary of correctly spelled Norwegian words in /lib/words.no. Assuming you have a UNIX machine nearby with the Norwegian wordlist for aspell installed on it, you can import the dictionary like so: ssh myunixpc | 'aspell -d nb dump master | aspell -l nb expand' | tcs -f 8859-4 > /lib/words.no (change "nb" here if you need another language, eg. "fr" for French). The lower and words shorthands take the special Norwegian letters æøå into account. nospell breaks up your document into individual, unique words stripped of any troff syntax, and prints any word not found in the dictionary (much like the standard spell command). nomiss is similar, but uses a dictionary of commonly misspelled words, and prints any word in your document that matches the dictionary (unfortunately comm doesn't handle non-English letters well, which is why we need an extra grep line to catch words that contain the Norwegian letters æøå). Finally nolook looks for correct spellings of Norwegian words.
These custom tools are crude, and in particular they do not handle suffixes/prefixes at all. This means that you will have a great many false positives when you first start using them (eg. "computer" may be in the dictionary, but not "computers", "computing" ect...). But as you keep adding the correct spellings to your dictionary with noaddword the number of false positives will grow less and less. If you also record your misspellings with noaddunword, these tools will gradually become honed to your style of writing, and may prove to be adequate. If not, they may at least motive you to write a more intelligent spellchecker ;)
"PIM" is just a fancy acronym for getting organized. My former work place was a disorganized disaster area with half a dozen "professional" project management solutions in place. Every so often my colleagues would be frustrated enough with the mess that they introduced a new project management tool, which naturally aggravated the situation further. The moral? No operating system or program will magically clean up your mess, only you can organize yourself.
Plan 9 does not pretend to be your nanny, but it does give you basic tools that you can use to get yourself organized. Such tools include date and cal to keep track of time, calendar and tel to keep track of appointments and contacts, and cron to schedule execution of programs (cron in Plan 9 requires a CPU+AUTH server). And with just a little bit of awk it's easy to create your own PIM tools. We will take a look at a few examples here. The following scripts are intentionally basic, likely they will not suit your needs exactly, but hopefully they can inspire you to write you own tools that will!
2do Lists
First off, lets create a simple 2do list manager:
#!/bin/rc
# 2do - simple 2do list manager
# usage: 2do [list [ id... | task... ]]
# bugs:  a task cannot begin with a number

# set some defaults
rfork ne
dir=$home/lib/2do
mkdir -p $dir
tmp=/tmp/2do-$pid
date=`{date -i}

# parse arguments
if (~ $#* 0) ls -p $dir && exit
if (~ $#* 1){ grep -v '^#' $dir/$1 | sort -k 2; exit }
list=$1 ; shift
id=1    # id is either 1 or one more then the highest id
if (test -f $dir/$list)
    id=`{awk '{ if($1 > id) id=$1 } END { print id+1 }' $dir/$list}

# id: remove tasks; task: add it
if (echo $* | grep -s '^[0-9\ ]+$'){
    for (id in $*)
        sed '/^'$id' /s/^/#/' $dir/$list > $tmp && mv $tmp $dir/$list
if not echo $id $date $* >> $dir/$list
And here is a short demonstration of its usage:
; for (thing in eggs milk cheese) 2do buy $thing
; 2do work start some project
; 2do
buy
work
; 2do buy
3 2021-03-23 cheese
1 2021-03-23 eggs
2 2021-03-23 milk
; 2do buy 1 3
; 2do buy
2 2021-03-23 milk
As you can see, this 2do script is very basic. It lets you define an arbitrary number of lists that you can add tasks to, one at a time, and remove tasks from by listing their ID numbers. Each new task is given a unique ID and today's date, and the tasks will be listed from oldest to newest. To remove a list completely just run rm $home/lib/2do/mylist, and you can of course edit the 2do list manually in a text editor if you want, eg B $home/lib/2do/mylist.
The script can easily be expanded in many interesting ways, for example you might want to add priorities and sort by priority first, then by date. The tasks are not actually removed, but commented out, so it is possible to check how many tasks have been completed since the project began and give an ETA of when the list will be completed. Finally, you may want to add flags that let you adjust some of the defaults here, such as setting a date other then today. Feel free to experiment and play with the code, and if you have added all of these features to the script, take a step back and consider the difference between this and the original version. Was it worth the extra complexity?
Queues
Our next script is embarrassingly simple, it's just a crude mechanism for managing a queue, by printing the next line in a file whenever we run que on it. But as we will see, this turns out to be surprisingly useful.
#!/bin/rc
# que - a simple queue tracker
# usage: que [-p] file

# set some defaults
rfork ne
tmp=/tmp/que-$pid
pronly=no

# check arguments and errors
if (~ $#* 0 || test $#* -gt 2) {
    echo Usage: que [-p] file >[2=1]
    exit usage
}
if (~ $1 -p) {
    pronly=yes
    file=$2
}
if not file=$1
if (! test -f $file){
    echo Error: File $file does not exist! >[2=1]
    exit nofile
}

# print task and update queue
if (! task=`{grep -n '<--' $file | sed 's/:.*//'}) task=1
next=`{ echo $task + 1 | hoc }
prev=`{ echo $task - 1 | hoc }
if (~ $pronly yes) { sed -n '$prev'p $file; exit }
sed 's/<--//' $file > $tmp
sed -n ''$task'p' $tmp
sed ''$next's/$/<--/' $tmp > $file
Suppose we are listening through a Red Dwarf audio book, and we have written a list of these chapters in $home/lib/que/reddwarf, that look like this:
/usr/glenda/music/reddwarf/ch1.mp3
/usr/glenda/music/reddwarf/ch2.mp3
/usr/glenda/music/reddwarf/ch3.mp3
...
If we run que $home/lib/que/reddwarf, it will print /usr/glenda/music/reddwarf/ch1.mp3, and our list will now look like this:
/usr/glenda/music/reddwarf/ch1.mp3
/usr/glenda/music/reddwarf/ch2.mp3<--
/usr/glenda/music/reddwarf/ch3.mp3
...
The next time we run our command, que will print ch2.mp3 and move the arrow marker to ch3.mp3. It's easy to automate things further. For example:
; fn reddwarf{ play `{que $home/lib/que/reddwarf} }
; reddwarf    # play next chapter in our audiobook
; du -a My_Little_Pony | awk '/mp4/ { print $2 }' | sort > $home/lib/que/mlp
; fn mlp{ treason `{que $home/lib/que/mlp} }
; mlp        # play next episode of My Little Pony
At times we may want to print our current task in the queue without advancing the marker. For example, I regularly attend weekly meetings and keep a list of meeting notes which look like this:
/usr/dan/lib/eread/mwb_N_202101/OEBPS/202021021.xhtml
/usr/dan/lib/eread/mwb_N_202103/OEBPS/202021088.xhtml
/usr/dan/lib/eread/mwb_N_202103/OEBPS/202021091.xhtml<--
/usr/dan/lib/eread/mwb_N_202103/OEBPS/202021094.xhtml
...
As you can see, the notes are provided in an Epub that spans several weeks (one for each line). I have a simple script that extracts the Epub and update my list, which I need to run maybe three or four times a year. At the start of each week que is run automatically on this list to advance the marker. Finally I have a meeting script that runs que -p $home/lib/meeting and open the corresponding HTML notes in mothra. I may need to run meeting several times a week, but with this setup it will always refer to the notes for the current week.
Of course the details of this example will probably not be very relevant for you, but hopefully it can give you some ideas on how to automate your own workflow. The weekly notes can easily be daily or monthly notes, and they do not need to be a file. It could be a directory of files or a script to run or what have you (check out the plumbing section for further tips).
Password Manager
Plan 9 has a very good built in service for managing encrypted files called secstore. You need to set up a CPU+AUTH server to use this service, the details on how to do this can be found in section 7 (7.4.3 for secstored specifically) of the 9front fqa.
Assuming that you have configured the secstore correctly, you can initially write your database of passwords in a plain text file. To prevent our secrets from being written to the harddisk, we can first run ramfs -p; cd /tmp. Whatever we write now in /tmp will be safely stored in memory, and removed upon reboot. We can now write our password database, it could look something like this perhaps (if your passwords actually look anything like this - change them!):
CATEG    NAME   USER   PASSWORD EMAIL            WEBSITE
Bank     PayPal -      123456   [email protected] paypal.com
Bank     MyBank 123456 password [email protected] mybank.no
Email    GMail  myuser MySecret [email protected] gmail.com
...
We can now do the following:
# put our database in the secret store
; auth/secstore -p passwords
# search the database for passwords
; auth/secstore -G passwords | grep -i bank
; auth/secstore -G passwords | awk '/Bank/ { print $2, $4 }'
# securely edit our database
; ipso -e passwords
We can also safely export/import our secret database to a UNIX machine:
# export to unix
; ssh unixpc 'gpg2 --gen-key'
; auth/secstore -G passwords | ssh unixpc 'cat | gpg2 -ser myuser > pass.gpg'

# import from unix
; ramfs -p; cd /tmp
; ssh unixpc 'gpg2 -d pass.gpg' > passwords
; auth/secstore -p passwords
If you need to constantly import and export such files, you can easily wrap some of these commands into more user friendly shortcuts. But suppose we don't have a CPU+AUTH server with a secstore service, can we still manage our passwords safely? Sure:
; ramfs -p; cd /tmp
; B passwords
; auth/aescbc -e < passwords > $home/lib/pass.aes
# and to double check that the password we typed was correct:
; auth/aescbc -d < $home/lib/pass.aes  > /dev/null
# search the encrypted file for a password
; auth/aescbc -d < $home/lib/pass.aes | grep -i bank
What if we have written something super secret to disk, is there any way to safely delete the contents? That depends. If a copy of the file exists in the read only dump filesystem, then no. A reinstallation of the operating system is the only way to remove the file. But if that isn't the case, it's simple enough to overwrite the contents with blank data:
# ps: the whitespace in the sed command here is a tab
; dd -if /dev/zero -of myfile -bs 1024 -count `{du myfile | sed 's/    .*//'}
This is a joke of course, there is no way to guarantee that data written to a modern harddisk is ever removed, no matter what the disk may claim to your operating system.
Personal Accounting
For many people the word "accounting" sends cold shivers down their spine, and to be sure, official business accounting tends to be horrifically complex. But this is largely due to convoluted legislature, and unnecessarily paranoid triple checking of the math. For personal accounting we don't need to worry about all that. We just need a way to quickly record our expenses, and a way to check our expenses against a budget. Here is a simple script that takes care of our first task:
#!/bin/rc
# account - add records to our personal account
# usage: account [-d date] [-c catg] $$.CC [ comments... ]

# set some defaults
rfork ne
account=$home/lib/account
date=`{date -i}
catg=food

# check arguments and errors
if (~ $#* 0) {
    echo 'Usage: account [-c catg] $$.CC [ comments... ]'
    exit usage
}
for(arg in $*){
    switch($arg){
    case -c
        catg=$2
        shift 2
    case -d
        date=$2
        shift 2
    }
}
if (echo $date | grep -vs '^[12][09][0-9][0-9]-[01][0-9]-[0-3][0-9]$') {
    echo Error: invalid date, use YYYY-MM-DD >[2=1]
    exit wrongdate
}
if (echo $1 | grep -vs '^[0-9.]+$') {
    echo Error: invalid expense, use $$.CC without prefixes >[2=1]
    exit wrongnumber
}

# add record to account
if (~ $catg income) amount=$1
if not amount=-$1
shift
echo $date $amount $catg $* >> $account
And here is a demonstration of its use:
; account -d 2021-03-01 -c rent 1000 it sucks to pay rent
; account -d 2021-03-02 -c income 3500 payday!
# this is too much typing, lets reduce it a bit
; fn prompt{ while (echo -n '> ') eval $* `{read} }
; prompt account
> -d 2021-03-04 21.25
> -d 2021-03-06 14.50 groceries
> -c transport 2.50 buss
> -c other 9.50 cinema
> 11.35 # hit Del key to quit input loop
; date -i
2021-03-09
; cat $home/lib/account
2021-03-01 -1000 rent it sucks to pay rent
2021-03-02 3500 income payday
2021-03-04 -21.25 food
2021-03-06 -14.50 food groceries
2021-03-09 -2.50 transport buss
2021-03-09 -9.50 other cinema
2021-03-09 -11.35 food
This demonstration illustrates that personal accounting is often quite tedious. At least our script tries to reduce some of the work. If we make the habit of typing in our daily expenses, we do not have to specify a date. Assuming that most of our expenses are "food" related, we usually don't need to specify a category either. The script allows us to give a comment to each input record, but that is optional of course. Note that we don't use + or - in our records, the script will interpret anything with a category of "income" as +, anything else as -. Lastly, our script requires us to type in one record at a time, but it feels redundant to type account every time. So we created a small function called prompt that lets us define a command, account in this case. It reads our input a line at a time, re-evaluates our line as arguments for our command, and executes it. We quit the loop by typing the Delete key. I find this trick handy in many different situations, for example, I might want to look up a bunch of words while writing an article, prompt look or prompt dict does the trick nicely.
If we plan on using this database for computations, such as summarizing our monthly expenses and checking it against a budget, it is vital that our database contain valid data. So we make a couple of extra sanity checks to see if the provided date and expense are correct. Our checks are not 100% bullet proof, but it should be good enough for personal use. So for the next step, the following script checks our current monthly expenses against a predefined budget:
#!/bin/rc
# budget - measure monthly expenses against a budget
# usage: budget [YYYY-MM]

# set some defaults
rfork ne
account=$home/lib/account_simple
if (~ $#* 0) date=`{date -i | sed 's/...$//'}
if not date=$1
echo $date

awk '
BEGIN {
    printf("%-s\n", "-----------------------------")
}
/'$date'.* income/ { income+=$2 }
/'$date'.* rent/   { rent+=$2   }
/'$date'.* save/   { save+=$2   }
/'$date'.* food/   { food+=$2   }
/'$date'.*/        { sum+=$2    }
END {
    printf("%-10s%10.2f %-10s\n", "income:", income, "of 3500")
    printf("%-10s%10.2f %-10s\n", "rent:", rent, "of -1000")
    printf("%-10s%10.2f %-10s\n", "save:", save, "of -200")
    printf("%-10s%10.2f %-10s\n", "food:", food, "of -1000")
    printf("%-10s%10.2f %-10s\n", "other:",
            sum - (income + (rent + save + food)), "of -1000")
    printf("%-s\n", "-----------------------------")
    printf("%-10s%10.2f\n", "Balance:", sum)
}' $account
Running the budget command will result in this output:
2021-03
-----------------------------
income:      3500.00 of 3500
rent:       -1000.00 of -1000
save:           0.00 of -200
food:         -47.10 of -1000
other:        -12.00 of -1000
-----------------------------
Balance:     2440.90
Naturally our budget here is unrealistically simple, but it does perhaps illustrate that accounting, at least for personal expenses, does not have to be very difficult. If you are more into spreadsheets and the like, take a look at the spreadsheets section below, for an alternative approach to managing your finances.
Time Management
There are many elaborate schemes and theories for time management of projects. I will not really cover that here, instead I will just look at the very basics for personal time management. First of all the classic calendar program is well suited to manage your appointments. If the date happens to be the 24 of March, and you have a $home/lib/calendar file that looks like this:
Mar 23    Finish the Plan 9 Desktop Guide already!
Mar 24    Flee the country
Mar 25    Dentist appointment
Mar 26    Go home
Running the command calendar will print the following lines:
Mar 24    Flee the country
Mar 25    Dentist appointment
Calendar will print any appointments matching today's and tomorrow's date, or on a Friday, all dates up until the following Monday. The date and the appointment have to be separated by a tab. The trick to making this program useful, besides actually writing down your appointments, is to configure your system to automatically run the program every day. Exactly how you want to do this depends greatly on your own setup and tastes, but one simple solution is to add the following to $home/bin/rc/riostart:
window rc -c 'calendar; rc'
If you need a stopwatch, timer or alarm clock, the following examples may provide you with some hints:
# hit enter to stop the clock, "r" is time in seconds
; time read
# set timer for 2 minutes
; sleep 120; play $home/music/sample/beep.mp3
# set of alarm at 17:10 o'clock
; while(! ~ `{date | awk '{ print $4 }'} 17:10*)
	sleep 60; play $home/music/alarm.mp3
Math, Graphs and Units
There are three calculators available in Plan 9: bc, hoc and dc. All of these have more or less the same capabilities, and the old UNIX warhorse bc is probably the one you will be most familiar with (or dc if you happen to be a 100 years old).
The units command is helpful for converting different units, such as meter to feet or kilogram to pound (it has some limitations though). As for graphs, one option is to use graph. Suppose you have the following stock exchange printout:
98
99
102    "102"
100
97     "97"
The command graph -y 80 120 -a < stocks | plot will draw a graph, with the y axis set to vary between 80 and 120, and the x axis set to increment automatically. The lowest and highest points in the graph are also labeled with "97" and "102". Of course you can make much more complicated graphs, suppose you had three columns of numbers in the database, one for each company you have invested in (each optionally tagged with a label). You can then run the command graph -y 80 120 -a -o 3 -p rgb < stocks | plot, to produce a graph of the three companies each with its own color (red, green and blue).
With all its capabilities, the graph program has a fatal flaw: It's clumsy to incorporate its graphs into documents. A more elegant graph tool for troff documents is grap. It has much the same capabilities as graph but uses a slightly different syntax. To add the stock exchange graph from above in a troff document you could write it as follows:
.G1
98
99
102
100
97
.G2
And you could view the graph by running the command grap stock.ms | pic | troff | page. Of course if you have a graph of three companies, each with its own style and label, things would become more complicated. Supposing the plot data is in a file called stocks, and looks like this:
You could write the grap graph like so:
.G1
frame invis ht 2 wid 4 left solid bot solid
label left "CompA" left .5 up .7
label left "CompC" left .5
label left "CompB" left .5 down .7
draw compa solid
draw compb dotted
draw compc dashed
copy "stocks" thru X
    next compa at $1,$2
    next compb at $1,$3
    next compc at $1,$4
X
.G2
Like the other troff preprocessors, such as tbl, pic and eqn, it takes a bit of effort to learn their language. But once you get used to the semantics, it's easy enough to add fairly advanced tables, pictographics, math expressions and graphs to your troff documents.
Spreadsheets
You do not have a nice pointy-clicky GUI spreadsheet in Plan 9, but it's not too hard to replicate the basic functionality. Let's assume you have a habit of doing your personal accounting in LibreOffice, and a typical fiscal year looks something like the following screenshot:
The crucial step in replicating such a report in Plan 9 is to separate data from presentation. For instance, lets write the variable account data in a fixed field database like so:
Groceries   345     353     321     398     373     362
Health      134     0       0       123     0       142
Transport   262     268     273     352     263     272
Cloths      0       150     0       0       175     225
Other       363     473     481     403     428     393
With this database in place it's fairly easy to generate the above spreadsheet. For example, the following awk script will print an ASCII report similar to our LibreOffice screenshot:
; cat account
#!/bin/rc
# account - print an account report
# usage: account database
# bugs:  requires a very specific input file

date=`{date}
awk <$1 '
BEGIN {
    # set some fixed income/expense values
    income=3000; rent=1000; lone=250; savings=500; fixed=1750

    # print header and fixed monthly values
    printf("%10s%6s%6s%6s%6s%6s%6s\n",
    "", "Jan", "Feb", "Mar", "Apr", "May", "Jun")
    prfixed("Income", income)
    print ""
    prfixed("Rent", rent)
    prfixed("Lone", lone)
    prfixed("Savings", savings)
    prfixed("FIXED", fixed)
    print ""
}
{
    # print each line in the db and save their values
    prline($1, $2, $3, $4, $5, $6, $7)
    jan+=$2; feb+=$3; mar+=$4; apr+=$5; may+=$6; jun+=$7
}
END {
    # print summary of expenses
    prline("VARIABLE", jan, feb, mar, apr, may, jun)
    print ""
    prline("Expenses", jan+fixed, feb+fixed, mar+fixed,
                       apr+fixed, may+fixed, jun+fixed)
    prline("BALANCE",
        income-fixed-jan, income-fixed-feb, income-fixed-mar,
        income-fixed-apr, income-fixed-may, income-fixed-jun)
    print ""

    # print current year and annual balance
    split("'$"date'", date)
    printf("%10s %d\n", "Year", date[6])
    printf("%10s %d\n", "SUM",
        (income*6)-((fixed*6)+jan+feb+mar+apr+may+jun))
}

# a couple of wrapper functions for printf
function prline(tag, jan, feb, mar, apr, may, jun){
    printf("%-10s%6d%6d%6d%6d%6d%6d\n",
    tag, jan, feb, mar, apr, may, jun)
}
function prfixed(tag, n){
    printf("%-10s", tag)
    for (i=1; i<=6; i=i+1)
        printf("%6d", n)
    printf("\n")
}
'
; account database
             Jan   Feb   Mar   Apr   May   Jun
Income      3000  3000  3000  3000  3000  3000

Rent        1000  1000  1000  1000  1000  1000
Lone         250   250   250   250   250   250
Savings      500   500   500   500   500   500
FIXED       1750  1750  1750  1750  1750  1750

Groceries    345   353   321   398   373   362
Health       134     0     0   123     0   142
Transport    262   268   273   352   263   272
Cloths         0   150     0     0   175   225
Other        363   473   481   403   428   393
VARIABLE    1104  1244  1075  1276  1239  1394

Expenses    2854  2994  2825  3026  2989  3144
BALANCE      146     6   175   -26    11  -144

      Year 2021
       SUM 168
If you are unfamiliar with awk, I am sure the above example looks quite terrifying. Settle down. Brew a cup of coffee, and read the script slowly, line by line. The logic is fairly straight forward, and most of the tedium here has to do with formatting. For example printf("%-10s%6d%6d%6d%6d%6d%6d\n"...) doesn't look pretty, but it makes sure that the fields are printed out nicely (print a line consisting of a 10 character wide string, followed by six 6 character wide digits followed by a newline).
Now it's all well and good to print ASCII tables for our own personal accounting, but lets assume we need to incorporate such a report in a business document. ASCII tables went out of fashion in the early 90's, so we definitely need something more professional looking to show to our boss. Don't panic, tbl(1) has your back! Consider the following example:
; cat << eof > table
    .TS
    expand center allbox;
    l l l l l l l
    l n n n n n n.
    eof
; account database | sed 's/[ ]+/    /g' >> table
; echo .TE >> table
; tbl table | troff | page
Let's take a step back and explain what is going on here. The tbl(1) program expects tab separated input fields, so we use sed to convert our spaces to tabs. Beyond that our tbl table must start with ".TS" and end with ".TE", and we need a short header that describes what our table should look like. expand, center and allbox control various visual aspects of the table, the next two lines state that the first row consists of seven left justified text fields, and that all following rows consist of a left justified text field and six numerical fields. Look up the tbl(1) manpage for more information, you can do a lot of cool stuff with it. To incorporate our table in an ms (ei. troff) document, just run cat table >> document.ms.
These examples may look very tedious, but they are actually not much harder to work with then our LibreOffice example. The above spreadsheet in LibreOffice consists of 550 characters. Some of these fields contain code, for example a field that reads "1104", may actually be typed "=SUM(B12:B17)". Compare that to awk's "jan+=$2". In addition to typing in these characters, we also need to use at least 101 mouse or keyboard actions to manipulate the table, making a total of 651+ actions.
Our awk program is 982 characters, excluding comments and whitespace, and our database 118, making a total of 1100 input actions. So our awk table requires initially 50% more work to write then our LibreOffice table. However, once our awk program is written, we only need to update the database when we do our accounting, and that is five times less work then our LibreOffice spreadsheet. In addition we can freely change our awk code without effecting the data, we can also use our data with other programs, we can feed it to graph or a database for instance. The flexibility of our awk approach, not to mention computational efficiency, is far superior!But lets consider one more problem. Writing a custom tbl file just to quickly view our data as a troff table is tedious, can we automate this? Sure. Lets write a script called table that automatically writes a tbl table for the file it is given and open it in page:
#!/bin/rc
# table - convert database to a tbl(1) spreadsheet
# usage: table file
# bugs:  only supports a simple generic spreadsheet

# set some defaults
rfork ne
tmp=/tmp/ttbl-$pid
mkdir -p $tmp
fn sigexit{ rm -rf $tmp }

# workaround: tbl can only handle one page (56 lines) at a time
pages=`{echo `{cat $1 | wc -l} / 56 | hoc}
if(~ $pages [0-9]*.[0-9]*){
    pages=`{echo $pages | sed 's/\.*//'}
    pages=`{echo $pages + 1 | hoc}
}
s=1
e=56
for(p in `{seq $pages}){
    p=`{echo 00$p | sed 's/.*(...$)/\1/'}
    sed -n $s,$e^p $1 > $tmp/p$p
    s=`{echo $s + 56 | hoc}
    e=`{echo $e + 56 | hoc}
}

# generate tbl for each 56 line segment
for(file in $tmp/p*){
    tbl=$file.tbl
    echo .TS > $tbl
    echo 'expand center allbox;' >> $tbl

    # create tbl header (header and content lines)
    for(word in `{sed 1q $1 | sed 's/[ ]+/_/g'}){
        if (echo $word | grep -s '^[0-9.-]+$') echo -n 'n '
        if not echo -n 'l '
    } >> $tbl
    echo >> $tbl
    for (word in `{sed -n 2p $1 | sed 's/[ ]+/_/g'}){
        if (echo $word | grep -s '^[0-9.-]+$') echo -n 'n '
        if not echo -n 'l '
    } >> $tbl
    echo . >> $tbl

    cat $file >> $tbl
    echo .TE >> $tbl
}

# compile all segments and print out
for (file in $tmp/p*.tbl){ tbl $file | troff >> $tmp/all }
page $tmp/all
One complication here is that tbl does not handle tables that overflow the page, so we need to split very large tables into smaller chunks. And of course our script cannot magically produce a perfect table for any and all input. First of all it just scans the first two lines to find out what type of fields it should print, left justified text or numbers, it assumes that all following lines have the same fields as the 2nd line. Lastly our input file must be a tab separated database, if it isn't we need to transform it first (eg. sed 's/,/ /g' db.csv > db.tab; table db.tab).
Databases
"Database" is another one of those IT buzzwords, that make really simple things sound amazingly complex. Consider this text file:
Asia             Japan       120     144
Asia             India       746    1267
Asia             China      1032    3705
Asia             USSR        275    8649
Europe           Germany      61      96
Europe           England      56      94
Europe           France       55     211
North America    Mexico       78     762
North America    USA         237    3615
North America    Canada       25    3852
South America    Brazil      134    3286
Lo, and behold, it's a database! A database is a list of values, nothing more. The above table is a database of countries, listing continent, name, population and area. We can easily retrieve values from our database with awk, for instance:
; echo Asias population is `{awk -F'    ' '
	/Asia/ { sum += $3 } END { print sum }' countries}
Asias population is 2173
; echo Germanys population density is `{awk -F'    ' '
	/Germany/ { print ($3*1000)/$4 }' countries}
Germanys population density is 635.417
Naturally these numbers are quite bogus, since my database is incomplete, and a little bit outdated, but I trust you get the point. Of course when people speak of databases, they often think of relational databases. That is tables of values that are related with each other through common key values. For example, suppose we augment our countries database with a capital database:
Brazil     Brasilia
Canada     Ottawa
China      Beijing
England    London
France     Paris
Germany    Bonn
India      New Delhi
Japan      Tokyo
Mexico     Mexico City
USA        Washington
USSR       Moscow
These two databases are related with each other through the common country names, the second field in our countries database, and the first in our capitals database. Lets merge them:
; sort -t'    ' -k 2 countries > tmp_countries
; sort -t'    ' capitals > tmp_capitals
; join -t'    ' -1 2 tmp_countries tmp_capitals
Brazil     South America     134    3286    Brasilia
Canada     North America      25    3852    Ottawa
China      Asia             1032    3705    Beijing
England    Europe             56      94    London
France     Europe             55     211    Paris
Germany    Europe             61      96    Bonn
India      Asia              746    1267    New Delhi
Japan      Asia              120     144    Tokyo
Mexico     North America      78     762    Mexico City
USA        North America     237    3615    Washington
USSR       Asia              275    8649    Moscow
You will note one complication here. Our sort and join commands have the flag -t' ' (-F' ' for awk), that is -t followed by a Tab character surrounded by single quotes. This is because our databases are tab separated values, this allows us to have fields containing spaces, such as "North America". Without the -t' ' flag, this would be interpreted as two fields rather then one. Of course we can use the same approach to work with comma separated values, just change the flag to -t,.
If you try this out yourself, you will see that we have actually cheated a bit in our examples. Tab separated databases do not align perfectly, they actually look more like this:
Asia    Japan    120    144
Asia    India    746    1267
Asia    China    1032    3705
Asia    USSR    275    8649
Europe    Germany    61    96
Europe    England    56    94
Europe    France    55    211
North America    Mexico    78    762
North America    USA    237    3615
North America    Canada    25    3852
South America    Brazil    134    3286
In UNIX it is easy to pretty print such text, just run join -t' ' -1 2 tmp_countries tmp_capitals | column -t. Plan 9 however does not have the column command. The closest equivalent, mc, does not have this auto align feature. But it's not too hard to write an awk script that does the same, here is one example:
PS: This script will replace tabs, so don't overwrite your tab separated databases with it! Use it for pretty printing only.
#!/bin/rc
# column - auto align column output
# usage: column < input > output

cat /fd/0 | awk '
BEGIN {
    FS = "\t"; blanks = sprintf("%100s", " ")
    number = "^[+-]?([0-9\ ]+[.]?[0-9\ ]*|[.][0-9\ ]+)$"
}

{    row[NR] = $0
    for (i = 1; i <= NF; i++){
        if ($i ~ number)
            nwid[i] = max(nwid[i], length($i))
        wid[i] = max(wid[i], length($i))
    }
}

END {
    for (r = 1; r <= NR; r++){
        n = split(row[r], d)
        for (i = 1; i <= n; i++){
            sep = (i < n) ? "    " : "\n"
            if (d[i] ~ number)
                printf("%" wid[i] "s%s", numjust(i, d[i]), sep)
            else
                printf("%-" wid[i] "s%s", d[i], sep)
        }
    }
}

function max(x, y){ return (x > y) ? x : y }

function numjust(n, s) { # position s in field n
    return s substr(blanks, 1, int((wid[n]-nwid[n])/2))
}'
Awk as Database
Ok, so we can merge our relational databases, but this is still a lot of tedious work. Can we automate this process? And besides, it's not so intuitive to write awk '/Germany/ { print ($3*1000)/$4 }', could we possible write awk '$country == "Germany" { print ($population*1000)/$area }'? Yes. The following script allows awk to query a relational database. It only requires you to write a relfile first, that describe what attributes are where. The relfile must also contain a table with all available attributes. If such a file does not exist, it must be created, and the instructions for doing so must be given in the relfile.
; cat relfile
countries:
    continent
    country
    population
    area
capitals:
    country
    capital
cc:
    country
    population
    area
    capital
    continent
    !sort -t'    ' -k 2 countries > tmp_countries
    !sort -t'    ' capitals > tmp_capitals
    !join -t'    ' -1 2 tmp_countries tmp_capitals > cc
    !rm tmp_* cc
; cat q
#!/bin/rc
# q - awk relational database query
# usage: q query
# depend: relfile

echo $* | awk '
BEGIN { readrel("relfile") }
/./   { doquery($0) }

# parse relfile
function readrel(f) {
    while (getline <f > 0 )
        if ($0 ~ /^[A-Za-z]+ *:/) {
            gsub(/[^A-Za-z]+/, "", $0)
            relname[++nrel] = $0
        } else if ($0 ~ /^[ \t]*!/)
            cmd[nrel, ++ncmd[nrel]] = substr($0,index($0,"!")+1)
        else if ($0 ~ /^[ \t]*[A-Za-z]+[ \t]*$/)   # attribute
            attr[nrel, $1] = ++nattr[nrel]
        else if ($0 !~ /^[ \t]*$/)
            print "bad line in relfile:", $0
}

# translate qawk query into corresponding awk query
function doquery(s,    i,j) {
    for (i in qattr)
        delete qattr[i]
    query = s
    while (match(s, /\$[A-Za-z]+/)) {
        qattr[substr(s, RSTART+1, RLENGTH-1)] = 1
        s = substr(s, RSTART+RLENGTH+1)
    }
    for (i = 1; i <= nrel && !subset(qattr, attr, i); )
        i++
    if (i > nrel)
        missing(qattr)
    else {
        for (j in qattr)
            gsub("\\$" j, "$" attr[i,j], query)
        for (j = 1; j <= ncmd[i]; j++)  # create table i
            if (system(cmd[i, j]) != 0) {
                print "command failed, query skipped\n", cmd[i,j]
                return
            }
        awkcmd = sprintf("awk -F''\t'' ''%s'' %s", query, relname[i])
        #printf("query: %s\n", awkcmd)  # for debugging
        system(awkcmd)
    }
}

function subset(q, a, r,    i) { # is q a subset of a[r]?
    for (i in q)
        if (!((r,i) in a))
            return 0
    return 1
}
function missing(x,    i) {
    print "no table contains all of the following attributes:"
    for (i in x)
        print i
}'
; q '$country == "Germany" { print ($population*1000)/$area }'
635.417
; q '{ printf("%-10s %4.2f\n", $country, ($population*1000)/$area) }'
Japan      833.33
India      588.79
China      278.54
USSR       31.80
Germany    635.42
England    595.74
France     260.66
Mexico     102.36
USA        65.56
Canada     6.49
Brazil     40.78
Our little q command cannot compete with large industrial databases, but for personal use awk is both flexible and efficient. By the way both this section, and the above spreadsheet section is greatly influenced by chapter 4 in The Awk Programming Language, by Aho, Kernighan and Weinberger. I highly recommend this book for your own personal library, whether you use Plan 9, UNIX or flippin DOS.
Ndb as a Database
Using awk for databases is fine, but it's a very UNIX'y way of doing things. Plan 9 actually has a really good, and super fast, database called ndb (network database). You have probably already used ndb to set up your network configuration file /lib/ndb/local, and it's for the purpose of network configuration that ndb was created. But it is actually a fully functional generic database, with all the trimmings. Here is how we can implement the above country database in ndb:
; cat countries.db
country=Japan
	continent=Asia
	population=120
	area=144
	capitol=Tokyo

country=France
	continent=Europe
	population=55
	area=211
	capitol=Paris

country=Mexico
	continent="North America"
	population=78
	area=762
	capitol="Mexico City"
...
; population=`{ndb/query -f countries.db country Germany population}
; area=`{ndb/query -f countries.db country Germany area}
; echo Germanys population density is `{echo '('$population'*1000)/'$area'' | hoc}
Germanys population density is 635.416666667
; ndb/query -f countries.db continent Asia
country=Japan continent=Asia population=120 area=144
country=India continent=Asia population=746 area=1267
country=China continent=Asia population=1032 area=3705
country=USSR continent=Asia population=275 area=8649
; ndb/query -a -f countries.db continent Asia population |
	awk '{ sum+=$1 } END { print "Asias population is", sum }'
Asias population is 2173
ndb entries are very free form, we can write them in one line, as in country=Japan continent=Asia population=120..., in multiple lines indented by spaces or tabs, or a combination of both. The empty newline that separate the entries above is not required, it's just added for the sake of readability. Note the -a flag in our last ndb example, without this ndb would return 120, the population of the first entry in continent Asia. ndb can handle multiple database files, and make attribute hashes to speed things up. See ndb(8) for the full details.
Conclusion
The primary value of Plan 9 lies in its simplicity. Making a hard copy of its documentation will not break your bookshelf, and the source code is actually readable. This cannot be said for main stream operating systems. Of course being such a simple system, there are many many features that popular operating systems provide, that Plan 9 don't. If you plan on using this alternative OS as a daily driver, you really have to pull up your sleeves, learn some shell, maybe even some C, and write a bunch of utilities to do your work. But it's a fascinating learning experience.
Hopefully, this article has also demonstrated that Plan 9 does not suck quite so bad as you may have thought. I know I was positively surprised a few times as I was writing it! Thanks to the good work of the 9front developers, you can run Plan 9 on modern hardware. Most of the laptops I have tried it on has just worked, including essential things like audio and wifi. As we have seen, you can do office work, play games and audio, work with images and the web. And with the recent additions of a decent music player, video player and web browser, 9front is actually starting to look pretty good even as a casual desktop. Of course the real charm of Plan 9 has always been in its simple and consistent design, which gives the user tremendous power with modest efforts. Using it will likely open your mind to the power of UNIX, much more so in fact, then UNIX itself will. Happy hacking :)
Recommend
About Joyk
Aggregate valuable and interesting links.
Joyk means Joy of geeK