

How to Uninstall or Disable Hyper-V in Windows
source link: https://www.nakivo.com/blog/uninstalling-or-disabling-hyper-v-in-windows-10/
Go to the source link to view the article. You can view the picture content, updated content and better typesetting reading experience. If the link is broken, please click the button below to view the snapshot at that time.

NAKIVO Blog > Hyper-V Administration and Backup > The Ultimate Guide to Uninstalling or Disabling Hyper-V in Windows 10
The Ultimate Guide to Uninstalling or Disabling Hyper-V in Windows 10

Hyper-V is the first type hypervisor that can be installed on Windows to run virtual machines. Recently we have explained how to install Hyper-V on Windows 10 and Windows Server 2019. But what if you no longer need Hyper-V on your machine? Hyper-V also causes issues if you want to run other second-type hypervisor such as VMware Workstation or VirtualBox on the same Windows machine. This blog post explains how to uninstall Hyper-V in Windows by using the graphical user interface or the command line interface.
How to Uninstall Hyper-V in Control Panel of Windows 10
Using the Control Panel to uninstall Hyper-V is the most convenient method and is preferred by most Windows 10 users. As a result, the Hyper-V feature is uninstalled completely. Let me explain the workflow step by step.
Click Start, type Control Panel, and open Control Panel. There are two alternative methods to open Control Panel. Press the Win+X combination on your keyboard, and, in the menu that opens, click Control Panel. Press Win+R. In the Run field, type appwiz.cpl and press Enter.
Click Turn Windows features on or off in the Control Panel window.
In the Windows Features window that opens, deselect the Hyper-V checkbox. Make sure that checkboxes in Hyper-V subfolders are deselected. Hit OK to save settings and start the Hyper-V uninstallation process.

Hit Restart now to restart your computer to finish the process and uninstall Hyper-V.

How to Uninstall Hyper-V in the Command Prompt of Windows 10
You can uninstall Hyper-V in the command line interface (CLI). At the end of this workflow you get the same result as for the method explained in the previous section when using the graphical user interface (GUI). Check the Hyper-V installation status in the command line before you start to uninstall Hyper-V and after you uninstall Hyper-V to make sure that this hypervisor is removed from your Windows system.
Open the command line (CMD) as administrator. Open the Windows Start menu, type cmd, right click the cmd entry, and click Run as administrator.
Run systeminfo to check whether Hyper-V is installed.
If Hyper-V is not installed, you can see in the Hyper-V requirements section the names of technologies required to install Hyper-V and the status of their availability on the machine.
If Hyper-V is installed, you should see the following message in the Hyper-V Requirements line:
A hypervisor has been detected. Features required for Hyper-V will not be displayed.

As an alternative, you can run msinfo32.exe to check whether Hyper-V is uninstalled in the GUI. The needed information is located in the System Summary section in the bottom of the item list.

Now it is time to uninstall Hyper-V in Windows 10 by using the command line. You should open PowerShell with administrative privileges (type PowerShell in the Start menu, right click PowerShell and click Run as administrator just as you do to run CMD). Run the following command to remove the Hyper-V feature from Windows 10:
Disable-WindowsOptionalFeature -Online -FeatureName Microsoft-Hyper-V-All

Do you want to restart the computer to complete this operation now?
Type Y and hit Enter.
Restart is required after executing this command. You can type N (No) and restart Windows manually.
Removing Hyper-V with DISM
DISM (Deployment Image Servicing and Management) is a tool for working with Windows images (.wim files) and install/uninstall Windows drivers, features, and packages.
Open PowerShell with administrative privileges, and run this command to disable Hyper-V:
DISM /Online /Disable-Feature:Microsoft-Hyper-V

You may need to disable Secure Boot in UEFI/BIOS settings of a computer to finish the uninstallation process and uninstall Hyper-V. The sequence to disable Secure Boot depends on your hardware vendor and differs for different motherboard vendors and models.
How to Disable Hyper-V in BCDEDIT
You can change Hyper-V startup options when Windows boots without uninstalling Hyper-V completely. In this case, Hyper-V is installed but inactivated. Hyper-V is not booted before Windows boots if you disable Hyper-V by using the command line bcdedit tool. Bcdedit is the command line tool to manage Boot Configuration Data or BCD. BCD store is used to describe boot parameters for applications, add boot menu entries, etc. If you use BCD to disable Hyper-V, the Hyper-V feature is disabled but not uninstalled completely from Windows. As you remember, Hyper-V is the first-type hypervisor that boots before Windows boots. The idea of using this method is to disable Hyper-V in boot configuration.
Run the command prompt (CMD) as administrator and run the following command to disable Hyper-V by using bcdedit:
bcdedit /set hypervisorlaunchtype off

Note: If you need to enable Hyper-V again, run bcdedit /set hypervisorlaunchtype on
For more convenience, you can create two boot entries for your Windows machine. One boot entry is used to boot an operating system with Hyper-V, and another one is used to boot an OS without Hyper-V.
Run the following command to copy the default boot configuration to the new entry. “Hyper-V disable” is the name of the new boot entry in my case.
bcdedit /copy {default} /d "Hyper-V disable"
The following output message is displayed:
"The entry was successfully copied to {xxxxxxxx-xxxx-xxxx-xxxx-xxxxxxxxxxxx}."
Run the command to edit Hyper-V boot options for the new boot entry you have created. Copy the value in brackets {} from the above output message and paste to this command:
bcdedit /set {xxxxxxxx-xxxx-xxxx-xxxx-xxxxxxxxxxxx} hypervisorlaunchtype off

You should see the message: The operation completed successfully.
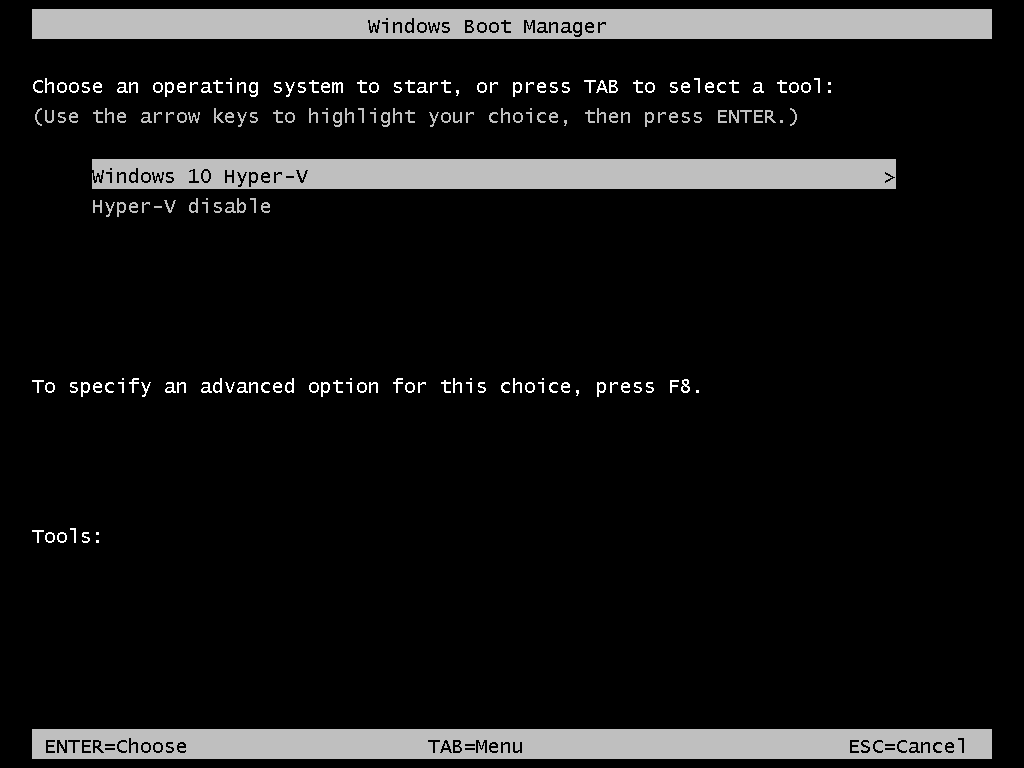
Edit the name of the default boot entry with Hyper-V to “Windows 10 Hyper-V” for more convenience:
bcdedit /set {default} description "Windows 10 Hyper-V"
Restart your computer.
Now you have two boot menu entries. Select “Hyper-V disable” to boot Windows without Hyper-V or select “Windows 10 Hyper-V” to boot Windows with Hyper-V.
How to Uninstall Hyper-V on Windows Server 2016
The process of removing Hyper-V in Windows Server 2016 is slightly different compared to Windows 10. In this section, I explain how to uninstall Hyper-V in Windows Server 2016. If you use Windows Server 2019, the workflow to uninstall Hyper-V on Windows Server 2019 is identical.
Using the GUI
If your Windows Server is installed with the graphic experience and has a graphical user interface (GUI), then the easiest way to uninstall Hyper-V is using Server Manager and the Remove Roles and Features wizard.
Open Server Manager (Start > Server Manager). Click Manage > Remove Roles and Features.

The Remove Roles and Features wizard opens.
Before You Begin. There is nothing to configure at this step, but you can select the Skip this page by default to avoid displaying this page in the future. Click Next to continue.
Server Selection. Select a server from the server pool and select your server in the list. The server name is Hyper-V-Repl.test.net in my case. Hit Next at each step of the wizard to continue.

Server Roles. Deselect the Hyper-V checkbox in the list of roles to uninstall Hyper-V.

The popup window opens. Check the features that you are about to remove. Select Remove management tools (if applicable) to remove Hyper-V Manager Windows tools. Click Remove Features.

Features. There is no need to remove custom features when you uninstall Hyper-V. Leave features configuration as is.

Confirmation. Check all items that are going to be removed. Select the checkbox if you want your server to restart automatically when the Hyper-V role is removed. Otherwise, you need to restart Windows manually for changes to take effect and finish Hyper-V uninstallation. Click Remove to finish and uninstall Hyper-V.

Using PowerShell
The PowerShell command to uninstall Hyper-V in Windows Server 2016 and 2019 is not the same as in Windows 10.
Open PowerShell as administrator.
Run the following command to uninstall Hyper-V on Windows Server 2016:
Remove-WindowsFeature -Name Hyper-V

Restart the server to finish the removal process.
Issues that Can Occur
Sometimes issues may occur when you try to uninstall Hyper-V in Windows 10 and Windows Server 2016 or 2019. Let me explain some common issues and offer recommendations to help fix these issues.
Case 1
If you see a message that Windows cannot uninstall Hyper-V components, try to check system files and their storage. Different error codes are displayed, for example, 0x800F0831, 0x80073701, etc. Use command line tools to fix this issue. Open the command line (CMD) with administrative privileges and run the following commands.
Dism /Online /Cleanup-Image /RestoreHealth
Dism.exe /online /Cleanup-Image /StartComponentCleanup
sfc /scannow
Disable-WindowsOptionalFeature -Online -FeatureName Microsoft-Hyper-V-All
After executing these commands, logs are written to CBS.log and dism.log. Logs are useful for troubleshooting.
Case 2
Hyper-V is not uninstalled because a virtual network adapter or a virtual switch created by Hyper-V is present in a host Windows system. Remove virtual Hyper-V network adapters, and try to uninstall Hyper-V again. Here are some posts about Hyper-V network adapters and virtual switches from our blog.
Case 3
You disable Hyper-V but after reboot, Hyper-V is enabled again. A possible cause may be that a group policy is set to enable Hyper-V automatically on login after each boot. A system administrator should edit group policy configuration to fix this issue. Remember, that Device Guard and Credential Guard are features using Hyper-V to work in Windows. Check Computer Configuration -> Administrative Templates -> System -> Device Guard in the group policy editor to make sure that there are no settings to force run Device Guard on a Windows machine.
Conclusion
This blog post has explained how to uninstall Hyper-V in Windows 10 and Windows Server 2016. “How to uninstall Hyper-V in Windows?” is a popular question among users. Hyper-V can be uninstalled with a graphical user interface or a command line interface in Windows 10 and Windows Server 2016/2019. The workflow is different for Windows 10 and Windows Server operating systems. If you have uninstalled Hyper-V, you can use another hypervisor to run virtual machines. Read the blog post about Hyper-V vs VMware and Hyper-V vs VirtualBox comparison to make the right choice.
Remember to back up your virtual machines to protect your data. NAKIVO Backup & Replication is a product that supports backup of VMware VMs and Hyper-V VMs. Download the Free Edition of NAKIVO Backup & Replication from the official website and try the product to protect your virtual machines.
Recommend
-
7
Many times we ran into problems where nothing related to Python seems working fine and we want to uninstall it completely and re-install it to remove the problem. So, in this post, we are going to see How to uninstall Python on Windows...
-
7
WSUS update will be released in early 2021, company says Adobe Flash Player is now dead, and Microsoft has already published a standalone package for a Windows update that allows users to remove the...
-
5
How to Uninstall Hidden and Stubborn Software on Windows 10 By Modisha Tladi Published 15 hours ago Can't find a way to uninstal...
-
5
6 Ways to Uninstall Built-In and Third-Party Windows 11 Apps By Tashreef Shareef Published 5 hours ago Has a program you've d...
-
9
7 Different Ways to Uninstall Software in Windows 11 By Jack Slater Published 13 hours ago When it's time to give your P...
-
13
6 Comments - Add comment ...
-
7
How To Uninstall and Reinstall Wi-Fi Drivers In Windows 11 By Tashreef Shareef Published 15 hours ago Wi-Fi on the...
-
8
Windows 11 basics: how to uninstall apps Skip to main content cloc...
-
10
Guide: Here's how to uninstall Windows 11 updates...
-
7
5 Ways to Manually Uninstall Windows 10 and 11 Updates By Arjun Ruparelia Updated 3 minutes ago Is som...
About Joyk
Aggregate valuable and interesting links.
Joyk means Joy of geeK