

How to install ownCloud – DreamHost Knowledge Base
source link: https://help.dreamhost.com/hc/en-us/articles/216472487-How-to-install-ownCloud
Go to the source link to view the article. You can view the picture content, updated content and better typesetting reading experience. If the link is broken, please click the button below to view the snapshot at that time.
How to install ownCloud
Overview
View ownCloud's documentation to confirm the version you plan to download will function with your site's PHP version.
You can then use the following article to adjust the PHP version of your site if necessary:
This article walks you through installing ownCloud using SSH. Please review the following articles before beginning as you'll need access to a terminal and basic knowledge of how to run Shell commands:
Installing manually
- Visit ownCloud’s download page.
- Look for the section to download a .Tar or .Zip file.
This example uses the .Tar file.
- The next page details all steps to install. Right click the Download Tar button and choose Copy link Address.
- Log into your server via SSH.
- Navigate to the directory you wish to install ownCloud
- Run a wget command to download the .tar.bz2 file. Type in wget, followed by the link you copied above.
[server]$ wget https://download.owncloud.org/community/owncloud-10.0.8.tar.bz2
- Under the Download Tar button, right click 'sha256' and choose Copy link Address. Then run wget to download this file.
[server]$ wget https://download.owncloud.org/community/owncloud-10.0.8.tar.bz2.sha256
- Next, verify the sha256 signature against the .tar.bz2 file to ensure it's matches.
[server]$ sha256sum -c owncloud-10.0.8.tar.bz2.sha256 < owncloud-10.0.8.tar.bz2
owncloud-10.0.8.tar.bz2: OK
- If it says 'OK', decompress the file:
This creates a new subdirectory called /owncloud in the same directory you ran the command.
[server]$ tar xvjf owncloud-10.0.8.tar.bz2
- In your browser, navigate to the /owncloud folder. The URL is most likely something like example.com/owncloud.
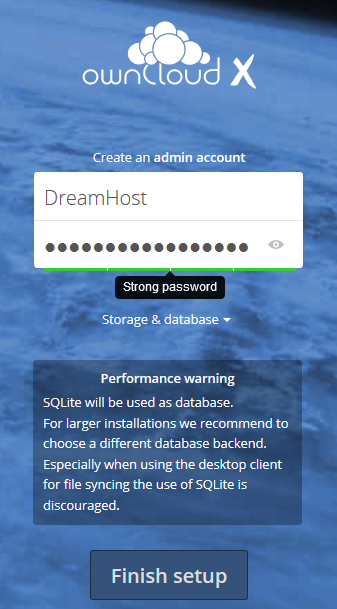
- Enter a username and password, and then click the Finish setup button.
Install a desktop client
You can also install a desktop client for Windows, Mac, and Linux. These allow you to interact with ownCloud from your local computer. Visit the following link for details:
Connecting to DreamObjects
Now that you've installed ownCloud, you can start using it to manage your data. If you're already using a DreamObjects account to store your data, you can link that to your ownCloud installation. View the following article for instructions:
Removing ownCoud
To remove your website ownCloud installation, just delete the directory of ownCloud files.
For the desktop clients, uninstall the program like any other program on your operating system.
Troubleshooting
After installing, you may see the following warning on the Settings > General page:
Transactional file locking should be configured to use memory-based locking, not the default slow database-based locking
This is just a recommendation to improve performance by installing Redis and using Memcache as noted here:
Since this installation requires sudo access, it is only possible on a Dedicated Server, or DreamCompute as these plans allow for root/sudo access to the server:
See also
Did this article answer your questions?
Recommend
About Joyk
Aggregate valuable and interesting links.
Joyk means Joy of geeK