

How to do print debugging in SwiftUI
source link: https://sarunw.com/posts/how-to-do-print-debugging-in-swiftui/
Go to the source link to view the article. You can view the picture content, updated content and better typesetting reading experience. If the link is broken, please click the button below to view the snapshot at that time.
How to do print debugging in SwiftUI
Table of Contents
Print debugging[1] is the simplest form of debugging. It is a debugging technique that we can easily carry over to any language and IDE.
In UIKit, we use a print statement to trace the flow of execution or stored value. In this example, we print out view variable in a viewDidLoad.
override func viewDidLoad() {
    super.viewDidLoad()

print(view)
}
Coming from the UIKit world, it might tempting to use print inside a SwiftUI view. But if you tried to put a print statement inside a SwiftUI view, you will get "Type '()' cannot conform to 'View'" compile error.
struct ContentView: View {
    var body: some View {
        print("Update body")
        Text("Hello, World!")
    }
}
Type '()' cannot conform to 'View' error.
Use print statement inside SwiftUI view
The solution to the problem is easy. You need to assign print() to a variable (var) or a constant (let).
Here is an example of how we can use print() in a SwiftUI view.
struct ContentView: View {
    var body: some View {
        var x = print("Update body") // 1
        let y = print("Update body") // 2
        let _ = print("Update body") // 3
        Text("Hello, World!")
    }
}
1 and 2 We don't use the returning result (x and y) anywhere. The compiler will give a warning in these cases.
3 Since there is no use for print's return type, using an underscore to ignore the value and silence the warning is preferred.
Result:
Update body
Update body
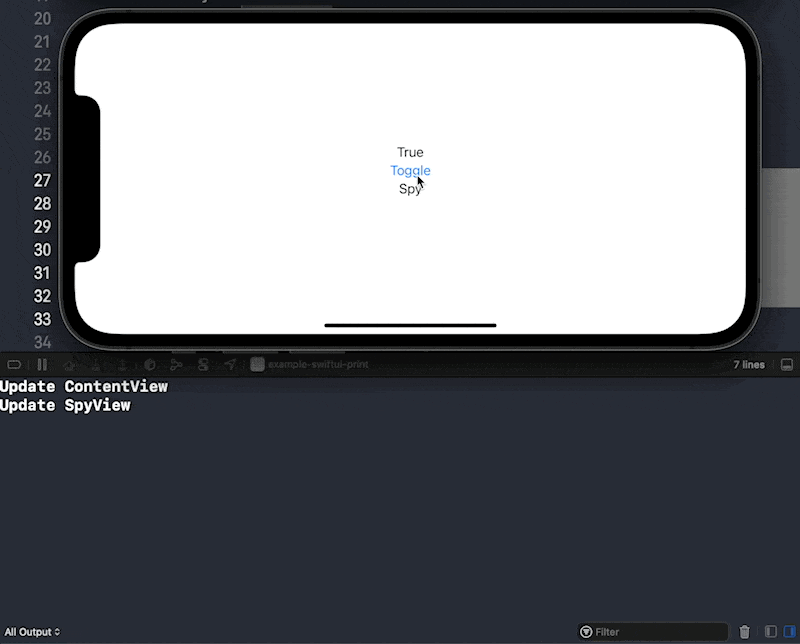
Update bodyHere is an example where we use print to detect whether the view body is reevaluated.
struct ContentView: View {
    @State private var isTrue = true

var body: some View {
        VStack {
            // 1
            let _ = print("Update ContentView")
            Text(isTrue ? "True": "False")
            Button("Toggle") {
                isTrue.toggle()
            }
            SpyView()
        }
    }
}

struct SpyView: View {
    var body: some View {
        // 2
        let _ = print("Update SpyView")
        Text("Spy")
    }
}
1 We use this print to trace whether the body of ContentView is executed or not.
2 We use this print to trace whether the body of SpyView is executed or not.
We learn from the result that only the body of the ContentView is reevaluated when we toggle the isTrue. The SpyView don't need to reevaluate since it doesn't depend on the isTrue value.
 Print debuggin in SwiftUI.
Use _printChanges statement to understand what is causing a view to be reevaluated
If you use a print statement to trace view lifecycle, you can use _printChanges for better understanding. _printChanges print out what is causing a view to be reevaluated.
In the following example, we change from print to _printChanges.
struct ContentView: View {
    @State private var isTrue = true

var body: some View {
        VStack {
            let _ = Self._printChanges()
            Text(isTrue ? "True": "False")
            Button("Toggle") {
                isTrue.toggle()
            }
            SpyView()
        }
    }
}

struct SpyView: View {
    var body: some View {
        let _ = Self._printChanges()
        Text("Spy")
    }
}
You can see in the debug console what is causing a view to be reevaluated.
 _printChanges print out what is causing a view reevaluated.
We need Self in Self._printChanges() since _printChanges is a static method.
::
Print debugging (or tracing) is the act of watching (live or recorded) trace statements, or print statements, that indicate the flow of execution of a process. https://en.wikipedia.org/wiki/Debugging ↩︎
You may also like
In UISearchController, we can set search bar hiding behavior with hidesSearchBarWhenScrolling property. But how to control this behavior isn't obvious in SwiftUI. Learn how to control search bar hiding behavior in SwiftUI.
SwiftUIIntroduction of SF Symbols, learn the basics, and how to use them.
SwiftUISKOverlay is a new tool from Apple for doing apps cross-promotion.
SwiftUIRead more article about SwiftUI, Debugging,
or see all available topic
Enjoy the read?
If you enjoy this article, you can subscribe to the weekly newsletter.
Every Friday, you'll get a quick recap of all articles and tips posted on this site. No strings attached. Unsubscribe anytime.
Feel free to follow me on Twitter and ask your questions related to this post. Thanks for reading and see you next time.
If you enjoy my writing, please check out my Patreon https://www.patreon.com/sarunw and become my supporter. Sharing the article is also greatly appreciated.
How to present an alert in SwiftUI in iOS 13/14
Learn how to show an alert (UIAlertController) in SwiftUI.
Recommend
-
120
Pretty print curl -i My favourite tool for working with APIs is curl, though I recognise that lots of people like HTT...
-
45
PySnooper - Never use print for debugging again PySnooperis a poor man's debugger. You're trying to figure out why your Python code isn't doing what you think it should be doing. You'd love to use a...
-
4
Stupid SwiftUI Tricks: Debugging Sheet DismissalSeptember 15, 2020Last week, I spent some time solving an odd bug with the WriteFreely client's iOS app. When you're looking at the list of posts, you can tap the gear button to...
-
4
Trying out this newsletter thing… It’s sort of astonishing to think about how much value I’ve gotten from Twitter over the last few years. At its best, my Twitter feels like spending a leisurely afternoon at a cafe where computing en...
-
2
Do Not Use Print For Debugging In Python AnymoreA refined “print” function for debugging in PythonWhat is the most frequently used function in Python? Well, probably in most of the programming languages...
-
4
Tips for debugging with print()Adam Johnson Home | Blog |
-
5
Photo by David Clode on UnsplashPure Print-Style Debugging in Ha...
-
4
A Couple Lines To Improve Print-Based Debugging In Loops 2022-05-30 • Raphael There are a lot of simple ideas that float about in programming. Many that are conceptually simple, yet end up being...
-
3
Hello! We released The Pocket Guide to Debugging back in December, and here’s a final update: the print copies are done printing and they’ve arr...
-
5
JS Party – Episode #281 Is print debugging good enough? YepNope: Jerod & KBall vs Amal & Eric...
About Joyk
Aggregate valuable and interesting links.
Joyk means Joy of geeK