

SVG Animation with Anime.js
source link: https://www.codedrome.com/svg-animation-with-anime-js/
Go to the source link to view the article. You can view the picture content, updated content and better typesetting reading experience. If the link is broken, please click the button below to view the snapshot at that time.
SVG Animation with Anime.js
Anime.js is a very powerful and versatile library which lets you animate CSS properties, DOM attributes, SVG and even JavaScript objects. The library's own documentation is comprehensive and has plenty of interesting examples, but for this article I will write a simple library using anime.js to create SVG elements with zero size and a specified position, and then animate them to their desired size and location. The end result is an SVG image which appears to grow and assemble itself before your eyes. Let's get to it...
Project Overview
As I mentioned anime.js is well documented at https://animejs.com/documentation/ so I'll just get stuck straight in to this project. At its core is a simple class with four static methods to create the following SVG element types:
- circle
- ellipse
- rectangle
Each method takes a settings object to specify, amongst other things, the starting positions and the ultimate sizes and positions. This is a minimalist implementation but if you want to expand on the idea then please go ahead and clone the GitHub repository.
The project also includes an HTML page and a separate JavaScript file to create a simple demo and then a slightly more complex piece of self-assembly art. The files can be downloaded as a zip from the Downloads page, or you can clone/download the Github repository if you prefer.
Source Code Links
There is also a short video on my YouTube channel to show the library in action.
The AnimatedSVGLibrary Class
Firstly let's look at the source code for the library which contains a single class called AnimatedSVGLibrary.
animatedsvglibrary.js
class AnimatedSVGLibrary
{
static line(settings)
{
const line = document.createElementNS("http://www.w3.org/2000/svg", "line");
line.setAttributeNS(null, "x1", settings.startAnimationPos.x);
line.setAttributeNS(null, "y1", settings.startAnimationPos.y);
line.setAttributeNS(null, "x2", settings.startAnimationPos.x);
line.setAttributeNS(null, "y2", settings.startAnimationPos.y);
line.setAttributeNS(null, "stroke", settings.strokeColor);
line.setAttributeNS(null, "stroke-width", 0);
document.getElementById(settings.id).appendChild(line);
anime(
{
targets: line,
x1: settings.pos1.x,
y1: settings.pos1.y,
x2: settings.pos2.x,
y2: settings.pos2.y,
"stroke-width": settings.strokeWidth,
duration: settings.duration,
easing: 'easeInOutQuad',
});
}
static circle(settings)
{
const circle = document.createElementNS("http://www.w3.org/2000/svg", "circle");
circle.setAttributeNS(null, "cx", settings.startAnimationPos.x);
circle.setAttributeNS(null, "cy", settings.startAnimationPos.y);
circle.setAttributeNS(null, "r", 0);
circle.setAttributeNS(null, "stroke", settings.colors.stroke);
circle.setAttributeNS(null, "fill", settings.colors.fill);
document.getElementById(settings.id).appendChild(circle);
anime(
{
targets: circle,
cx: settings.circle.cx,
cy: settings.circle.cy,
r: settings.circle.r,
duration: settings.duration,
easing: 'easeInOutQuad',
});
}
static ellipse(settings)
{
const ellipse = document.createElementNS("http://www.w3.org/2000/svg", "ellipse");
ellipse.setAttributeNS(null, "cx", settings.startAnimationPos.x);
ellipse.setAttributeNS(null, "cy", settings.startAnimationPos.y);
ellipse.setAttributeNS(null, "rx", 0);
ellipse.setAttributeNS(null, "ry", 0);
ellipse.setAttributeNS(null, "stroke", settings.colors.stroke);
ellipse.setAttributeNS(null, "fill", settings.colors.fill);
document.getElementById(settings.id).appendChild(ellipse);
anime(
{
targets: ellipse,
cx: settings.ellipse.cx,
cy: settings.ellipse.cy,
rx: settings.ellipse.rx,
ry: settings.ellipse.ry,
duration: settings.duration,
easing: 'easeInOutQuad',
});
}
static rectangle(settings)
{
const rect = document.createElementNS("http://www.w3.org/2000/svg", 'rect');
rect.setAttributeNS(null, 'x', settings.startAnimationPos.x);
rect.setAttributeNS(null, 'y', settings.startAnimationPos.y);
rect.setAttributeNS(null, 'height', 0);
rect.setAttributeNS(null, 'width', 0);
rect.setAttributeNS(null, 'fill', settings.colors.fill);
rect.setAttributeNS(null, 'stroke', settings.colors.stroke);
document.getElementById(settings.id).appendChild(rect);
anime(
{
targets: rect,
x: settings.rectangle.x,
y: settings.rectangle.y,
height: settings.rectangle.height,
width: settings.rectangle.width,
duration: settings.duration,
easing: 'easeInOutQuad'
});
}
}
This method takes a settings object with the following properties:
- id - the id of the DOM element where the line is to be created
- pos1 & pos2 - the ultimate start and end positions of the line
- strokeColor & strokeWidth - just standard SVG attributes
- startAnimationPos - the point where the line will be created
- duration - in milliseconds
The first half of this method is pretty standard code for creating an SVG line, but note the stroke-width is set to 0 and that typically the start and end points will be the same. This creates a line with zero length and width which is then animated into existence by the final part of the code, a call to the anime method.
This method's argument object can contain a wide range of properties, but here I am setting targets to line, ie the newly created line object, the desired start/end points and stroke-width, the duration and easing.
The anime.js library has a selection of easing functions to choose from, and these are listed in the documentation. I have used easeInOutQuad which gives a pleasing acceleration/deceleration effect but you might want to play with a few others.
circle
The other methods in AnimatedSVGLibrary all work in pretty much the same way. The circle needs cx and cy attributes for its centre, and an r attribute for its radius.
ellipse
This is nearly identical to the circle method but here we have two radii, x and y.
rectangle
This final method again follows the familiar pattern, but here the x and y attributes specify the top left corner of the rectangle, and we also have a width and a height.
Putting the Library to Work
I won't bother showing the HTML from animatedsvg.html here as it only contains an empty SVG element and the various JavaScript files. Note though that we also need the anime.js library itself, the minified version of which I have included with the ZIP and GitHub repository. (It's less than 18kB. Pretty good!)
This is the source code for animatedsvg.js which uses the AnimatedSVGLibrary.
animatedsvg.js
"use strict"
window.onload = function()
{
basicDemo();
// mondrian();
}
function basicDemo()
{
AnimatedSVGLibrary.line(
{
id: "svg",
pos1: {x: 16, y: 256},
pos2: {x: 496, y: 256},
strokeColor: "#000000",
strokeWidth: 16,
startAnimationPos: {x: 0, y: 0},
duration: 2000
});
AnimatedSVGLibrary.circle(
{
id: "svg",
circle: {cx: 256, cy: 256, r: 64},
colors: {stroke: "#000000", fill: "#00C000"},
startAnimationPos: {x: 0, y: 0},
duration: 2000
});
AnimatedSVGLibrary.ellipse(
{
id: "svg",
ellipse: {cx: 104, cy: 256, rx: 64, ry: 192},
colors: {stroke: "#000000", fill: "#C00000"},
startAnimationPos: {x: 0, y: 0},
duration: 2000
});
AnimatedSVGLibrary.rectangle(
{
id: "svg",
rectangle: {x: 344, y: 32, width: 128, height: 448},
colors: {stroke: "#000000", fill: "#0000C0"},
startAnimationPos: {x: 0, y: 0},
duration: 2000
});
}
function mondrian()
{
const corners = [0, 512];
const rectangles =
[
{coords: {x: 64, y: 64, width: 256, height: 256}, color: "#FF0000"},
{coords: {x: 64, y: 320, width: 128, height: 128}, color: "#000000"},
{coords: {x: 0, y: 384, width: 64, height: 128}, color: "#FFC000"},
{coords: {x: 320, y: 0, width: 128, height: 192}, color: "#FFC000"},
{coords: {x: 320, y: 384, width: 128, height: 64}, color: "#0000C0"},
{coords: {x: 448, y: 384, width: 64, height: 128}, color: "#FF0000"}
];
for(const rectangle of rectangles)
{
AnimatedSVGLibrary.rectangle(
{
id: "svg",
rectangle: rectangle.coords,
colors: {stroke: rectangle.color, fill: rectangle.color},
startAnimationPos:
{
x: corners[Math.round(Math.random())],
y: corners[Math.round(Math.random())]
},
duration: Math.floor(Math.random() * 5000) + 2000
});
}
const lines =
[
{pos1: {x: 0, y: 64}, pos2: {x: 448, y: 64}},
{pos1: {x: 64, y: 64}, pos2: {x: 64, y: 512}},
{pos1: {x: 0, y: 192}, pos2: {x: 64, y: 192}},
{pos1: {x: 0, y: 384}, pos2: {x: 512, y: 384}},
{pos1: {x: 128, y: 0}, pos2: {x: 128, y: 64}},
{pos1: {x: 320, y: 0}, pos2: {x: 320, y: 448}},
{pos1: {x: 64, y: 320}, pos2: {x: 448, y: 320}},
{pos1: {x: 320, y: 192}, pos2: {x: 448, y: 192}},
{pos1: {x: 64, y: 448}, pos2: {x: 448, y: 448}},
{pos1: {x: 448, y: 0}, pos2: {x: 448, y: 512}},
{pos1: {x: 192, y: 320}, pos2: {x: 192, y: 512}},
{pos1: {x: 384, y: 192}, pos2: {x: 384, y: 320}},
];
for(const line of lines)
{
AnimatedSVGLibrary.line(
{
id: "svg",
pos1: line.pos1,
pos2: line.pos2,
strokeColor: "#000000",
strokeWidth: 8,
startAnimationPos:
{
x: corners[Math.round(Math.random())],
y: corners[Math.round(Math.random())]
},
duration: Math.floor(Math.random() * 5000) + 2000
});
}
}
The window.onload function contains two function calls which can be commented/uncommented as required.
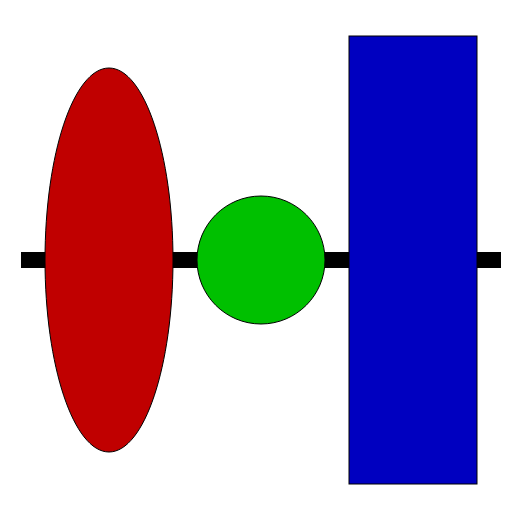
The basicDemo function calls each of the AnimatedSVGLibrary methods in turn, and to use the library yourself you can just copy/paste these and change the arguments. All the shapes start at 0,0 which of course is the top left corner.
If you open animatedsvg.html in your browser you'll see this rather boring set of shapes fly into existence. (It gets more interesting in a moment...)
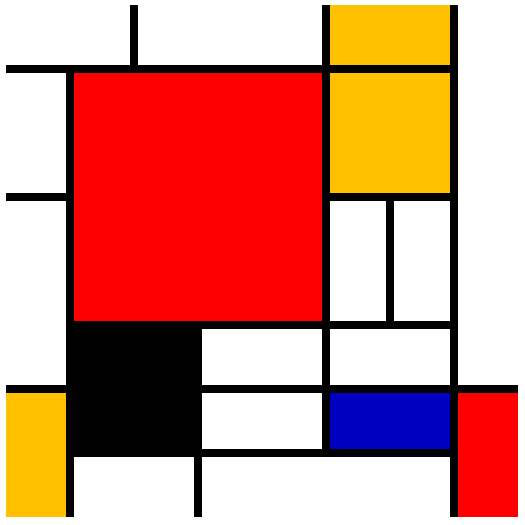
For the next function, mondrian, I have hard coded the various attributes of the rectangles and lines into arrays which are then iterated, calling the relevant AnimatedSVGLibrary methods.
The starting positions are chosen at random from 0 or 512, ie the corner coordinates, and the durations are random values between 2 and 5 seconds.
In onload comment out basicDemo, uncomment mondrian, refresh the page and watch this masterpiece throwing itself together with dignity and aplomb.
As I mentioned AnimatedSVGLibrary is very minimalist, but I hope comprehensive enough to be useful. There is plenty of scope for expansion: more SVG shapes, more attributes and more anime.js options.
Recommend
About Joyk
Aggregate valuable and interesting links.
Joyk means Joy of geeK