

Nginx tuning tips: TLS/SSL HTTPS - Improved TTFB/latency
source link: https://haydenjames.io/nginx-tuning-tips-tls-ssl-https-ttfb-latency/
Go to the source link to view the article. You can view the picture content, updated content and better typesetting reading experience. If the link is broken, please click the button below to view the snapshot at that time.
Since 30th June 2018, the PCI Security Standards Council has required that support for SSL 3.0 and TLS 1.0 be disabled and, more recently, to disable TLS 1.1. Using TLS 1.2 and 1.3 is strongly recommended. In addition, as of July 2018, Google Chrome began to mark ‘HTTP’ websites as “not secure.” Over the past few years, the internet has swiftly been transitioning to HTTPS. Over 90% of Chrome’s traffic loads over HTTPS and 97 of the web’s top 100 websites now use HTTPS by default.
With this in mind, let’s look at Nginx tuning tips to improve the performance of Nginx + HTTPS for better TTFB and reduced latency.
Enable HTTP/2 or HTTP/3 & QUIC on Nginx
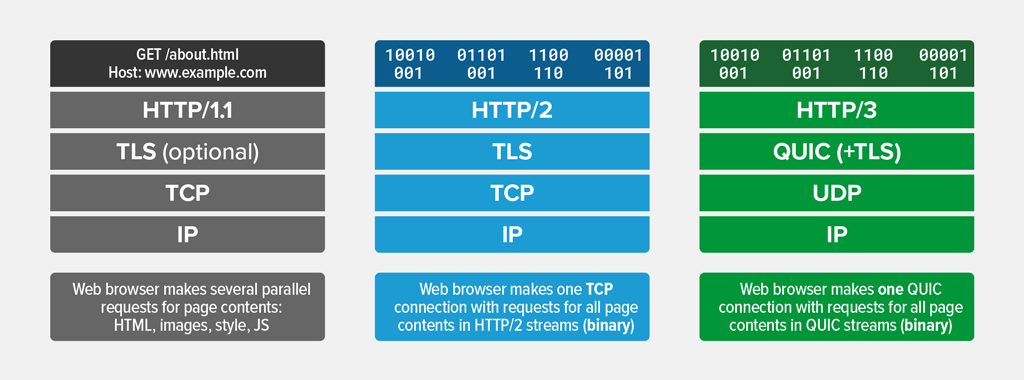
The first step in tuning Nginx for faster TTFB/latency with HTTPS is to ensure that at least HTTP/2 is enabled. HTTP/2 was first implemented in Nginx version 1.9.5 to replace spdy. Enabling the HTTP/2 module on Nginx is simple. We need to add the word http2 in the server block of our Nginx config file (ex. /etc/nginx/sites-enabled/sitename). (Remember: HTTP/2 requires HTTPS)
Look for this line:
listen 443 ssl;
change it to:
listen 443 ssl http2;
That’s it! HTTP/2 is used by 40% of all the websites, and HTTP/3 is used by only 20% of all the websites. (Source) You can enable HTTP/3 & QUIC by following these (French) guides.
Check if HTTP/2 or HTTP/3 is enabled using Google Chrome
To confirm if HTTP/2 or HTTP/3 is enabled:
> open your website in Google Chrome
> right-click anywhere on the web page and select Inspect
> click the Network tab
> press F5 (on your keyboard) or refresh your web page manually
> the Protocol column should now show h2 (or h3-29) for all assets loaded via your server
> If the Protocol column is missing, you can add it using right-click.
Check if HTTP/2 or HTTP/3 is enabled using command line
Test from your Linux/Mac command line with curl:
(Don’t also forget to curl test your CDN-hosted requests. Example: cdn.domain.com.
Compare KeyCDN, BunnyCDN and other CDN provides which support HTTP/2)
curl --http2 -I https://domain.com/
curl --http3 -I https://domain.com/
If the –http3 command does not work, you can also check here: https://www.http3check.net/
Enable SSL session cache
With HTTPS connections, instead of end-users connecting via one round trip (request sent, then the server responds), the connection needs an extra handshake. However, using HTTP/2 and enabling Nginx ssl_session_cache will ensure faster HTTPS performance for initial connections and faster-than-http page loads.
Using the option ssl_session_cache shared:SSL:[size], you can configure Nginx to share cache between all worker processes. One megabyte can store about 4000 sessions. You’ll also want to specify the time during (cache TTL) allowed for reuse:
ssl_session_cache shared:SSL:1m; # holds approx 4000 sessions
ssl_session_timeout 1h; # 1 hour during which sessions can be re-used.
Disable SSL session tickets
Because the proper rotation of session ticket encryption key is not yet implemented in Nginx, you should turn this off for now.
ssl_session_tickets off;
Disable TLS versions 1.0 and 1.1
As we’ve discussed in the opening, HTTPS and HTTP/2(3) are a move towards the latest, fast and most secure web technology. In light of this, TLS 1.0 should be disabled. Update: I would also recommend disabling TLSv1.1 and enabling TLSv1.3 (Nginx 1.13+ required for TLSv1.3).
Look for:
ssl_protocols TLSv1 TLSv1.1 TLSv1.2;
modify the line to:
ssl_protocols TLSv1.2;
Nginx 1.13+
For Nginx 1.13+ enable TLSv1.3, look for:
ssl_protocols TLSv1 TLSv1.1 TLSv1.2;
modify the line to:
ssl_protocols TLSv1.2 TLSv1.3;
Enable OCSP Stapling
OCSP (Online Certificate Status Protocol) stapling is an alternative approach to the OCSP for checking the revocation status of X.509 certificates. Enabling OCSP stapling allows the Nginx to bear the resource cost involved in providing OCSP responses by appending (“stapling”) a time-stamped OCSP response signed by the CA to the initial TLS handshake, eliminating the need for clients to contact the CA. Also see: Using OCSP Stapling to Improve Response Time and Privacy.
ssl_stapling on;
ssl_stapling_verify on;
ssl_trusted_certificate /path/to/full_chain.pem;
resolver 8.8.8.8 8.8.4.4 valid=300s;
resolver_timeout 5s;
Note: ssl_trusted_certificate specifies the trusted CA certificates chain file, in PEM format, used to verify client certificates and OCSP responses.
Reduce SSL buffer size
The Nginx ssl_buffer_size config option sets the size of the buffer used for sending data via HTTPS. By default, the buffer is set to 16k, which is a one-size-fits-all approach geared toward big responses. However, to minimize TTFB (Time To First Byte), it is often better to use a smaller value, for example:
(I was able to shave about 30 – 50ms off TTFB. Your mileage may vary.)
ssl_buffer_size 4k;
Full Nginx SSL_ config for improved TTFB
Above is my tuned Nginx SSL config. Pasted below for convenience:
ssl_protocols TLSv1.2 TLSv1.3;
ssl_prefer_server_ciphers on;
ssl_ciphers 'EECDH+AESGCM:EDH+AESGCM:AES256+EECDH:AES256+EDH';
ssl_ecdh_curve secp384r1; # see here and here (pg. 485)
ssl_session_cache shared:SSL:5m;
ssl_session_timeout 24h;
ssl_session_tickets off;
ssl_stapling on;
ssl_stapling_verify on;
ssl_trusted_certificate /path/to/your/CA/chain.pem;
resolver 8.8.8.8 8.8.4.4 valid=300s;
resolver_timeout 5s;
ssl_buffer_size 4k; # I've since found 8k works best for this blog. (test!!) Default = 16k
Test config, then reload Nginx after changes:
nginx -t
nginx -s reload
Enable HTTP Strict Transport Security (HSTS)
Another Nginx HTTPS tip is to enable HSTS preload. HTTP Strict Transport Security (HSTS) is a header that allows a web server to declare a policy that browsers will only connect to using secure HTTPS connections and ensures end users do not “click-through” critical security warnings. (locks clients to HTTPS) This policy enforcement protects secure websites from downgrade attacks, SSL stripping, and cookie hijacking. Aso see: https://hstspreload.org/#submission-requirements
add_header Strict-Transport-Security "max-age=63072000; includeSubdomains; preload";
Other headers I use in my Nginx config for this blog are:
add_header X-Frame-Options sameorigin; # read here
add_header X-Content-Type-Options nosniff; # read here
add_header X-Xss-Protection "1; mode=block"; #read here
HTTP/2 reference and useful reading
HTTP/3 & QUIC reference and useful reading
Posted: June 30th, 2018
Last updated: June 14th, 2021
Recommend
About Joyk
Aggregate valuable and interesting links.
Joyk means Joy of geeK